

I’m overjoyed to introduce a festive craft that’s perfect for the holiday season!
This 3D Cardboard Christmas Tree Craft is a fantastic way to add some Christmas cheer to your child’s room.
With my easy-to-follow free template, this project is simple and enjoyable. Plus, the template includes bonus printables for tiny gift boxes you can fill with little treats, making this project a wonderful way to add a personal touch to your holiday decor and make some great memories with your kids!

Although children can be active and participate during painting and some of the gluing, this project requires adult guidance and supervision.
If you have younger kids (5 and under), I have a more friendly Christmas tree craft for them!

Ready, set, go!
Tools & Materials
- Printer
- Template (download at the end of the article; you don’t need to subscribe!)
- White cardstock
- Glue*
- Scissors
- Craft knife (optional)**
- Cardboard
- Pencil and ruler
- Green and brown paint
- Paintbrush
- Pom poms (optional)
- Scoring tool (If you want to make the gift boxes)

*You can use regular kids’ glue if you plan to use the ornaments included in the template. If using pom poms, you can also use regular glue, but it takes a while to dry.
For faster drying and even as a secondary way to assemble the tree, you can also use hot glue. Keep in mind that an adult must do that part.
**You can use a craft knife to cut the tree from the cardboard.
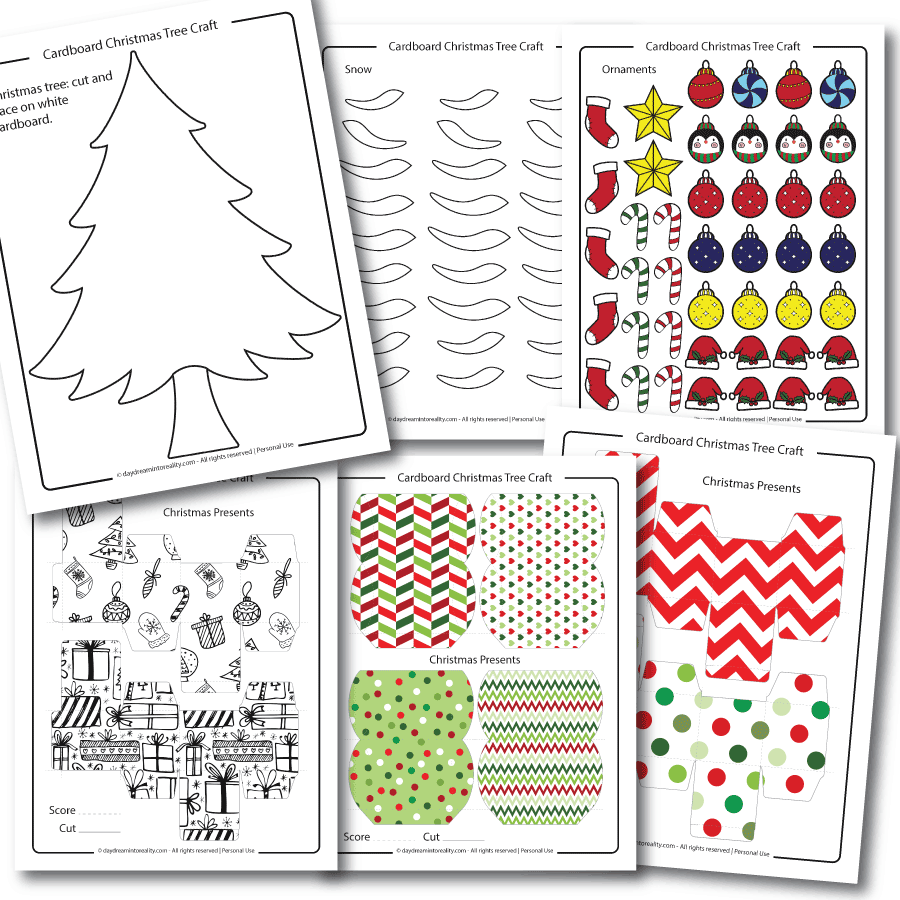
Step 1 – Print Christmas Tree Template
Before you press print, check the template; there are many pages from which you can choose!
Besides the “Tree” page, there’s an option for ornaments that you don’t need if you want to use pom poms. Plus, there are many different pages with small gift box templates. There are many patterns and colors, but mainly two types of boxes: cubes and pillows.
For a faster project, you can use pom poms and leave out the gift boxes. You know your kids and their attention span. The only requirement for this activity is to have fun.

Step 1 – Trace & Paint the Tree
First, cut the Christmas tree template and trace it on the cardboard.
Once you trace the trees on the cardboard, cut them. The cardboard I used was quite hard to cut, so I had to use bigger scissors.
You can also use a craft knife for more precise cutting.


There are two ways you can join the tree. One uses hot glue, and the other uses inserting both trees into each other.
If you don’t have or want to use hot glue, trace a 6-inch line with a pencil and a ruler. On one tree, trace it from the top; on the other, trace it from the bottom. After tracing, cut through the lines.
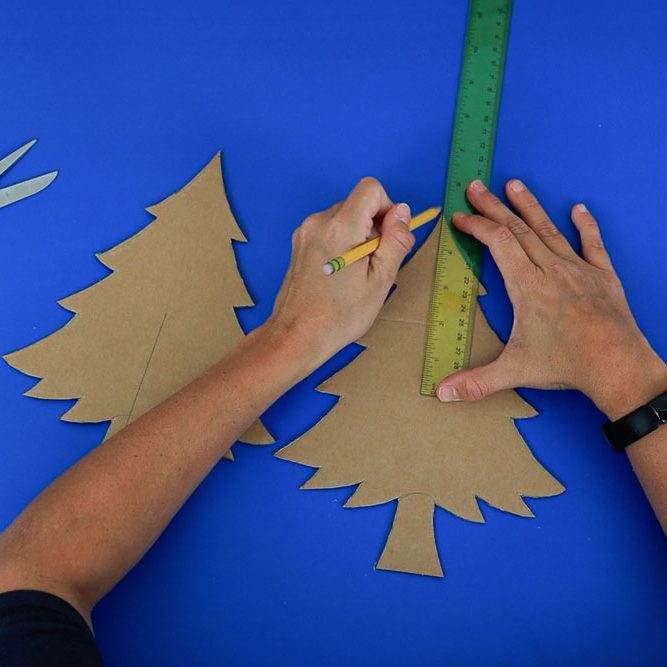


Once you finish cutting the trees, paint them on both sides. I did two coats of green and two coats of brown.
Set aside and let them dry.
Step 2 – Cut Snow & Ornaments
If you’re using the ornaments for the tree, go ahead and cut them along with the snow. If using pom poms, you only need to cut the snow.
I really recommend the snow because it adds a lot of contrast.

Step 3 – Make Gift Boxes
If you want to make the little gift boxes to accompany your tree, I recommend using a scoring tool and a ruler before you cut them.
The boxes have a very thin dashed line where you should score (the lines blend very well, and you can barely see them once your box is fully constructed).
If you don’t have a scoring tool, you can also use the lines as a guide for where to fold.


Tip: These boxes are so cute that you can even pack tiny presents for your loved ones!


Assemble Christmas Tree Project
It’s time to wrap up this project!
Grab the tree with the cut at the bottom and insert it into the second tree with the cut on top.
Tip: If you’re having difficulty inserting the trees into each other, you can make the initial cut line a little thicker on one of the trees.


Alternatively, you can cut one of the trees in half and use hot glue. To secure everything, you’ll want to use glue on the bottom and both sides of each half of the tree.


Glue snow and ornament on the tree.
I used glue dots to add a pop effect, but regular glue is also fine.


Finally, place all the little gift boxes under the tree, and just like that, your 3D Christmas tree project is complete!
This is how it looks using pom poms!
Tip: Although it can be done, pom poms will take a long time to adhere to the tree when using regular kids’ glue. Hot glue may be a better choice since you need to use many pom poms to complete the project.

Which one do you like best?


Download Template!
As I mentioned, here’s the “Cardboard Christmas Tree” template for your craft! Click the image to open the PDF in a new window or the yellow button to trigger a download on your phone or computer.
Oh!
Just so you know, I also have a library full of free SVG files and Printables for all my subscribers, a.k.a. Daydreamers. You can see a preview right here or get access by filling out this form.
You May Like These…
I hope you enjoyed crafting these Christmas ornaments with your little people. If you enjoyed that activity, you would love the following.
- Fall Paper Plate Craft
- Paper Plate Snow Globes with five different scenes!
- Paper Plate Baby Chick Craft
- Turkey Headband Craft
Happy Crafting!


This is so cute can’t wait to use it!
Yay!
I have been looking for a pattern for making a 3-D Christmas tree for a very long time. Thanks for this one. Can’t wait to get started making them…
Yay! So happy to hear!
I love it!
They are amazing crafts ..
Hope you have a fun time making them!
This look great, can’t wait to make them.