Hello Daydreamers!
In today’s tutorial, you will learn everything there’s to know about color in Cricut Design Space.
How to add and change colors, fill images, and “Color Sync” are some of the things you will be learning today!
Most things I will teach you today can be done on the Cricut app. Although most screenshots are from a desktop, I will also be including the screenshots that will show you where to find the tools to replicate all of the examples I have on this post.
Ideally, you will read this tutorial from the beginning because as we go, we will be implementing the concepts mentioned in the previews steps.
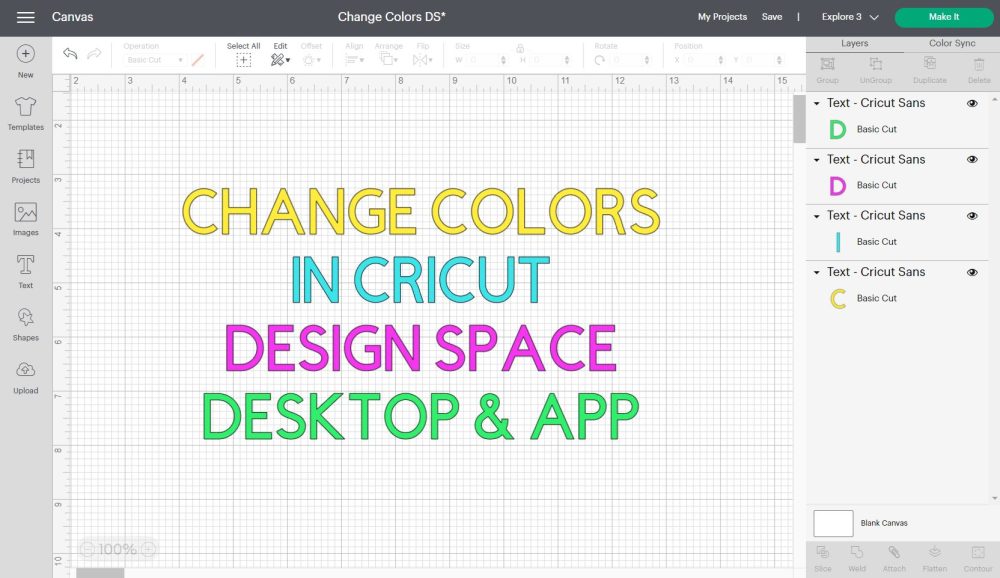
If there are some tools or concepts you don’t understand, make sure to check out my Cricut Design Space tutorial for Desktop and my Cricut App tutorial.
Are you ready?
Let’s Daydream Into Reality!
How to Add Color in Cricut Design Space
To understand how to add Color in Cricut Design Space, you also need to know how colors are used with your machine.
All of these settings work from the “Operation” drop-down menu located on the top panel of the canvas.
“Operation” is the way you tell your machine what action to perform; there are three different main operations (Cut, Draw, Print then Cut), and some of them are divided into additional options that translate into separate tools you can install on your machine to perform an action.
- Cutting a material (Basic Cut and Wavy Cut)
- Drawing on a material (Pen, Foil, Score, Deboss, Engrave)
- Print then Cut
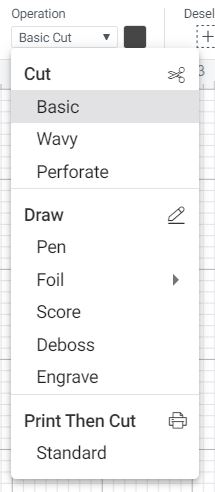
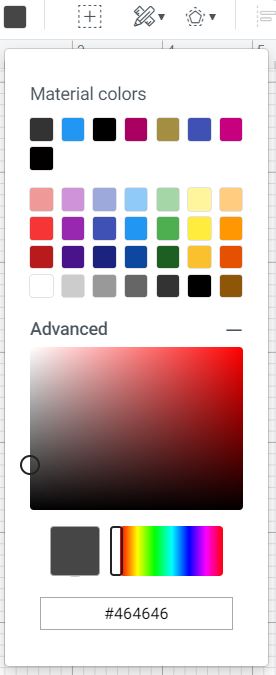
Next to “Operation,” there’s a little color box that allows you to change colors in Design Space. Some operations will show a filled color box, others will show a stroke, and other operations will not allow you to change colors.
Depending on the machine you own, the operations you can perform with your device will vary.
For this tutorial, I will show you all the operations from the Maker’s point of view.
You can skip over the things that don’t apply to you.
SUPER IMPORTANT: Most operations will require you to use the “Attach” tool before sending a
project to the “Make it” interface. Attaching will tell your Cricut where to write, score, perforate, foil, etc.
Some operations, like “Basic Cut,” “Wavy,” and “Print then Cut,” represent an entire material you’re working with, like cardstock or iron-on. Other Operations like “Pen” and “Foil” represent a tool you will be installing on your machine, and your device will draw a visible design, and there are multiple colors you can choose from.
Last but not least, operations like “Perforate,” “Score,” “Deboss,” and “Engrave.” represent an action you want to perform on a material, and the tool itself doesn’t add color to it.
Now, let’s have a little chat for each one “Operation.”
Change/Add colors with “Basic Cut”

Every color represents a different material. Every color represents another material when a layer has “Basic Cut” as “Operation,” every color represents another material. These materials can be vinyl, paper, fabric, you name it.
Select “Basic Cut” when you only want your machine to perform a solid or straight cut on a material. Let’s say you want to cut a star, a card, a decal, etc.
Depending on the material you’re using, basic cuts can be done with different blades. For instance, you’ll use the fine point blade if you’re cutting iron-on. If cutting craft foam, you’ll need the deep point
blade. You’ll use the bonded fabric or rotary if you’re cutting fabric. And if cutting basswood, you’ll need the knife blade.
Although you can select “Basic Cut” for any layer, you can choose only the tools your machine is compatible
with on the “Make it” interface.
Tip: If you are working on a single color design, you don’t have to change colors because everything is one single mat during the cutting process.
To change colors, add something to the canvas (image, text, shape), select it, and click on the little square next to “Operation” to pick your color.
There’s also an “Advanced” setting to allow you to see more colors and even find them by hex code.
Change/Add colors with “Wavy”

The Wavy cut will require a “Wavy Blade” if you have it along with a Maker machine. This type of cut will create a decorative edge on your designs.
You can also change the color of a Wavy cut because you’re cutting a solid design, only with a pretty edge. It can be fun to use on a card, scrapbooking, party decor, etc.
Change/Add colors with “Perforate”

Perforate Cuts require a “Perforation Blade.” Select this option if you want to make tear-offs like the ones you see on raffle tickets, booklet pages, etc.
You can’t change the color of a “Perforate” cut because you need to tell your machine where and what you want to perforate; it’s not like a “Basic cut.”
Learn how to use the perforation blade.
Change/Add colors with “Pen – Draw”
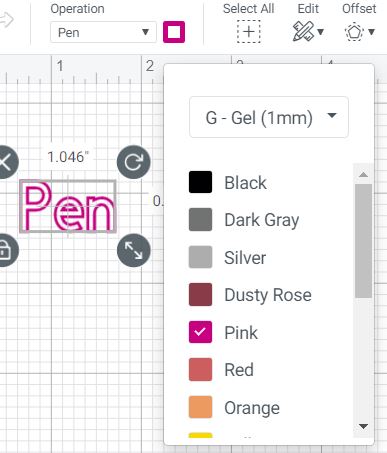
Select “Pen” if you want to draw on your projects with Cricut Pens. Pens won’t color your designs; therefore, the color box won’t show a solid color but a small stroke around it.
Important: When working with more than one color, it’s always a good idea to select the type of pen and color you will be using.
Cricut uses random orders to draw, so you may use the wrong pen if you don’t assign them correctly. Something cool is that you can see the thickness of the pens when you use different pen sizes.
To learn all about the Cricut Pens, make sure to read my step-by-step guide.
Change/Add colors with “Foil – Draw”
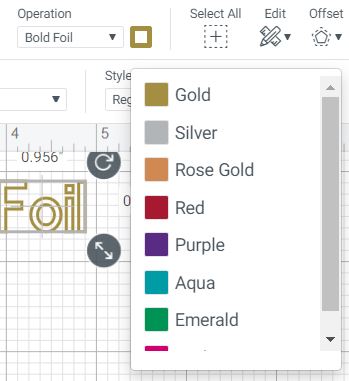
To add foil effects to your projects, you need the Foil Transfer Kit. The kit has three different tips (fine, medium, and bold) for big machines and only one tip for the Cricut Joy.
Again, the foil kit won’t foil the inside of your design, it will only draw around it, and that’s why the color box will show a stroke rather than a solid color.
Caution: Choose the right tip for your project because some materials have compatibility issues. Check out Cricut’s website to see what tips you need for different materials.
Change/Add colors with “Score – Draw”

Scoring will allow you to add folds to your projects. Scoring is
essential when making a card, boxes, 3d projects, etc.
You can use two different tools for scoring: the scoring stylus and the scoring wheel (tips 01 and 02). You can’t change colors because the tool itself doesn’t add any color but adds a scoring effect on a particular material color.
Change/Add colors with “Engrave – Draw”

This operation engraves a wide variety of materials, and to use it; you need the “engraving tip.” It’s perfect for personalizing dog tags, jewelry, etc.
You can’t change colors because the tool itself doesn’t add any color to your
material.
Change/Add colors with “Deboss – Draw”

This operation will push the material in, and it will create beautiful and detailed designs on paper, faux leather, etc.
To use it, you need the “debossing tip.” You can’t change colors because the tool doesn’t add any color but instead creates a debossing effect on a particular material.
Change/Add colors with “Print then Cut”
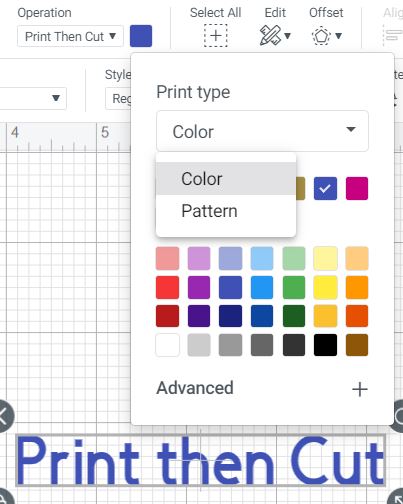
If you want to print a particular design and then cut it with your machine, then you would select “Print then Cut.” With this operation, you can either use solid colors or patterns.
There are two ways to tell your machine that something needs to be printed and then cut. The first is through “Operation,” and the second is “Flatten.”
Unlike any other “Operation,” you can FILL in images with the colors you want to use.
“Print then Cut” is one of my favorite features the Cricut machine has. Some of the things you can make with this feature are stickers and gift tags.
When you use this feature, you are putting your printer to work, and your Cricut will cut the edges of your design.
Previously I mentioned that changing colors wasn’t always relevant because the final color is given by the material you use or the pen you install in your machine.
Well!
That’s not the case for print then Cut designs. Before you send your project to your printer, you need to make sure to add the colors the way you want.
Something great about “Print the Cut” is that you can fill in (Color) your images with patterns. Cricut has hundreds of them! (Patterns are only available on Desktop computers, the app doesn’t have them).
How do colors look like in Cricut Design Space?
At this point, you know all the ways to add or change colors in Cricut Design Space.
Here’s a screenshot of how each option looks in the canvas area, so you have a better idea of how colors look when using different operations in Design Space.
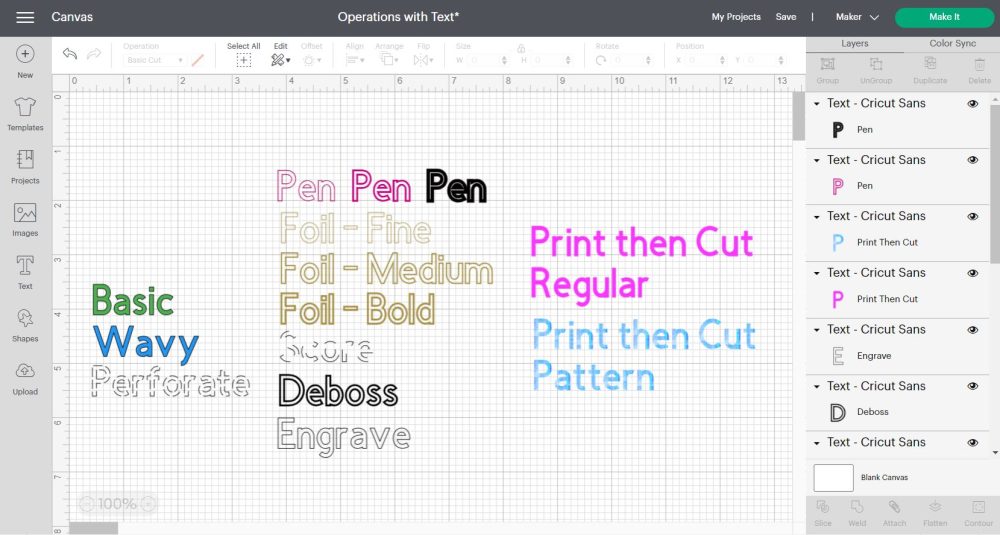
“Basic Cut” and “Wavy Cut” “mages have a thin grey outline (where the blade will cut through) around the shape or design; remember this color represents the materials you are cutting.
“Perforate” “an be recognized when you see a dashed line.
Pen and foil draw layers are outlined. That outline represents the color of the pen or foil sheet you plan to use for your project. The thickness of the outline will vary according to the type of pen (marker, calligraphy pen, etc.) or foil tip (fine, medium, bold) you are using.
“Score” layers look dashed; however, the lines are a little bit larger when you compare them to “Perforate.”
“Deboss” layers are represented with a solid bold outline, and “Engrave” layers are represented with a solid thin outline.
“Print then Cut” “mages have no outline. The blade will cut through the edges of your design.
How to Change Colors of a Multi-Layer Design
When you download an SVG file from the internet or add an image from Cricut’s library, you’ll find that some designs have different colors.
Designs that have multiple colors are called multi-layer designs.
Usually, these images are organized and grouped when you add them to the canvas area; therefore, if you change the color right away, all the layers will have the same color.
Learn more about Grouping in Design Space
To fix this issue, select the multi-layer design and click on the ungroup option located on the top panel of the canvas area.
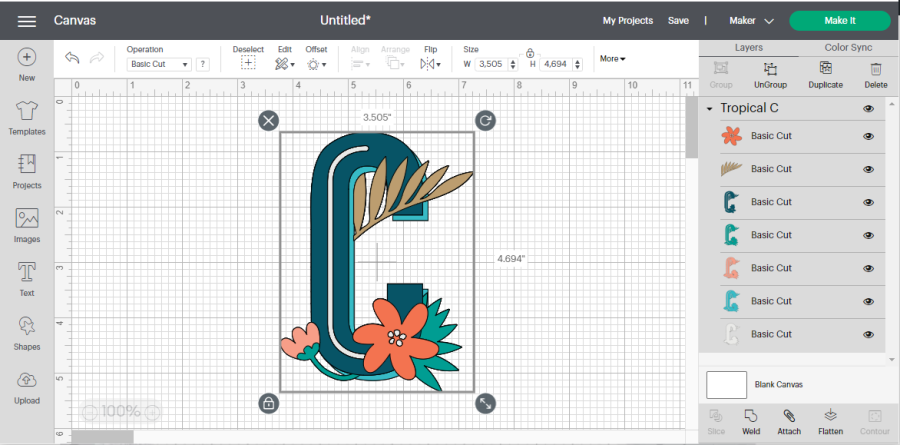
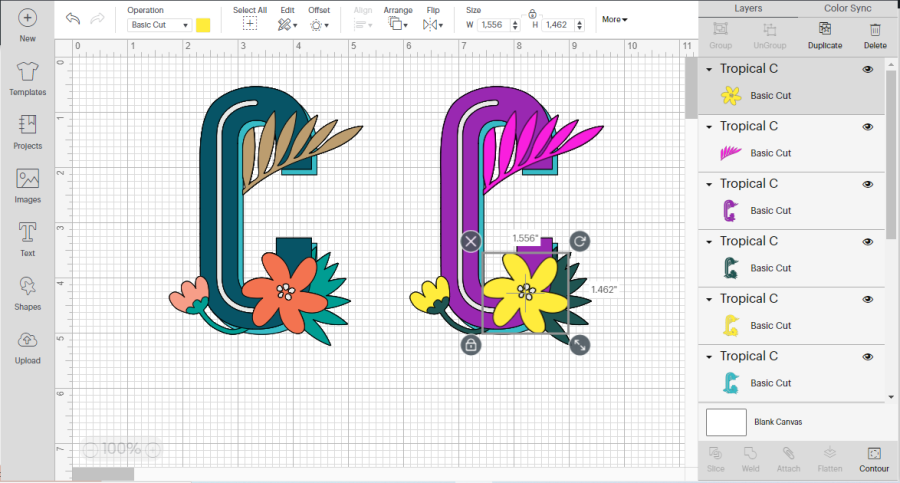
If images are on top of each other, like the screenshot right above, you’ll have a hard time changing the colors of the layers at the bottom.
The best way to change the colors of each element is from the layers panel. Select the layer you want to change and click on the color square next to “Operation.”
How to Color images in Cricut Design Space (Fill in Images)
There’ll be a moment in time where you find an image that you love a lot, but it’s in a single layer.
Note: If you want to follow along, the following image can be found in CrCricut’sibrary by the code MB30A0C5.
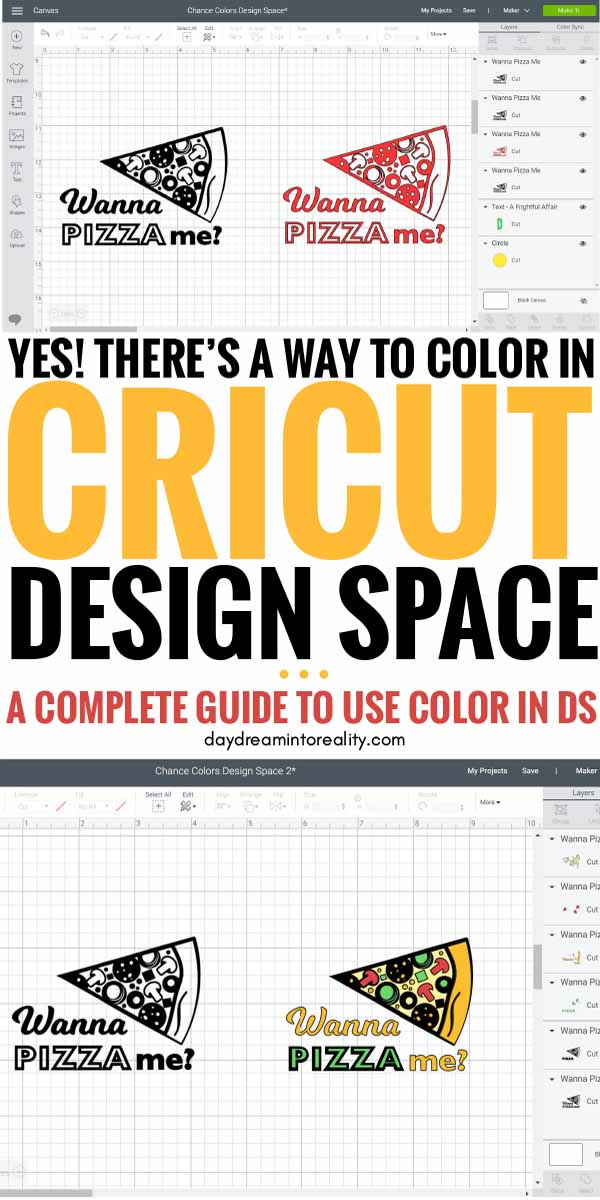
Look at the screenshot down below.
When you change the color of the pizza, all of the elements will change with it.
Also, if you look close enough, you’ll see some blank spaces inside the image; this is how the image was designed, and if you want to have different colors, you need to use the “Contour” tool.
This tool will allow you to hide/show unwanted pieces from your projects, and it’s located at the bottom of the Layers panel.
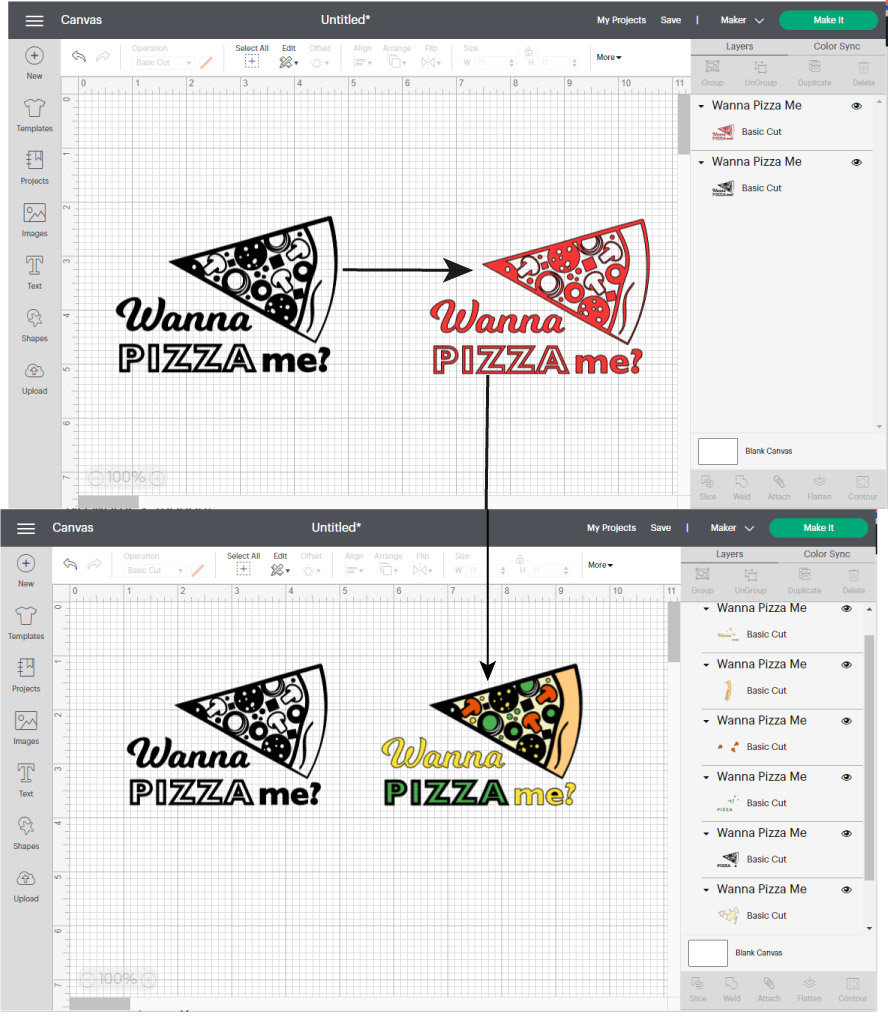
With the “Contour” tool, you can manipulate an image to reveal something that wasn’t there before, like the blank spaces in the pizza.
Don’t forget that these colors will represent either a material, pen, foil color, or print. For instance, if you were making a T-Shirt with vinyl after doing what I am about to teach, you would need five different iron-on colors.
If you are new to “Contour” and are confused about using it, make sure to read my how-to guide.
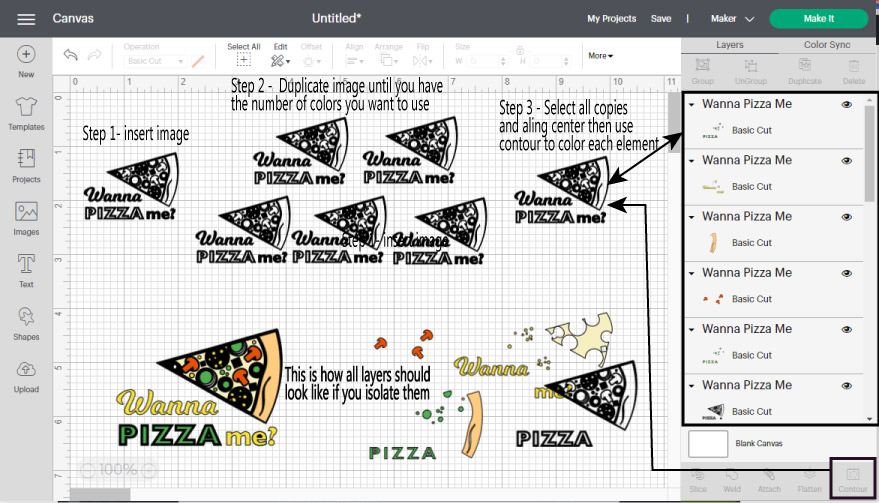
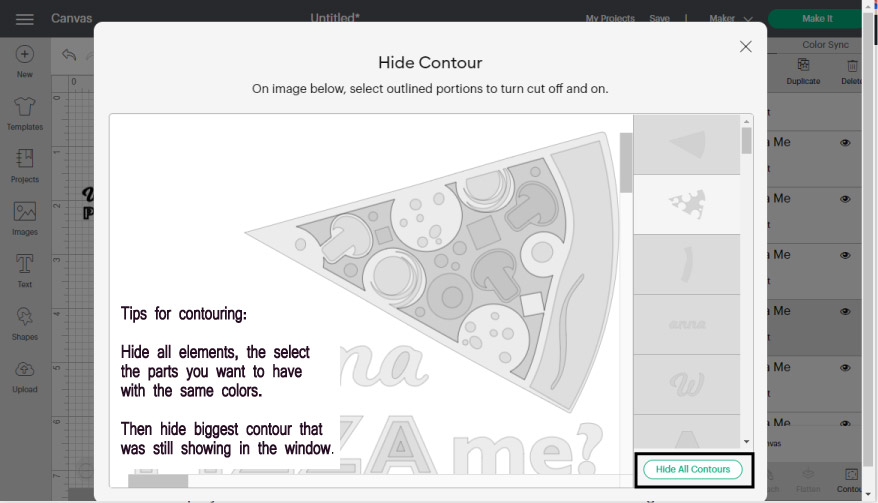
These are the steps you need to take to color inside the “Wanna Pizza Me” image.
Step 1 – Insert Image
Add the image you want to color to Cricut Design Space. Ideal images for this technique have blank spaces.
Step 2 – Make copies for each color
Duplicate or copy/paste the image until you have the number of colors you want to use, plus another copy of the original image.
For this project, I used four different colors. Therefore I needed four identical copies.
Step 3 – Center images and use Contour
Select all copies and go to the top panel and click on Align and select the option, center.
With the contour tool, reveal the blank spaces and change the colors afterwards.
The best way to do this is by selecting each one of the images on the layers panel, taking into consideration the size and order of the pieces you want to color.
Most times, the original image always needs to be the first, or bottom layer on the layers panel. The original image (pizza in black color) will be the outline or border of your design.
This coloring is somewhat easy because all layers (pizza condiments) respect their space. Nonetheless, there are times when one layer can be covered by the other one.
Check out the following example to see this in action.
This image is a cute little landscape and can be found in Cricut’s library with the code MD77B2E8.
I followed the steps I mentioned before up until step 4.
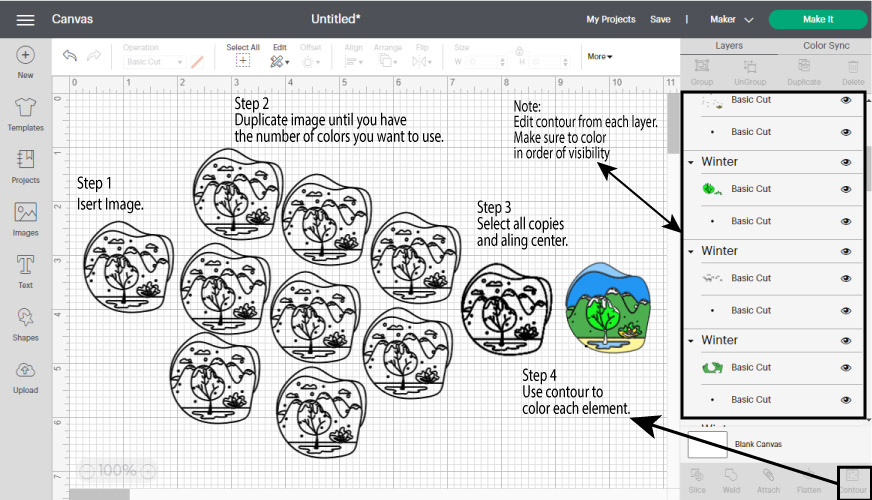
Step 4 – Contour
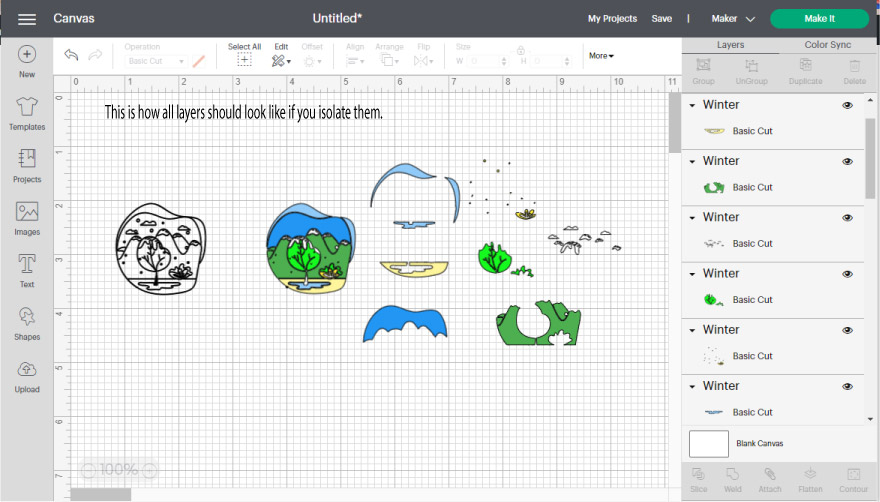
Notice how you can’t see the snow and clouds?
For instance, the mountains need to be underneath the snow (small black dots) in the layers panel; otherwise, the snow would disappear.
The order of the layers doesn’t matter if you are cutting vinyl or other types of materials, but if you are using “Print then Cut” and “Flatten,” you need to make sure all the layers are in the correct order.
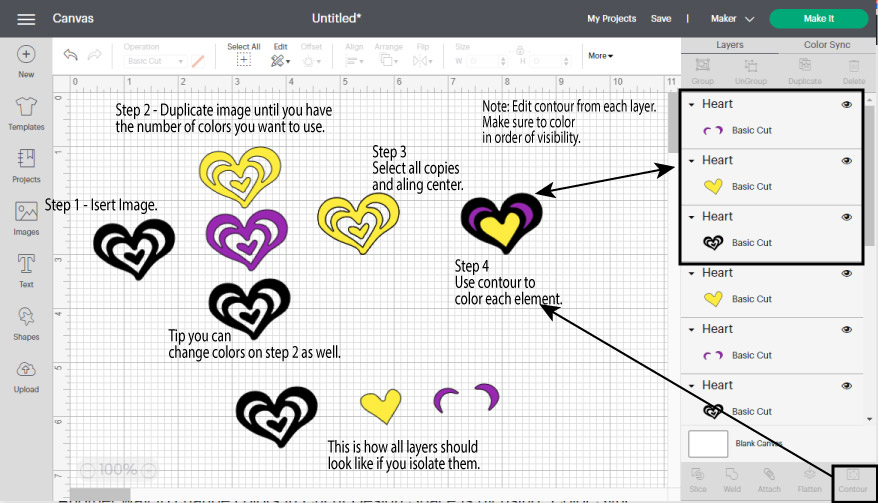
Here’s our third and last example!
I followed the same steps, but this time I decided to change colors before I used the contour tool.
As you can see, there are many ways you can do something in Design Space. You get faster and figure out better ways to accomplish the same task as you practice.
Don’t ever think for a moment that everything comes easy to me!
Sometimes I get into fights with my Cricut too, that’s why I like taking my time putting in excellent content, so no one else faces the same problems I do.
What is Color Sync in Cricut Design Space
Another way to change colors in Cricut Design Space is by using “Color Sync.”
This little feature doesn’t get as much love as other tools like “Weld, Slice, Attach, etc.” But let me tell you that you won’t stop using it once you know why it’s for you.
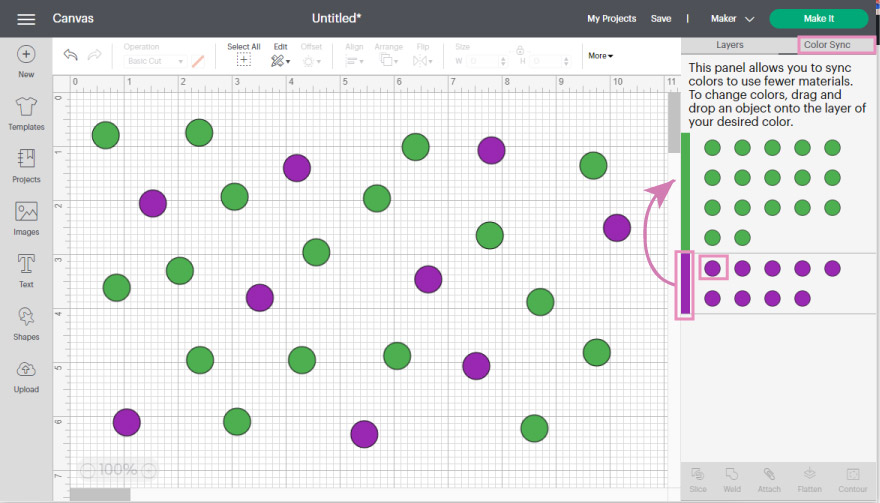
“Color Sync” is located in the tab next to the layers panel.
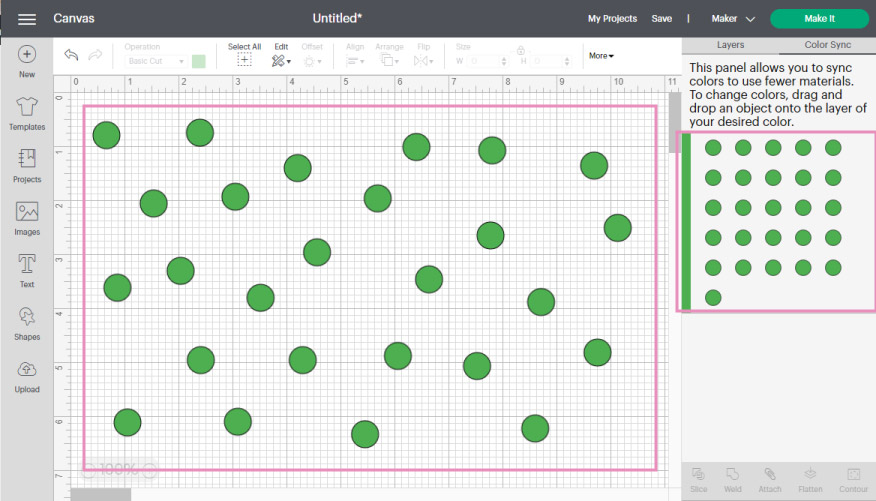
When you click on it, all the layers (images, text, shapes) that have the same color will be grouped.
In this case, you only see circles, but if you have text, you will see a little initial of the word, and if you have an image, you will see a tiny icon that will represent it as well.
From the Color Sync panel, you can drag each layer to other colors, but what I like the most is that if you select the rectangle representing each color and drag it to another color (green in this case), all the colors will change instantly!
Isn’t that amazing?
The con with this technique is that if you have identical layers, you can’t identify them one by one. But, if you want to change color in bulk, this tool will be your best friend.
What if the color you want to add or change it’s not on the canvas?
Very simple.
Add an element, change its color for the one you want to use, and go back to Color Sync.
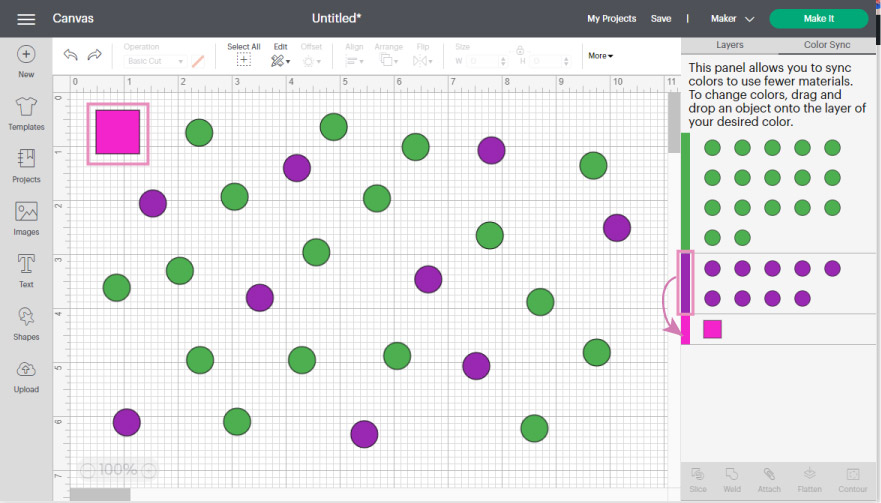
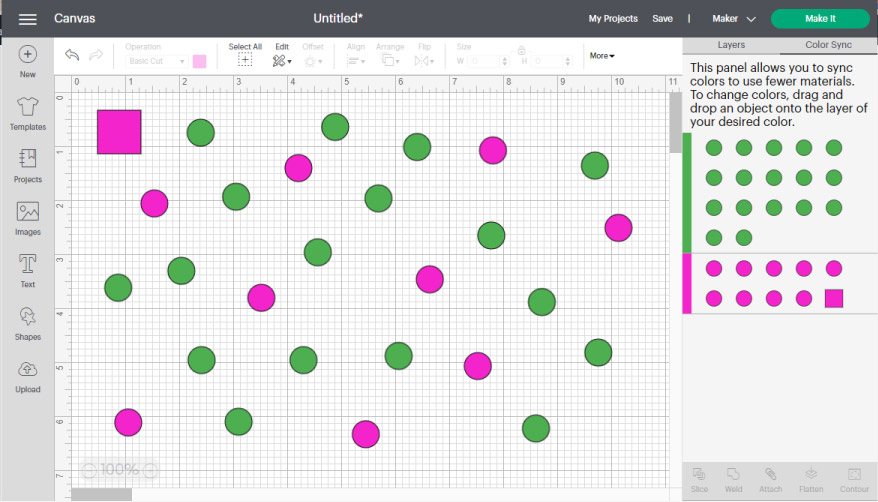
Now, select the colors you want to change and drag them to the new color.
It’s like magic!
Don’t you think?
Changing Colors in Cricut Desing Space App
Most of the color tools and techniques I just explained throughout this tutorial can be applied from your iPad/Phone.
There are only two things that the app doesn’t support:
- Using Patterns for Print then Cut
- Bulk editing colors with Color Sync. It can only be done with one layer at the time.
If you have a phone, here are some graphics that will help you to find all of the things I just taught you!
“Operation” is in the Edit menu (bottom panel).
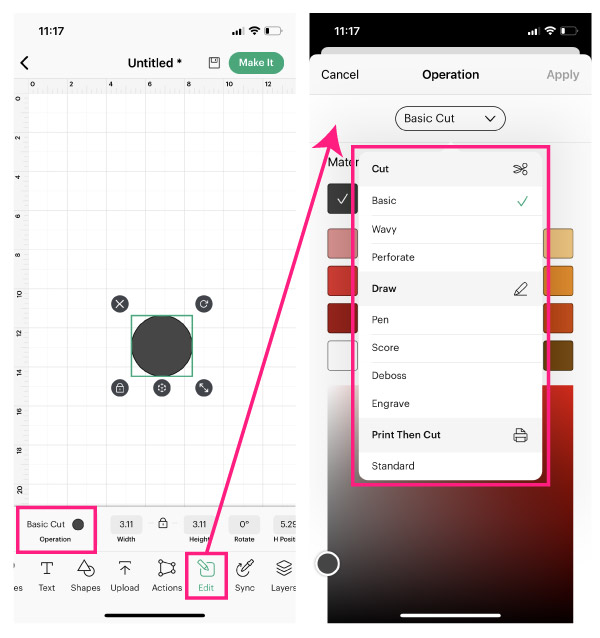
“Color Sync” is right by the “Edit” menu, and the “Contour” tool for coloring an image in Design Space is located in the “Actions” menu.
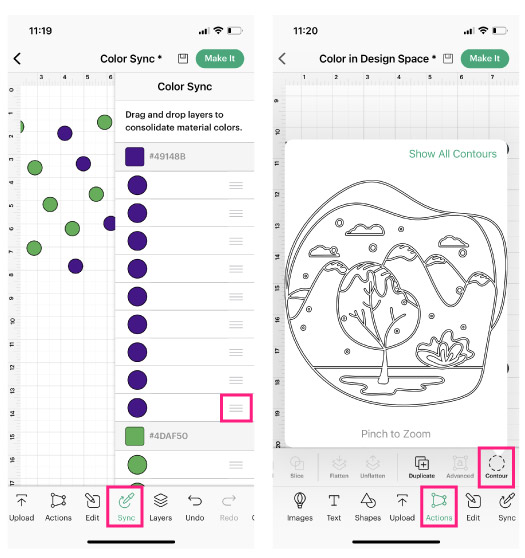
I really hope these screenshots help! I want to start considering app users more often.
Share it
Do you know it takes me over 25 hours to complete a single Cricut article? I know it’s wild, but I want to make sure you understand everything!
I would appreciate your support on Instagram , Pinterest , and YouTube as I try to grow my audience and continue producing great content!
Oh!
Just so you know, I also have a library full of free SVG files and Printables for all my subscribers, a.k.a. Daydreamers. You can see a preview right here or get access by filling out this form.

Hi Catalina,
I just wanted to let you know your tutorials have helped me out a lot and was wondering if you could help me put your tutorials in order so I can learn each step you have taught us over the years. Thank you again for sharing. You are one of the best
Thank you! 🙂 You simply can start by clicking the extra tutorials linked in this page.
There’s not a particular order you need!
Hello Catalina and thank you for all your tutorials. You do an excellent job and everything is very clear. I found this color changing is very difficult to understand, not because of you of course but i couldn’t get it. I’ll be practicing and practicing until a get it because it is very interesting and helpful. Thanks again for sharing. I have learned a lot from you. One of the best ❤
Thank you so much! You’ll get it with time 🙂
Is there a way to change the colours of a Print then cut file that is already a Print then cut file? I found out they have a way of doing this in the Silhouette app.
If you upload it as a cut image. There are tips and tricks on YouTube to upload when images have more than one layer.
You can also try online converters.
Love your tutorials! I’m a long time Cricut user and I always learn something from your tutorials. Thanks for sharing your knowledge.
Thank you for the lesson very informative
I am trying to print the cut bee shaped stickers on vinyl sticker paper. How can I be sure the machine will cut around the outside of the bee only? The image I uploaded off design space has inside cuts.
Check out my Print then Cut tutorial.
Hi Catalina, I realized that you have Step 4 as being Contour (written in the landscape images). You added it to Step 3 -“Step 3 – Center images and use Contour”. That’s where the confusion was.
I’m new at Cricut. Again thank you for your tutorials and instructions.
Hi Catalina, Thank you for your many tutorial, they are very helpful. I do have a question on this one.
On the section: How to Color images in Cricut Design Space (Fill in Images).
You provided Steps 1-3.
However you mention just above the landscape image:
Check out the following example to see this in action.
This image is a cute little landscape and can be found in Cricut’s library with the code MD77B2E8.
I followed the steps I mentioned before up until step 4.
Where is Step 4?
I look forward to your response.
Thanks
Sorry it wasn’t evident, I just corrected the article.
hello,
can you tell me why when I download an SVG file, then upload to Cricut Design Space it alters the colors of the image? ie, the hat was yellow, the ears are gray but when it opened in design space the hat and eyes came over as gray. how do I fix this problem?
thank you,
Sometimes design space is a little glitchy when you upload a file. It also depends on how the SVG was saved.
Can you help me get true color match from cricut design space to the printer. I have a brand new epson sure color p400. The color transfer from cricut design to the printed product is nowhere close. Thanks so much!!
Hi Dina, you need to use CMYK colors and know the HEX Code of each one of them for a true real match. Very bright colors are not achievable during a regular printing process. To see a true match of what shades of color you need you may need Adobe Illustrator. That’ll tell you whether the color will remain true when printing.
What color are you trying to use?