Hello Daydreamers!
In today’s tutorial, I am going to teach from start to finish how to make beautiful and stunning hair bows with your Cricut machine.
Not only am I going to show you how to make them, but I will also provide you with 18 free hair bow templates all in this article!
Ideally, you will read this tutorial from the beginning because, as we go, we will be implementing the concepts mentioned in the previews steps.
In a nutshell, these are the topics I am going to be covering in this tutorial.
- Materials you need to make bows
- Cricut Design Space steps
- Cutting and Assemble process
- Tips and other considerations when making bows
- 18+ Free SVG bow templates
- More pics of bows you can make with your Cricut.
Are you ready?
Let’s Daydream Into Reality!
Materials
Making bows with my Cricut, believe it or not, has been one of the most challenging projects I’ve made so far.
I mean, the steps are easy, but the variety of materials you can find out there to make bows is unlimited and, sometimes, tough to cut.
Don’t worry, though!
I need to start with this, so you trust my recommendations when doing this project.
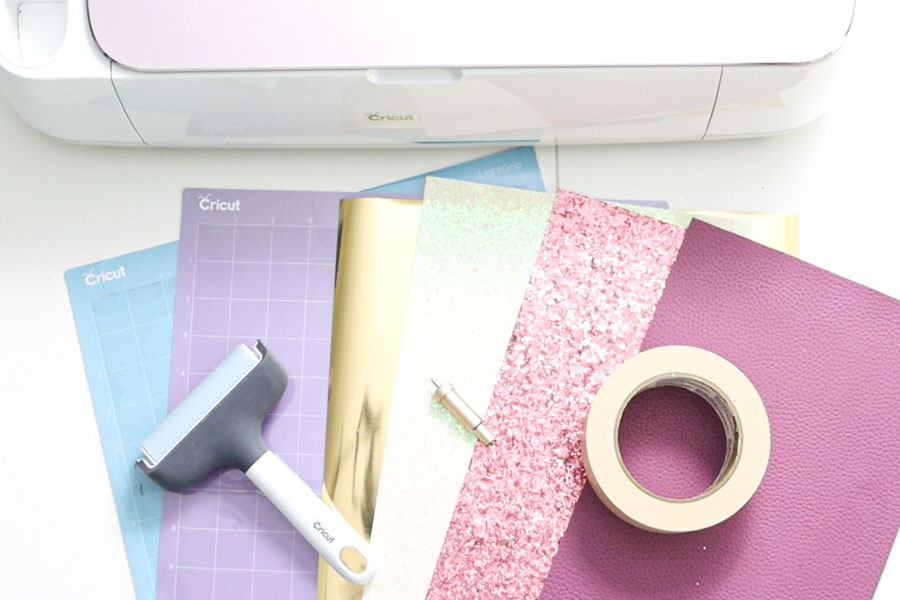
- Brand New StrongGrip Mat (purple)
- Fine Point Blade (sharp)
- Cricut Maker or Explorer
- Brayer
- Faux Leather
- Glitter Canvas (faux leather)
- Hair Clips
- Iron-On
- LightGrip or StandardGrip Mat.
- Masking Tape
- Practice File (yellow download button)
The rest of the FREE files are in this article after the Step by Step tutorial.
Note: I only used Iron-On on one bow because I wanted to show you different possibilities.
To make these bows, I invested in a wide variety of materials from Amazon. There are so many companies that have so many options. However, I found them to be a little deceiving.
The materials are beautiful!
But, every single glitter sheet that claimed to be “faux leather” was, in fact, canvas, or for very chunky glitter was some sort of fabric.
It’s not a huge deal to me, but it does mean you need to test a lot!
Here are some of the faux leather and glitter canvas I bought.
- Mermaid Style
- Pastel Colors Glitter Sheets
- Mixed Faux leather and glitter canvas (beige colors)
- Mixed Faux leather and glitter canvas (black and white colors)
- Chunky Glitter Canvas
- Variety Pack fine glitter Canvas sheet.
All of these packs have a strong smell before you work with them, let them air out for a couple of days.
Make Hair Bows in Cricut Design Space
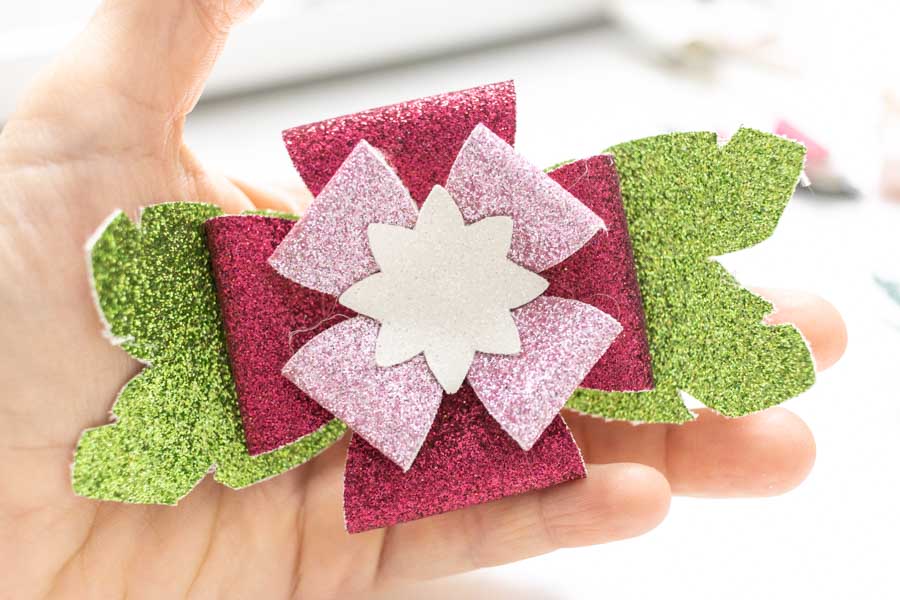
For this step by step tutorial, I picked the “Unicorn File” because there’s a lot of details and opportunities for you to learn.
Upload Bow
Download the file (in the materials section) the go to the canvas in Cricut Design Space, and click on the “Upload” button located on the left panel.
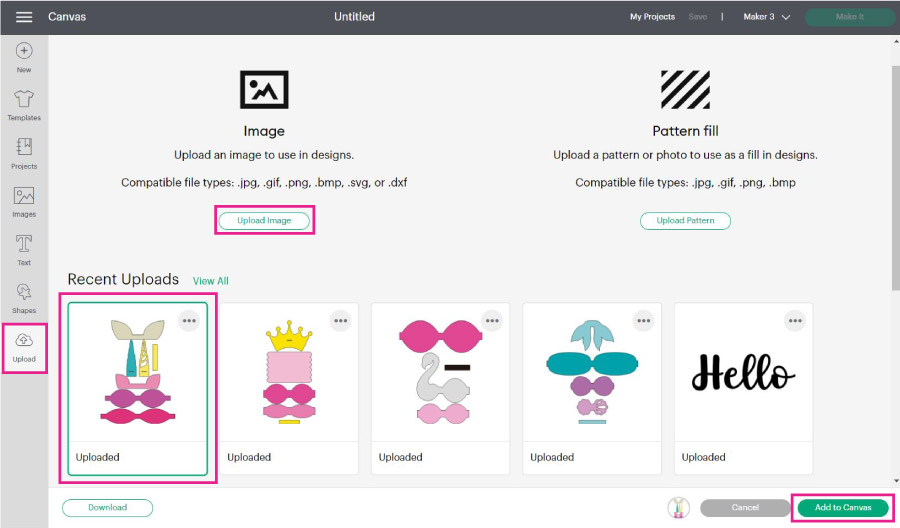
Follow the prompts to upload the bow, then select it from the “Recently uploaded images” and add it to the canvas.
Resize Bow Template
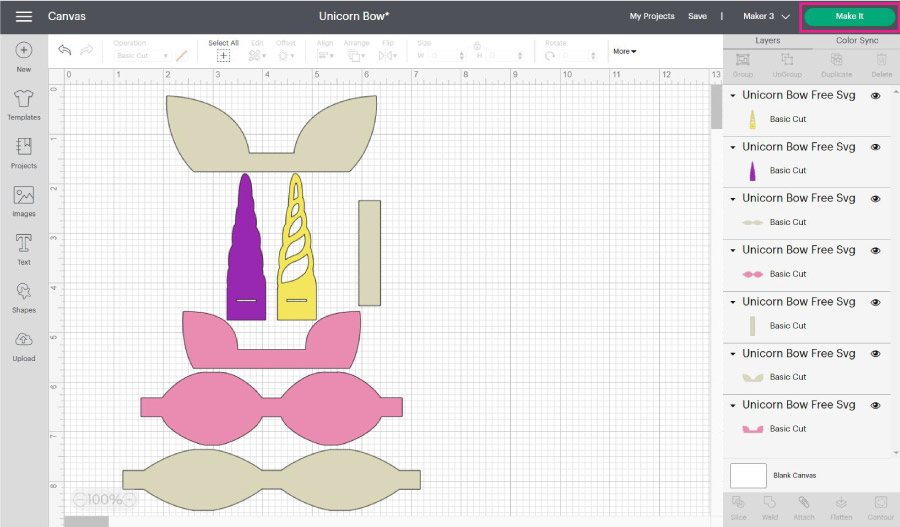
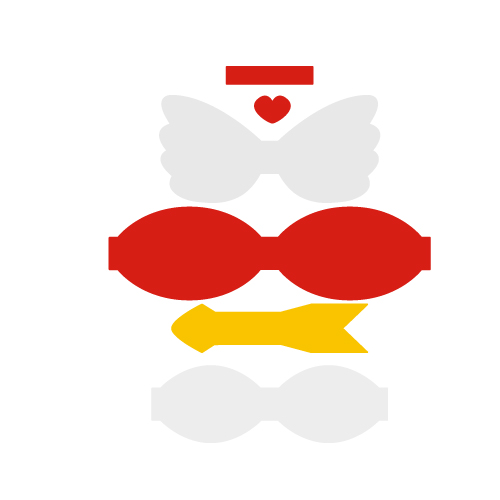
This is how the hair bow looks when you upload it. There are multiple colors, and all of the pieces of the bow are grouped.
The first thing you need to do is resize your project.
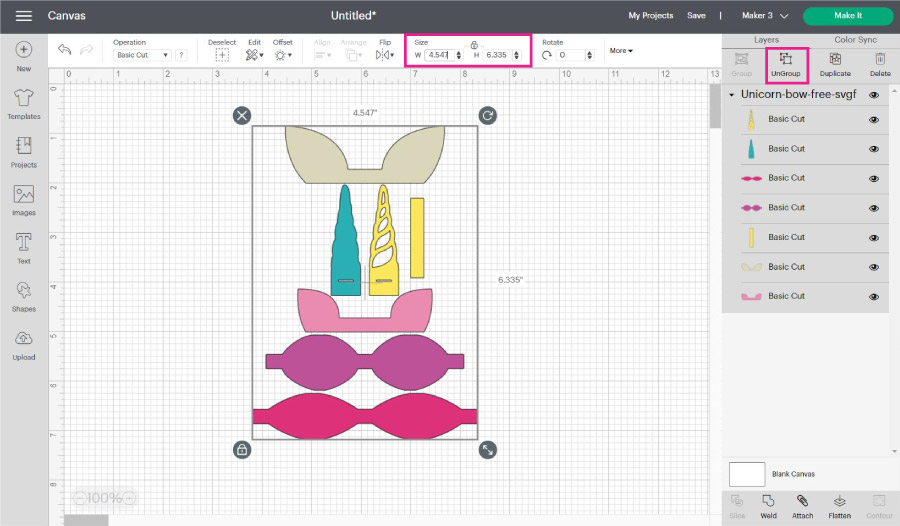
Make sure you resize according to the largest piece. In this case, it is the one at the bottom.
Everything has to increase proportionally!
So select all of the pieces that are part of the bow and type in the width you want.
In this case, I did a width of 6 inches.
Bows need to be folded, so the actual size of this bow be cut in half pretty much. The ears and the horn will be bigger than the larger piece on the canvas.
I think 6 inches is an excellent size for small bows; they end up looking cute. However, you can also make them bigger.
Change Bow Colors
After resizing, ungroup the bow and change the colors of your bow. If you were going to leave it as is, you would need six mats!
That’s ok, but I just wanted four different colors. All of these colors will represent different materials as well!
To change colors, select the layer, and click on the color box next to “Operation.”
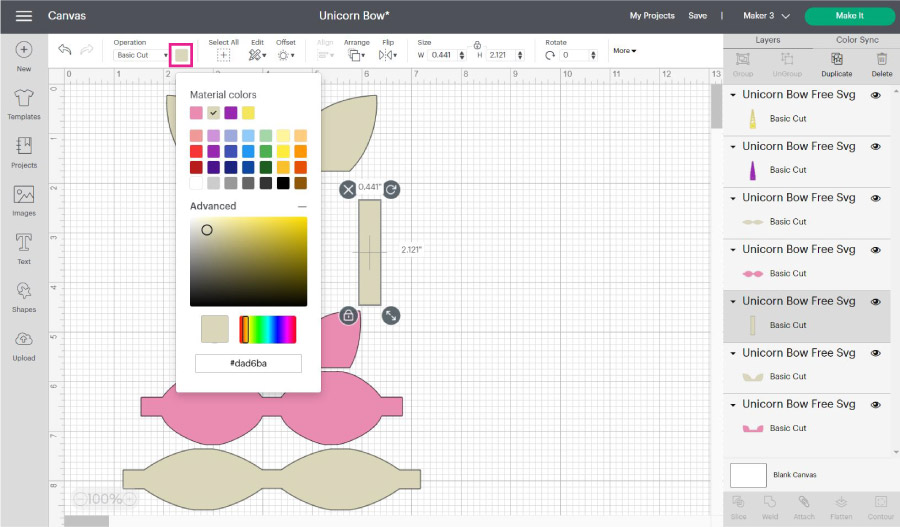
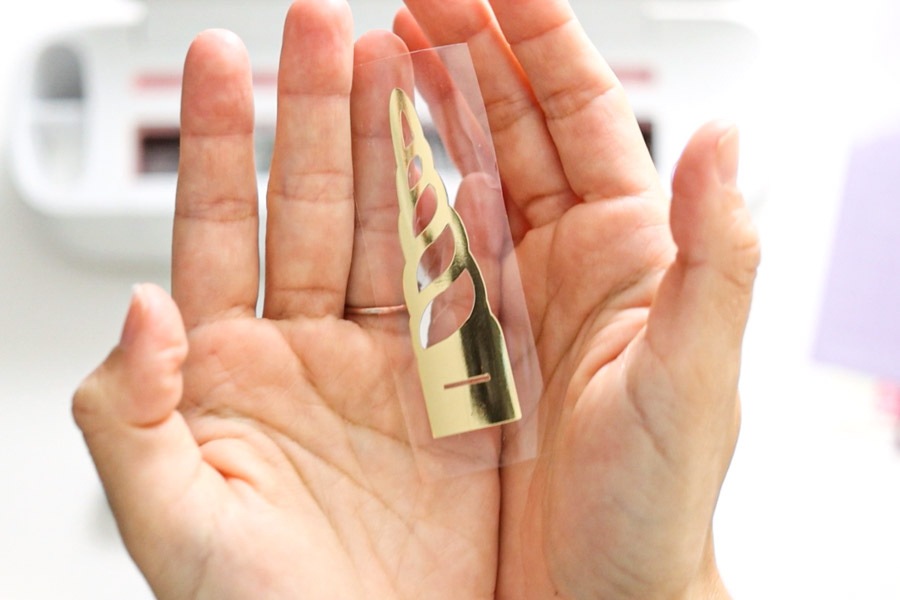
Here’s how my bow looks like, and these are the materials I am going to use per color.
- Beige & Pink: Chunky glitter canvas
- Purple: faux leather
- Yellow: iron-On
The reason why I am using iron-on on the horn is because of the small details. I don’t recommend cutting visible intricate cuts on glitter canvas.
Once you’re happy with the colors and size, click on the green “Make it” button.
Hair Bow Cutting Setting in Design Space
It’s time to check out the mats your project needs.
After trial and error (I made more than 100 cuts to bring this article to you), I found that the best practice when cutting glitter canvas is to move all pieces leaving an entire inch on the left and one on the top.
Click on them and move them around. You also want a functional space between each space.
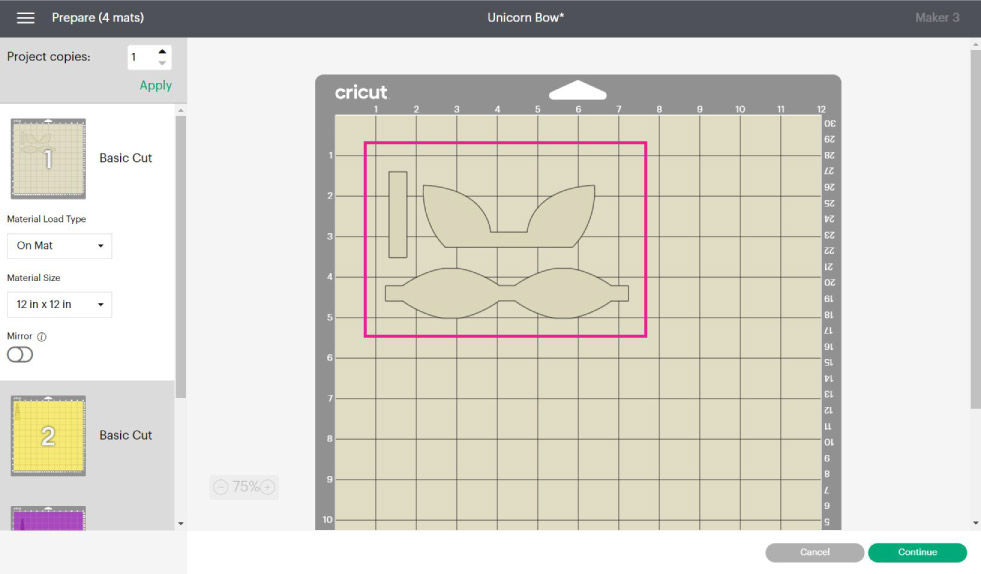
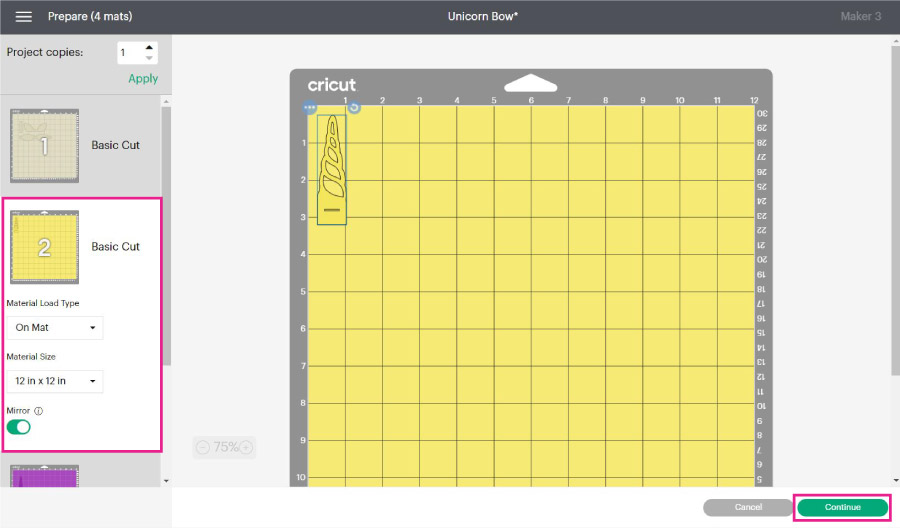
There are two mats where you need to mirror the image if you are using faux leather and iron-on because you will be placing them pretty-side down.
Once you check all of the mats, go ahead and click on continue to select the materials.
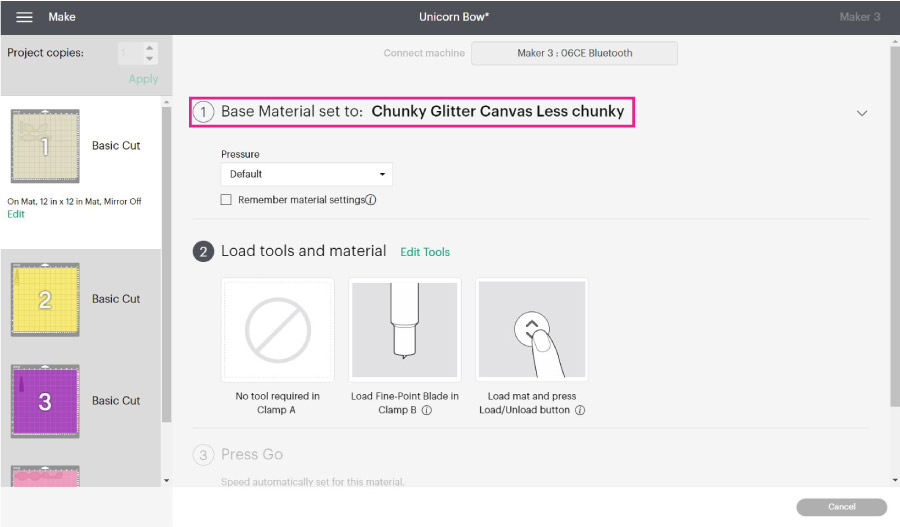
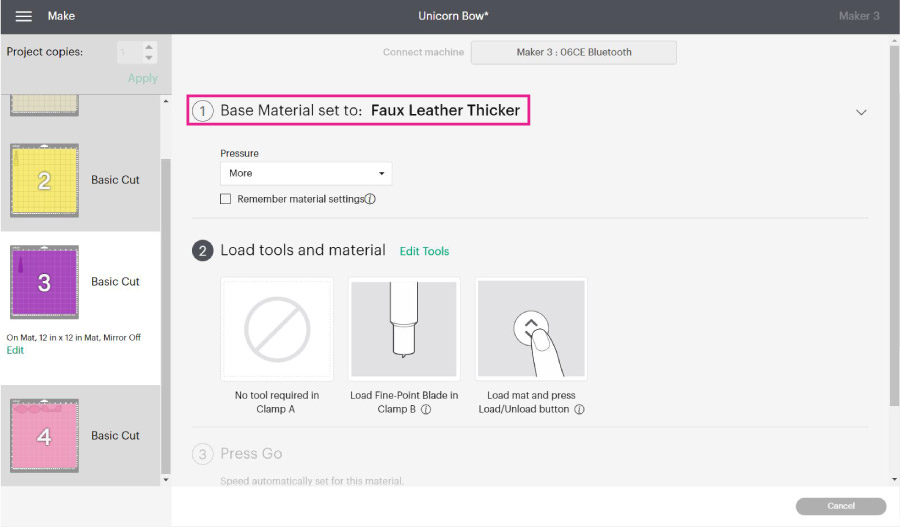
Material Settings for bows in Cricut Design Space
Cutting glitter canvas and faux leather that you buy online it’s quite tricky. I tested multiple options to find the sweet spot.
Those materials don’t exist in Cricut Design Space, so to make bows, we need to create a new material.
It’s quite easy!
On the “Set material” section, click on “Browse all materials.”
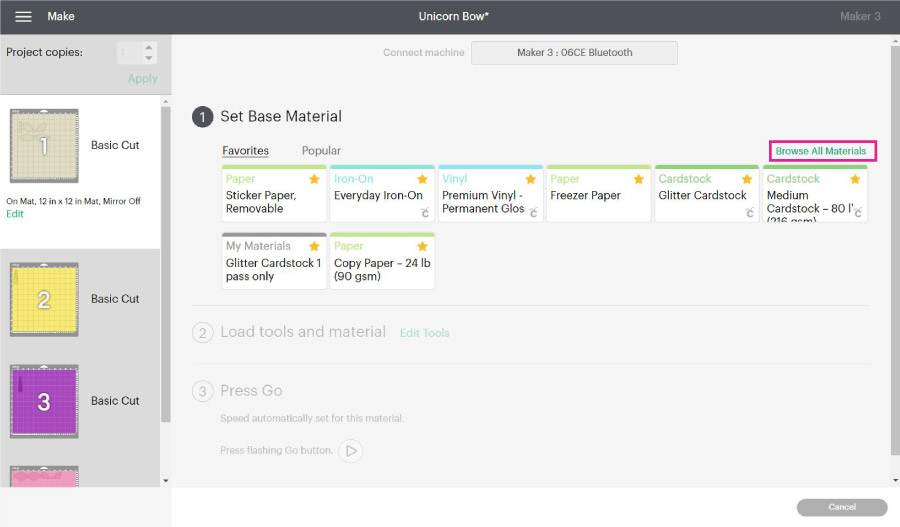
A new window will open with the most common materials.
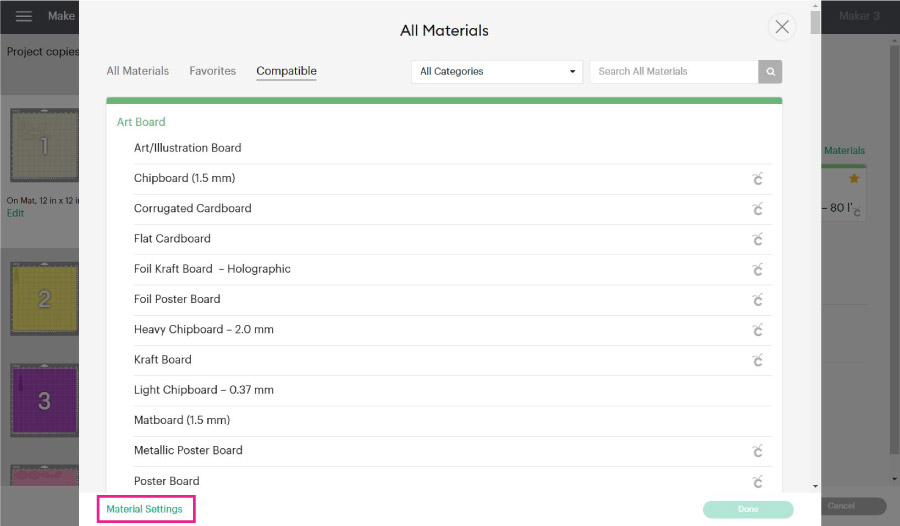
Click on “Material Settings” to add a new material.
The information you’ll see is quite interesting!
Here you can see the exact pressure and number of passes your Cricut will perform on each material.
To come up with the settings I am about to show you, I looked at different materials and just played around with them.
Before we create the first material, let’s take a look at all the different materials we’re going to use for this bow.
As a reference, a fine glitter canvas sheet can be cut when you select the option “Faux Leather Paper Thin” (an existing material in Design Space) and move the pressure to “more.”
But, as we move in thickness, we need to adjust the settings.
- Chunky Glitter Canvas (less chunky): It’s the typical glitter that is larger in size. The depth of the glitter is a bit more than fine glitter.
- Chunky Glitter Canvas: It’s a combination of fine, chunky, less chunky, and really really chunky glitter, it has a lot of texture and hard surfaces. Some of the super chunky glitter sheets can’t be cut with the Cricut (Especially animal printed ones).
- Faux Leather Thicker: The option in Design Space for paper-thin leather. Most sheets I bough were thicker than paper.
To create a new material type in the name in the “New Custom Material” box and click on save.
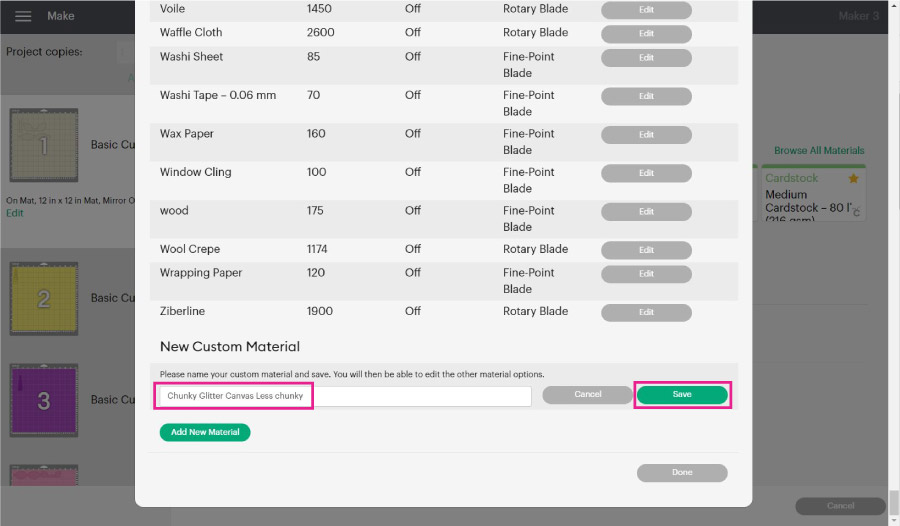
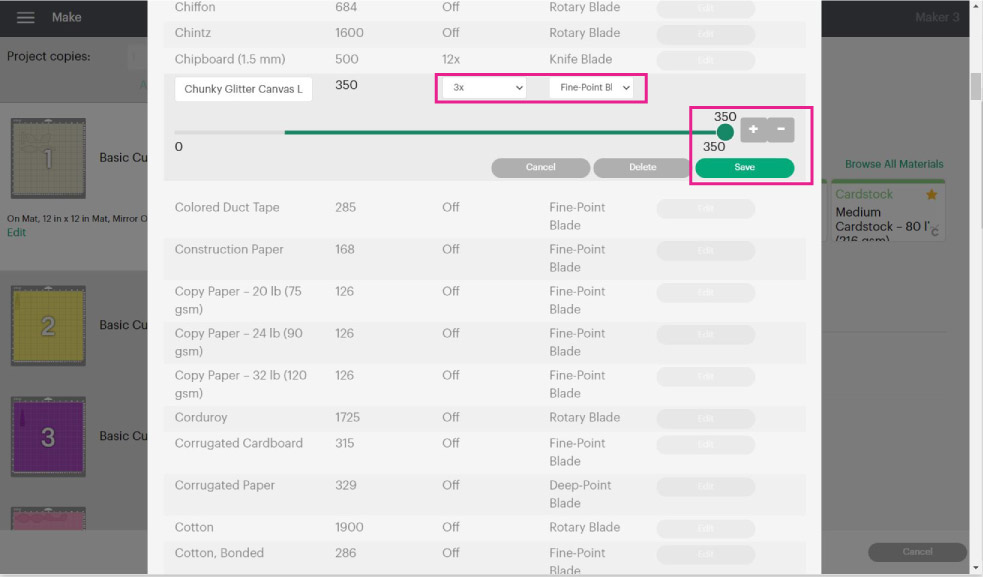
Upon saving the new material, you’ll be able to edit it. For chunky glitter (less chunky) canvas, move the pressure to 350, 3x (number of passes), and select the fine point blade.
For a thick chunky canvas sheet, you’ll need the Deep point blade, move the pressure to 350 and add six passes. Very thick chunky canvas sheets can be quite hard to cut. Before you commit yourself to a large project, do a test cut.
Check out my guide on how I make test cuts with my Cricut Machine.


For faux leather, you need the fine point blade at 350 in pressure, and there’s no need for extra passes.
If you are using Cricut’s faux leather, use the paper-thin material in Design Space.
After creating the new materials, close the window, go back to browse materials, and select the one you need according to the mat you’re on.
Sometimes, there are chunky glitter canvas sheets that are a little bit extra chunky, if that’s the case move the pressure to “more.”
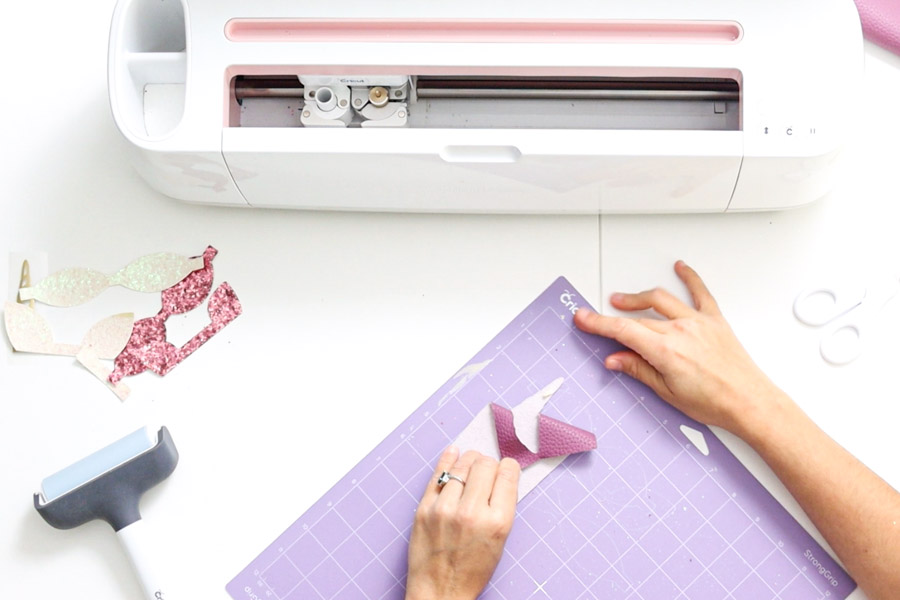
Let’s start with the cutting process!
Cut Bow with your Cricut
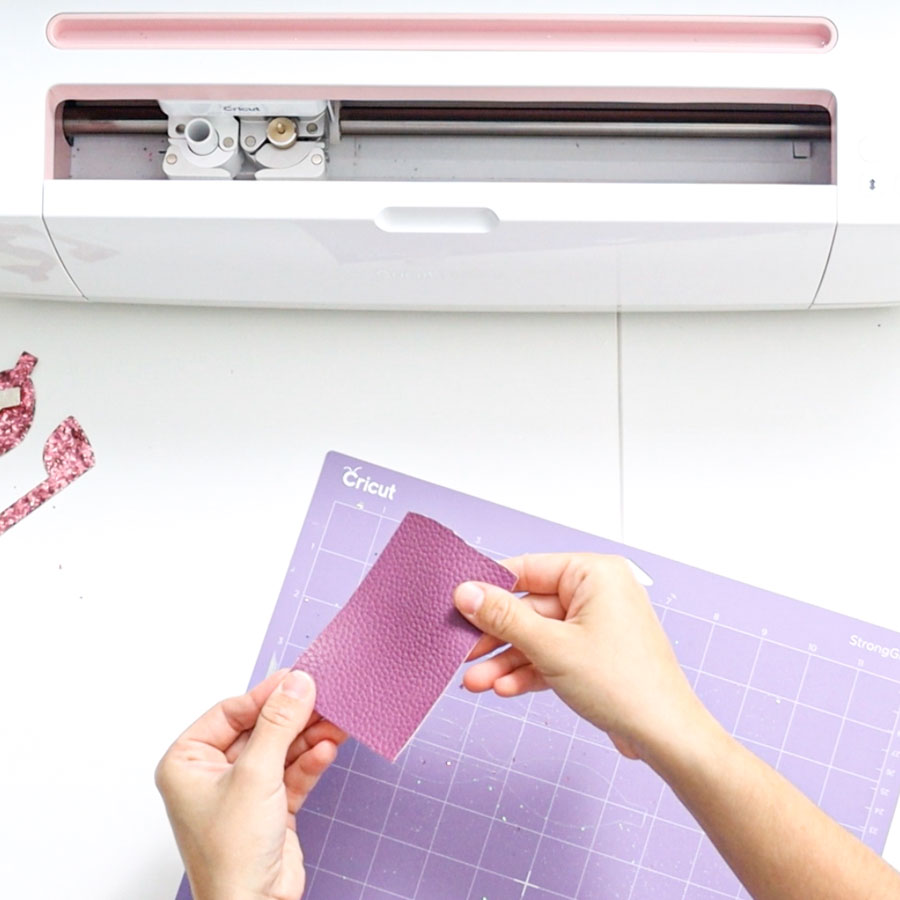
There are two mats where I am cutting Chunky Glitter Canvas (Less Chunky). So I selected from Design Space.
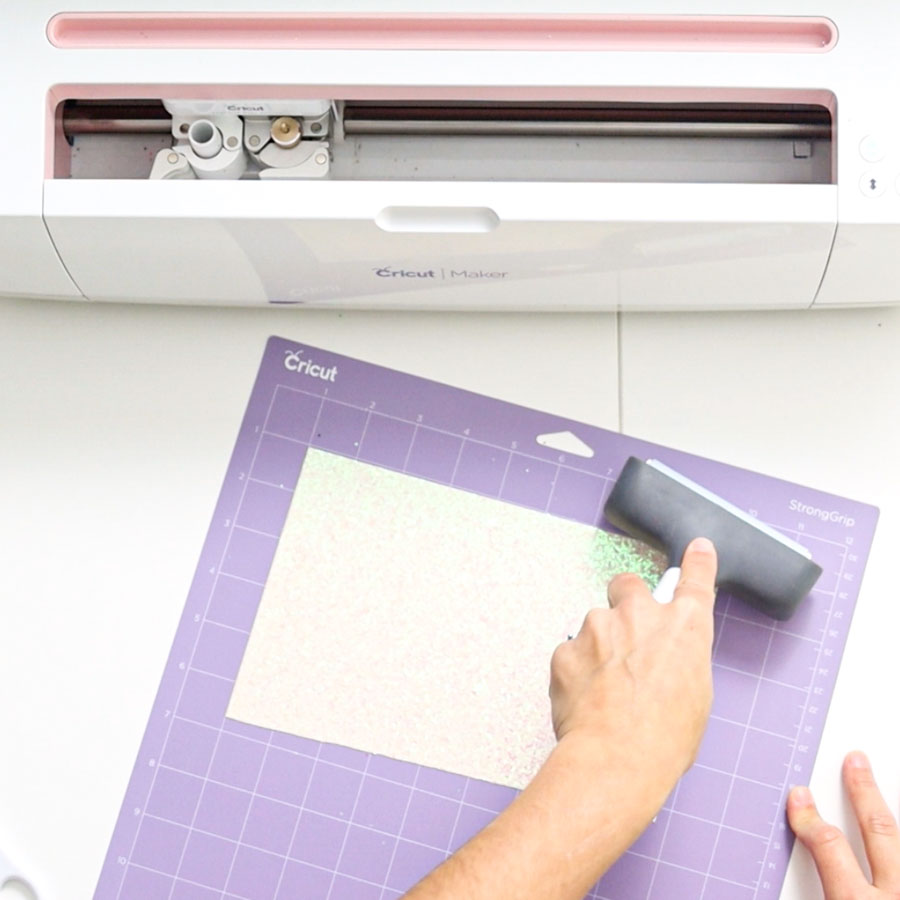
Now we are going to organize the material on the mat.
Remember, we move the material one from the left and the top? Do the same thing on the mat.
It’s important to mention that you need a lightly used or brand new mat when making bows out of chunky glitter canvas. Otherwise, the material can move and get ruined.
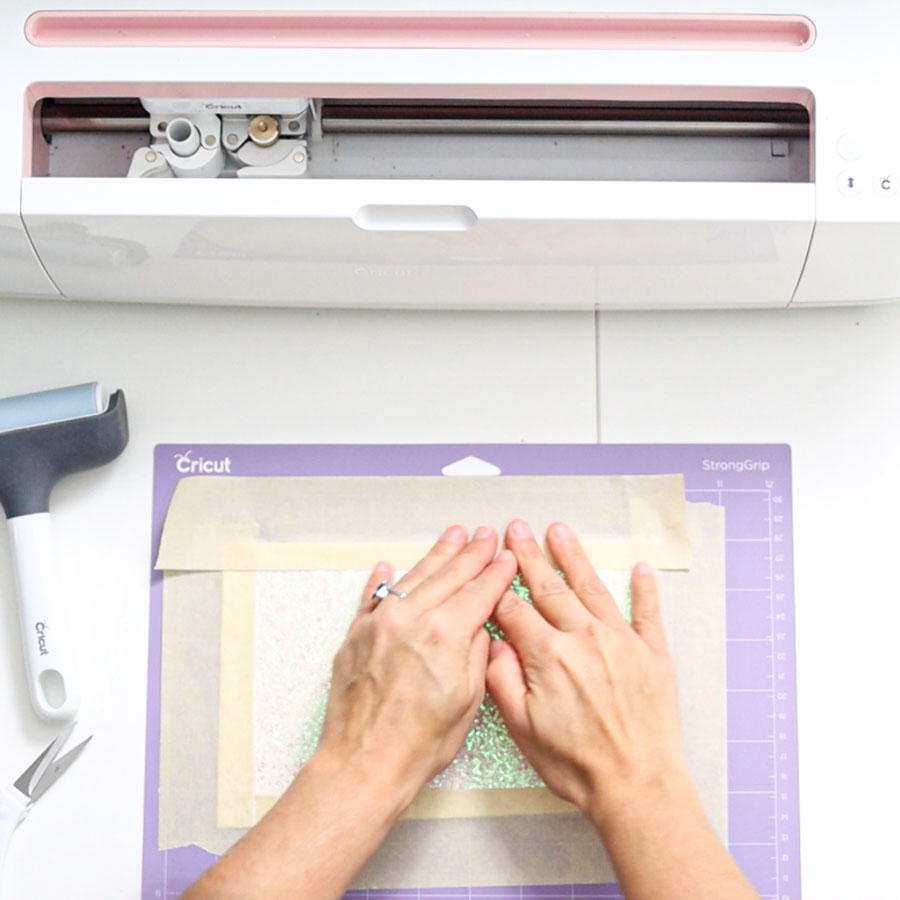
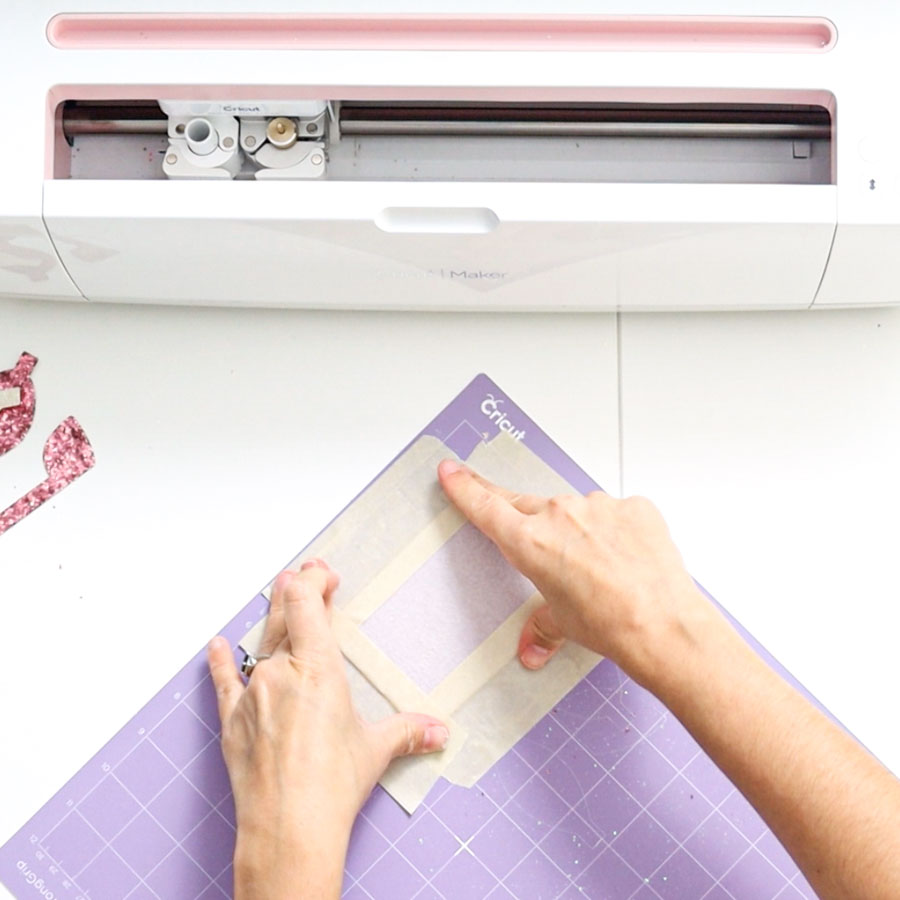
IMPORTANT: Masking tape needs to be away from the blade. Make sure to place it away from the cut. Otherwise, your bows won’t cut through.
The brayer is also very important to stick the canvas sheet to the mat.
You don’t need tape for fine glitter sheets, but the chunkier the glitter is, you may want to add masking tape to add extra security to your project.
Masking tape will be pretty handy if your mat is not that sticky.
I am sure you don’t want to buy a mat for every bow you make.
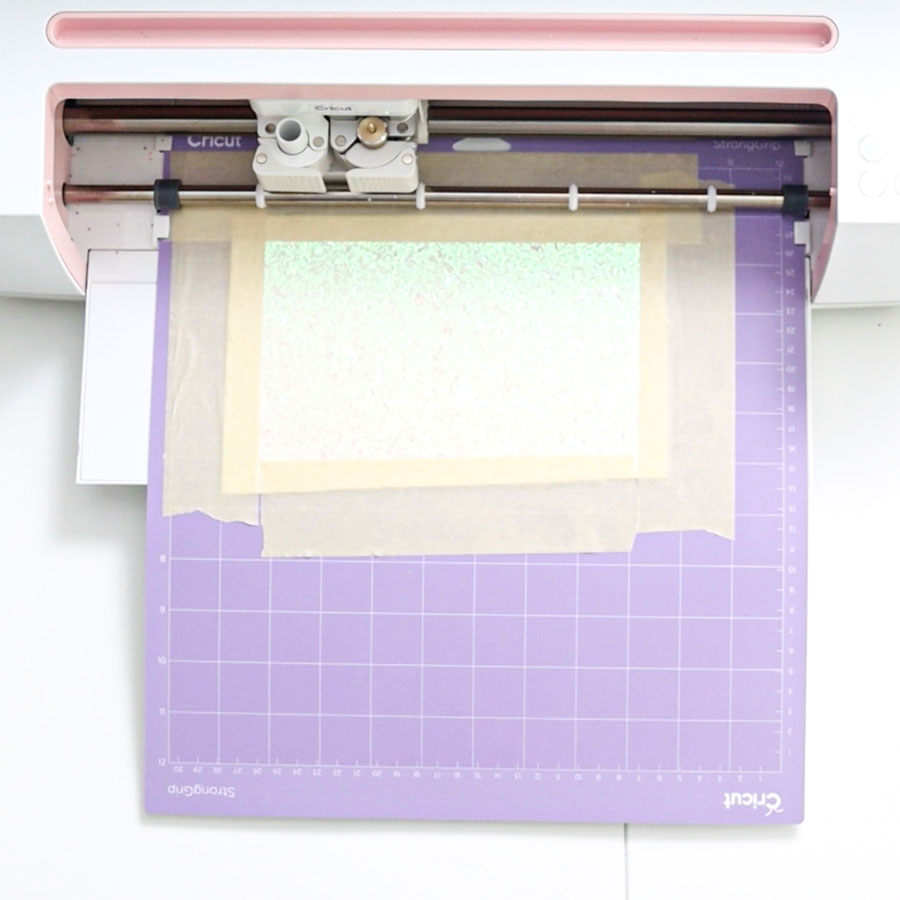
Once you’re done arranging everything on the mat, feed it to your machine and tap on the flashing “Go” button.
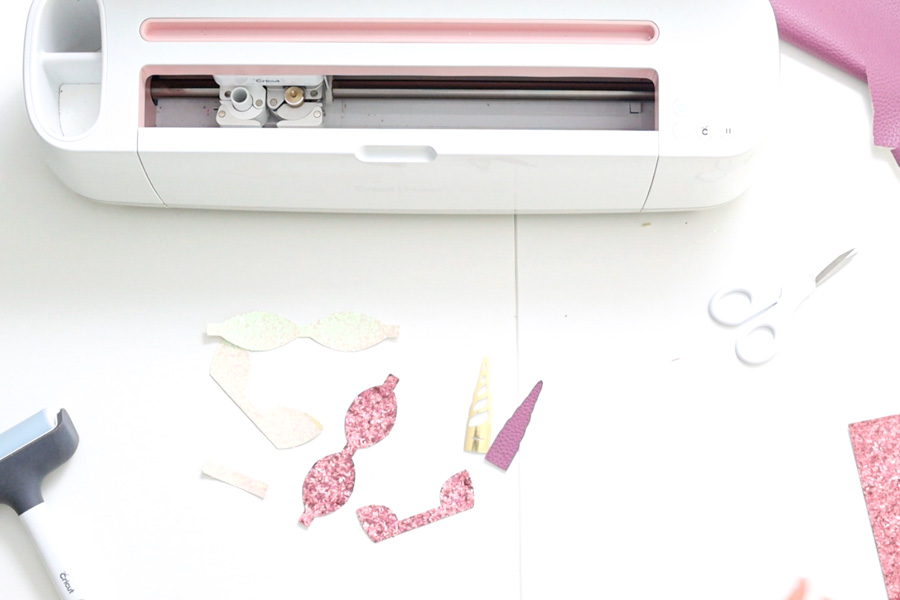
Unload mat, remove the tape, and cuts from the mat.

Here’s the other mat using the same settings.

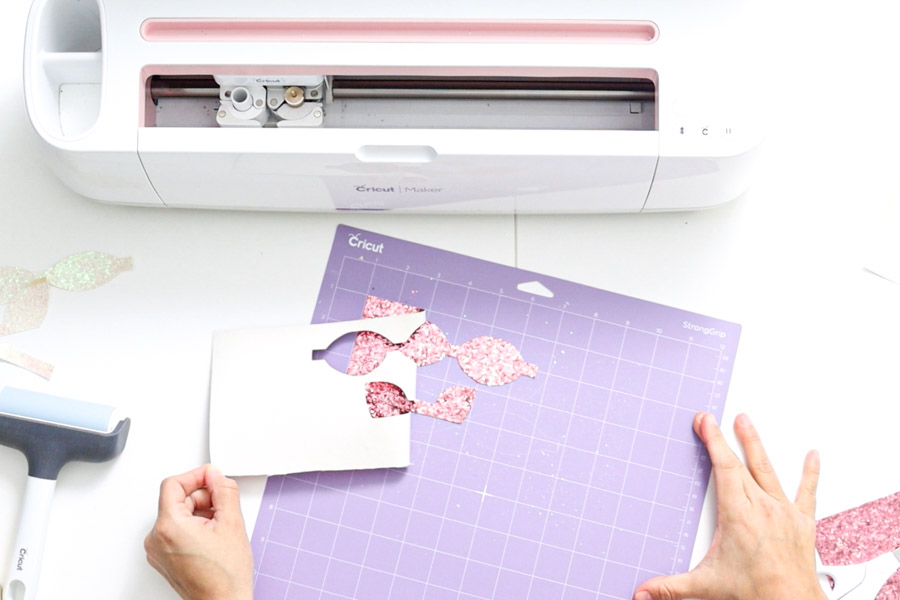
It’s not that hard!
Now let’s cut Foil-Iron On.
Select the material in Cricut Design Space (check mirror is on).
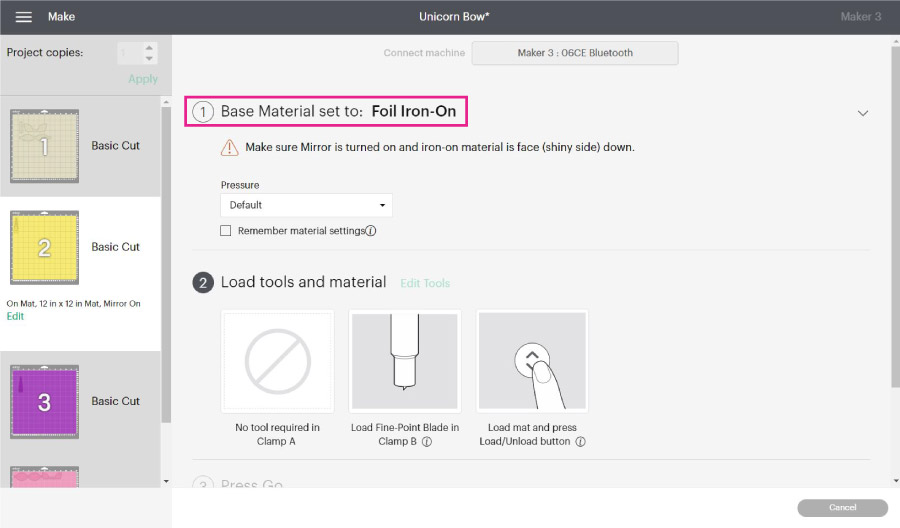
Place it on the mat “pretty side” down, then load, cut, and weed it!
This tutorial is not an Iron-On tutorial, so I won’t go into detail on how to work with it. But if you are curious, you can check my “How to work with Iron-On tutorial.”
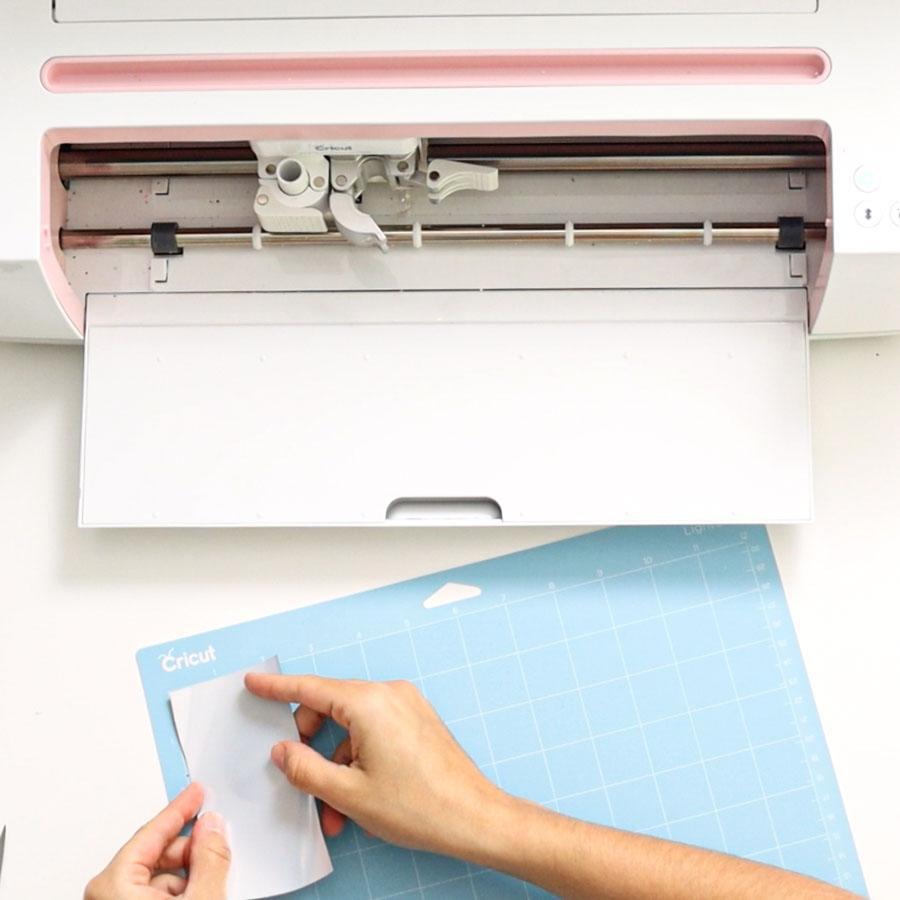
Now it’s time to cut the faux leather!
Once you select the material in Design Space, place the faux leather pretty/pattern/color side down (make sure mirror is on).
If your mat is very new, you don’t need masking tape. If it’s used, I recommend you use it.
Again, avoid placing tape where the blade will cut through.
Load your mat to the machine, cut, and remove cut from the mat.
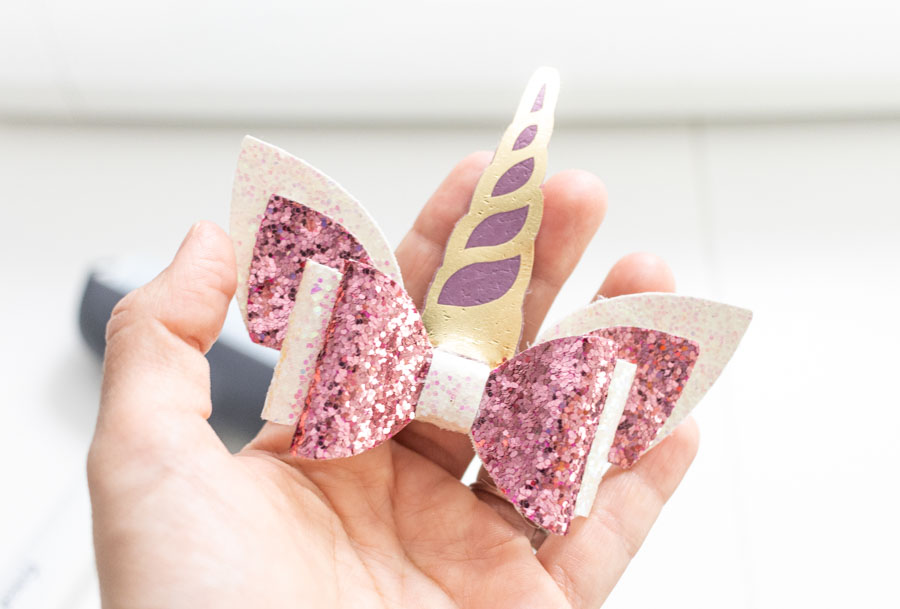
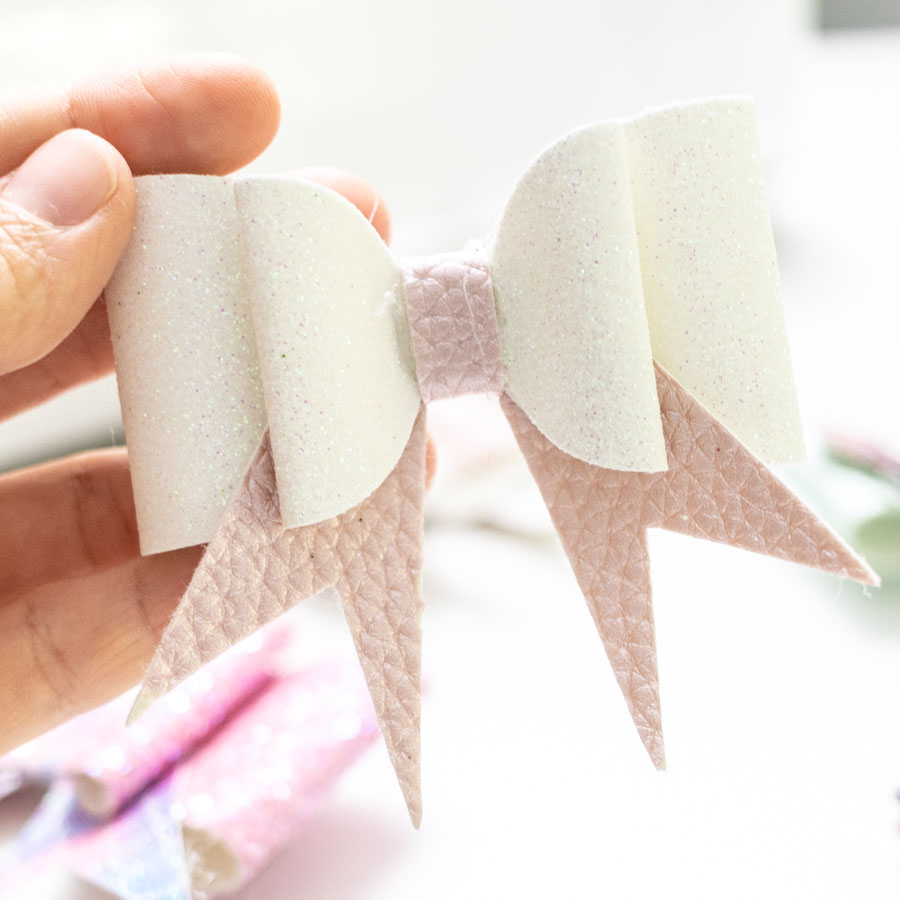
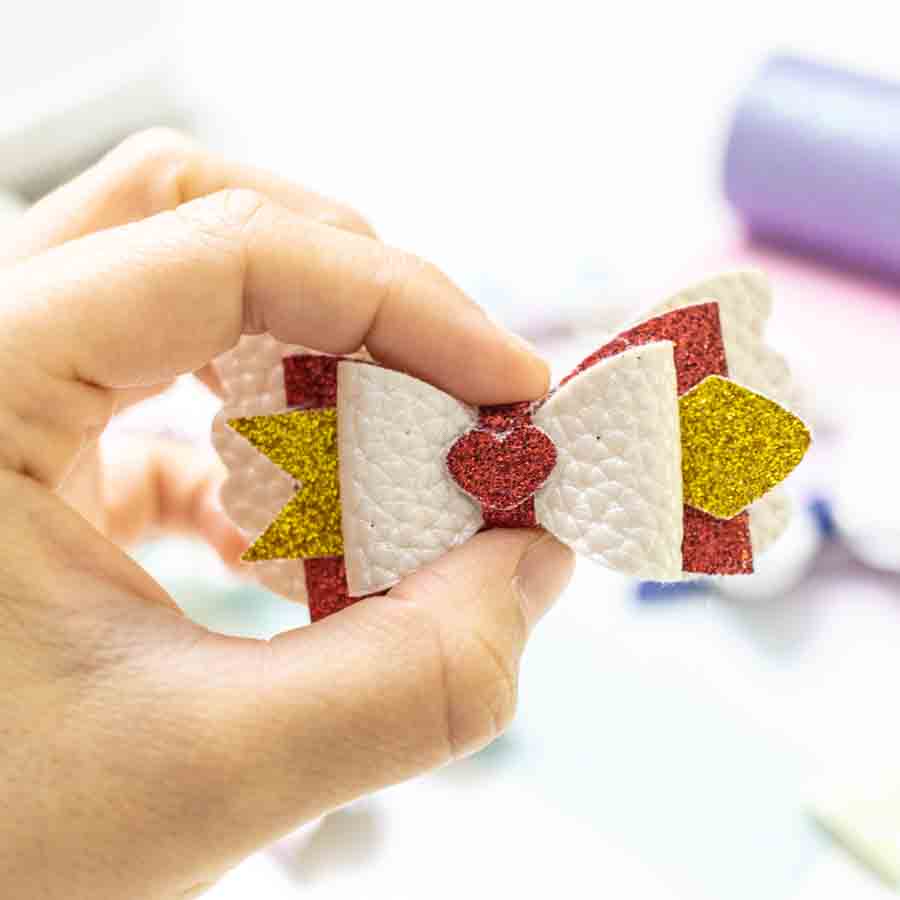
Here are all the pieces we cut.
Are you ready to put the bow together?
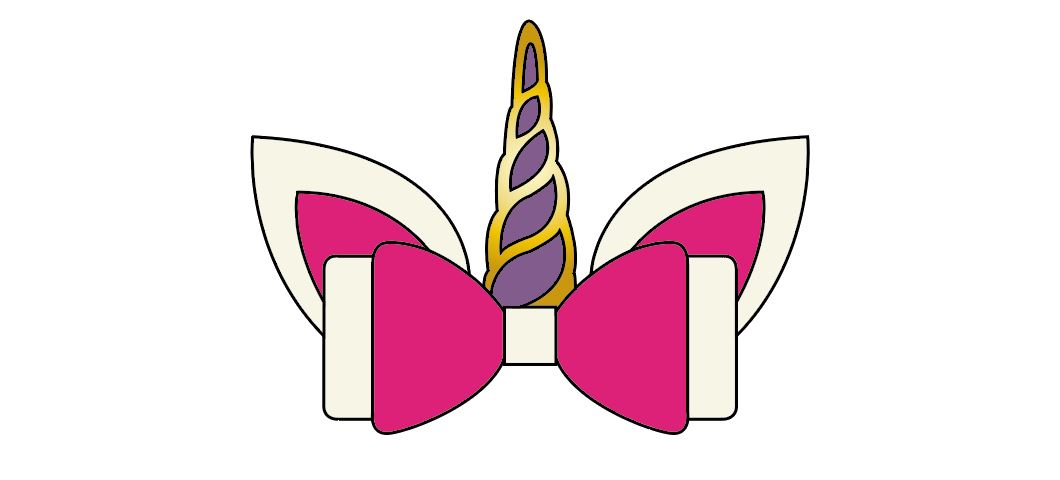
Assemble Hair Bows
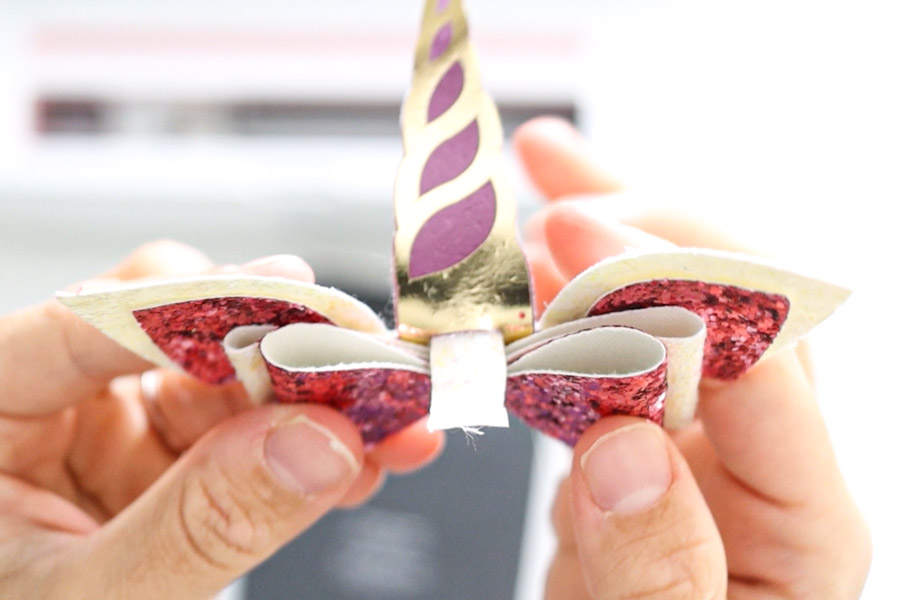
Assembling hair bows is the easiest part and most fun part. The only thing you need to consider is the order of each piece.
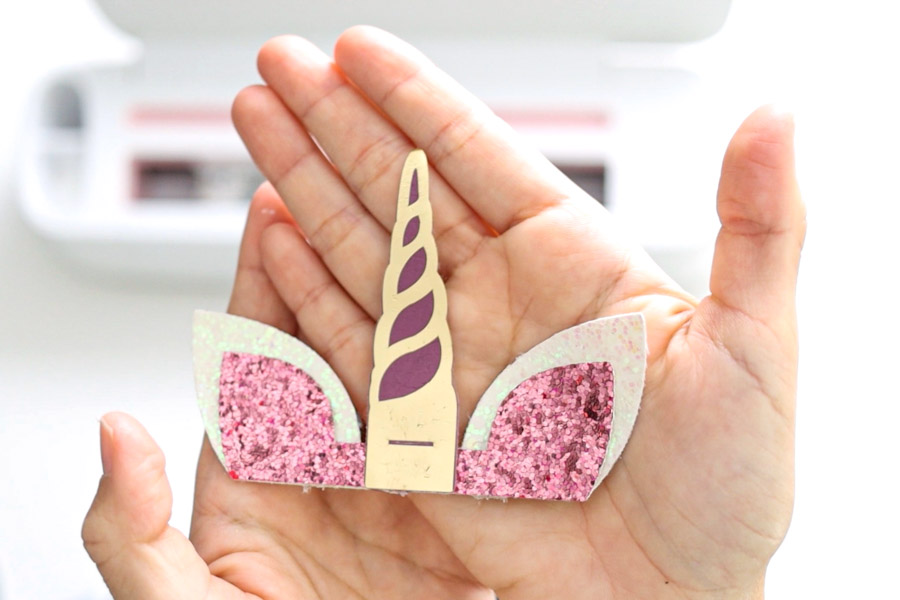
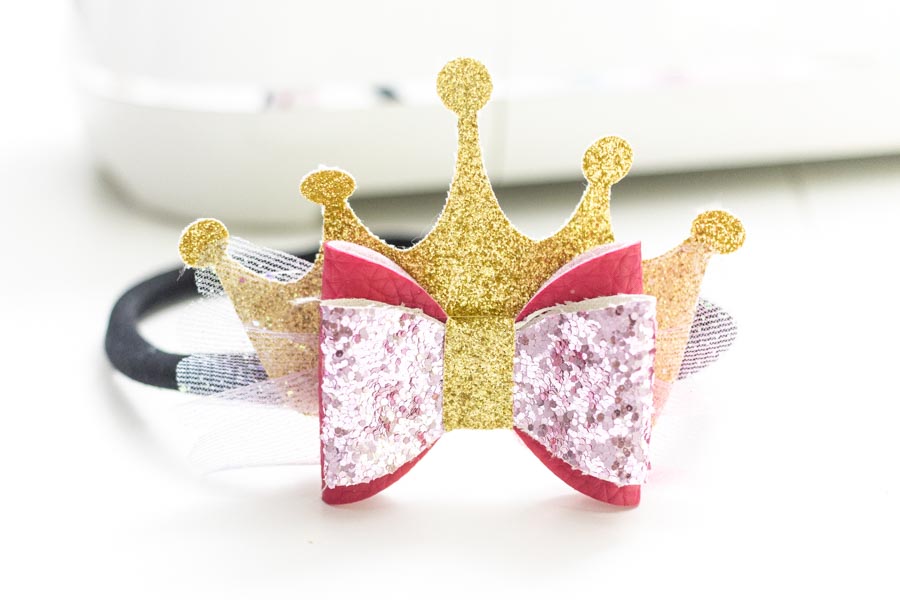
Here’s a little preview of how the bow should look like.
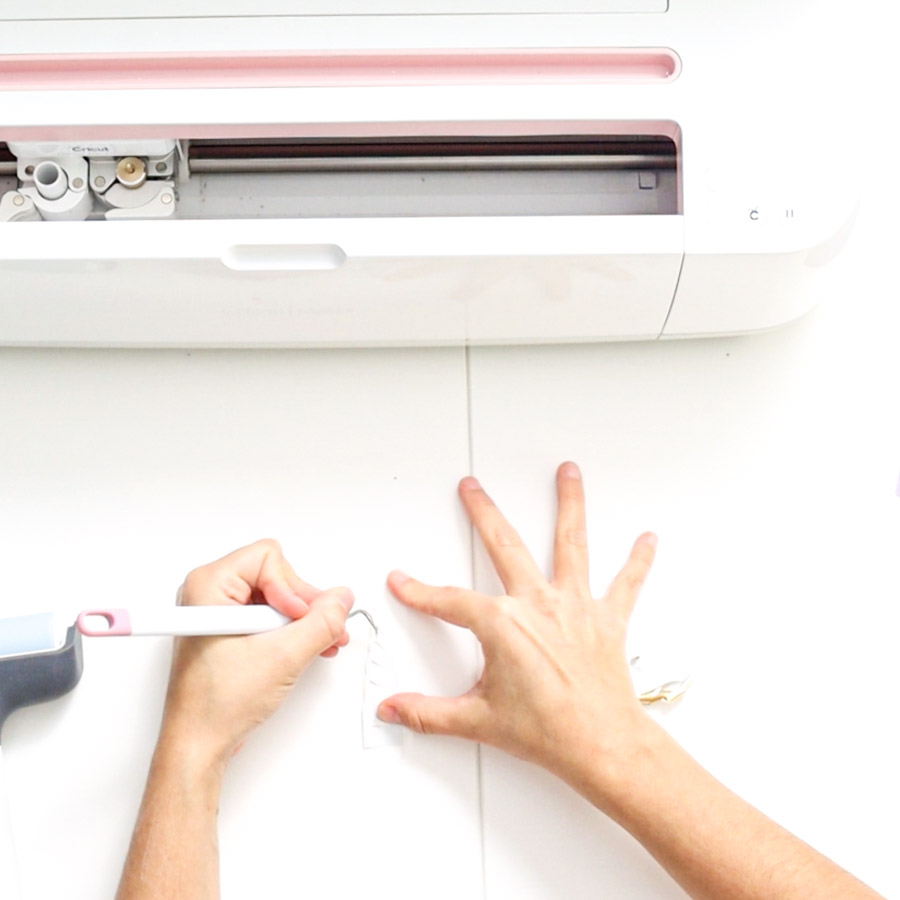
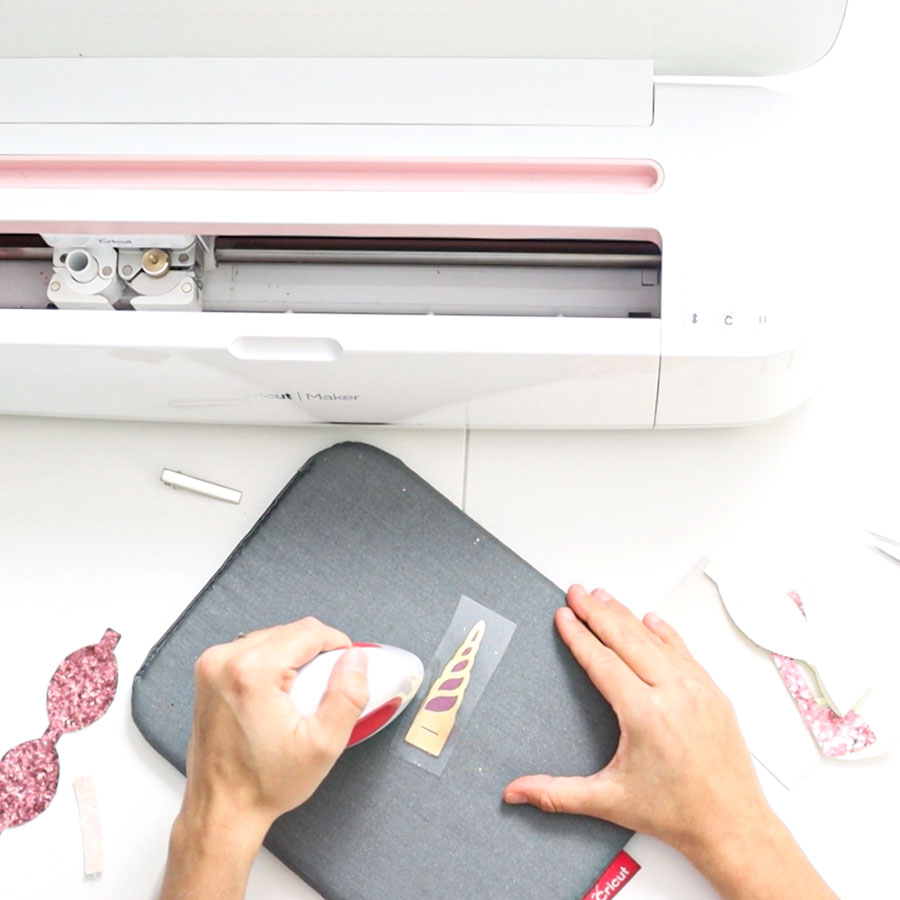
First, I transferred the foil iron-on to the horn. I used the Easypress Mini and followed Cricut’s heat guide.
Secondly, I glued the inside ears with hot glue, then stuck the horn to the ears.
Necessary: Make sure the little cut on the horn is not glued.
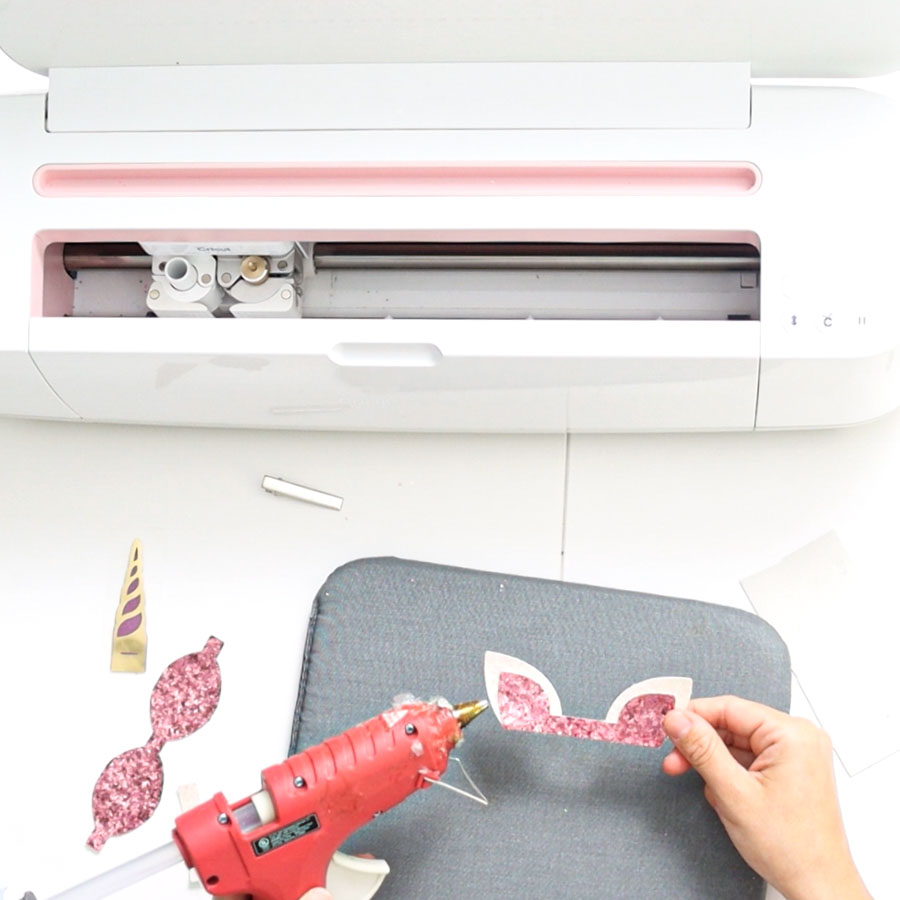
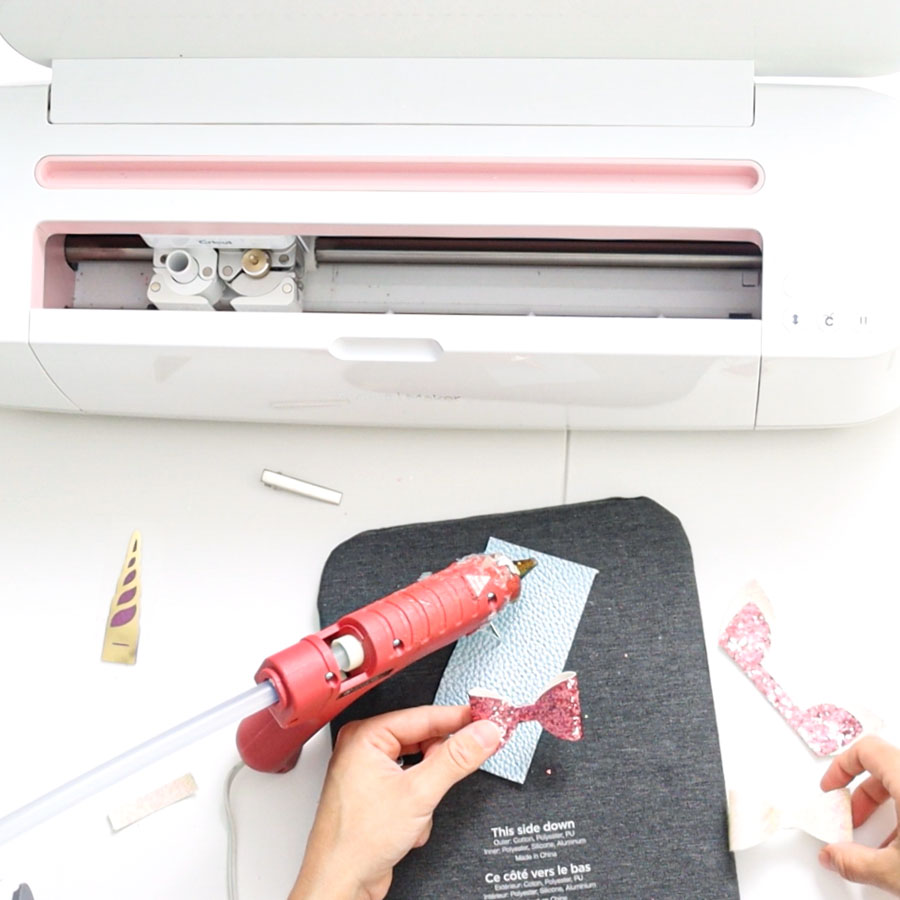
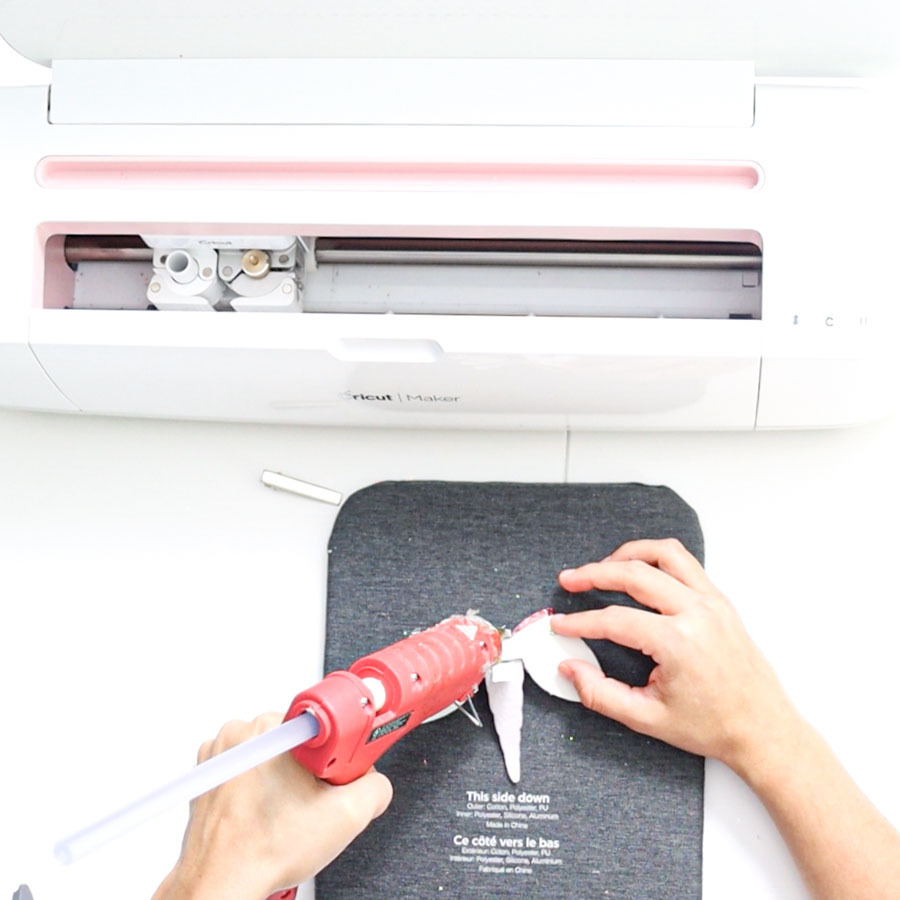
It’s time to glue the bows!
Flip them and add a little bit of hot glue in the middle of them, then carefully close the bow.
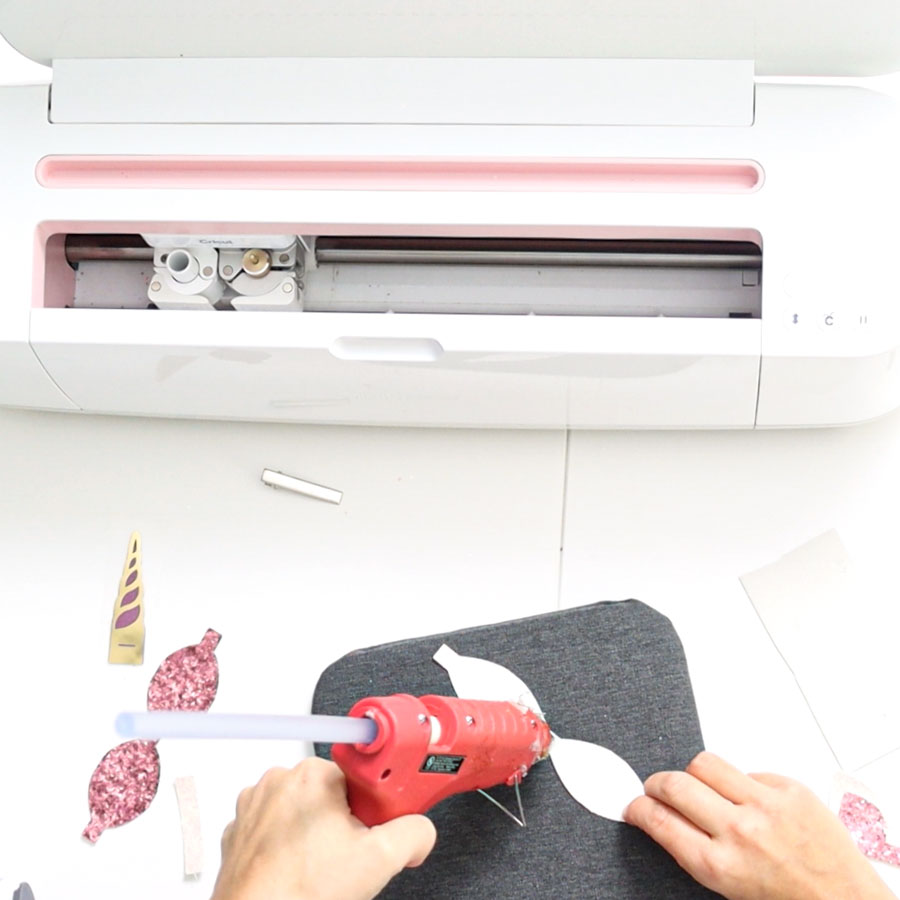
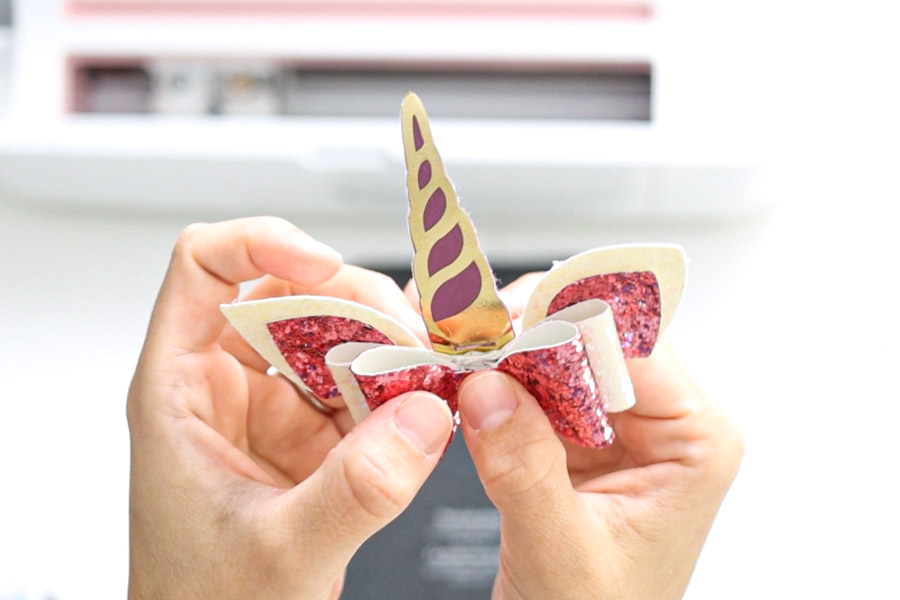
Now glue the long bow to the ears, and finally, glue the shorter bow. At all times, keep the small cut on the horn visible.
Insert the little rectangle through the horn cut and glue it on the back to close the bow.
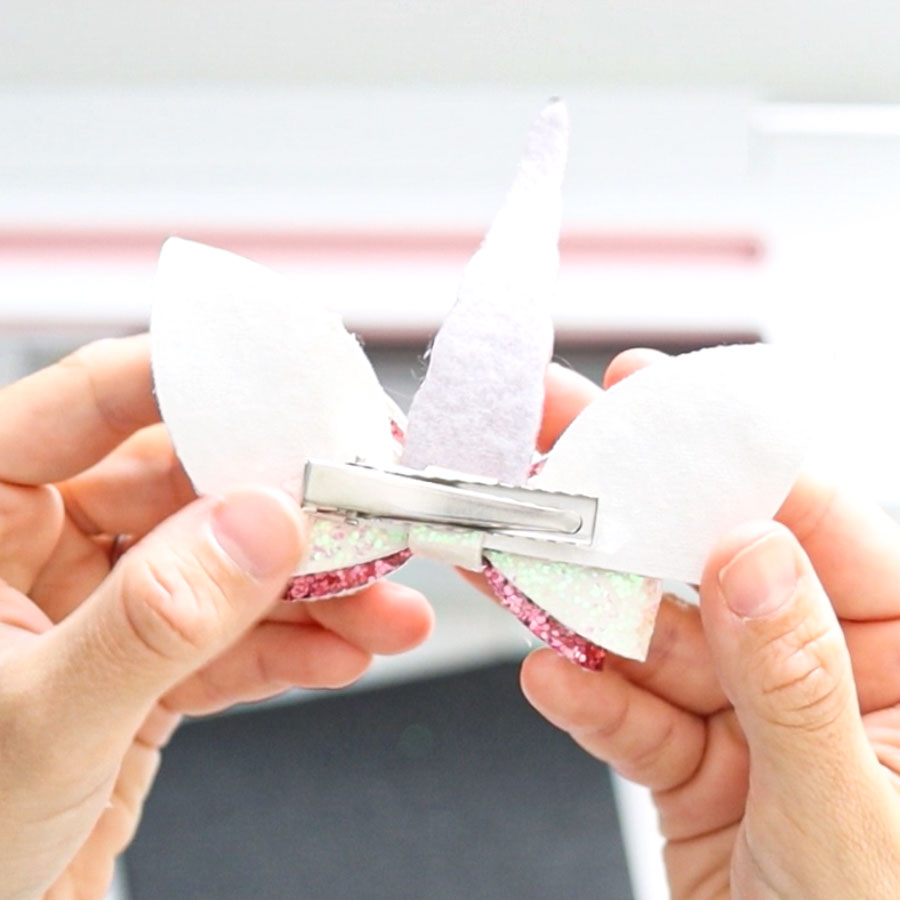
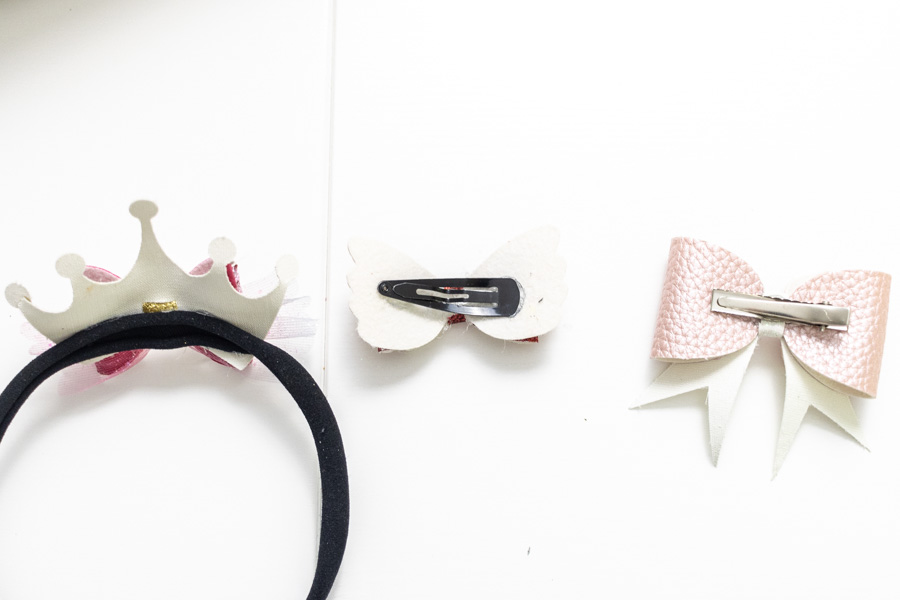
Finally, glue a hair clip to complete your bow.
Doesn’t it look lovely?
Any girl would love to wear this cute little bow.
Try using different types of hairbands, snap hair clips, etc.!
There’s no limit to creativity.
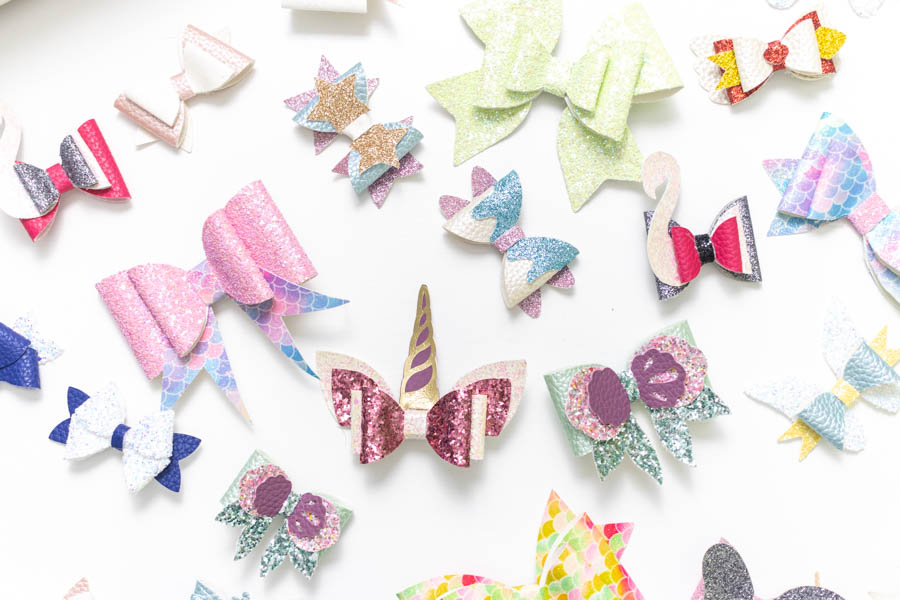
Free Hair Bows SVG Templates
Here are 18 bows you can use for your personal use! My great assistant helped me with the designing process.
Isn’t she so creative?
There’s one for any occasion and season!
To download the file(s), you need to be on a desktop or laptop and click on the button to trigger a download file on your PC. However, I’ve noticed that I can also download them from my iPhone.
Depending on your browser settings, your PC sometimes asks where to save the file, although most files will be in your download folder.
If the image opens in a new window (this may happen because of your browser settings), right-click on it, select the option “Save Image As,” and choose where you want to save the file.
SVG files look like web page files when you download them.
Oh!
Just so you know, I also have a library full of free SVG files and Printables for all my subscribers, a.k.a. Daydreamers. You can see a preview right here or get access by filling out this form.
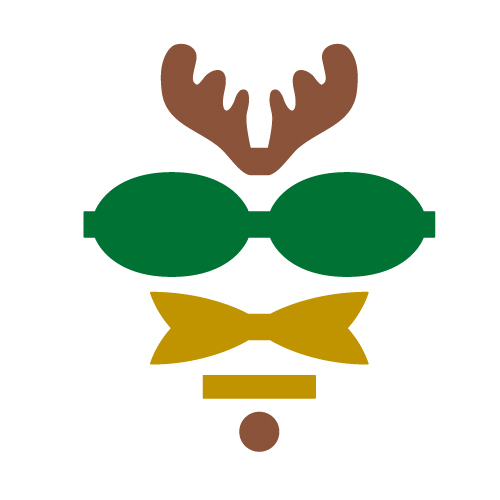


You can use the Reindeer one for Christmas.
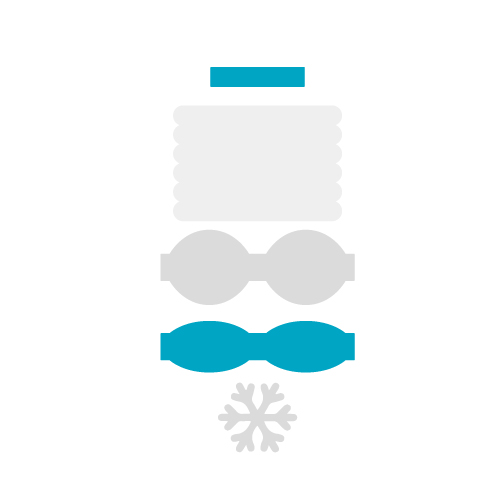
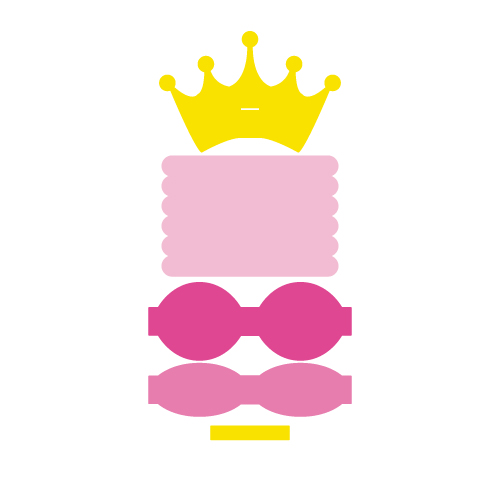
Important: Princess and winter bow have a square meant to represent a very thin fabric like tulle.
If you have a Maker machine, you can use the rotary blade, and if you have the Explore, you will need to use a heat-and-bond sheet and pink blade (or fine point blade dedicated to fabrics only).
Here’s a little graphic with the order of each bow in case you have any doubts about how to assemble them.
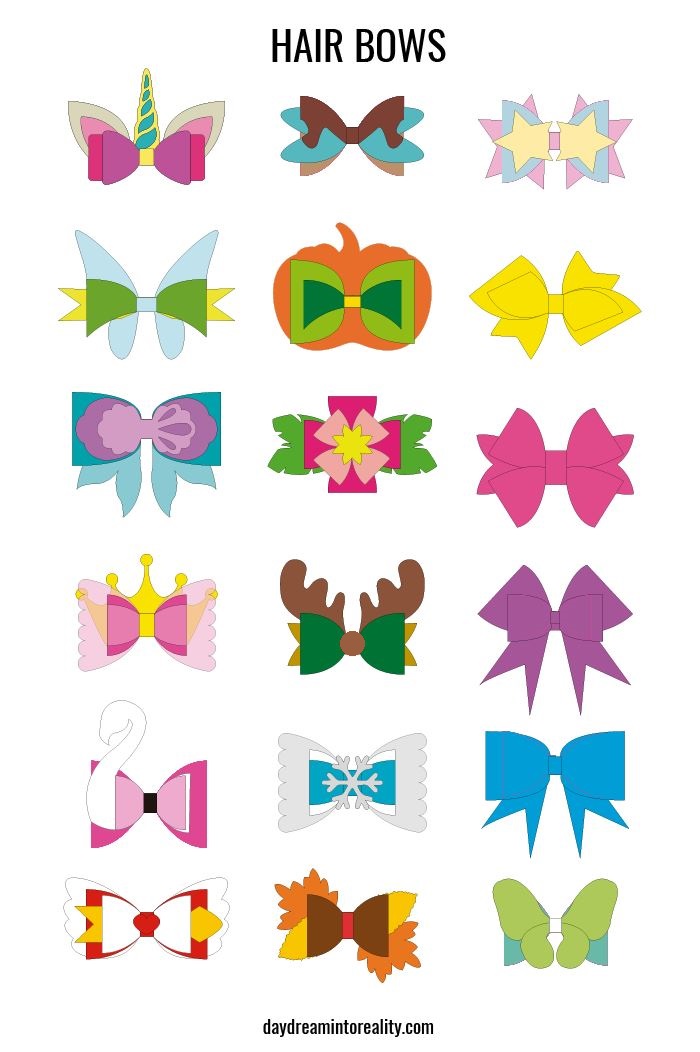
Which one is your favorite?
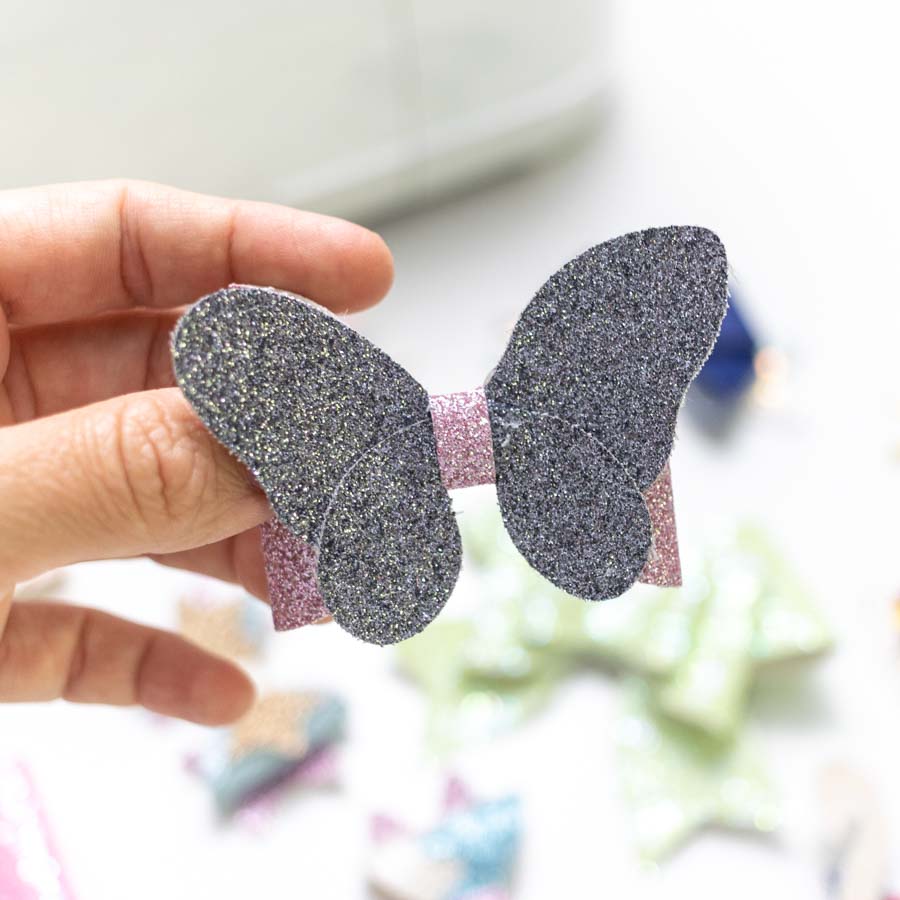
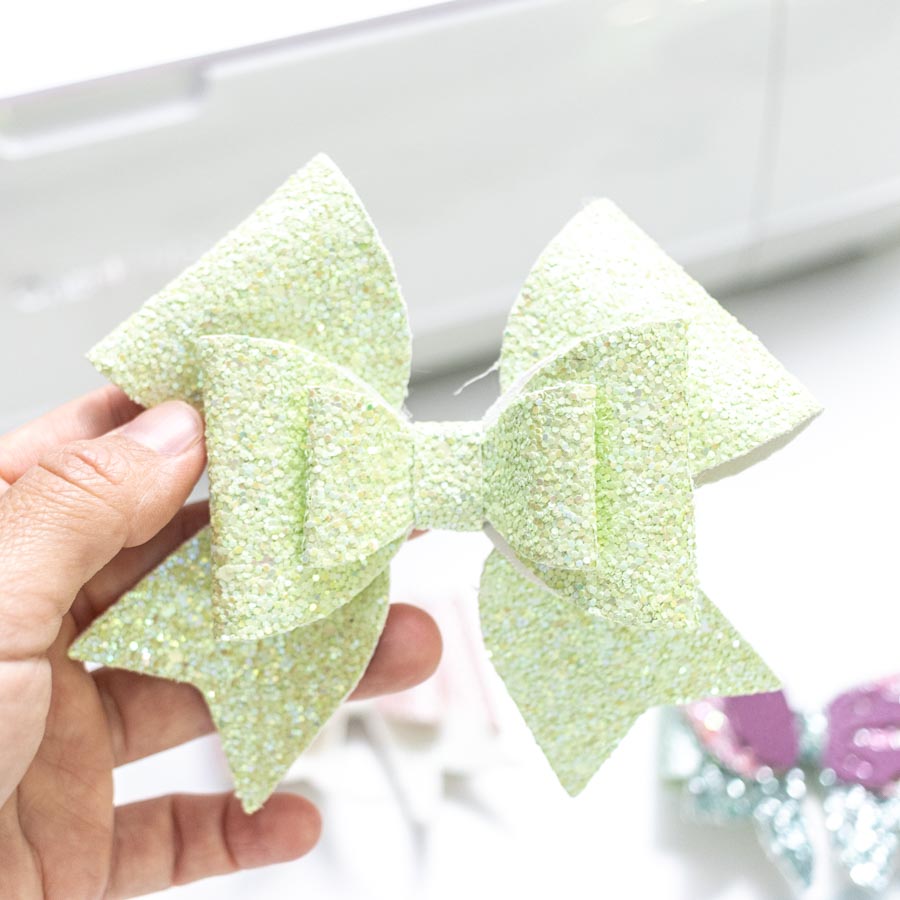
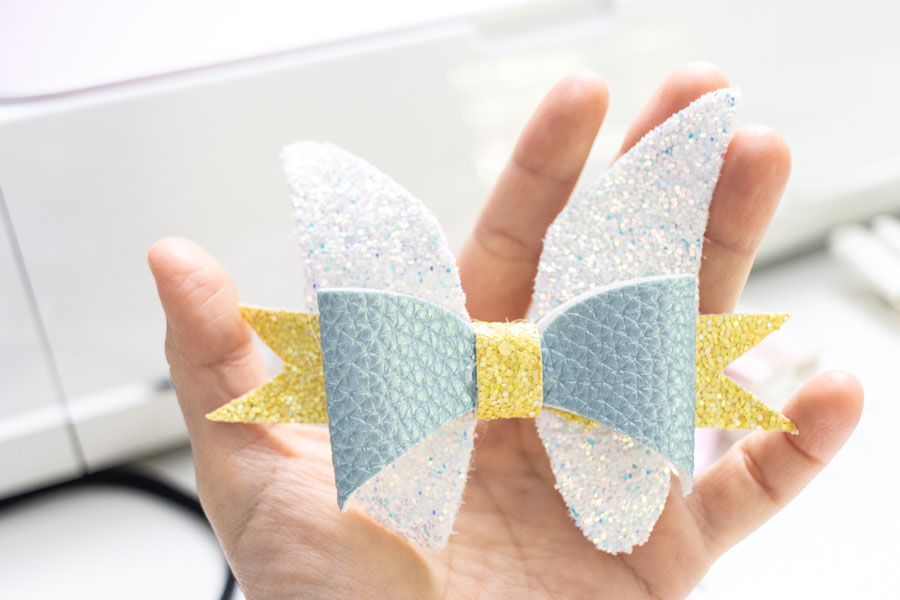
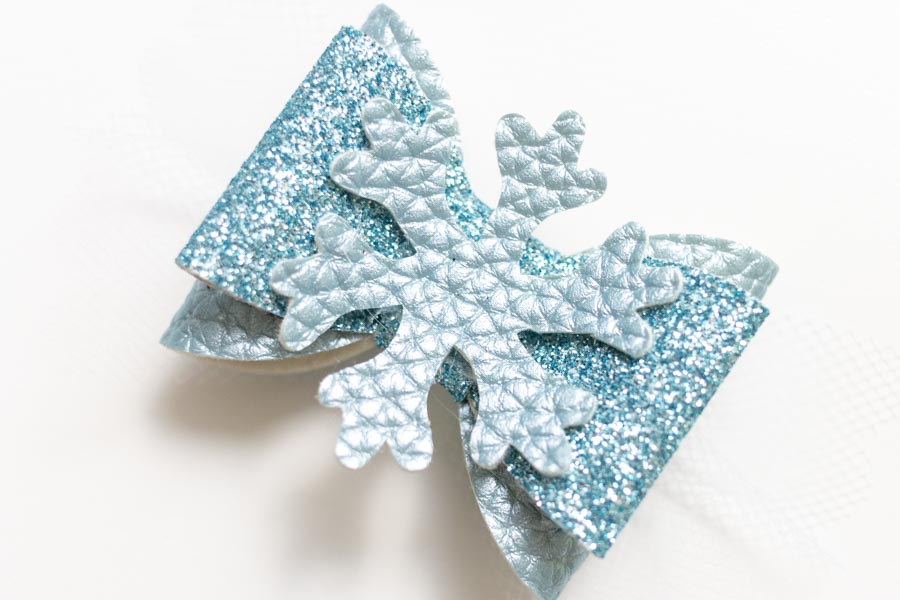
Look how some of these bows look once cut and assembled.
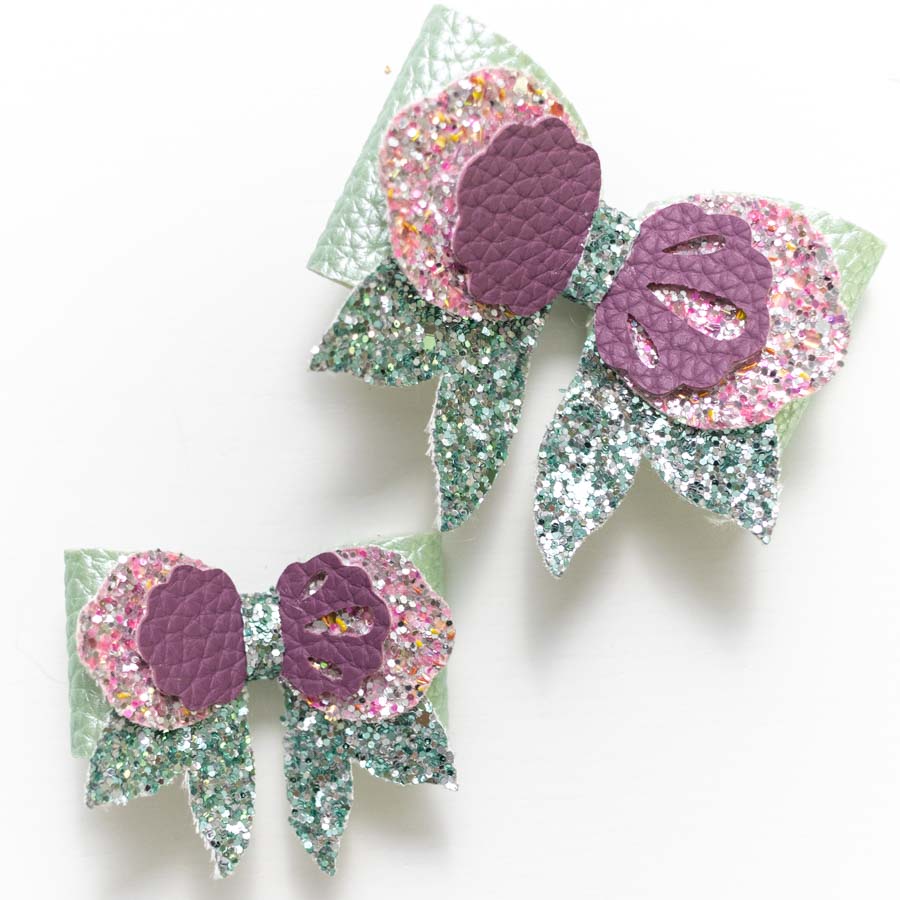
For the mermaid bow, I used super chunky glitter canvas. Can you see the texture in the photo? Those sheets have small pieces of colorful plastic or something thick I can’t quite tell.
Also, I would never use glitter canvas for the purple piece in the mermaid hair bow; the cut is very intricate.


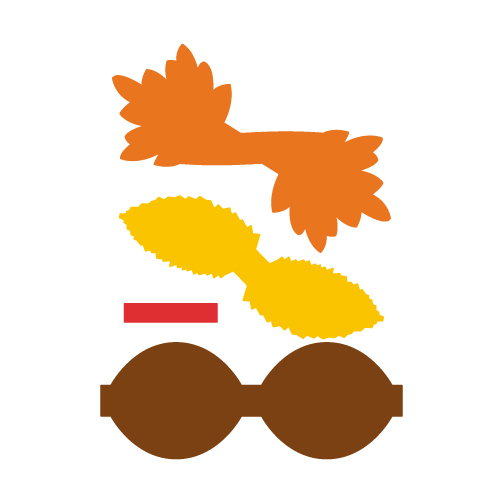
Swan Hair Bow Using Mermaid Glitter Canvas
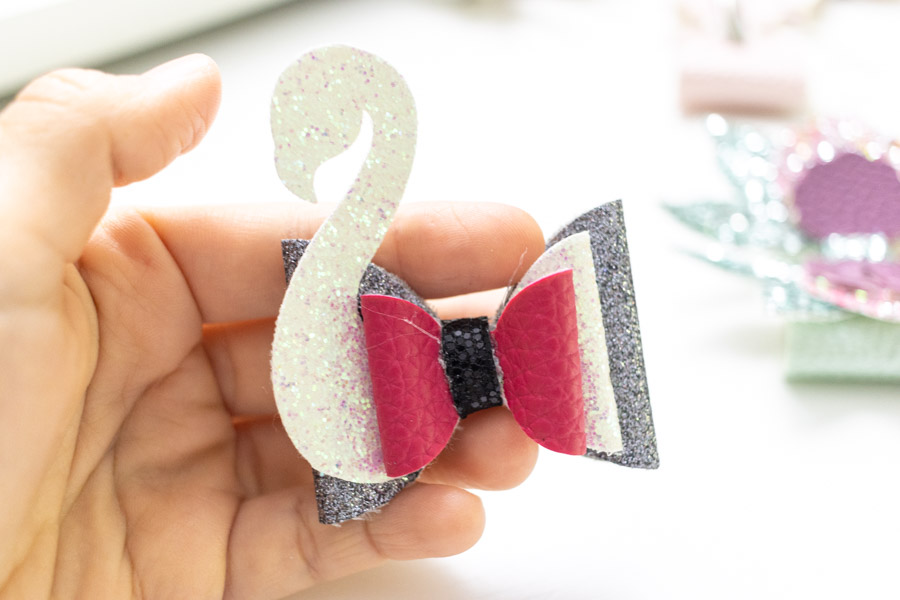
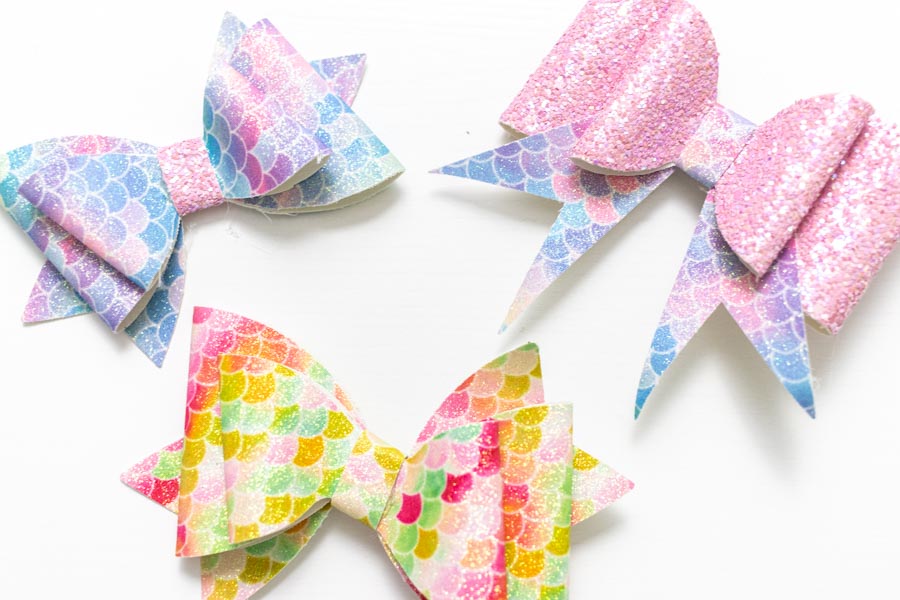
With mermaid scales glitter canvas, you can give any bow a magical mermaid touch.
Play with different textures and colors!
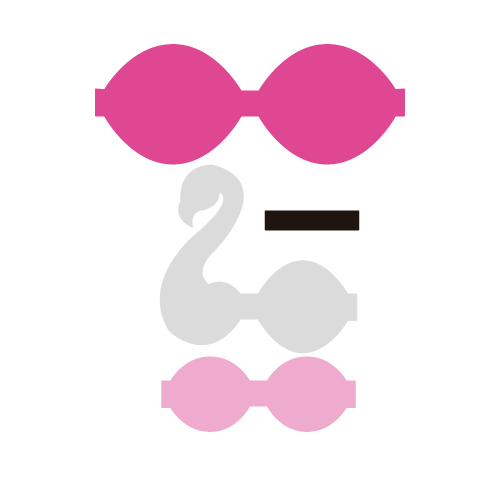
Fairy Hair Bow
If you look carefully at the winter and princess bow, you will see the tulle.
It’s so classy and different.
Winter Hair Bow Cupid Hair Bow Princess Hairband
If you make any of these bows, make sure to tag me on Instagram. And I would also appreciate a follow!
Don’t forget to pin this tutorial.
I’ll see you in my next article.
Thank you very much I can’t wait to make these for my granddaughters they will love them
Thank you so much! I can’t wait to make these for my granddaughter!
Thanks for the great designs!
Thank you…
hi i hope your well. as a newbie im getting so confused with the measurements do you have size guides for them all please. i keep messing up and cutting things to short. thank you for your help this is a beautiful site.
Thank you a lot!
Thanks alot you are a blessing
thank you . I’m going to try it
blessings
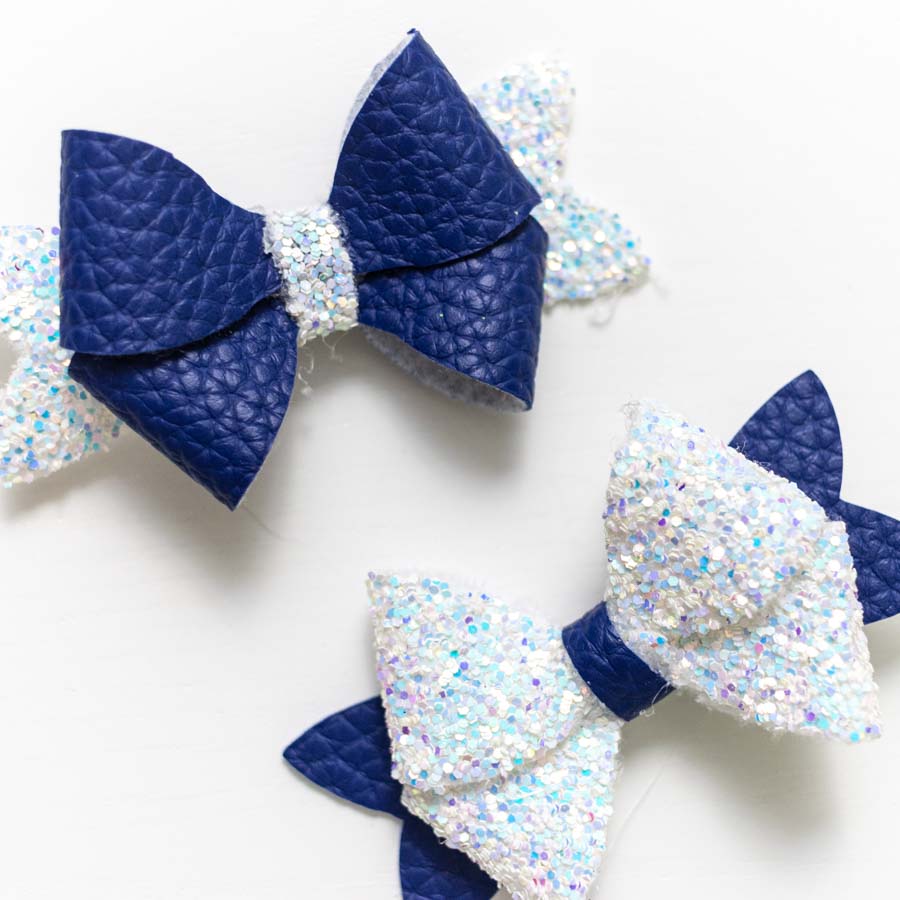
I am having a difficult time figuring out how a certain bow is assembled. What do I do? It is the four corners bow
I’m gonna have to do a step-by-step with that one soon.
Thank you so much for sharing, im new in this craft world, i apreciated your help
Hi started making bows for my girls and they are so happy to see what we can make together
thank u so much
Thank you
Going to make it
Had fun with this. Thank you. Very easy to assemble and modify for different ages
Am I allowed to sell these. My granddaughters friends want me to make some for them and I need to pay for products. They are so cute, even if I can’t sell I’m definitely making a few more
You can contact me for specific requests at daydreamintorealityblog@gmail.com
This was incredibly helpful, thoughtful, and generous of you to share. I made the unicorn bow today and was able to use the settings on my cricut that you suggested.
Hi Catalina,
Amazing bow ideas and thank you for all the hard work you put in for creating the patterns. I dont own a circut but would like to try out these bows.
Can you let me know if I can just print out the SVGs and use them as size guides or any other ideas as to how i can do them?
Thankyou!!
Yes you can! You would need to play with the printing size.
I can’t for the life of me figure out how to put together the Odd Bow design, I’ve cut out all the materials is there maybe a tip or two you have for that one? thank you so much for the amazing files.
I understand, You sort of have to play with it, I don’t know how to explain it 100%. I will see if I take some pics.
Thank you, love them
I am fairly new to the amazing world of Cricut. I just finished making a few hairbows for my son-in-law’s nieces for Christmas. Your tutorial has now taken me to the next level on them. Thank you!
So beautiful. Thank you so much for sharing. I appreciate big time. God bless
new to cricut and don’t know how to add you
Fill out this form.
Thank you so much your information on how to make bows and the settings for cricut machine and for the svgs your fyi is the easiest to understand than the Sooooooooooo many others I have looked at ????????????
Yay! Very happy to hear!
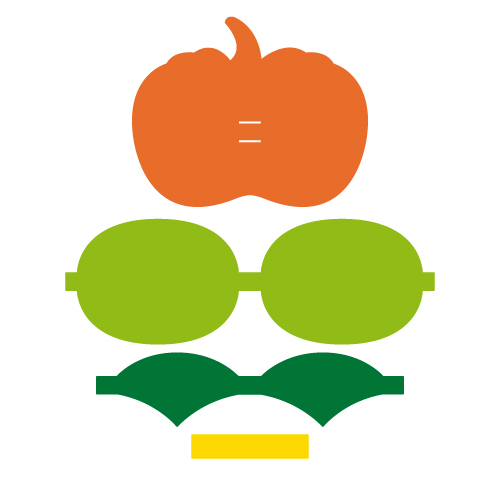
Where do I find the directions to put the pumpkin bow together. Im so lost
It’s like a little puzzle. There’s a little preview on the image that will give you an idea.
Thank you for your hard work and in-depth tutorial giving such detailed information. Your designs are beautiful. I’ve ordered my glitter canvas and faux leather, thanks for the link and machine set-up instructions.
You’re very welcome 🙂
i cant get the free templates to upload into design space and ungroup them, can you help me???
Are you using the button? Don’t upload the thumbnail.
Is there a way to download the svgs to an iPad or chrome book?
There is, but I have to put a guide together. But you can also look at YT videos for some tips.
These are beautiful designs and super instructions for making them. I am having trouble downloading your svgs though – I click download, it opens the image in a new page, and then click “save as” but the only option it gives is “web archive” which cannot be opened in Design Space. Please help with what I’m doing wrong! I’m on my apple laptop…
Thanks again
It worked when I right clicked and selected “download linked file” – thank you!
How o you save from Mac?
The same way I explain in tutorial.
which cricut is best to make hairbows
If you’re planning on making bows with fabric, I think the Maker is the best option.
Hi there I am trying to download to my iPad and It is just opening a new tab not giving me the option to save as, are there any pointers for IPad users? I am so excited to make these for my little one.
I am working on a tutorial for this.
@Traci,
I used iPad and just saved the file right after I clicked the download svg button. It saved the file to my iPad files. When I used the cricut design space app, I just uploaded the image by locating the svg file on my iPad Files folder. There was no problem with the iPad.
Thanks very much. I can’t wait to try them. The download worked perfectly
Happy to hear!
Ive found how to download the file via clicking on it and “save as”. I cant get it to open on Design space it only shows as a print and cut file. Sorry am I missing something?
You need to click on the “download” button. And if it opens on a new window, then you click on “Save Image As.”
Thank you so much this is a great help
You’re welcome 🙂
Thank you so very much, both for the free bow templates and the easy to follow instructions on making your own material settings on the design space. My daughter is going to love her bows.
Thank you so much Catalina. The bows look great and my fiancee is looking forward to making them. Downloads were quick and easy, just right click and select “save image as” and voila! Do you have a Youtube account we could follow?
You’re very welcome! I am happy to hear. Yes, I do, I plan on making more videos soon.
love the designs
🙂
Anytime I click on the download button it just opens up in a new tab and just shows the picture… I am on my laptop, is there anything I am doing wrong?
Never mind! it worked after I submitted the comment! I cannot wait to use these!
Your browser settings. On the new image, right-click and save image as.
Just downloaded all the patterns. Can’t wait to make them for my niece!
Yay!
Such gorgeous bows thank you for sharing. I was wondering if I can sell the bows I make? I didn’t see anything saying it wasn’t ok, but I wanted to be sure.
At the moment I only have personal use only, but will be working on a commercial license soon!
Thank you so much! I was able to download the files without any trouble! Cannot wait to make these for my granddaughter!
Finally, someone not having trouble downloading the files lol! Your granddaughter is going to look beautiful!
gracias, voy a probar <3
con mucho gusto! 🙂
For those of you struggling with the download, I did, too, at first. Click on the download button and it will open the template. Then right-click and choose save as. It will pop up the save option and should autofill the name and file type. It should then show the download at the bottom of your screen. If you click that, it will open the template in a new tab. But if you go to design space and click on upload, you will see it as an option. Upload as normal.
all the download button does is open a picture of the bows not an SVG. i think your links are broken
They do work. The file that opens is an SVG file. Depending on the settings of your browser you will trigger the download or not.
Links are not broken, I’ve verified this info over and over.
If you click on “download” and a new window opens, right-click on it and click on “save image as.” It will look like a web file, but that’s how SVG files are saved.
This needs to be done from a laptop, not a phone (I am trying to find a way to do it from a smartphone).
If you’re on a smart phone there’s, or there should be a download button on the top bar. Mine was where the bookmark button is. Hope this helps! Also thank your so so much for this page!!! I haven’t tried to tackle bows yet with my cricut. Now I can no worries!
Hi,
I have tried downloading the free templates from my laptop and iPad. I can’t get the downloads to work on either device. What should I do?
Blessings,
Randi
The bows should download right away from a laptop. Check out your downloads folder, the file should look like a web file.
Hi! I am trying to download the SVG but they are not working. I even tried to look in the library. I am on a laptop. I hope you see this!
The file should download to your PC. It looks like a web file, but that’s how SVG files look like.
hi i have not recieved in my email i have searched my whole email account in all folders and it is not in there anywhere
The bows are there to download from the article itself. Are you talking about the subscription?
I’m having a hard time downloading these.. can I get some guidance?
Make sure you are from a laptop and click on the download button. It should download automatically.
How do you assemble the reindeer bow?
There’s a little pic on this article that shows the final look of how the bow looks when assembled.
Hi my name is Waleska. i want to know if you have any halloween svg for bows.
There’s the little pumpkin one, but I don’t really have for that particular date!
I’m having issues getting the SVG’s onto my computer to work on design space! am I doing something wrong??
Just make sure you’re clicking on the “download” button. Thye should download to your PC.
I love these, however, I am having a tough time with the 4 corners bow. When I fold over the portion that is to be folded I see a lot of the back side of the bow. Could you advise please? Thank you! 🙂
It’s really like a puzzle and hard to explain. I do have a little pic of them in this article. They are the white and navy blue ones next to the swan bow. I hope this helps 🙂
The little picture of the 4 corner bow does NOT help whatsoever. I thought this was supposed to be a tutorial for all of the bows?!
It’s like a little puzzle to put together. I think this tutorial is quite complete, I did the tutorial for the hardest one, and the fact you have 18 bows to choose from and play with makes it the best tutorial you’ll ever find. I will see if I have a chance to add a little step by step at some point (currently 8 months pregnant).
There’s a picture of it too, next to the swan bow at the bottom.
I am having the exact problem and for the life of me, I can’t figure it out!
I don’t know why 🙁 The files should download once you click on the button the file looks like a web one, but that’s how SVG files work.
Catalina gracias por compartir tanta belleza de lazos y muy creativos. Dios te bendiga me encantan todos es difícil decidir mi favorita. Acabo de seguirte en tu blog y me gusta mucho. Te agradezco que compartas los archivos para cricut es difícil encontrar gratuitos y que gusten tanto.
Saludos desde Costa Rica
Con mucho gusto! Me alegra mucho que te gusten, ya tienes uno favorito?
I just started making bows for my granddaughters and they will love these! Thanks so,UCB for the files and great directions.
You’re welcome. I am sure they will look adorable!
Thank you, thank you, thank you! Where are you doing your mission work, and Praise the Lord for you and your family. You will be in my prayers
You’re very welcome! Thank you for your prayers.
Thank You So Much for the Awesome Bow Cutting Patterns and Wonderful Tutorial on Making them I have just Bought My Cricut Maker and I am sooo Excited to also find your Website too!! It’s a Website I definitely will be Bookmarking and Coming back to often Cheers Kylie in Australia ????????
This makes me so happy to hear! I hope your bows look adorable!
I LOVE LOVE LOVE LOVE all these bows! I have 3 granddaughters who love them too! Thank you so much for providing these SVGs for us. I do have one question. The pattern with the pretty scalloped edges is a difficult one for me. Can you please send a picture of it completed? I can’t understand how to fold so the scalloped edges are on the outside.
thank you again so very much!
For the princess and winter bow? You need tulle so you can assemble with ease. You can see pictures of most bows at the end of the tutorial!
Hi, I just want to thank you for being so generous. Thank you so much for sharing all of these. I’m a new follower from the Philippines.
You’re very welcome 🙂
Thank you so much for these patterns. I love them. After 4 grandsons, I have a granddaughter.
So exciting! She’s going to look adorable with them!
Oh my GOODNESS! I just came across your page and I can’t stop reading your tutorials! They’re all tho ha I love to do and you have fantastic tips and tricks to accomplish them! Thank You!
You’re welcome! I am glad I can help!
Love, Love, Love these bows.
I am glad you like them 🙂