Hello Daydreamers!
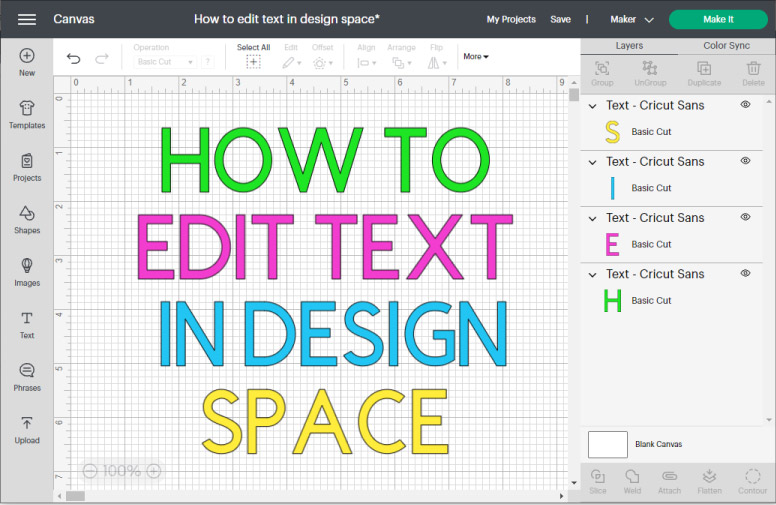
Get ready because you will master how to edit text in Cricut Design Space like a PRO by the end of this article! I want to teach and empower you with the knowledge to come up with fantastic ideas on your own!
Text is a huge deal in any design. You can accomplish so much with it, and that’s why you need to get hands-on and learn all the possibilities you have with the Cricut Machine.
Learning the basics and more advanced options available within the Cricut Design Space area will allow you to personalize things and do them beautifully!
This tutorial is quite juicy, and since I don’t want you to get lost, these are the topics I will be covering.
- How to add text
- Editing text Menu (operation, curve, offset, font, kerning, change spacing, advanced settings, etc.)
- Using the “Attach” tool with text in Design Space
- Thinking outside the box when editing text.
Tip: This tutorial builds upon the skills I teach in every step. If you’re just starting with your machine, I suggest you read and follow each step.
Feel free to check out other links in this article to learn more about a specific topic.
Are you ready?
Let’s go ahead and get started!
Note: This article has been updated; therefore, some pics may look different if you’re coming from IG or Pinterest.
How to Add Text to Design Space
First things first!
To add text to the design area, you need to click on the T (text) icon located on the left panel of the canvas.
A box with the word “Text” will appear on the canvas. The initial text will go away if you start typing, and what you’re writing will appear on the canvas.
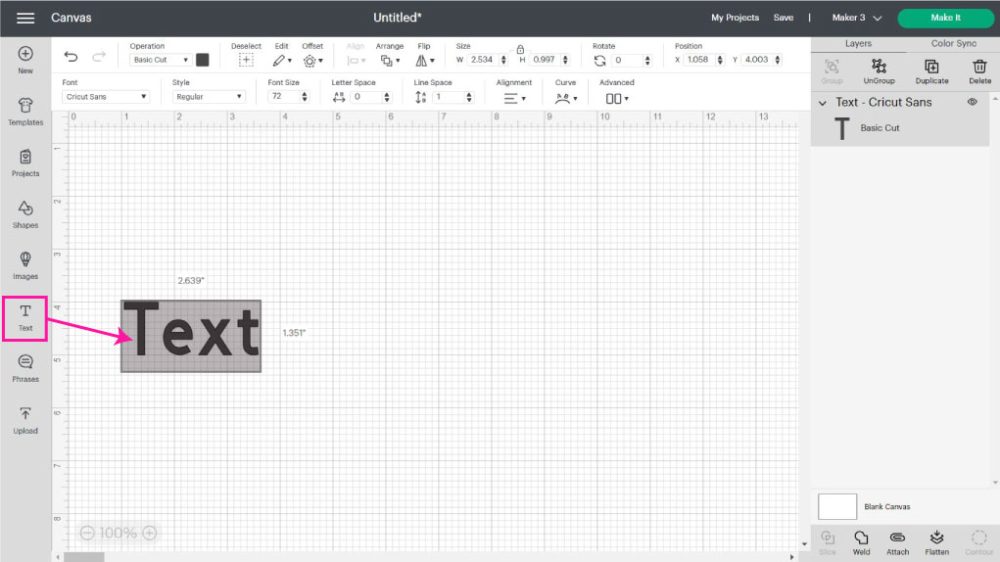
To exit the text tool, you need to click on an empty area of the canvas; and if you’ve already typed some text, you can easily edit it by double-clicking the text itself.
Editing Text Menu
When you add text to Design Space and select it, you’ll activate certain features or settings that otherwise would be greyed out.
Check out the following screenshot, and let’s see what I will be covering in this section.

- Operation
- Offset
- Font
- Font Style
- Size, Letter, and Line Space
- Alignment
- Curve
- Advanced
Using Operation with Text in Cricut Space
“Operation” is how you tell your Cricut what action you want it to perform; you’ll have different options depending on your machine.
Here’s a helpful table with all the machines available and the operations you can perform.
| Operation | Machine | Maker Machines | Explore Machines | Cricut Joy |
| Basic Cut | x | x | x |
| Wavy | x | ||
| Perforate | x | ||
| Pen | x | x | x |
| Foil* | x | x | x |
| Score | x | x | |
| Deboss | x | ||
| Engrave | x | ||
| Print then Cut | x | x | |
| Guide | x | x | x |
*Foil has fine, medium, and bold tips with Maker and Explore machines. However, with the Cricut Joy, there’s only one standard foil tip.
Let’s see from a Cricut Maker machine perspective how every operation looks when using text in Cricut Design Space, and let’s have a little chat.
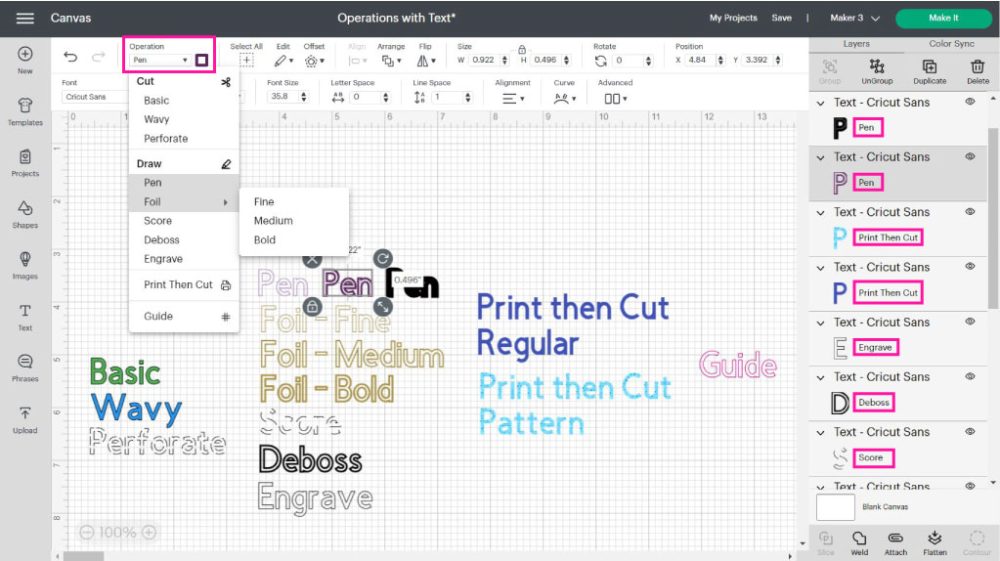
From the “Operation” drop-down menu, you can tell your machine what action you want it to perform, but you can also choose the different colors for the materials you want to use.
Next to “Operation,” there’s a little box. From this box, you can change the colors of specific operations (Basic, Wavy, Pen, Foil, & Print then Cut).
With the exemption to “Basic” and “Wavy,” all operations have a distinctive appearance on the canvas area. And some operations like “Foil” and “Pen” allow you to see how your text would look on your project when using different sizes of pens or tips.
Print then Cut allows you to use patterns as well.
Learn how to use Print then Cut with Cricut.
“Guide” is a new “Operation” that allows adding notes to your project or details that won’t be sent to your machine.
You can also see what operation every layer is set at on the layers panel.
Offset Text in Cricut Design Space
I love adding borders or outlines to my projects!
If you like the look of the following screenshot, you will love using the offset tool with your text in Cricut Design Space.
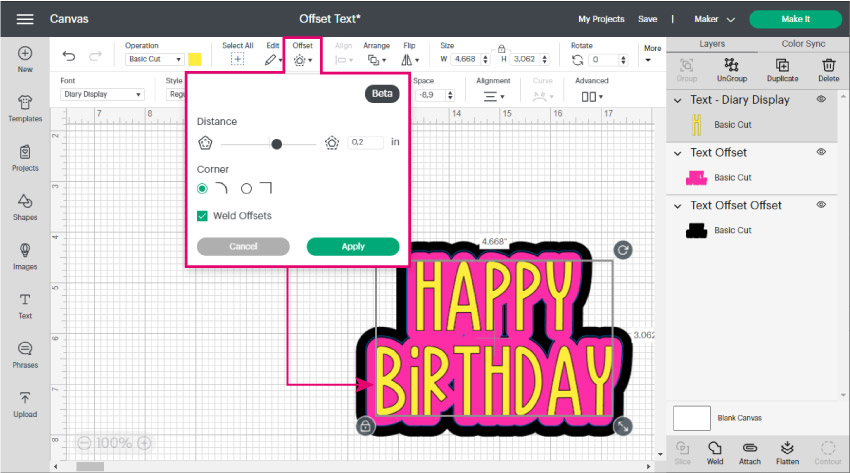
To add a proportional outline to your text, type it, then click on “Offset” and move the little slider to the right. You can choose between rounded and square corners.
If you want your offset to be a single layer, check “Weld Offsets,” but if you don’t, just leave it unchecked.
There are a lot of things you can do with this little tool. Check out how to use offset to perfection in Cricut Design Space.
Font Type
Every time you type something, Cricut Sans will be the default font. If you want to change the font, click on the Fonts drop-down menu and choose your favorite font.
Keep in mind that not all fonts are free. If you have Cricut Access, you can use most of them. However, some of them need to be purchased before cutting your project.
If you don’t know what Cricut Access is, read this excellent guide I put together.
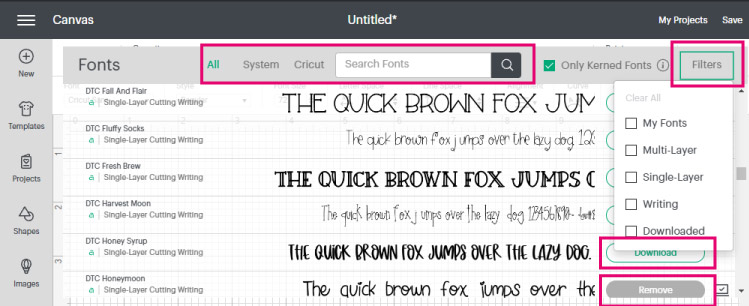
If you want to stick to free fonts, make sure to filter by “My Fonts” (This will include your system fonts and some Cricut Fonts that Cricut may have free at the moment.
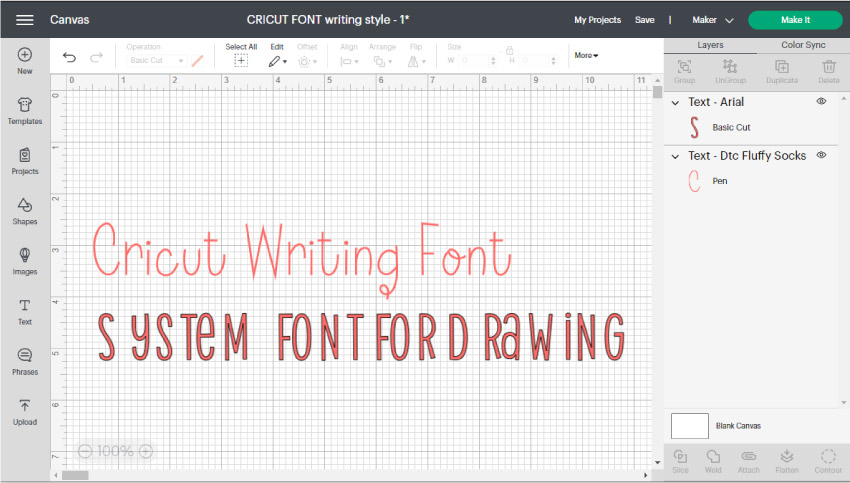
Something cool about Cricut Fonts is the writing and Multi-layer Fonts.
Writing fonts are great for Cricut Pens and the Foil transfer kit because they will give a hand-drawn effect to your projects. Multi-layer fonts are a type of font that consists of two or more layers.
Using Kerning in Cricut Design Space
In the past, if you wanted to use a cursive font in Design Space, you had to do a lot of steps to fix it because the letters weren’t joined.
To have joined cursive letters, you must check “Only Kerned Fonts” in the “Font” drop-down menu.
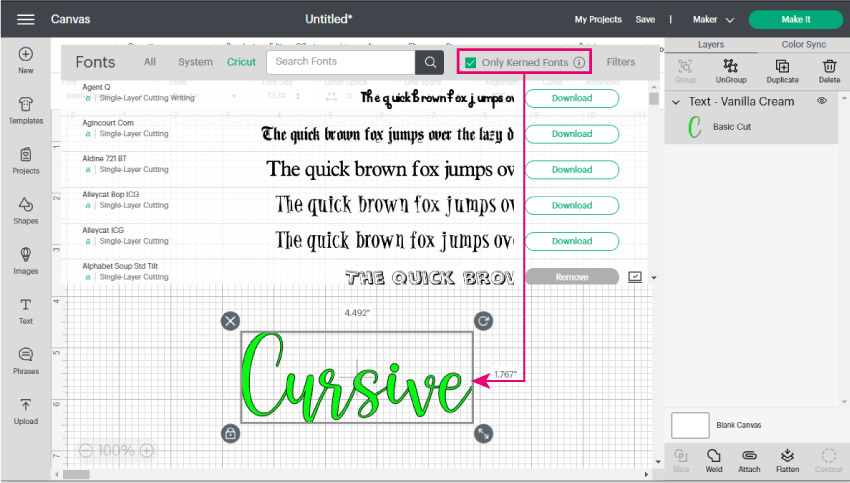
Kerned fonts will look “welded” when you send your project to cut, so there’s no need to “Weld” them on the canvas area because you won’t be able to edit your text.
You’ll find a font that won’t work very well with kerning in Design Space from time to time. If that’s the case, let me show you how to fix it.
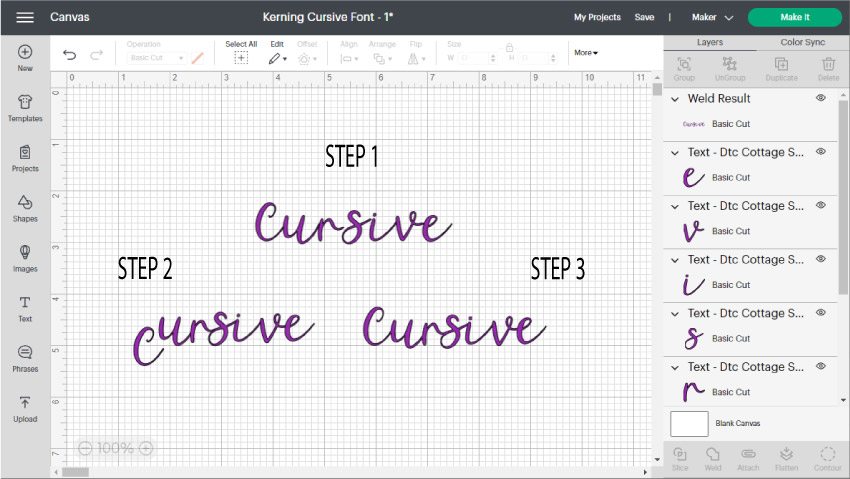
Step 1: Write your design text, click on “Advanced,” and then select ungroup to letters so you can manipulate each letter.
Step 2: Connect the letters that need it.
Step 3: If you were going to cut your project right now, all letters would be cut out individually. To make this a single word, select all letters and click on the “Weld” tool located at the bottom of the right panel of the canvas area.
Font Style
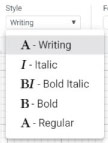
When you click on font style, you will be given a drop-down menu. Regular, Bold, Italic and Bold Italic are the most common options.
However, if you are using Cricut Fonts, you may have more or fewer options like “Writing.”
The Big Difference between Cricut Fonts and System Fonts
There’s a big difference between the Cricut and System fonts. The Cricut Fonts are designed to fit all of the potentials of your machine.
You have the Writing – as a font style – and the Multi-Layer options.
You can write with your system fonts – by changing the operation from cut to “pen,” but it would look more like an outline of the font rather than a handwritten effect.
If you are like me and like “free,” you can get away with free fonts if you know what to look for. I teach this in my “Best free and premium fonts to use with Cricut” article.
Font Size and Letter Spacing

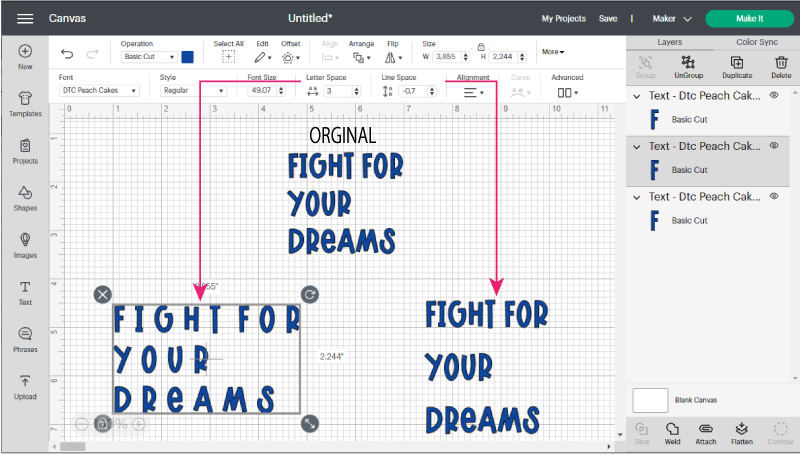
As the name says, the font size will allow you to change the size of your selected text.
Letter Space is excellent because you can adjust the space between letters.
Line Space is excellent; you can either increase or decrease the length of text lines this time.
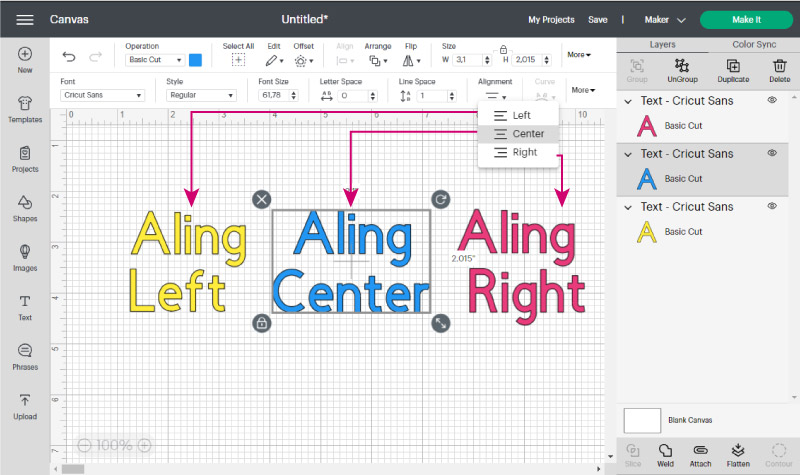
Text Alignment
This option will allow you to align paragraphs in three different ways:
- Left: Selected text will be aligned to the left
- Center: Selected text will be centered
- Right: Selected text will be aligned to the right
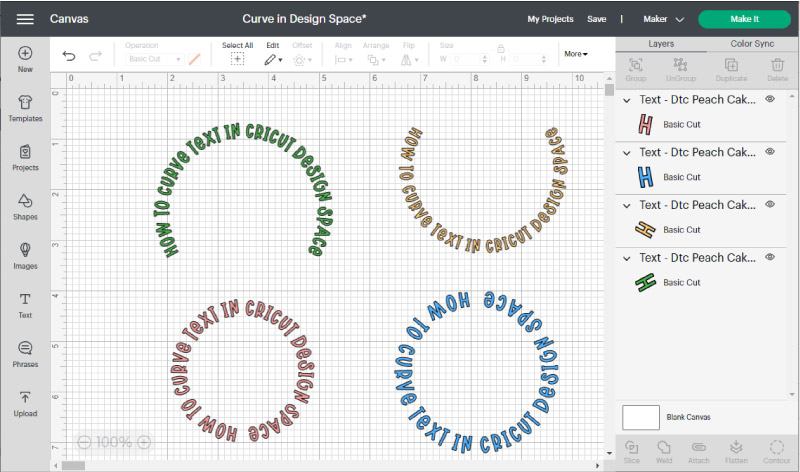
Curve Text
I love this feature! Curving text can add an extra touch to any design. However, this option is only available for one line of text at a time; no paragraphs!
Tip: Ensure that when you write your line of text, you don’t have the cursor on the second line of the text block because it will keep the “Curve” tool greyed out.
Select your text line and play with the curve option. The further you are from the center, the more curved appearance you will add to your text.
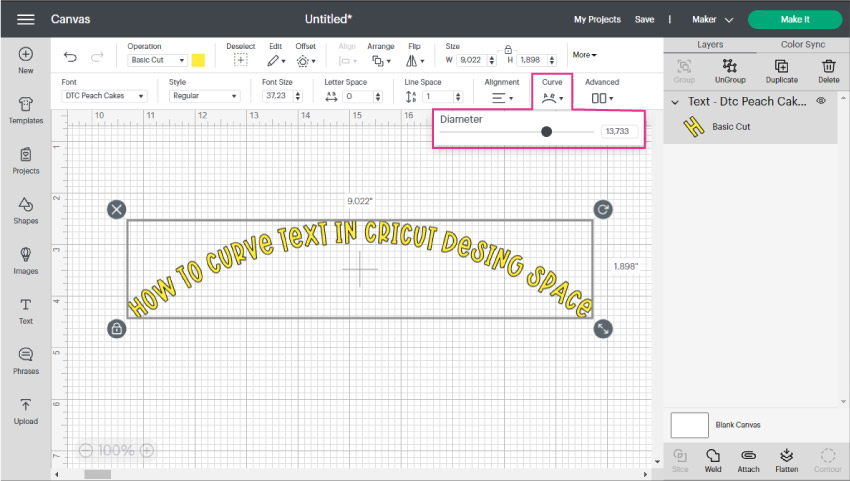
Here are some examples of the same line of text while curving positive and negative.
Advanced Options
This is by far one of my favorite options, and you may think it is not easy because of the name of this icon!
I am using a Multi-Layer font called A Frightful Affair for this example. This font is made out of two layers. An outer (black) and inner (purple) one. Each layer may represent a different material color when cutting your project.
Using this font, let’s see how each of the “Advanced” options works.
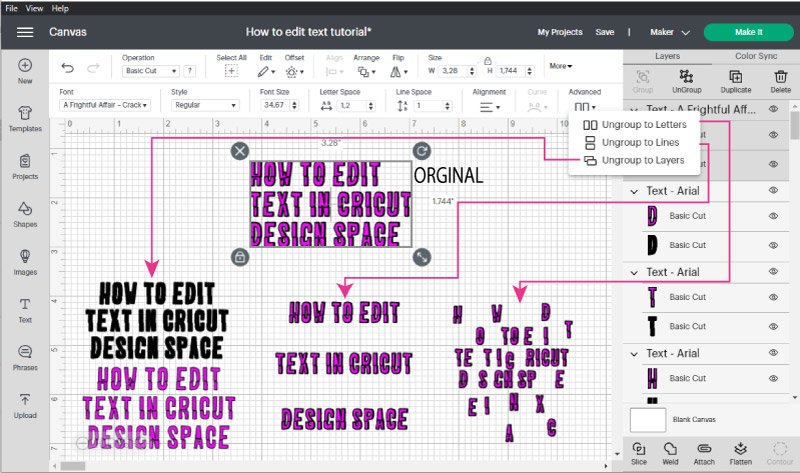
Ungroup to layers: This option is only available on multi-layers fonts. When you click on this setting, you can separate all of the layers that make up the font and edit them individually. This is great if you only want to use a particular text layer.
Ungroup to lines: If you need to write a paragraph but need all text lines on their own, this tool will be your best friend.
Write your paragraph, align and space your fonts, and click on ungroup to lines. Then, you can edit each line of text on its own!
Ungroup to Letters: This option allows you to separate every letter into a different layer; it can be applied to a paragraph, line of text, or just any word.
Notice that the font kept the multi-layer attribute when you ungrouped to lines and letters. So, If you have a multi-layer font, you can ungroup to layers after using either ungroup to lines or letters.
Vertical Text in Cricut Design Space
Let’s see the following image to have vertical text on your projects.
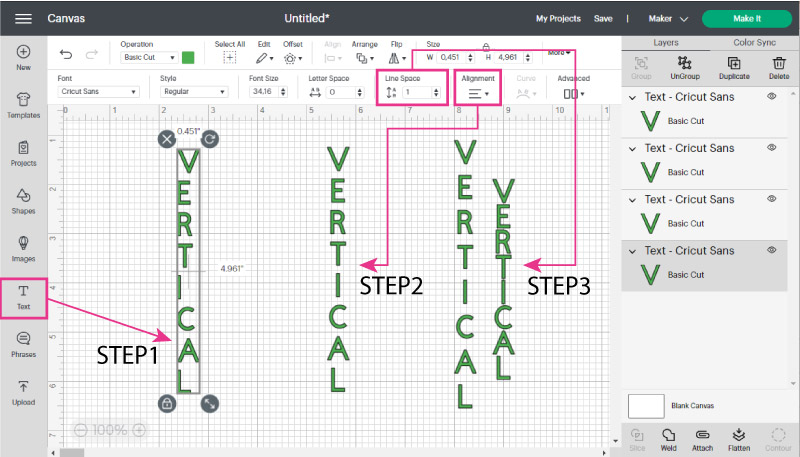
Step 1: Click on the text icon, then press “enter” on your keyboard after every single letter. For instance, “V” enter “E” enter, and so on, until you complete your word.
Step 2: Select text on canvas, click on “Alignment,” and select “center.”
Step 3: You can adjust “Line Space” to make letters closer or apart.
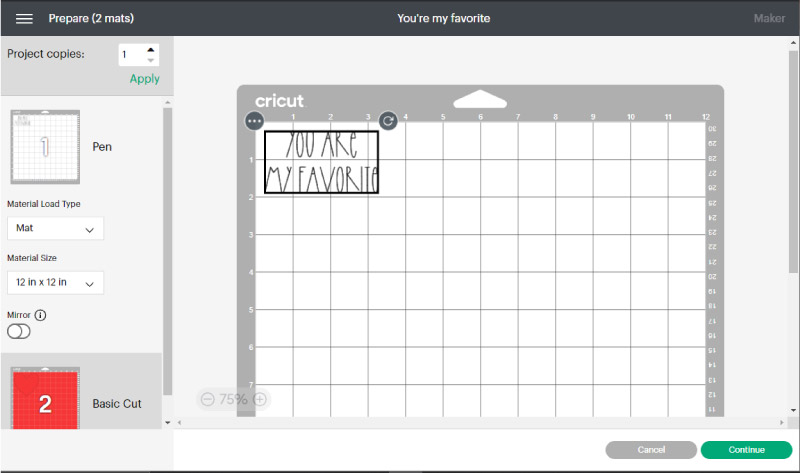
Using the Attach tool with Text in Cricut Design Space
Let’s say you want to add text to a card using pens, foil, etc. You need to tell your machine where you want that text.
Attach joins the room!
In my opinion, “Attach” is the most critical tool inside Cricut Design Space. Usually, this little setting is what causes THE MOST HEADACHES for beginners.
Let’s see the following screenshot. It’s a small heart shape with some text on top of it. Select both layers and click on ” Attach ” to tell your machine you want your text in the middle of the heart.
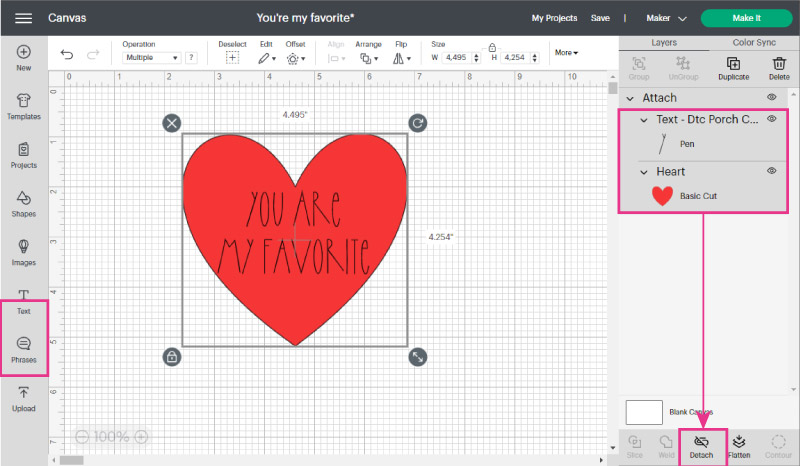
When you click on “Make it,” everything will look just like it’s supposed to!

If you forget to attach your project, your text will be on a different mat, and it will drive you crazy!
Check out my “Weld, Attach, and Group” tutorial if you’re just learning your machine.
Think Outside the Box when Editing Text in Design Space
I want to show you two superb examples of what you can accomplish when you learn how to edit text in Design Space and turn a boring-looking design into a unique and creative one.
Making Text into a Heart in Design Space
How about using multiple words to make a heart in Cricut Design Space.
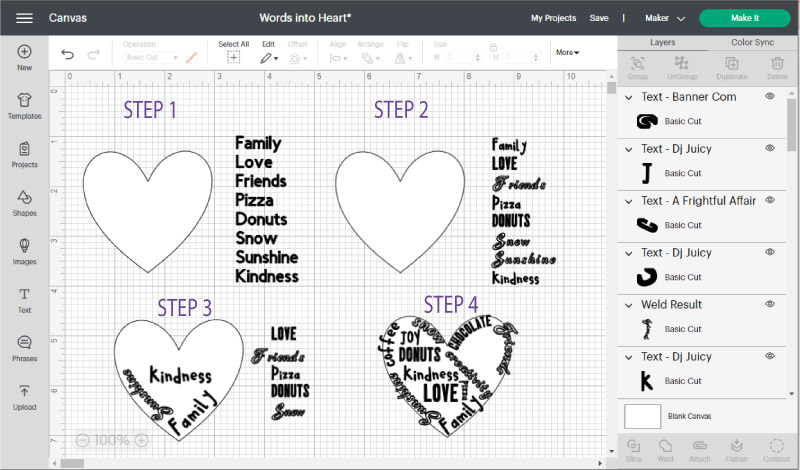
Step 1: Add a heart and text. Choose meaningful words, such as the name of your little ones, the food you love, what you like to do, etc.
Step 2: Choose three fonts you like (less is more) and change the initial fonts. For this example, I used:
- A Frightful Affair
- DJ Juicy
- Banner Com
Step 3: It’s time to fill your heart. Use the curve tool to fit some words around the edges. Then be creative and rotate in different directions to add life to your design.
Step 4: Continue adding text. If you still have space for more words, don’t be afraid and add more. I added a couple of ones like chocolate, daydreams, joy, etc.
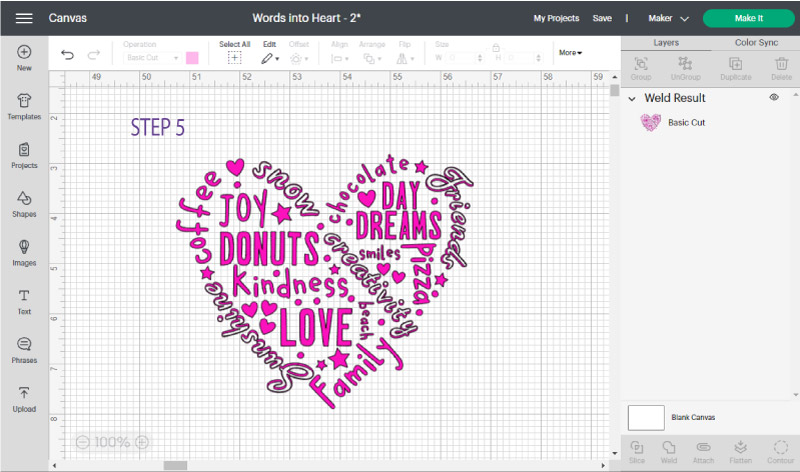
Step 5: If your heart has some spaces where you can’t fill a word, just add shapes! Small circles, stars, and hearts. When your design is complete, hide the heart and either weld (if you want a single layer) or attach.
Turn Plain text into a Beautiful quote.
Sometimes we think we need to have excellent hand-lettering skills to have a fun design. I wish I had some of those, but let’s just say I am not gifted in that area, lol. (One day, I must learn). So what are we going to do?
Well, work with what we have, fonts and shapes.
This is how we do it:
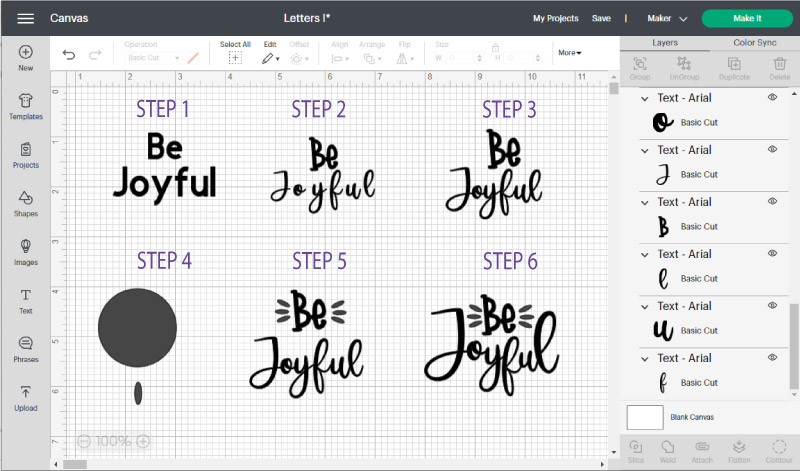
Step 1: Add two different lines of text. (Or one paragraph and ungroup to lines)
Step 2: Pick two fonts that look good together. Regularly, this is the hardest part. It took about 15 minutes trying to pair them. But you’ll get better with time.
These fonts are:
- DJ Flirt for the “Be”
- Sweetie Almeera Script (You have to buy it, but it’s BEAU-TI-FUL
If using a script font, uncheck “Kerning fonts only,” as you learned in this tutorial.
Step 3: Organize cursive font by reducing letter spacing and then ungrouping to letters (click the text and go to the advanced options)
Step 4: Add a circle and unlock proportions to make a small oval.
Step 5: Duplicate and rotate the oval to complete glyphs. I usually like to do the ones on the left, and then I select and copy them and flip them horizontally.
Read my how-to mirror and flip tutorial.
Step 6: If you didn’t ungroup to letters in step 3, now it’s the time to do it. Modify each letter, so it hugs the glyphs and the “be.”
Experiment. I had to double the size of the letters J and L and bring the other letters down.
Step 7: When you are happy with the result, select all of your designs and click on “Weld.”
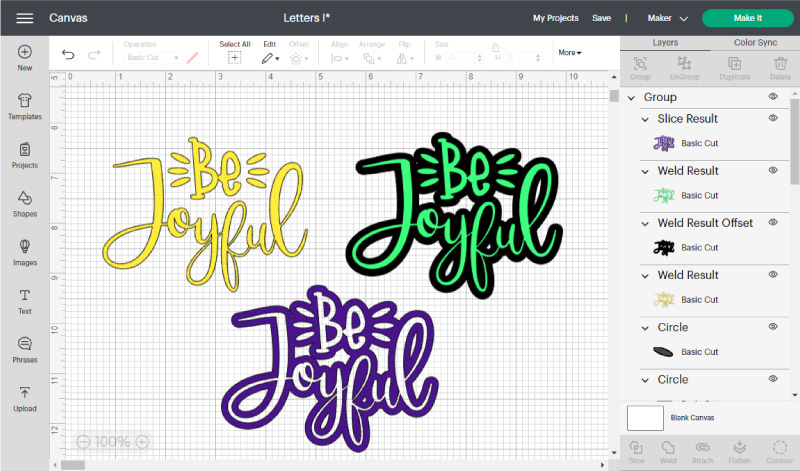
The yellow layer is how it looked, but you can edit the text even further!
What about adding an offset.
So beautiful!
And to edit, even more, go ahead and select both the original and the offset layers and “Slice” at the bottom of the layers panel.
You have something new.
You see!
It’s not that hard. You just need to practice, practice, practice!
That’s it! You are a Pro Now!
So…
What did you guys think? What kind of projects will you make now that you are a Pro at editing text in Cricut Design Space?
I can’t wait to hear all about so make sure to comment on the section below.
Please share it!
Do you know it takes me over 25 hours to complete a single Cricut article? I know it’s wild, but I want to make sure you understand everything!
I would appreciate your support on Instagram , Pinterest , and YouTube as I try to grow my audience and continue producing great content!
Thank you for spending your time putting this tutorial together. I appreciate the photo shots of Design Space and showing which keys to select. I’ve spent the afternoon trying to addtext to a shape. Once finding your site, my project meets expectations. Look forward to learning from your site.
I’m glad I was able to help 🙂
Your tutorials are great. Can they be printed?
Thank you so much for this tutorial. Your tutorials are easy to understand and follow. I will keep learning with your information.
Hi,Can you give me an advise,what is minimum fonts size for engraving with Maker?
Thanks
I haven’t engraved with Cricut yet. I think the size is fairly small. I mean, you can do jewelry; usually, those projects use small fonts.
Wow…thank you for this tutorial. It is so helpful.
Super helpful! I learned so much with your help, it will make everything so much easier for me, and better looking too!
thanks so much!
This was really helpful. I have watched several videos as I learn to navigate my Cricut. I have some experience with text before Cricut but this tutorial was very easy to understand and your pictures explaining each step really helped. Thank you.
This is such a fantastic tutorial! Thank you so much for taking the time to write it! I’m still new to my Cricut Joy and have just started making some cards. I thought it would be nice to print something on the back saying that it was handmade etc but couldn’t work out how to make sure the text is positioned where I want at the bottom in the same place every time. If you have any words of wisdom I’d be extremely grateful to hear them please ☺️
There’s not an option like that for now. I mean you can do it manually by flipping your material and then, on the mat preview position where you want the print.
Hi, I really hope u can help me cause I am new to cricut and a design space dummy. I’m trying to cut a font out to use for a iron on vinyl and the font I want to use is from dafont.com and then I take that font and insert it into my phonto application on my cell phone and then I upload it to design space on my android (I don’t have a computer to use design space on) and when I try to hit make it it says please adjust the affected layers and click OK. I feel like a idiot because I go 2 the layers panel and I just see the one line sentence text and i don’t understand how to see the layers and what I’m suppose to do to get past that error. the light bulb in my head is not coming on and I get so irritated and I’m hoping u can dumb things down for me and explain this to me. thank u So so much
Most likely you have a sizing problem, make sure the size of your design doesn’t exceed your machine’s specifications.
LOVE LOVE LOVE this.
Best I have read and understood
after 9 hours of watching and trying too many others! Thank you …thank you
You’re welcome 🙂
Love this, very helpful! I’ll be looking for a more if your tutorials! Thanks!
You’re very welcome 🙂
Do you have Instructions in a printable format?
Not yet! Working on an Info-Product.
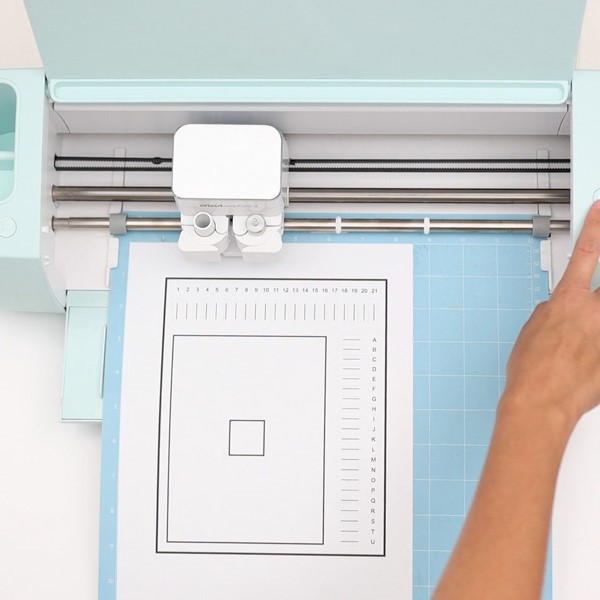
Hello! I am new to Cricut and bought the Explorer Air 2 machine to print the delivery addresses for my daughter’s wedding invitations. I have spent too many sleepless nights awake watching tutorials on how to best print envelope addresses (return addresses are coming pre-printed on the back flap). Your tutorials are the best by far! The only part I can’t figure out is how to remove the rectangle shape ‘guide’ prior to printing. The machine prints the address then proceeds to print the outline of the rectangle. Also, to change the address for subsequent envelopes, do I simply double click the text box to edit (assuming I don’t weld the text) prior to printing the next envelope? Thank you!!
I am glad you like my tutorials! I have an awesome tutorial on how to make and address envelopes in Cricut Design Space.
@Deborah, yea I wonder the same thing. After I save and come back to edit I can’t get it to allow me to edit.
Dear Catalina,
Your tutorials are very detailed and I like it very much but after about a year of just buying my Maker and its accessories I now have the time to play with my machine…and found your tutorials. I have the new version of the Cricut Design Space but I cannot find the Linetype & Fill / Linetype: Cut – Fill: Print, print type: Pattern section. On the top after the Undo/Redo section it says Operation. Underneath the Operation Section It says Basic Cut with options and the color. I am missing the Linetype: Cut – Fill: Pattern so I wasn’t able to follow your tutorial. :(((( Can you tell me how to remedy that? Thanks…
Hi Izzie! Cricut updated his software and I am working around the clock to update my articles. Everything that was under “Linetype” it’s now under “Operation.”
Do you have any tips on how to connect the dot on lowercase j and I so they cut in 1 piece?
Yes! Have a copy of “j,” then with contour, hide the dot on one of the copies, and on the other copy, show the other part of the letter. Now you have two layers, drag the dot to connect the “j” and weld both pieces.
I hope this helps.
Thank you! Thank you! Thank you! I am just finding this and I love how you have made this tutorial. The way you explain things is just perfect!!!
So happy I can help!
Thanks so very much for putting these instructions together. You are so detailed and are in my Favorites!
Thank you so much! I am glad I was able to help.
I have been so frustrated with trying to get my cricut explore to use the pen to write. When I click on “Draw” I get an outline. I want a solid text. Also, I don’t see advanced anywhere on my tool bar. How do I find that? Any help you can give is appreciated.
Thank you, Martha
You need to use writing fonts. My Cricut Pen tutorial will explain more in detail how to use pens with your Cricut.
I don’t understand PRINT and CUT. DO PRI t off a separate printer and then cut yourself or do you print on canvas and the it cuts.
Check out my print then cut tutorial! It will help you a lot.
Are you able to create your DAYDREAM logo in design space? I’ve tried to create that curve in the middle of the word SURVIVOR by adjusting the font size for each letter but with no luck.
Not really, but you can use shapes and make words into shapes. You can get a similar result!
How would you do this? Would you slice??
Yes, I would.
Hello! I am new to Cricut and have learned a lot from your tutorials. Thank you so much! Is this curve text feature not available for a MacBook Pro laptop? If no, any guess as to when it might be. There is a project I want to do that would require this feature
Thanks for any insight you can offer!
You can use the curve tool from your MacBook Pro as far as I know. You can’t from your Ipad, or phone.
Hello!
I just bought my Cricut Air 2 a few days ago and today I wanted to try using the Pens. And I did everything as far as changing it to draw instead of cut and all that and placed my pen into the right place but it wouldn’t go down enough to actually write once the time came. The cricut moved as if it was drawing but it wasn’t. Am i doing something wrong or is there another piece I need to add in order to use my pens? thank you in advance
Installing pens can be tricky sometimes. Did you gently push the pen until it clicked? If you didn’t, then the pen was installed correctly.
Hi, I’m
Fairly new to cricut. I created a design. Saved it and want to reprint it. I went in and made the words bigger. Now I can’t get the font option to display across the top after double clicking. Are you able to change the font and letter spacing after saving a project and going back in another time?
You can unless you welded or sliced the text. When you perform those actions your texts is no longer a “text layer.”
thank you for the info. I have a question, though. How would you cut the word
“KINDNESS”, so the D remains a D and not an open hole? Hope that makes sense
if you are using paper, letter fallouts will happen unless you use a stencil font. You can find them online some free, other paid. Even Cricut has some. I hope this helps 🙂
I need you to pack your bags and move in with me for at least 6 months plenty of crafting to do!!
Or, could you stop me from going around in circles today? I have text in my Design Space, but when I go to ‘make it’, it shows it cutting from the left-hand side of the paper, I want it to cut out of the middle of the page.
Hi Kim! You made me smile, for sure.
Regarding the text, it’s very simple. Send it to cut, then select it on the mat and move it where you want it to be. It’s that simple 🙂
Hello Catalina,
As a beginner, I have found a lot of useful infos in ths post. Thank you for that !
I do have on problem though. Can I split some letters in their parts ? I mean letters like i and j. They use to have a dot that is not connected to the rest of the letter. I case of a cake topper for example, the dot is loose. Is it possible to move the dot independent of the rest of the letter ?
Thank you !
Hi Ramona. Yes, you can, but you need more tools than text. For instance, type in the letter “i”, then make a small square and place it on top of the dot, then select both and “Slice.” this will allow you to separate the dot from the letter. Keep in mind you won’t be able to edit that text anymore.
I hope this helps!
Catalina, this is an incredible resource! Thank you for sharing your hard work. I’ve been working with Design space and know a bit, but I’m interested in learning how you bent just the top of the word “Daydream” in your blog post title. I like that! Could you please explain.
I do it in Illustrator. But I have a nice tutorial on how to make words into shapes!
Catalina do you know how to print your own handwriting with ou having double lines. Try to do art piece of mom’s recipe but print her writing in double lines, I DOWNLOADED ILLUSTRATOR, BOUGHT A WHY TO EXPENSIVE CLASS AND STILL CAN’T DO IT.
Hi Evonne, handwriting when you convert it to cut image is a shape. This will make your lines double, no matter what. If you want a single line you need to work on vector lines or solid lines.
Shapes and lines are very different. I hope that makes sense. On Illustrator try using the pen tool with a very thin stroke and don’t expand the design. I hope this makes sense.
Hi! thank you for this tutorial – I’m very new to the cricut world! I just purchased a cricut maker. I want to make fabric pennants – like baseball pennants. How can I make the angled letters to fit in a pennant? I want to cut them out of fabric with my cricut. So the pennant is a sideways triangle, and the first letter (left) is the largest, and they angle smaller to the last letter. I’ve seen some people just make each letter a different size, but it doesn’t achieve the angled, cohesive look of the traditional pennant. Can anyone help me? Thank you!!
Hi Carrie. You need to edit each letter slightly. On programs like AI, you can make the text take the shape with the angle, but not with design space. Check the last section of my how to edit shapes tutorial. for ideas on how to do this.
Hi – I am fairly new to the Cricut world. I am having a problem with the text feature. I find that after I have typed my text, chosen the font, moved the letters around a bit – then decide I want to change the words, I can’t get my type-able text box back. The instructions I’ve seen say to double click in the box where your font is showing up, and the text box is supposed to pop up. Sometimes it does, but most of the time it doesn’t. What am I doing wrong? Please help.
I just discovered your site this evening, and am really enjoying it. Are any of your tutorials printable? (I am old school, and prefer to read on paper, rather than a screen (also that way I can highlight, etc).
thank-you in advance!!
Did you use Weld on your text? Your text will stop working as a “text layer” if you do this. I hope this helps 🙂
I’m struggling with changing fonts in the projects I have created. It is not clear how I can edit if I have misspelled something. I’m also not seeing the second line which is where the font names are listed and the editing options are located. I’m wondering if I have inadvertently changed settings and that is what is causing my issues.
I just purchased some training material yesterday but I wish I had looked at yours.
Thank you
Hi Deb.
There’s no autocorrect on Design Space. However, you can install the Grammarly, browser extension to see the misspellings.
Just found your helpful ideas. Going to sit at “my desk” and practice. The. I might need to raise my hand with a question ????. (That’s the 30 yr of teaching school still left in me). May God bless you and your family as you lead us all on the Cricut Quest!
So happy to hear! Also, the weather here is terrible. Can’t wait for summer!
Hi! Is there a way to stretch fonts to be taller? I am trying to get my font to be similar in size while using bigger words in small spacing. I can’t increase the font height without increasing the width as well and have a limited amount of space.
Select the text, then on the canvas you’ll notice there’s a little lock on the left corner of the selection. Click on the lock to unlock proportions.
Is there a way to make fonts thicker? I want to do a cut with a certain font and it was too dainty to get a good effect when I cut it and put fancy glitter paper behind it.
Hi Julie, you can select the font and choose “Bold” in the font style. If you want outlines, I have a handy tutorial that’ll help you achieve what you want!
I want to make a cute sign like the farm style signs, so all I really want to do is to print my text and cut it out! So i’m lost, There a easy way to just print and cut out text.
Check out my Print then Cut tutorial! I show you how to do it with text there!
I’ve been making labels for my pantry – I started with bold and decided I wanted to change to regular. When I click on the word to make that change, I have no problem with some of the words. But other times I click on a word and the text/font/size details bar is not visible and I’m unable to make any changes that would be available on the second bar of options – font/style/spacing/advanced, etc. It seems to come and go on a whim (the upper bar is always visable – undo/linetype/fill, etc.). What causes that and how can I make it appear without having to retype the entire word. Thanks
Did you weld that word? If you did, you can’t edit it a text anymore. Also, are you selecting each word on its own? You can change font type when selecting more than one text layer.
Let me know if this helps!
Wondering if there is a way to use the foil quil to “write” the text in Design Space and then cut it out with a border (or shadow)?
Hi Karin, most likely is that if you can think it, you can achieve it. However, I don’t have experience with Foil quil yet! Coming soon, though!
HI. Is it possible to underline your text in Cricut Design Space?
At the time is not possible.
What is the cursive font that you used in this tutorial? I am trying to purchase a font that looks like the ones used in the ‘images’ in Cricut Design Space and cannot seem to find one! Thanks!
Hi, Melissa, this font is called Sorilena.. I really like it!
I am trying to figure out how to connect letters if I am doing something in a cursive font so that they look connected instead of individual letters when I cut them out. Is this possible? How do you do that? I want to be able to connect them then lock it in so that I can make it bigger or smaller or curved but that doesn’t seem to be working.
Hi Lace,
There’s a section on this article called “fix cursive.”
If you want to curve, do this before joining the letters.
Once you weld, you can’t edit the text anymore.
I hope this helps.
Help I need to have my text draw exactly as I have it in on the screen..I have an air explore 2
Hi Rebecca, check my “how to use the Cricut Pens” tutorial to learn how to do this.
I want to curve text so I can put it on ornaments, but when I ungroup so I can make the letter closer and then regroup, I don’t have the choice to curve anymore. WHY??
If you ungroup words into separate layers you can’t group them again. Before you ungroup to letters make sure you add all the changes.
That seems a bit mad? I need to ungroup so that I can join a cursive font up but when I group together again I’m unable to use the curve option – yet if I curve before I join the font up and then ungroup and try to do that afterwards, it doesn’t look right. Frustrating that the second layer of edit options aren’t available after you ungroup…
If you ungroup by letters when you group back (are you using the options on top of the layers panel?) you’re just keeping the text together. If you want to curve text do it before you ungroup to letters. 🙁
Try curving the best you can, then ungroup to letters and finish the touches you need.
I’m going crazy! I can’t figure out how to print a saying and then have the saying connected as opposed to having to individually place each letter on my shirt. 🙁 I am using the infusible ink. I am a beginner and so i’m sure this is incredibly basic, but I can’t seem to find an answer.
Thank you!!
Hi Myndee, what type of font? Check out my T-Shirt Infusible tutorial
Wow Catalina! Thanks for your hard work! I used Cricut Design Studio years ago but this is more advanced and I’m unable to figure out how to master it. I want to cut welded words, for titles. With a larger layer following the shape of the title and another larger layer behind the second layer. Like a fully surrounded triple word title. Is that possible with Cricut Design Space?
You are welcome, Deena! In this tutorial, I explain about multi-layer fonts. Maybe those will work. At this moment you can’t do a triple shadow effect from the software, but I know there are some apps on the phone that will allow you to do so.
I hope this helps!
How do I keep all letters the same size without having to individually size them? I tend to get different sizes letters when I go to print them. ☹️ I try to remember the size when I make the first letter but never can get them just right each time. Is there a simpler way? TIA for your time.
Hi Elizabeth, add all of the letters you need in one single text box and resize the entire text at the same time; then select it and click on Advanced (I show it in this tutorial where it is) and select the option “Ungroup to letters.” I hope this helps!
I have a question – Hope you can help. I used my gypsy and loved it because I had a lot of options when using fonts. One was that I could slant the letter or skew them. Is there not a way to do that in Cricut Design space now? thank you!
Hi Dina. Unfortunately you can’t do this from Design Space. However, If you check my How to edit shapes tutorial you’ll find a section that shows you how to get a similar effect (make words into shapes)
I hope this helps!
I have a question……. I make earrings on my cricut from leather. How can get my machine to cut a capital B out of the teardrop? So that you can see it is a letter B? HELP ME!!!!!!
Hi Misty, you need to use a stencil font. Or convert the font you want to use into a stencil one, by using shapes and slicing. I will be writing a tutorial about this soon; in the mean time I hope this makes sense.
What about design space on my iPad? Wish the tutorials would show how to do the same things there……or aleast acknowledged the fact not all things are the same.I
Someone please make note of this!!!!!!
Hi Kat.
I understand your frustration, I will add this in a future. I do have a tutorial for the Ipad or iPhone
There it will show you where everything is, plus it will also tell you how it differs from the Desktop version.
Have a great day
Hey your instructions are very helpful for beginners like me . However once I weld is there an option to undo it? Also the “ advanced”option disappears once I weld my letters? How can I curve once I weld the letters? Thanks again
Hi Gargi,
Unfortunately you can’t edit text once you weld. You need to curve and edit all text before you weld.
I hope this helps!
Thanks so much
I have a Circut Marker and Need to know where I can find line type so I can use pens.
Hi Nancy, checkout the part of the post that explains Linetype. It explains it there!
Have a great day!
I love reading over your instructions! I’ve always wanted a Cricut but wasn’t sure what I needed it for and then I saw different ways to personalize cups, totes and t-shirts and thought this was a beginning. Your directions are very good and I might be a little slow and will need to practice but I will master this. I feel confident!
Hi Jean!! I am so happy that I get to help you on your Cricut Journey! Please check out ally other posts so you keep getting better and better!