
Looking for a fun indoor activity to keep the kids entertained on those cold, snowy days? Look no further than this Paper Plate Santa Craft for Kids.
It’s easy, festive, and guaranteed to bring smiles all around. I’ve even got a FREE template to make the crafting process a breeze.

This project is suitable for toddlers, preschoolers, kindergartners, and even older children with the guidance of a parent or teacher.

This craft is fun and easy, and it helps your little ones develop their fine motor skills as they cut, paint, and assemble the craft.
So grab your supplies, and let’s get creative with this adorable holiday project!
Related: Paper Plate Nativity Craft For Kids!
Tools & Materials
- Printer
- Template (download at the end of the article; you don’t need to subscribe!)
- Glue
- 9-inch paper plate
- Scissors
- White cardstock
- Skin paint*
- Paintbrush
- Cotton balls**
- Colors, markers (optional)

*Now, most likely, you don’t have skin color paint. I didn’t, and I have bins of craft supplies!
Here’s how to make skin paint for your Santa:
- 4 teaspoons of white paint
- 1 teaspoon of brown paint
- 1/2 teaspoon of yellow paint
- 3 drops of red
Depending on the hues of your paint, you may need to modify the quantities; do one drop at a time!
**If you don’t have cotton balls, you can make this craft using only the template, which will be just as fantastic.

Super tip: If you don’t have paper plates, cut an 8-9-inch circle with white cardstock.
Step 1 – Print Santa Template
As with all of my crafts, you can make them as easy or complex as you want. To save time, print the colored template. For a more extended activity, print the coloring one.
I printed the colored template!

Step 2 – Paint
Always start by painting first, as it takes longer to dry. Your children will probably want to glue as soon as they finish cutting.

Step 3 – Cut Template
Cut all the pieces you want to use. There are two different sets of eyes and mouth. Keep in mind that the eyes may be a bit difficult to cut, so you may want to use a black marker instead.

Step 4 – Glue
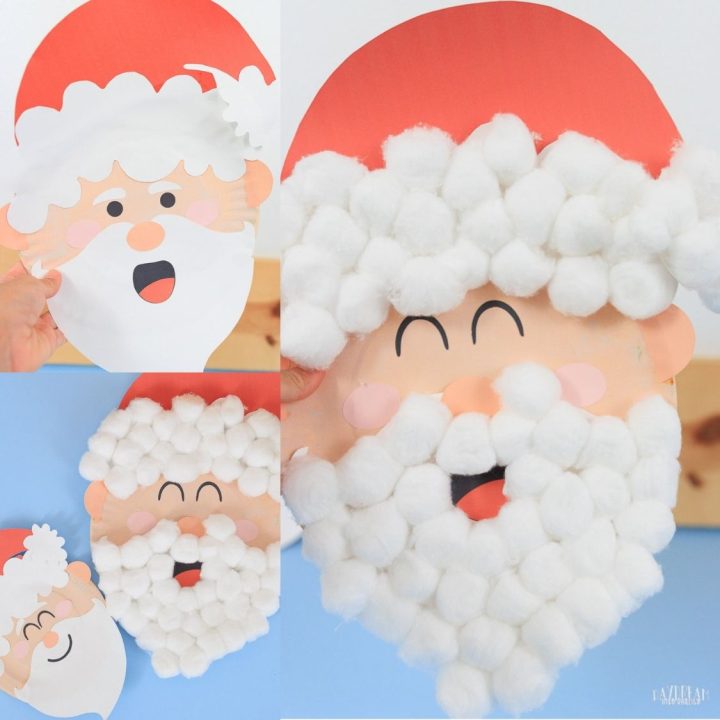
Let’s assemble Santa!

Start with the beard.
Glue the mouth and nose as shown in the following pics. Then, glue the cotton balls, avoiding the mouth and nose area.


You can also use cotton balls on the white parts of the hat.
Note: This project consumes a good amount of cotton balls.

When you’re done gluing all the cotton balls, assemble the hat and set it aside. Next, glue the beard to the bottom of the plate.
Before you glue the hat, place it tentatively on top of the plate so you have enough space for the ears, cheeks, eyebrows, and eyes.


Once you glue all the pieces in your Santa face, glue the hat.

And, just like that, your Santa craft is complete!

A Santa Without Cotton Balls
If you don’t feel like spending a lot of cotton balls, here’s a picture of the craft using only the template!

Doesn’t it look charming?
Want a Smaller Santa?
I made an extra small Santa using a 6-inch plate! It looks so cute.
If you decide to make an extra-small one, cutting will be a little harder. At this point, I would use a black marker for the eyes and mouth.

To make a smaller craft in a 6-inch plate, scale the printable to 66%.

Download Template!
As I mentioned, here’s the Santa template for your craft! Click the image to open the PDF in a new window or the yellow button to trigger a download on your phone or computer.

Oh!
Just so you know, I also have a library full of free SVG files and Printables for all my subscribers, a.k.a. Daydreamers. You can see a preview right here or get access by filling out this form.
Paper Plate Santa Craft For Kids | Free Template!
Make Christmas memorable with our Simple Paper Plate Santa Craft! This easy-to-follow DIY project includes a printable template for kids to create their own Santa Claus using a paper plate and cotton balls.
Ideal for toddlers, preschoolers, and kindergarteners, it's a great indoor activity for chilly days.
Materials
- Template
- 9-inch paper plate
- White cardstock
- Skin color paint*
- Cotton balls (optional)
- Colors, markers (optional)
Tools
- Printer
- Scissors
- Glue
- Paint brush
Instructions
- Download the template
- Paint the paper plate with skin color paint and set aside to dry.
- Print out the version of the template you want to use.
- Cut template.
- Start by gluing the mouth and nose to Santa's beard.
- Glue cotton balls around the white parts of the hat and the entire beard, avoiding mouth and nose areas.
- Assemble Santa's hat and glue the beard on the paper plate.
- Before gluing the hat, place it on top to find the right spot for the ears, eyes, and eyebrows and glue them.
- Glue the hat to the paper plate.
Notes
*You can make your own skin paint by mixing white paint with a little bit of brown, then add a few drops of red and yellow until you reach your desired consistency.
You May Like These…
I hope you enjoyed crafting this adorable Santa with your little people. If you liked that activity, you would love the following, too!
- Paper Plate Christmas Tree Craft
- Fall Paper Plate Craft
- Paper Plate Snow Globes with five different scenes!
- Paper Plate Baby Chick Craft
- Turkey Headband Craft
- Build a Salad Craft
- Build a Fish Tank
- Paper Plate Cow Craft
Happy Crafting!

This is absolutely great for kids.
Love it
love this
Glad you like it 🙂