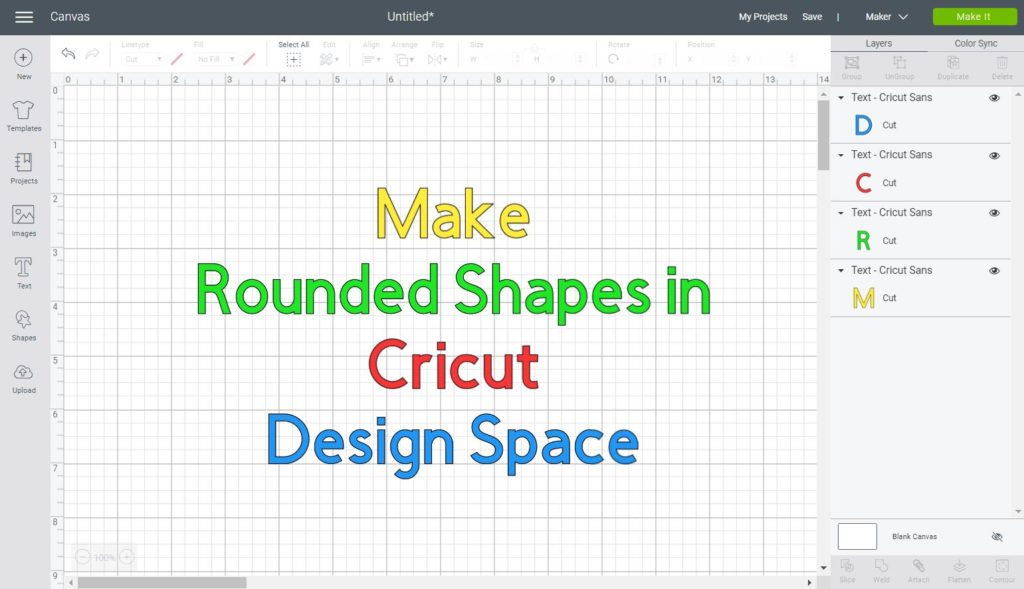
Are you losing your mind trying to Round Shapes in Cricut Design Space?
Let me tell you that I almost lost mine in the process. Thankfully, I finally found a decent way to achieve beautifully rounded corners!
The best way to make rounded corners in Cricut Design Space is by slicing your desired shape against a circle, or an oval.
Although it sounds effortless, there are some things you need to keep in mind like alignment and smoothness.
I love my Cricut!
It was love at first sight. However, sometimes, I do get into some fights with Cricut Design Space.
Why isn’t there a simple way for you to just round corners?
Here’s the thing, Cricut Design Space is not meant for you to design complicated stuff from scratch.
Related: Check this great guide about Cricut Access, their gigantic library!
Why should it though?
I think they do a great job of providing you with the tools for you to make minimal designs. Things like Shapes, Text editing tools, patterns, etc. will take your creations to another level.
Every day I am so happy and thankful for all the things I can accomplish with this great machine, that I think this is one of the best investments ever!
As I mentioned above, I found a way to make round shapes because they are so needed!
Oh, and just in case you don’t want to make them on your own. I also have some FREE SVG ROUNDED shapes for you to download and use in your projects.
If you are a beginner still figuring out Cricut’s software, I recommend this comprehensive and easy Design Space tutorial.
Are you ready?
Let’s get started!
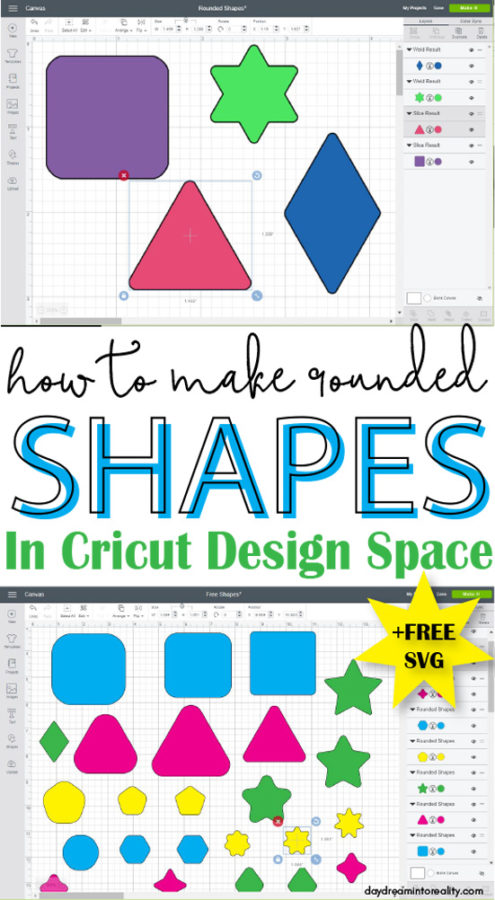
Make a Rounded Square
To make a rounded square, we are going to use the following. There’s also a step by step tutorial on how to it; I want you to have an idea before we get going.
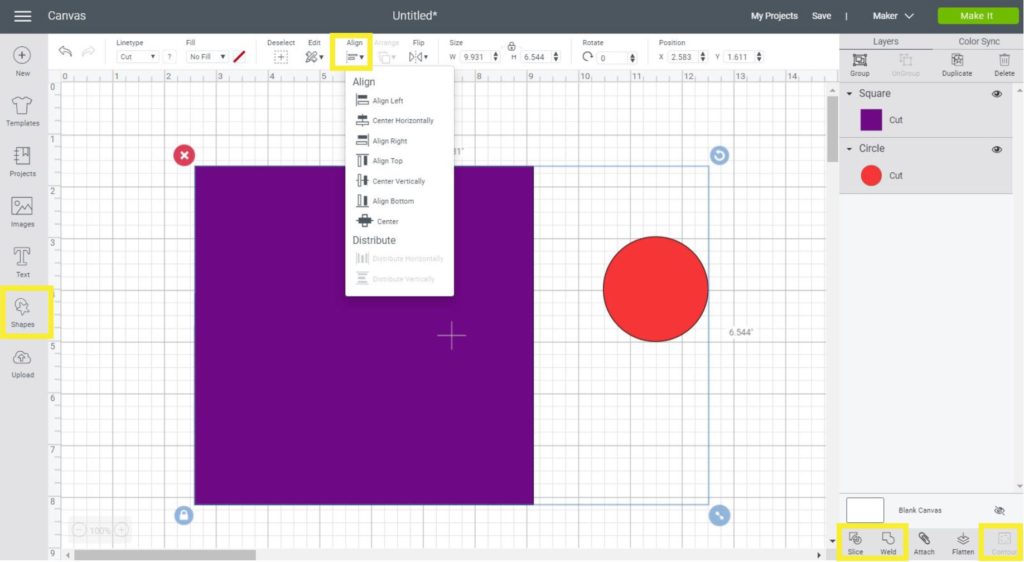
- Shapes: Square and circle shape. (The bigger the circle, the more rounded the corner will be)
- Alignment: We need to place the purple circle in four corners. The easiest way to do it is by aligning the circle with each corner, and the alignment tool located on the top panel of the canvas area does a beautiful job.
- Slice tool: we are going to cut out the circle out of each corner, and for that, you are going to use the Slice tool.
- Weld tool: after slicing out all of the corners, we will need to make our shape one.
- Contour: we need this tool to get rid of unwanted pieces.
Step 1 – Add Shapes and Slice
Since there’s not an option for you to make a rounded corner on Cricut Design Space, we need to build it from scratch.
How do we build it?
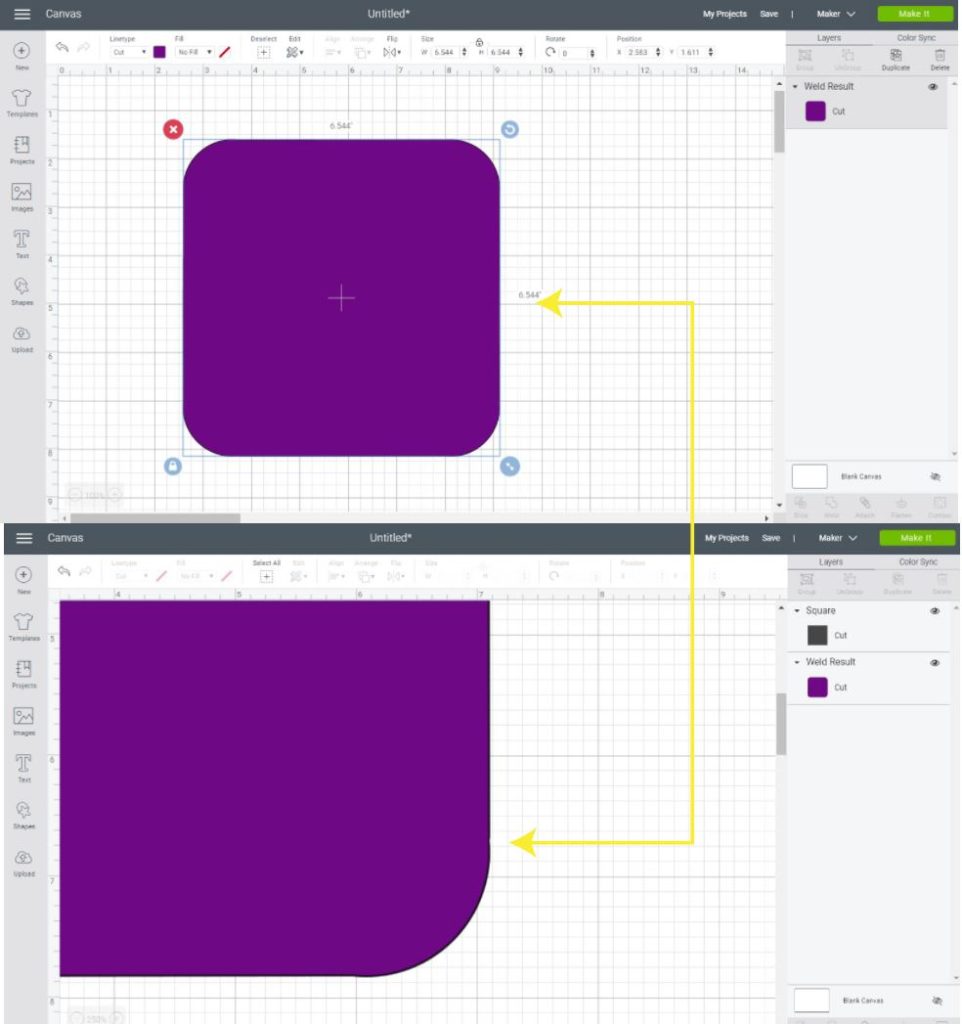
Easy, drop in a square and a circle like shown in the picture below; then select them both and click on Align Top and then on Align Left.
Having both shapes selected, click on “Slice,” this will cut out the circle against the square.
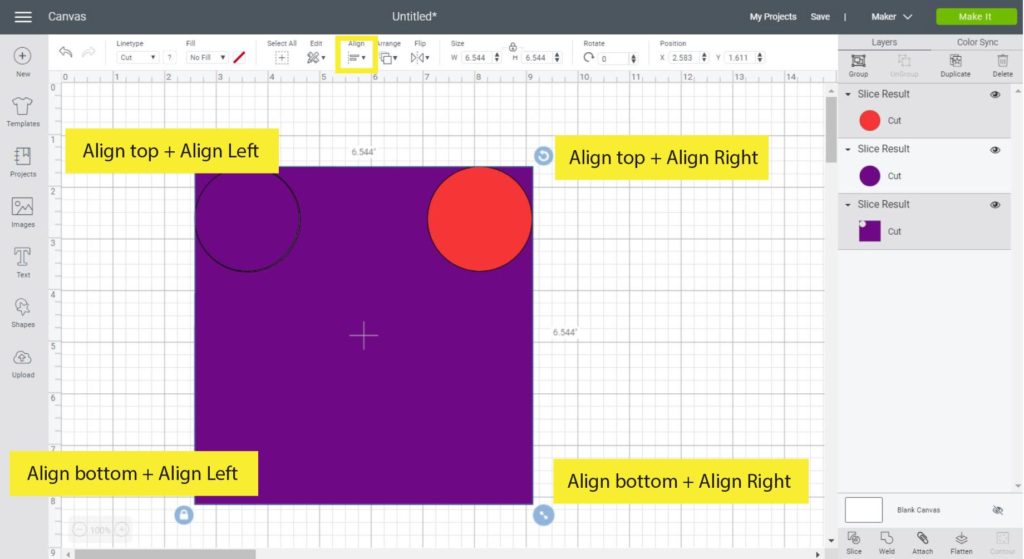
Now you have the FIRST CORNER!
From this moment on, you will only need to select the main circle – my case purple – along with the square and repeat the process to cut the rest of the corners.
These are the missing corners:
- Top Right: Use Align top + Align Right.
- Bottom Left: Use Align bottom + Align Left
- Bottom Right: Use Align bottom + Align Right.
Step 2 – Hide Square Corners
We are getting close to having a rounded square!
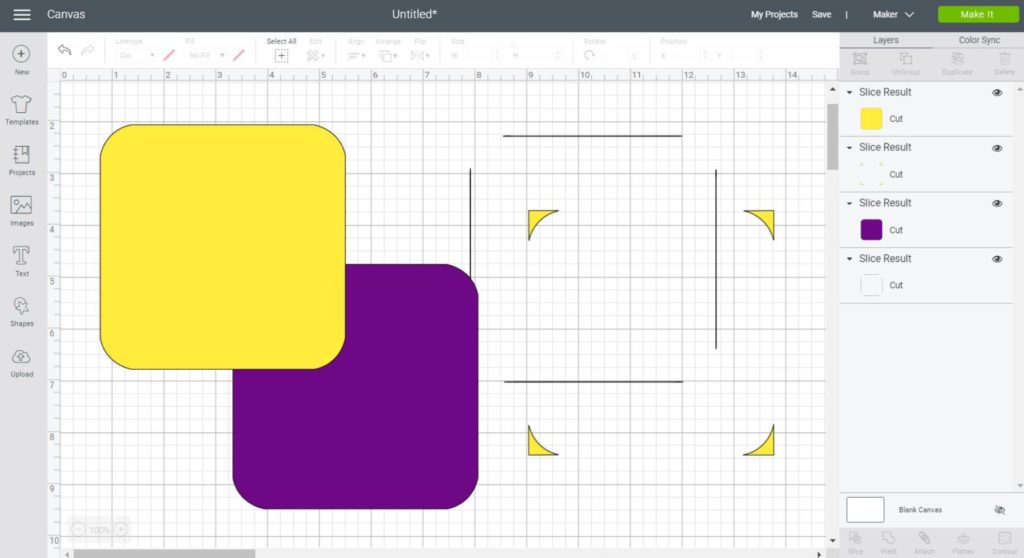
In many cases, when we “Slice” something, there are unwanted pieces. For this case, we still have the pointy angles on our square.
To get rid of them, select the square layer on the layers panel, and then click on contour.
Contour is located at the bottom of the Layers panel.
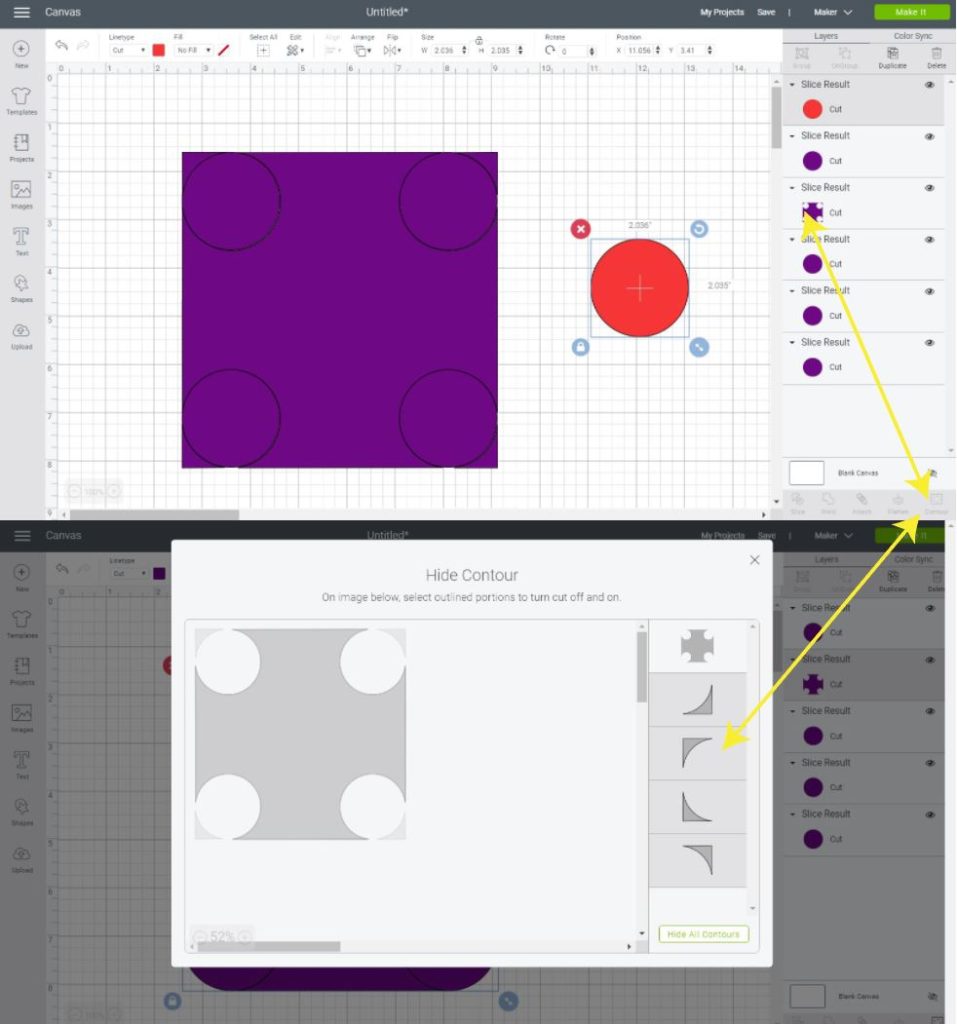
After clicking, the Hide Contour Window will pop up.
Proceed to select all four corners; you can do this by clicking the image itself, or by clicking on the sidebar icons.
Once you are done, go ahead and close the window by clicking the upper right cross.
Step 3 – Weld and Smooth Square
We are getting closer!
When you close the contour window, you will see that you have – “almost” – a rounded shape. However, some circles are floating in there.
So what we are going to do here is select all of the pink pieces and click on “Weld.”
This action will make a rounded shape.
What I am about to explain here, I don’t know why it happens.
For some reason (I tried this more than 20 times) the final shape has some parts that aren’t smooth enough.
And, I don’t know about you, but I don’t like this at all, so I came up with a solution for it.
To smooth out all of those lines, create another square that is a little bit smaller than the rounded one.
The critical part here is that the lines of the new square need to be inside the rounded one.

When you’re done, select both squares and click on “Align Center,” and then – by keeping both shapes selected – click on “Slice.”
Ladies and Gentlemen!
We are done, move the pieces that resulted from slicing both squares, delete what isn’t necessary; and there you have it, not one, but two perfect rounded squares.
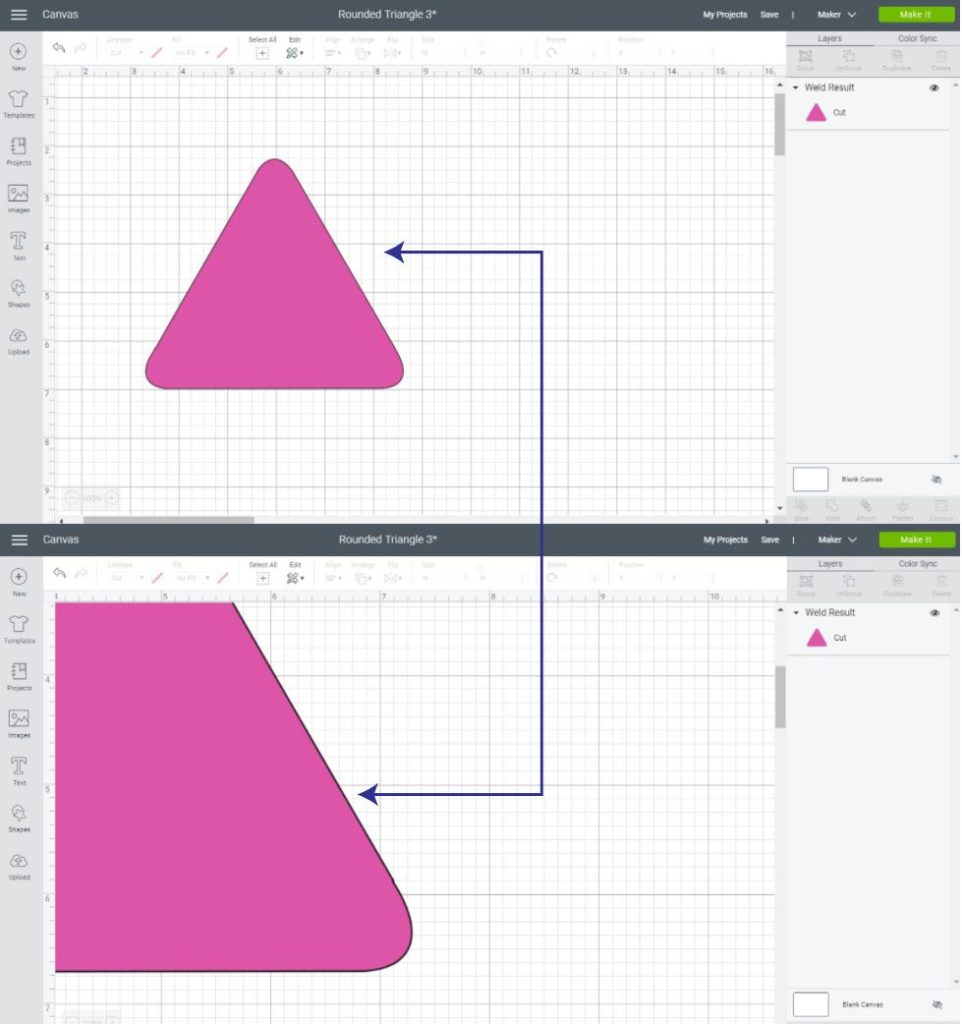
Make a Rounded Triangle
Before I put a tutorial out there, I make sure I try things multiple times because I want you to avoid possible headaches.
If you haven’t read how to make a square, you might get lost on this tutorial, as I am taking into consideration some of the things I just explained and I don’t want to be too repetitive.
Step 1 – Tools needed to form a rounded triangle
Building a rounded triangle is going to be a little bit more different than a rounded square, I don’t know why, but a circle didn’t work, so I tried with an oval and, that my friend, worked to perfection.
The tools we are going to use here are:
- Shapes: An equilateral triangle (It’s the one that comes by default) and an oval.
- Slice tool: To cut all of the corners out.
- Contour: to delete unwanted pieces
- Rotate: To align the oval with the angles of the triangle.
Tip: To make an oval, just select a normal circle and click on the little lock on the left. Now you can increase the shape vertically.
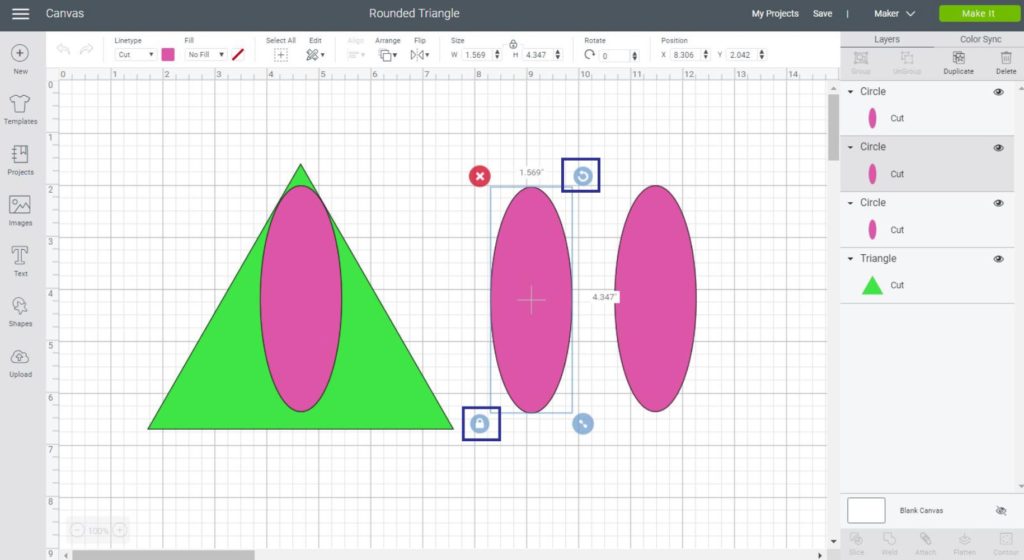
Once you have your triangle and oval – they should look like the ones on the screenshot right above – copy and paste the oval two more times, this will leave you with three ovals.
Since the angles here are narrower than the square ones, no matter how hard I tried, every time I tried to slice the oval against the triangle, the oval itself wouldn’t retain its shape. So make sure to copy and paste before slicing.
Step 2 – Slice Triangle and Contour Corners
On this step, you are going to eye align the top angle. You can try and use the other align tools, but for a triangle, it doesn’t work as well.
Then select both, the oval and the triangle and click on “Slice,” and delete oval you used in the first place.
For the bottom angles, you can try to rotate them manually, or you can use the rotate tool on the top panel.
For the left angle, select one oval and rotate it -120 °, then eye-align it with the left bottom angle. Once you are done, select the triangle and oval and “Slice” them, then delete the original oval.
For the right angle do the same thing, but rotate the remaining oval 120 ° instead.
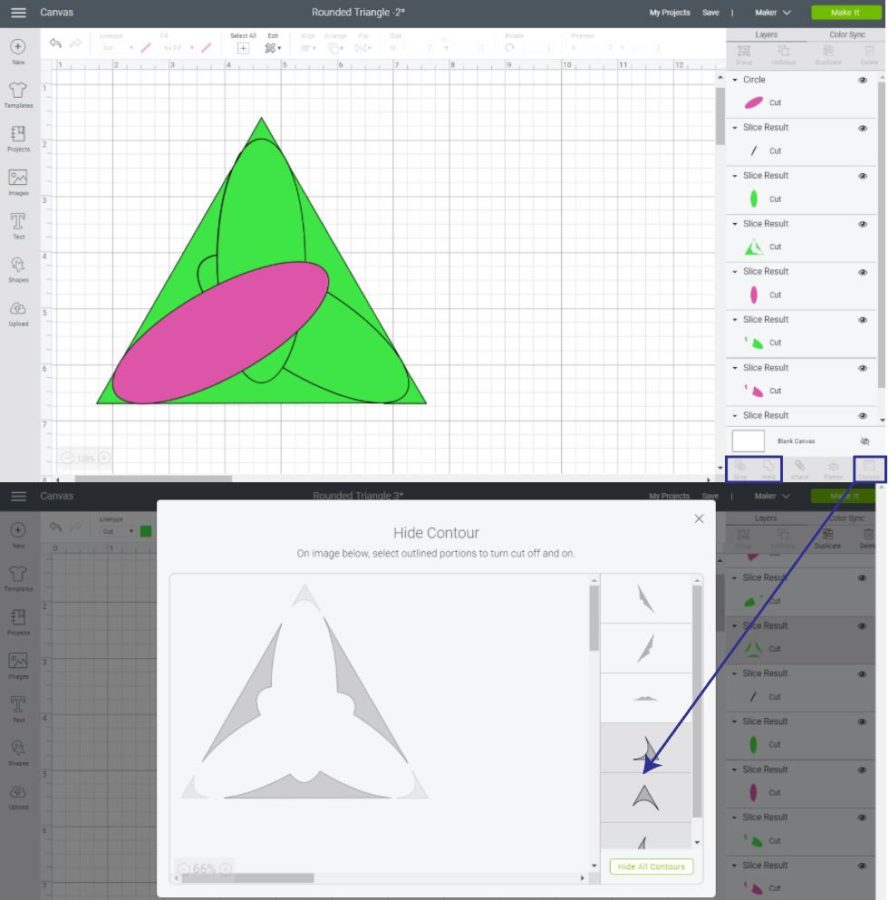
After slicing out the ovals from the triangle; select what’s left of it in the Layers panel, and click on “Contour” to hide the three corners and close the window.
Step 3 – Weld the rest of the pieces
After closing the “Contour” window, go ahead and select all of the remaining parts, and click on “Weld.”
You almost have a perfect triangle, but just as it happened with the square, the lines are not very smooth.
Let’s fix it.
Step 4 – Let’s make the triangle smoother
Create another triangle that is a little bit smaller than the rounded one; The critical part here is that the lines of the new triangle need to be inside the rounded one.
Then, as we did with the square, select both shapes, “Align Center;” and click on “Slice.”

We are done, move the pieces that resulted from slicing both triangles, delete what isn’t necessary; there you have it, not one, but two perfect rounded triangles.
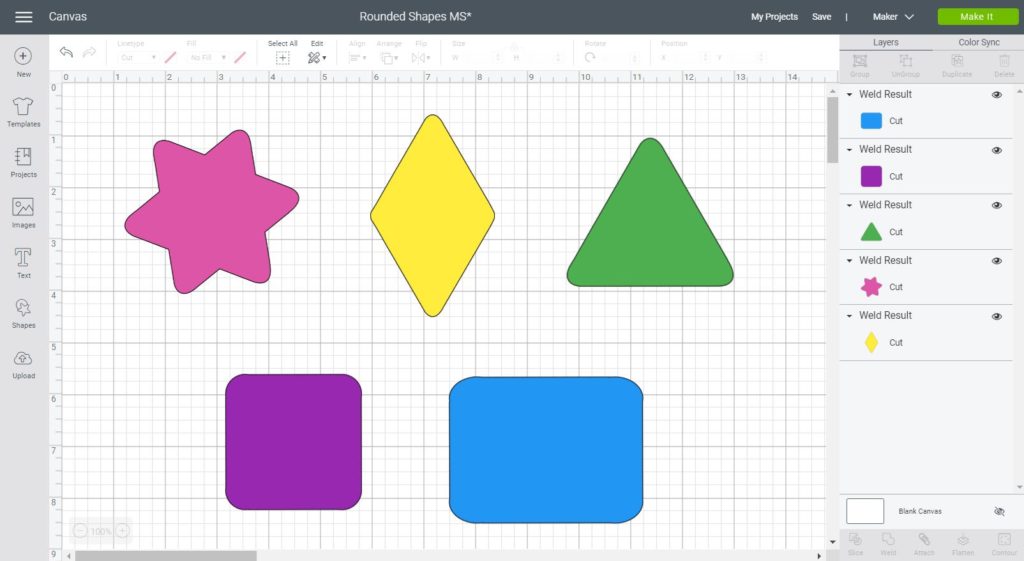
Compound Shapes to make New Ones
With a rounded triangle, you can create new shapes!
Weld two triangles and either make a diamond shape or a star. Just play along with them, and see what you can come up with.
There you have it, and now your imagination is the limit.
What I don’t like about this method
Although you can accomplish rounded shapes on Cricut Design Space, you are still very limited. I don’t like having to do a whole lot for just a rounded shape.
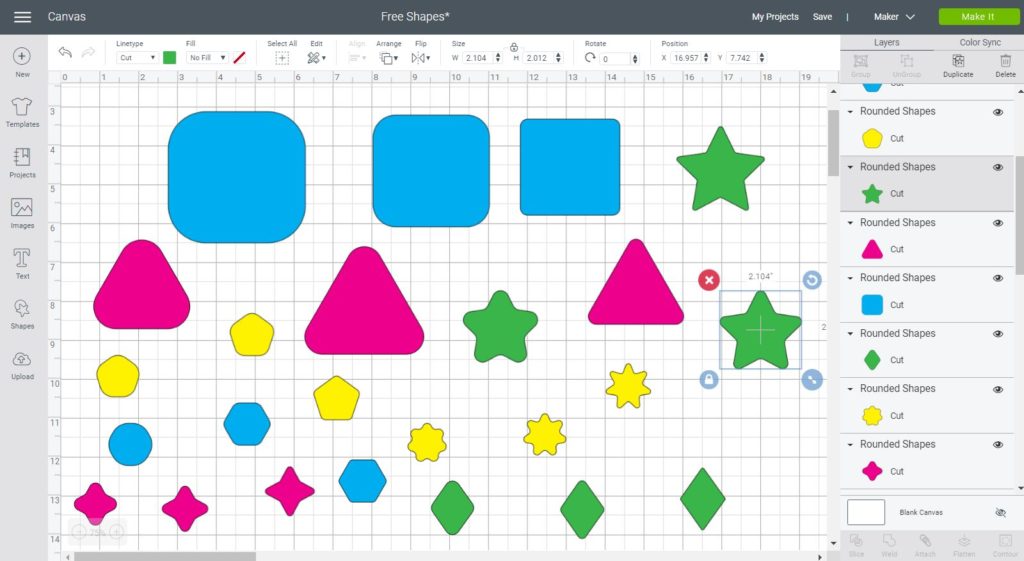
Making rounded shapes is SO EASY to accomplish in Adobe Illustrator, and since I create my designs there, I have decided to do something for all of the Cricutters out there!
My gift to you!
I believe that everyone should have access to rounded shapes. And that’s why I created this file filled with the most common shapes out there, with different levels of roundness!
The best part of it is that you can use them for your FINAL commercial projects. You don’t have to give me attribution although, It’s always appreciated.
What you can’t do, is that if you are a blogger or have some online store is to sell them or to upload them on their own. They need to be part of a final or cut project.
Oh!
Just so you know, I also have a library full of free SVG files and Printables for all my subscribers, a.k.a. Daydreamers. You can see a preview right here or get access by filling out this form.
So…
Was this tutorial helpful?
Am I missing something? Let me know in the comments below if you are now making rounded corners.

Awesome stuff! Thanks for teaching me tricks !
Catalina your tutorials are the best!! Very explicit and easy to understand. Thank you very much.
God bless your for your kindness. I’m very behind but I’ll ge there. This tutorial is from July, but I always keep them and watch them.
Thank you!
Genius, just Genius!!
THANK YOU !! Wish I had seen this before it took me forever to make a rounded shape!
Instead of using “contour”, I found you can click on the finished shape and all the extra peices will show. Move them off the finsihed design & “delete”. Easy peasy.
Love that you share your amazing tips.
You are honestly the kindest creative blogger out there. I know how much time you put into everything you do for us Daydreamers and I have to say THANK YOU from the bottom of my heart.
Honestly, when I started reading this post I was like…. “This can’t be serious… This can’t be how they make us do this in Design Space…” I was so happy to make it to the end and see your generous gift. Thank you for doing what should have honestly simply been included in Design space!
Thank you! Thank you! Thank you! I have tried making rounded shapes and ended up cutting pointy corners and then using my corner rounder to shape them. Your file will save a LOT of time!
Thank you so much for this post! I’ve been loosing my mind trying to make a rounded triangle. Thanks also for the free downloads.
You’re very welcome 🙂
Yes, I was going out of my mind trying to round the corners…..I tried to use inkscape, but I am new to that program and couldn’t figure it out. Thank you soooo much, I’ll be able to print my own business cards now.
So awesome 🙂
Brilliant! I was trying to figure out how to round the corners on a photo for a mug (the circle removed too much of the photo). Thank you so much for sharing.
You’re welcome. You can also use the offset path and do a negative distance!
Thank you for sharing this information and the SVG.
You’re welcome 🙂
Thank you so much for this – absolutely brilliant!
Great article! Is it possible to do a deeply rounded corner on a rectangle using this method? Just one rounded corner, top right so it looks like an arch?
New to Cricut – thanks for the help!
Yes, I think so!
Thank you for sharing! I just happen to come across your rounded edges tutorial and then came to this one. I’m so new I didn’t even know there were special steps to make these shapes. Many thanks for the download files as well. I’m sure I will get much use out of them.
You’re very welcome! Check out the offset path tutorial, now you’re able I am trying to update all my articles.
Very helpful tutorial and I am able to follow the instructions. I tried to download the rounded shapes SVG and it came out as an A4 sheet in design space. Please can you advise the best way to get the individual shapes in design space? Thank you
You need to delete the ones you don’t need in Design Space. All shapes are in the same file.
As a beginner to Cricut, I can’t thank you enough for showing me how rounded corners happen! I spent some time thinking I can do this!!! You set me on the way. Still lots to learn but feeling dangerous now. XO
Yay! Very happy to hear.
Thank you for this – it really helped me out!!
Happy to hear!
I’m in need of DESPERATE HELP! My circles keep coming off “balance” seperating at some point and no matter what I cannot get them to weld properly without being able to see the spaces where they separated and I cannot for the life of me get the second rectangle to line up. I’m trying to make a card for a friend and I’m about in tears.
Did you use the square to smooth out those cuts? Also, did you try to use the files I have in this article so you can skip making them manually?
Hello, thank you for the tutorial and free file! I subscribed but I can not find the to file to download. I tried looking it up and I still can’t find it.
For this file, you need to right-click on this article and save it to your PC, it’s by the end of the tutorial.
Thank you, thank you, thank you!!!!!!!!!! I was struggling and although I didn’t follow the tutorial I certainly downloaded the file.
That’s what they are for! Gosh doing that manually it’s quite annoying! lol
Thank you for this tutorial. I couldn’t get the circles into the square all at te same time. I had to do one corner at a time. Is that how you meant for it to be done?
Yes, one at the time!
Catalina,
Thanks for this excellent tutorial on rounding corners in Design Space. You’re always so helpful.
You’re very welcome! 🙂
Hi Catalina! Thanks for this post! I’m having a hard time towards the end of creating the square with the rounded corners.. I get to where I hide the corners and for some reason I’m not able to weld! I’m not sure why, but when I highlight the square with the circles cut out it doesn’t give me the option to click the weld button.. Any advice? Thanks in advance!
Hi Amber, I don’t know why this is happening. Did you download the file at the end? There’s a bunch of rounded shapes you can use for your projects.
Thank you so much for sharing this! Kepp up the great work!
You’re welcome. I am glad I can help!
Hello Catalina,
Naomi, here I just want to say how much I appreciate your step by step instructions and your understanding of others needing help. I am most impressed with your willingness to help others. I have a Cricut maker I love my machine but I need to learn how to use all the different features. lol, I have learned so much from following your instructions.
Thank you so much,
Sincerely Naomi
Hi Naomi,
That’s very sweet of you, thank you so much… I am glad I can help!
Thanks for this Catalina, great help.
You are very welcome Peter
This is awesome and extremely helpful for the craft i’m trying to make. Thank you so very much!!
You are so welcome. I am very glad I can help!
Your post inspired me. I wanted to make layered planets, but none of the images I found worked. I created odd shapes by making ovals different sizes and laying them over each other and slicing to get different rounded shapes that looked like clouds, etc. for the planets. THANK YOU!!!
Hi Amy! That’s awesome I am really happy to hear that! This is the reason why I do what I do!
I tried to save the rounded shapes, but I’m not sure how to save it to my design space. Could you give me a little more detail.
Thank you.
Hi Gwenn I am sorry I took this long! Go to this link: https://www.daydreamintoreality.com/wp-content/uploads/2018/12/Rounded-Shapes.svg and then you need to right click this image and save it. Then on your design space upload it. If you don’t know how to upload them, make sure to read my full Cricut Design Space Tutorial: https://www.daydreamintoreality.com/cricut-design-space-canvas-tutorial/
Have a lovely day! 🙂