If you are not using Templates in Cricut Design Space, you are missing out on something very cool! This is a feature that can cut your designing time when used correctly, and today I am going to show you how to use it.
But first of all, what are Templates in Cricut Design Space?
Templates allow you to visualize and get a general idea of how your final product will look like once you cut it. There are many types of templates, and each of them represents where your final design will be placed.
This tool is very useful because it takes all of your second-guessing out of the picture. Is my design too big? Will it fit? Will the colors match?
Now that you know what template are, let’s learn how to use them!
If you are a beginner still figuring out Cricut’s software, I recommend this comprehensive and easy Design Space tutorial.
How to use templates
Templates are very easy to use and I am sure that once you are done reading and following this tutorial you will start using them on a regular basis.
The best way for you to learn, is by following along!
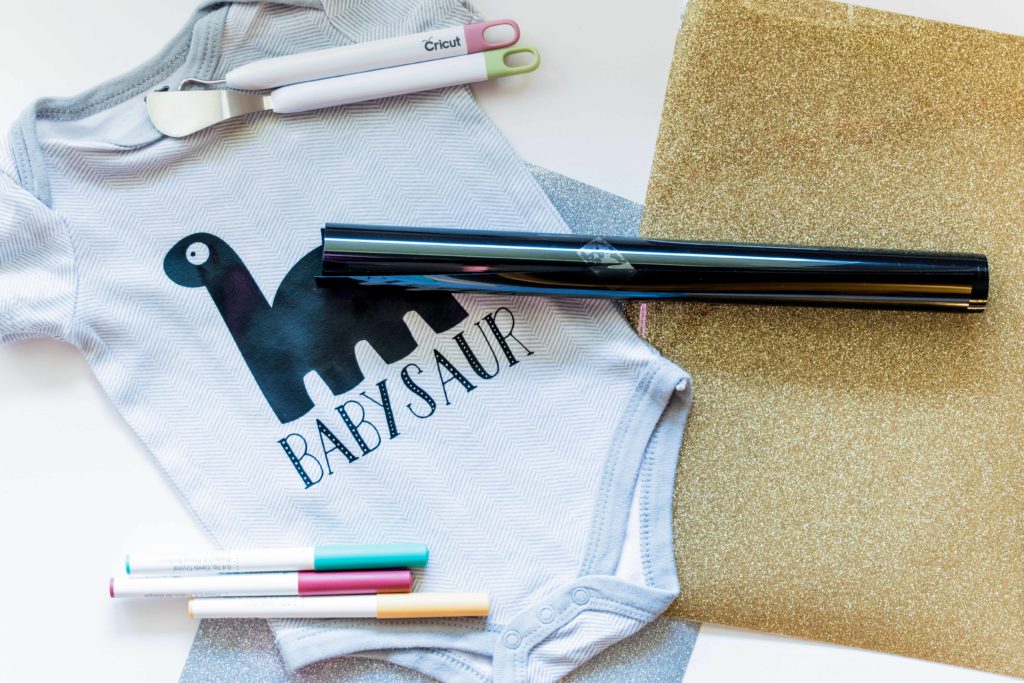
For this tutorial we are going to make an Iron on – HTV – design on a Onesie for a 3 month old baby.
Right click on the image – this an SVG File – and hit save. Upload it to Cricut Design Space, and let’s get ready to learn how to use this great tool.
Oh!
Just so you know, I also have a library full of free SVG files and Printables for all my subscribers, a.k.a. Daydreamers. You can see a preview right here or get access by filling out this form.
Insert your design
Depending on the type of templates you are going to use your final cut for, you will want to insert your design before and after.
Since my design is already made, and it’s for a onesie, I will add my image first, and then I will add my template.
However, If I was designing from scratch with text and/or shapes; and the design was dependent on the template itself – like cards, and banners – I would add the template first to make sure I have into consideration all of the space.
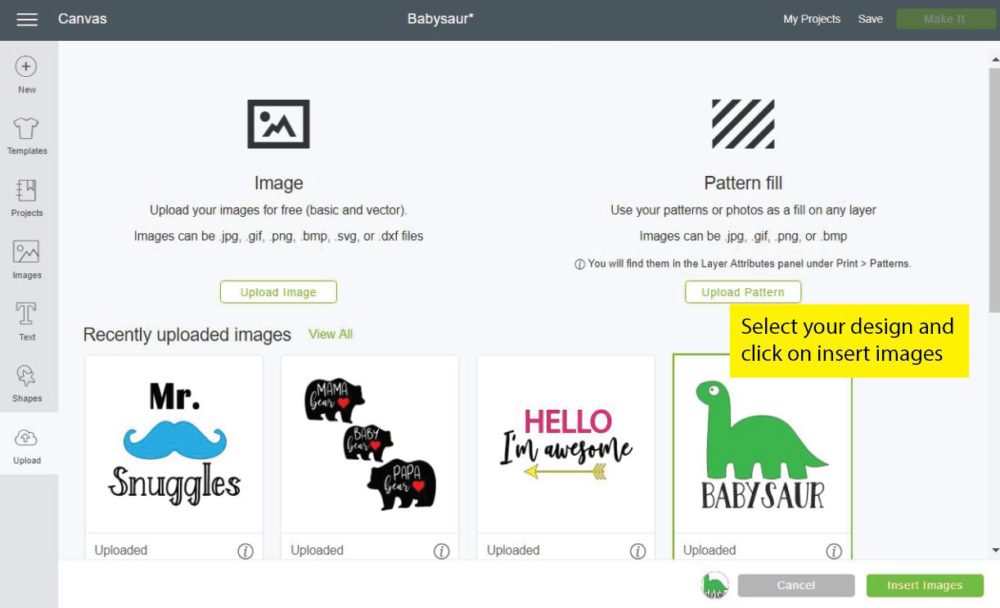
Once you upload your design, select it and click on Insert Images.
Select your desired template
To add your template, simply click on the templates button on the left panel of the Canvas area.
From this window you can choose your desired template, you can filter them by categories, or you can search them on the search bar option as well.
Note: In my opinion, unless you know how Cricut names the templates, I wouldn’t really use the search option. For instance, the word “onesie” isn’t a searchable word, but you will still find this template on the fashion category.
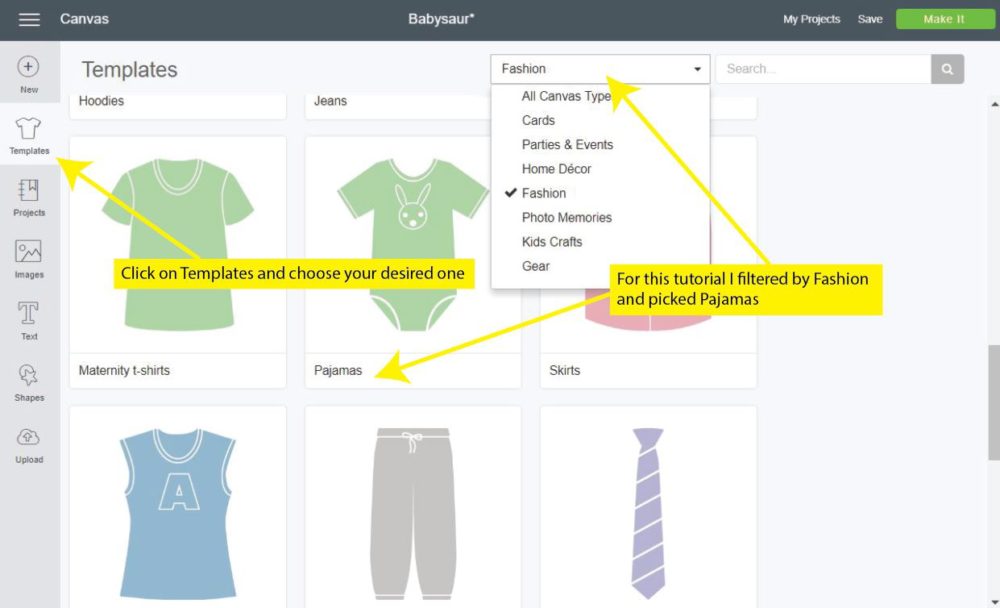
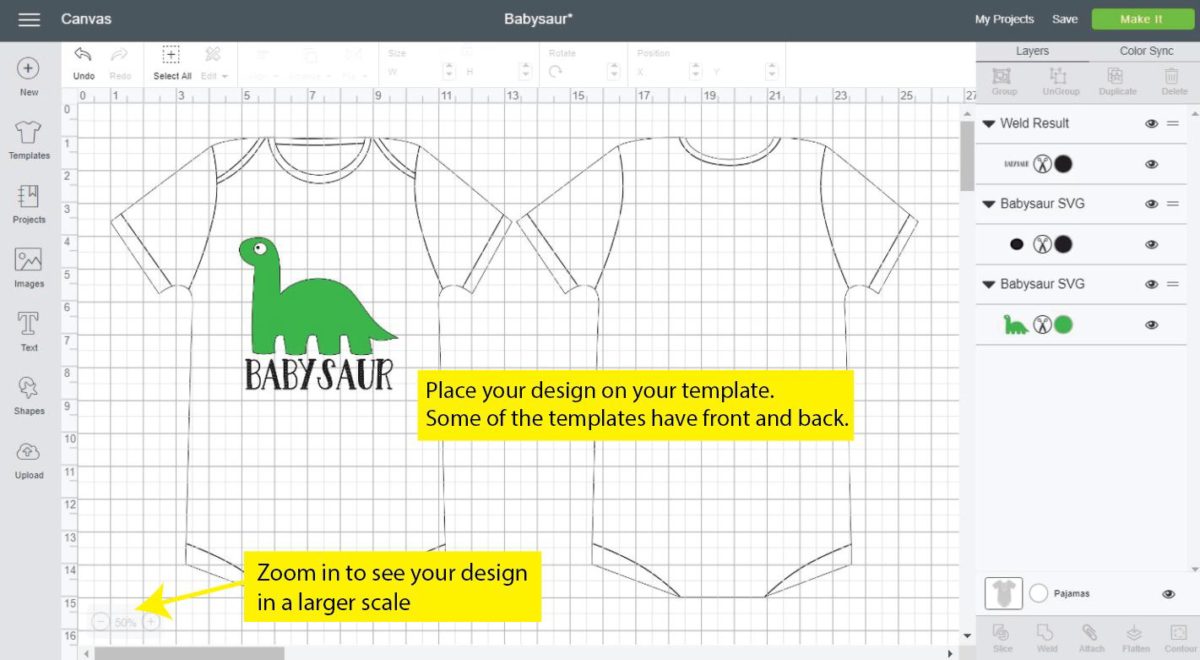
Once you click on your desired template, your canvas area will reopen again and this is how it will look like.
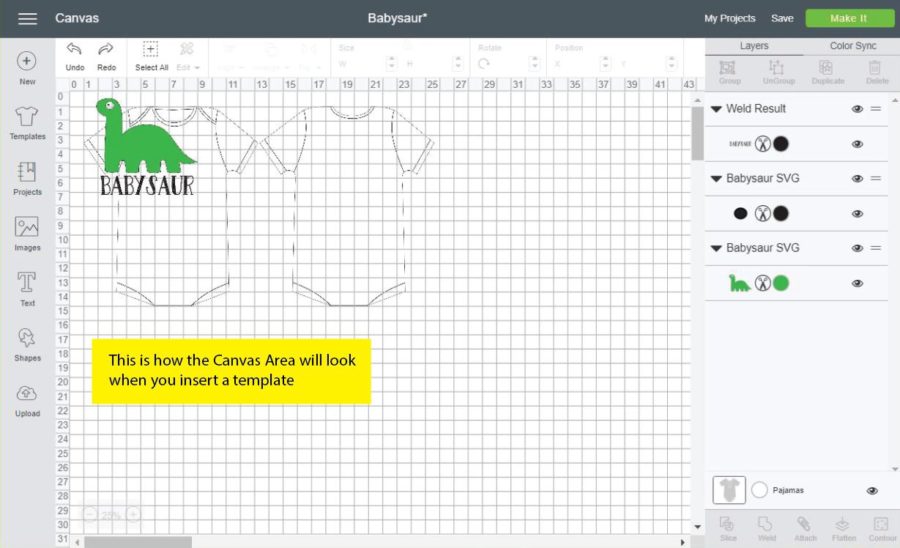
As you can see the measurements changed. This is because the template is bringing REAL LIFE measurements!
Something really cool about templates is that some of them allow you to see front and back. In this case, this feature would be great if I wanted to Iron on different designs on both sides of the onesie.
The thing that I love the most about templates is that once you insert them, you can play around with your files and visualize we they will look better.
Adjust the template settings
Here’s where you get to play around!
This design, is very obvious; It will go in the center of the onesie. However, and depending on the projects you are working on you can get very creative and see what’s the best size and place for your designs.
Tip: If you are like me and like to see big at all times, make sure to zoom in by clicking on the plus sign located on the left-bottom corner of the canvas area.
What if you need to change the color, size, or even the visibility of your template? Another point for templates! You can totally do this 🙂
Check out the graphic and its explanation right down below
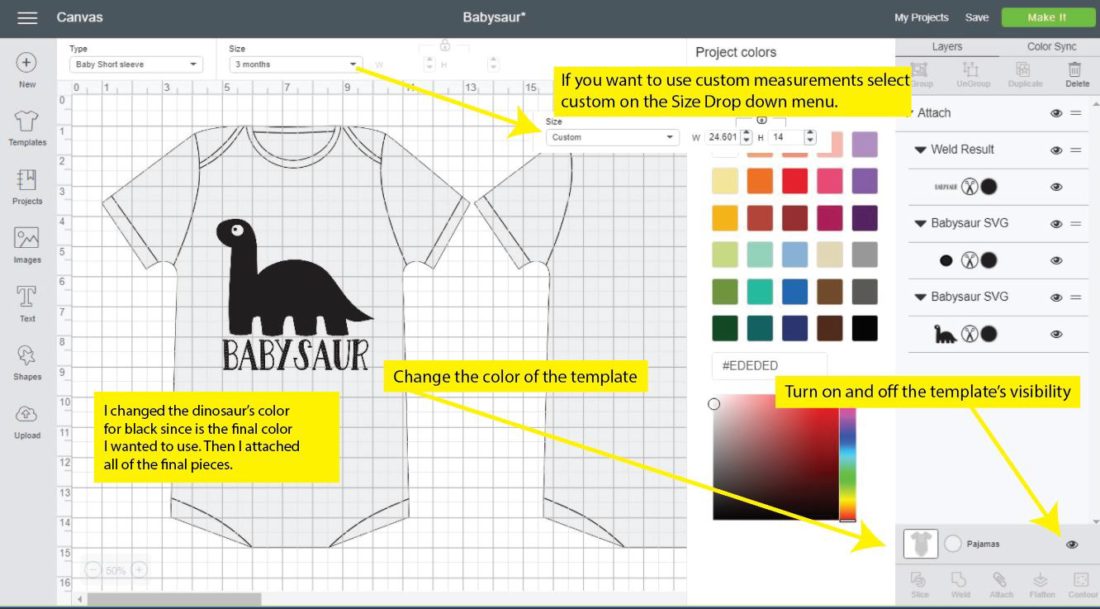
To change the background color of the template simple go to the bottom-right panel of the Canvas Areas and click on the template icon. After clicking, the colors panel will slide open, just choose the background color that better fits the surface where you will place your final cut.
By clicking on the template icon, you can also change the size and different types of options for the specific template you chose in the first place. These option will appear on the top panel of the canvas area.
For this particular template – pajamas – you can choose from romper, short, and long sleeves. And for size you can choose from 3, 6, 12, 18, 24 months. If you need a custom size – maybe you want to be completely sure – just click on the custom option of the size drop down menu.
Every template or category has different types, so make sure you explore them all!
Right by the template Icon you will notice that there’s a little eye. If at any moment you want to turn off the visibility of the template, just click on it.
At this point, and before you cut your project you might want to change some aspects of your original design as well.
For instance, the little circles on the letters look adorable on the final product but are hard to get out on the weeding process; in fact, for a moment, I thought it wasn’t going to be possible lol.
You can remove them by selecting that specific layer and then clicking on contour. (Located on the right bottom panel of the canvas area)
If you were using this on paper, you will need to remove the circles, this because paper is a rougher material than Iron on, and since these circles are so intricate, you can risk tearing your paper.
Or you can try it and let me know in the comments down below how it went for you!
For this tutorial…
I went with a short sleeve and 3 month old size. The onesie that I am using for this project has white and grey lines, so I just chose a grey color to see how my design would look against grey.
Fun fact: since I didn’t have green Iron on Materials I decided to make the whole design black, then I attached all of the pieces so the would remain together after sending them to the mat.
I wish you could upload different patterns to your templates, but right now that’s not an option.
Send to cut
After you are done with your design you will now proceed to cut!
As you can see, when you send your project to be cut, the template is no longer visible. This is because the template was for you to visualize, not to cut.
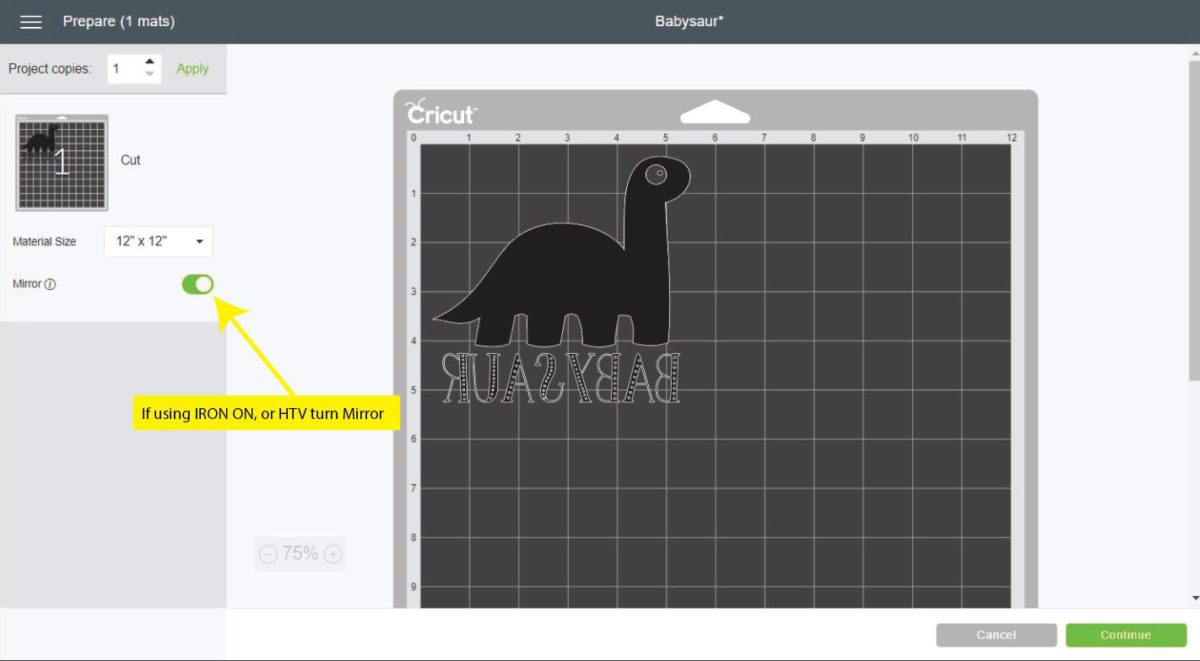
Remember that for Iron on or Heat Transfer Vinyl project you need to turn on the Mirror option. Once you are done, just follow the cutting instructions and then you are ready to go.
Types of Templates
As I mentioned before there are many templates to choose from. However, I wanted to give you a list of all of the types of templates you will find on Design Space so you have an idea of all the projects you can accomplish by using them.
All Canvas Types: this includes all of the available templates. However, for some reason, not all templates that you see here are filtered in a different category. So make sure to check these out too!
Cards: If you love card making this template is ideal for you to manage the space, and see how all of your elements and or designs will look on your cards.
Parties & Events: If parties are your jam, these templates are the perfect way for you to visualize how some of your cuts will look on party decoration items.
Find these type of templates:
- Party Banners (triangle, half circle, rosette, etc)
- Goblets
- Stockings
- Wreaths
Home Decor: If you are all about doing home decor around your house, this category will have really cool and useful templates for you to take on any project you can think of.
Find these type of templates:
- Candles
- Washer & Drier
- Doors
- Mugs & Glasses
- Pillows
- Jars
- Napkins
- Canisters
Fashion: This is the perfect category if you want to create designs for your T-Shirts, or any type of clothing.
Find these type of templates:
- Aprons
- Shorts
- Pajamas (onesies)
- Hoodies
- Flip flops
- Jeans
- Maternity Shirts
- Ties
- Yoga Pants
Photo Memories: Are you a scrapbooker? If you are, these template will help you to create precise layouts for your photos.
Find these type of templates:
- Collage Frames
- Scrapbook layouts
- Wall Calendars
Kids Crafts: I wish I could tell you there’s a lot of things going on this section lol. So Cricut, if you read this, make sure to add more templates here! 🙂
Find these type of templates:
- Tots
- Book covers
- Aprons
Gear: If you are all about personalizing things, these templates will really help you to visualize how your final cuts will look on your desired surface.
Find these type of templates:
- Backpacks
- Laptops
- Guitars
- Locker
- Smartphones
- Skis
So…
What did you think?
Are you going to use templates more often? Let me know in the comments down below!
Also, if there’s something you think I am missing out, tell me! I want this guide to be the most complete out there!
If you loved this tutorial and you think it can help someone else, don’t forget to share it on your favorite social media.

Thank you soo much!!! Super helpful …. Saves a lot of time.????????????????????
I just read your article! Fantastic! I never knew! Thanks a million for this, will make life so much easier!
I have a Mac computer. I can’t get the options to change the color of the baby suit or the size. I did what you said, but no luck.
I will take a look if any of the updates changed this setting.
I’m new to cricut I’m buying the 3. I’ve heard that the design thing you purchase doesn’t actually have downloadable templates. Is this true. I need to make my own boxes but I don’t want to purchase a machine and buy the cricut access if I have to design my own templates.
You can use Cricut’s files and your own within the platform. However, you can’t download any of the creations from the software to use somewhere else.
Am I able to change a word on one of the templates, I wanted to change baby’s first Christmas to an individual name.
You really can’t they are more for you to see how your project would look on your “template.”
Why isn’t the template for “cricut machines” showing up on the canvas?
I tried adding them and they are not populating the canvas. Maybe because they are working on the new ones? I really don’t know.
Why doesn’t my design space have templates I CANT FIND them in the app or in canvas mode no one is helping me with this.
There are no templates on the phone app 🙁
I’m new to this my circuit sits on my table and I want to do so much but I don’t know where to start HELP I’m really into all this and need to learn I’ve read your blog and it’s helpful thank girlfriend ppl l
Hi! You can star with installing the software, then learning Cricut design space and making a small project like a card, or t-shirt! You got this.
I do not have a Cricut yet, but I am trying to read as much as I can before purchasing the one that will be most useful for me. I have yet to see anyone demonstrate cutting stencils so I can paint on wood. Is that something you do or no? Thank you, Penny
I am coming up with a stencil tutorial very soon! There are tons of Youtube videos teaching how to make stencils, though!
I’ve had my Cricket for a year but it’s been a very busy year. I haven’t had the opportunity to watch the YouTube videos I want to watch plus, I’m with Nikki, I get bored during the first paragraph on most tutorials. I don’t read tutorials to find out more about their affiliations or how busy you’ve been trying to get this info out, etc…maybe they should add that at the end, if it’s something we need to know, but I don’t want to have to “look” for the tutorial thru the whole text. You do an amazing job of cutting to the chase and are very direct with your instructions. I had no idea what the temples were for so thank you. I will certainly be following you with interest from now on.
I am very happy to hear this! My tutorials are hands-on from the beginning. I am glad you can appreciate them!
Thank you for this lesson. I have been using my cricut for over 2 years now. I have different papers cut out that have sizes on them and I test drive them on the shirt. Boy, this will make it easier and faster. I had noticed the templates before, but never tried them. Now I will be using them all the time. I can even throw away my paper cutouts! My room will be cleaner too. The bonus!
Yay! That’s awesome 🙂
Thank you for this tutorial. I have used the template feature, but a refresher course is always useful!
It sure is! I am glad you like this tutorial!
Thanks so much for all of your tutorials. I just started with my Cricut and I appreciate all the info I can get. I just finished with the templates and wow what a help! I will continue to view your site and look forward to all the projects and fun that goes will it! Sincerely Dianne Cepik!
You’re very welcome! I am glad I can help 🙂
Thanks so much for sharing the information with us on templates I have not got my cricut machine yet I am waiting for it to come in but have a living grandchildren from age 14 to newborn so I will be using the templates quite often and we’ll definitely be looking forward to reading more of your information thank you so much for putting it in a way that I can understand some that I have read have just totally lost me thank you so much sincerely
I am happy I can help! You’ll be quite entertained crafting for all of your grandkids!
Thank you! This is a tutorial I desperately needed!
You’re welcome! 🙂
Hi ! I love your tutorials. I know how to use the template but I wanted to move the template around on my screen. I haven’t found a way to do that. Can it be done? For example move the template from the top left of the screen to the bottom right?
You can’t move it. It’s always on the corner. I hope this helps 🙂
Thank you soo much for taking time and explaining all of this.. I am a new cricut user and all of ur blogs that i have read have been such a big help thank you sooo much!!!
you’re very welcome! I am very happy I am able to help!
Use my iPad usually will be setting up my laptop more often to experiment with Templates. Thank you!!
You’re welcome 🙂
Thanks for the instructions on templates, I thought they were just for ideas! I got my cricut Air 2 for Christmas, but have only cut fabric for masks and hats. I have several projects in my space, but still learning how to make corrections once I save it. I’ll look forward to your other instructions. Thanks!
You’re very welcome 🙂
I just got my Cricut maker!! I am excited to start using it. Thank you for all the great info!! I have no idea what I am doing yet so any info helps!! I truly appreciate your time and effort to post great information.
Tonya
I am happy to hear this article is helping you! 🙂
I’m really enjoying all the info about everything Cricut! Have you ever experienced an issue with the templates not actually being true to size? I was working on a t-shirt project the other day using the t-shirt template but for a youth large the measurements didn’t actually change. While designing and getting ready to cut I realized that my project size was only going to be 2” by 3.3” when I actually needed it to be closer to an 8”. Anyone else experience this?
The template should change in size and you should adjust. At first, I was always very cautious. And still am sometimes. If I am working on something very important I will also measure my shirt.
Thanks so much, I had the original Cricut for 15 years and just upgraded. I am so overwhelmed with the workspace. This was very helpful thank you. I’m attempting to make shirts for my bachelorette trip to Disney.
I am glad I was able to help!
This was very helpful to me
Happy to hear 🙂
Thank you for this it was very helpful
You’re very welcome 🙂
Unfortunately, Ido all my design space work on my iPad. And Cricut STILL HAS NOT made the template option available!! Very frustrated at this. They keep exhausting hours on so many other things but can’t get this fixed.
Great tutorial though for those who use a PC
Let’s hope they work on this! Have a great day!
Yasssss! I totally feel you on that bc I use my iPhone & iPad for 99.99% of the stuff I do on my Cricut and the template option is STILL not available! I don’t understand why it isn’t available, but it would be SOOOOO helpful if it was! Well, maybe if Santa brings me a new laptop for Christmas I won’t have to worry about it! LOL! ????
Thanks for the tutorial! I will be sure to use it when I use my new laptop! ????
I know! lol Let’s hope you get a nice laptop for Christmas 🙂
Thank you so so much……
I have been using my Cricut for a little over a year now and I thought I had gotten it pretty much figured out…. but clearly I was wrong bc I had to idea about this feature and there has been time after time that I had to guess the size of my cut for my project where this tool would have been PERFECT!!! An would have removed all of the guess work!!….
It’s VERY VERY rare that I actually take the time to read these tutorials Bc usually they either don’t make any sense or there’s just so much unnecessary information in them that it muddy the water and makes things confusing But your tutorial, On the other hand, was PERFECT I don’t think I ever actually finish reading a Tutorial Until today!!! It was very informative and Made it very easy and clear!!! You have a Dedicated reader/ subscriber
You’re very welcome Nickie, I am very glad you found good information!
I don’t have a cricket machine I have a skinny cat can someone tell me where to go to get the free templates so I can use them thank you Debra
Hi Debra, templates are only for Cricut machines!
Have a great day.
I didn’t realize that users didn’t know about the cricut templates. It’s the first thing I used. 😉
Aren’t they awesome 🙂
I love using templates on the laptop but I can’t find them through the app on my iPad or phone
Hi Jessica!
The Cricut App doesn’t have the templates option.
🙁
I am fairly new to Cricut, got mine for Christmas and have made lots of shirts and party decorations for the grand babies but have never used the templates. Wasn’t quite sure what they were for! Thank you so much for explaining it so clearly ?
Hi Ginger – You’re welcome!