Are you trying to learn everything about Cricut Design Space and don’t even know where to start?
Learning a new hobby or skill can be intimidating at first. Sometimes, we don’t even know where to start because there’s so much information, and it’s overwhelming.
The best way to learn and master Cricut Design Space is from the beginning!
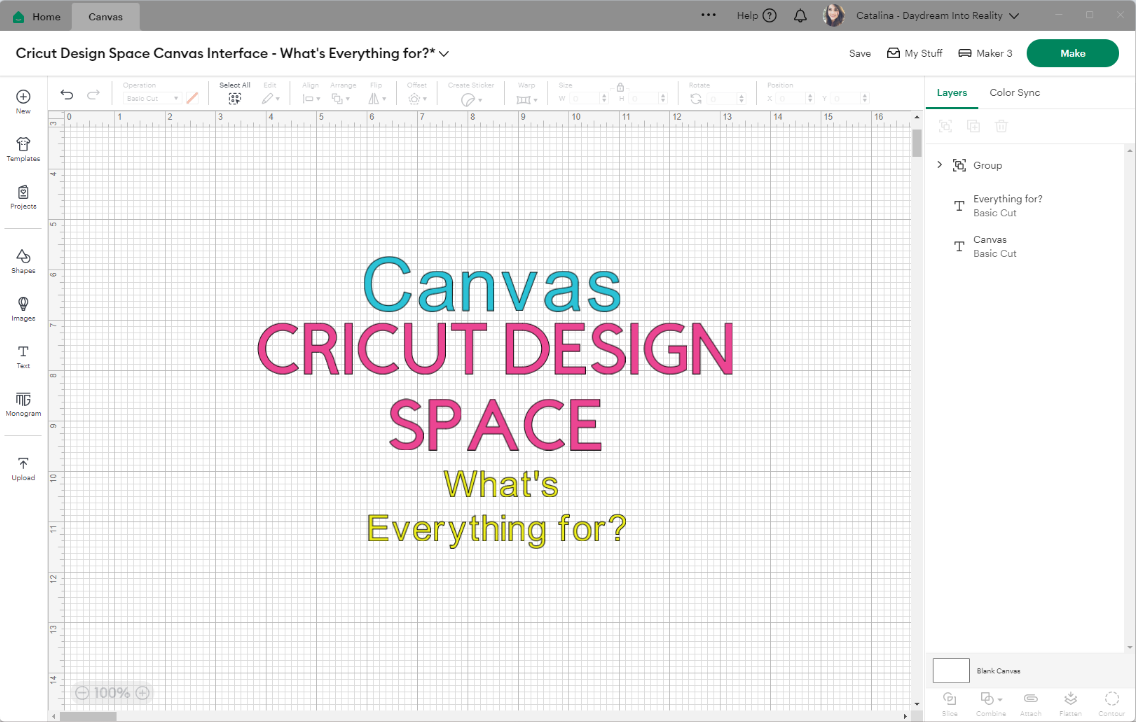
When you log into your Cricut Design Space account and want to start or edit a new project, you will do everything from a window called CANVAS.
There are so many buttons, options, and things to do that you might feel lost. Don’t worry; I am here along the way, cheering you up and encouraging you to keep going.
Design Space mainly touches your projects and creates minimal designs with shapes and fonts. On the other hand, if you have preview experience with any Adobe Creative Cloud apps or Inkscape. You will see that this program is just a breeze.
If you want something more sophisticated, you will need your own designs or Cricut Access. That’s a membership where you get access to their supergiant library. Learn more about it in this guide I put together.
Note: If you are still learning what a Cricut is and which one you should get, I highly recommend reading this post, where I walk you through 50+ questions before and after I got the Cricut. I spent multiple hours of research and a whole week putting together this ultimate guide, and I update it as Cricut releases new cool stuff.
Tip: This is not a short post, so I encourage you to get a cup of coffee with some donuts or cookies if possible.
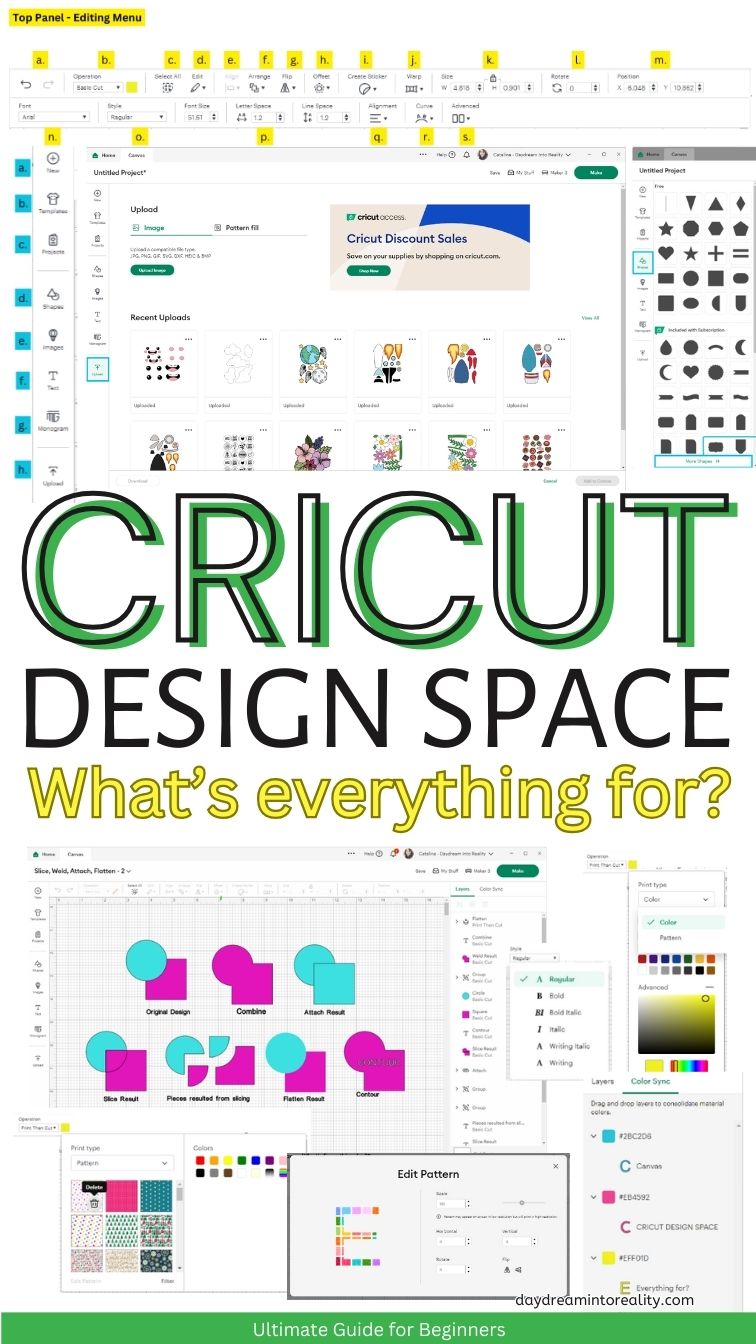
Top Panel Cricut Design Space
The top panel in the Design Space Canvas area is for editing and arranging elements on the canvas. You can choose what type of font you’d like to use, change sizes, align designs, and more.
This panel is divided into two sub-panels. The first allows you to navigate Design Space, save, name, and finally cut your projects. The second one will enable you to control and edit things on the canvas area.
Sub-panel #1 Name Your Project and Cut it
This sub-panel allows you to navigate from the canvas to your profile and projects and sends your completed projects to cut.

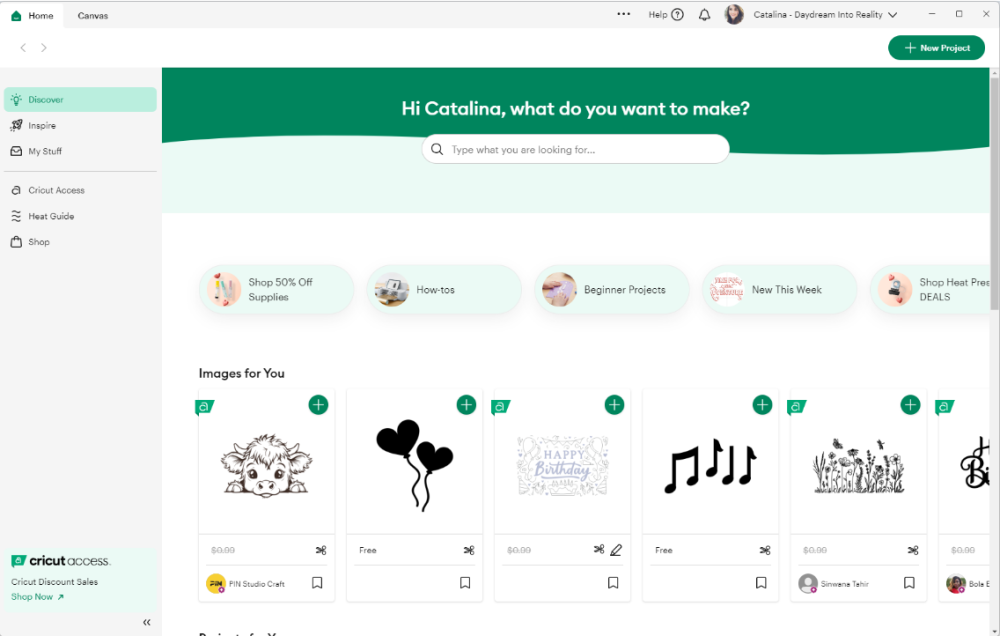
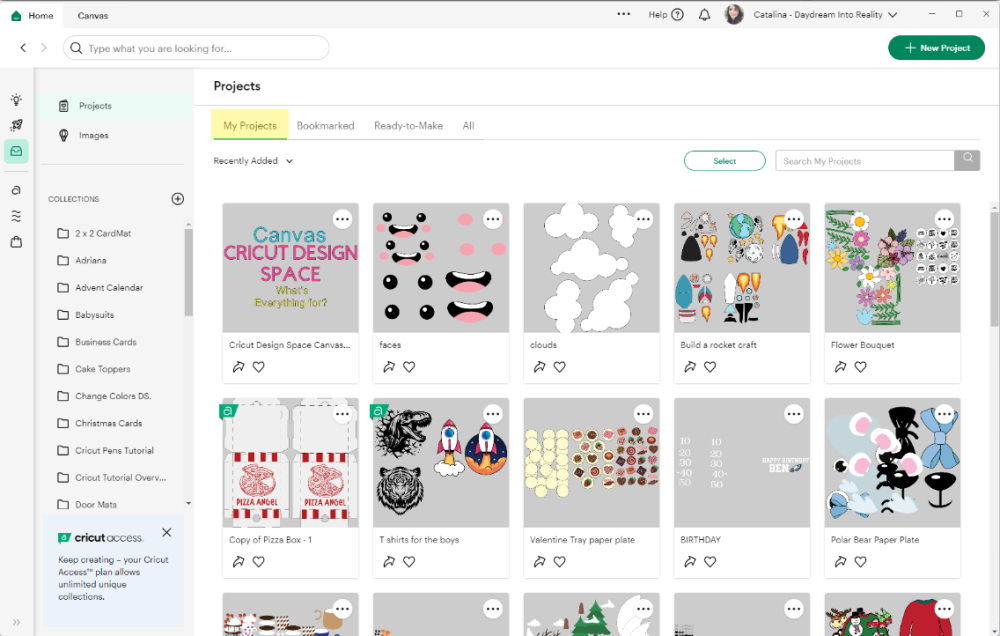
a. Home
When you first launch Design Space, “Home” will be the interface you’ll be in. On this screen, Cricut shows you different projects you may want to do, such as sales.
To start a new project, click the green “New Project” button or the “Canvas” tab.
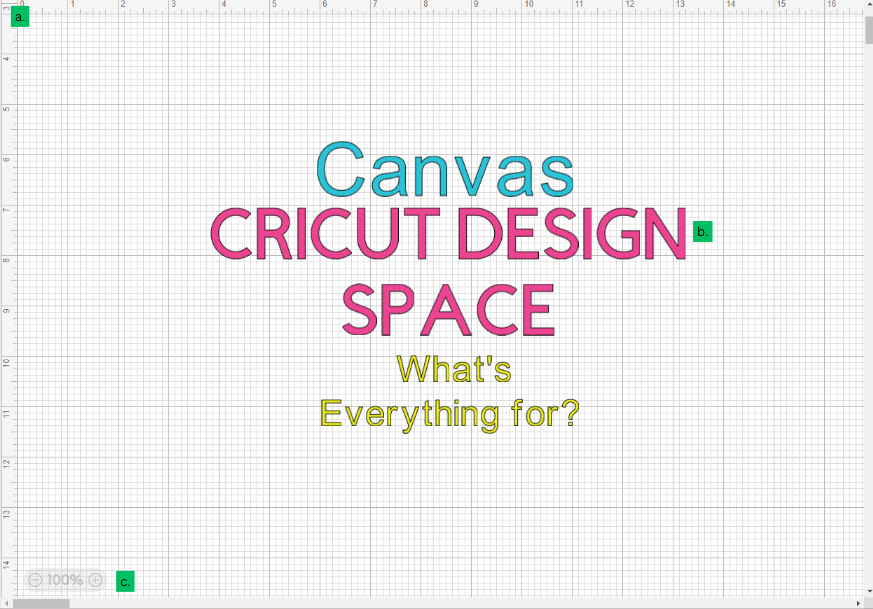
b. Canvas
The Canvas is what this tutorial is all about.
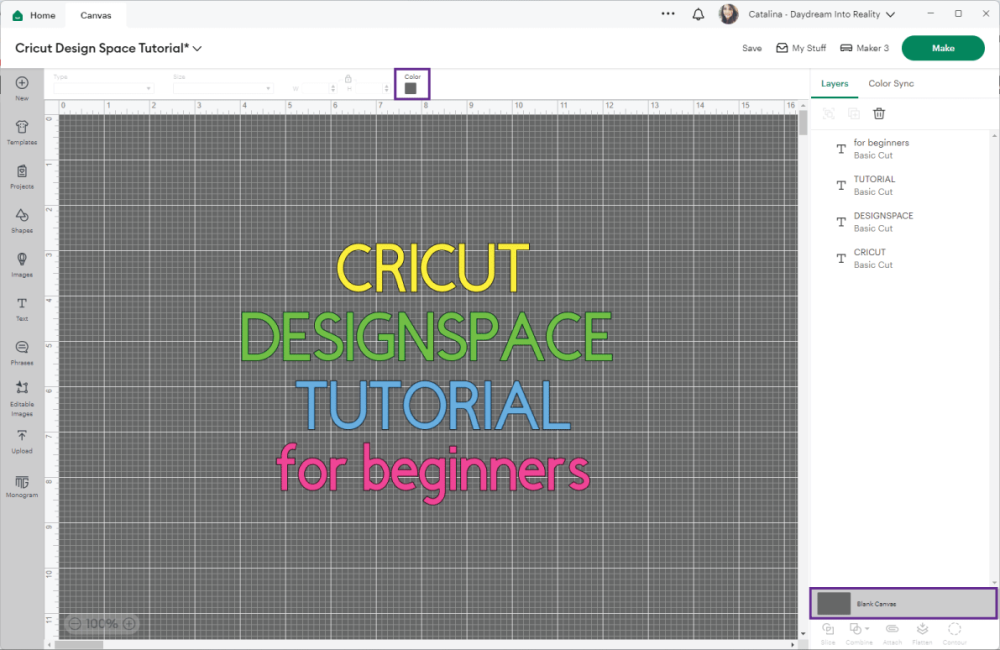
To make this tutorial more engaging, I divided the canvas into four different panels:
- Top Panel Yellow – Editing Area
- Left Panel Blue – Insert Area
- Right Panel Purple – Layers Panel
- Canvas Area Green
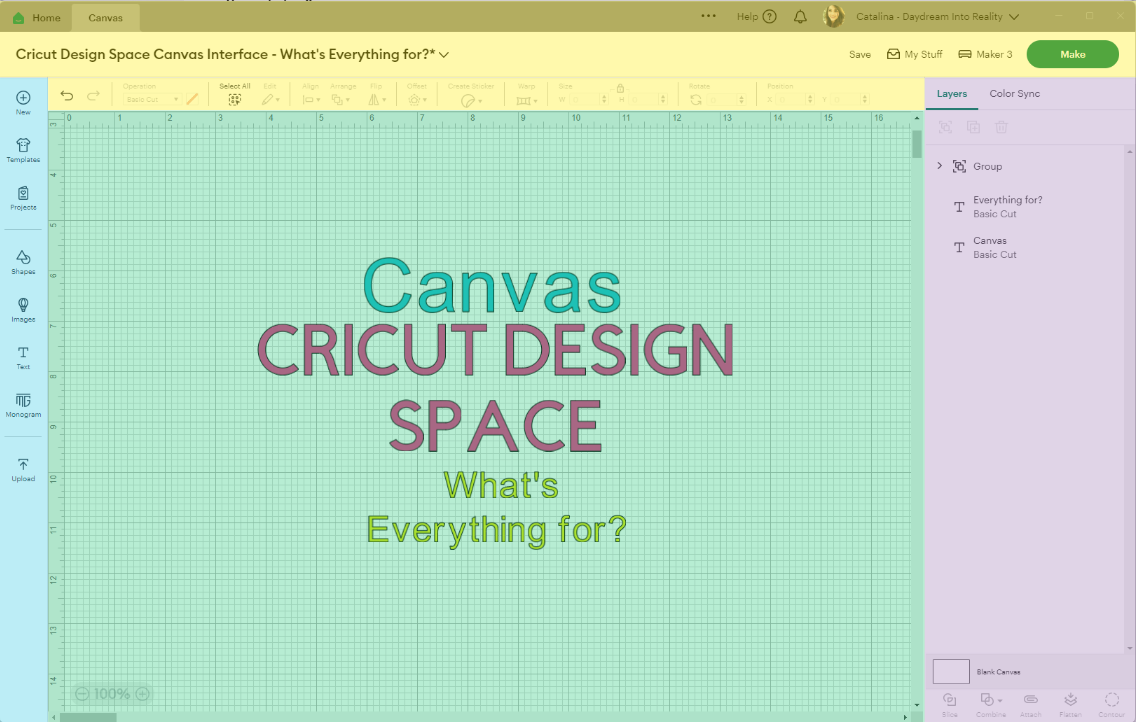
Note: Right now, we are on panel yellow.
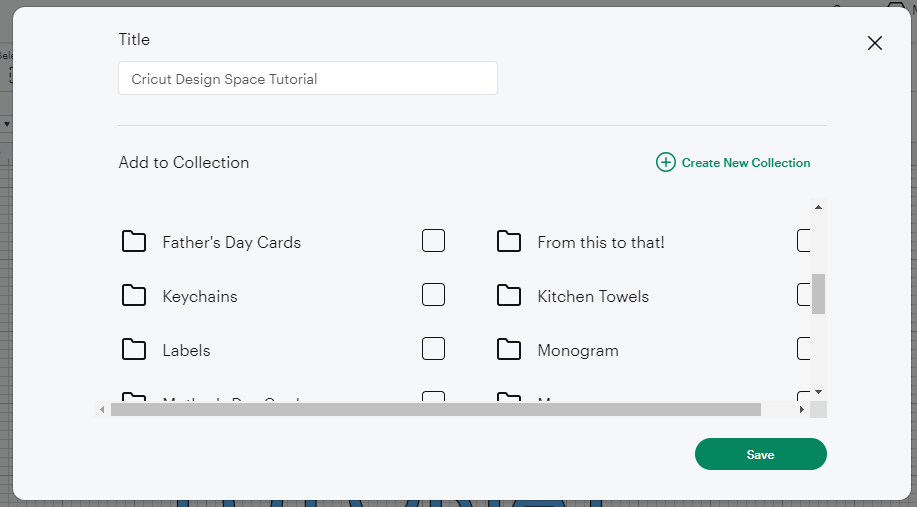
c. Project Name
All projects start with an *Untitled “title,” you can only name a project from the canvas area after placing at least one element (Image, shape, etc.) on it.
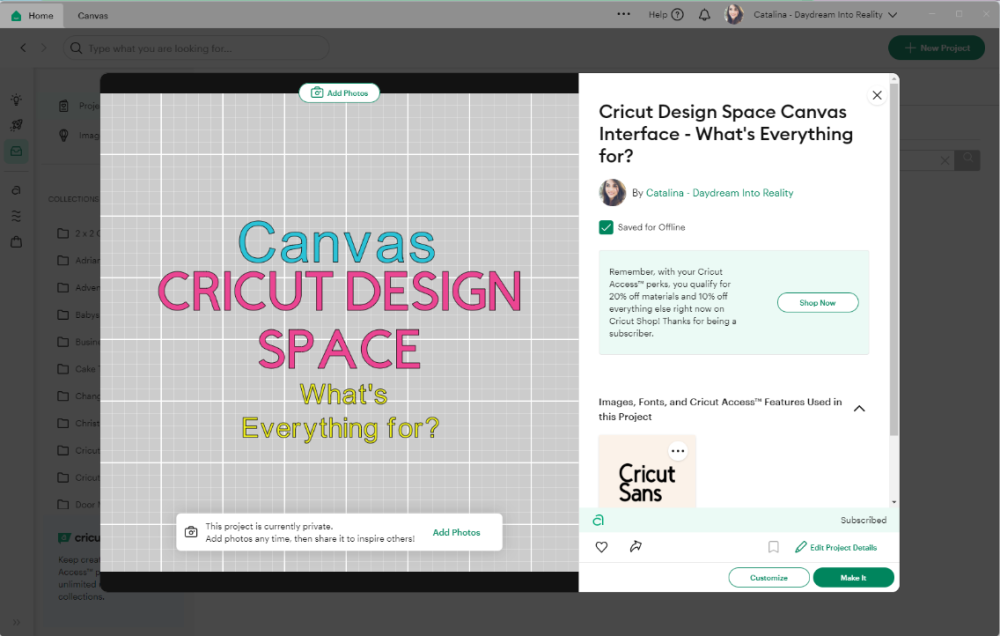
Once your project is saved, the project name will become interactive and display a window with the project information.
Go ahead and click on the options to explore all the options you have to save and find your project later on.

d. (…) & Help, & Notifications
The (…) icon allows you to open a second window of Design Space to work on a second project simultaneously. You can click on other settings to get more familiar with the program.
Click “Help” to see different tutorials, cheat sheets, report problems, and in general, if you need help while using your machine.
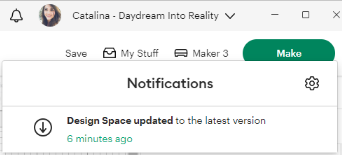
Cricut is an entire community, and if you decide to share your projects with people, you’ll receive notifications when someone follows, likes, or shares a project inspired by you.
If there’s someone that you follow, you’ll also get notified when they share new projects.
Tip: Cricut will notify you when a new tool is available in Design Space.
e. Profile Drop-Down Menu
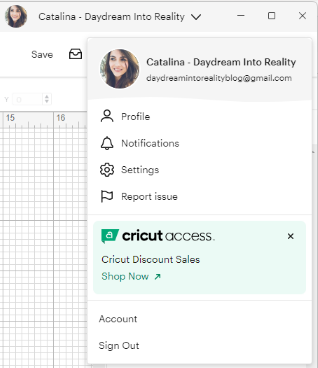
A small window will slide open when you click on this drop-down menu. However, since it’s not part of the Canvas, I won’t be going into much detail.
You can do other valuable and technical things from this menu, like calibrating your machine and blades and updating your machine’s firmware (software).
You can also manage your subscriptions from Cricut Access, your account details, etc.
I recommend you click on every link to explore everything Cricut Design Space has for you.
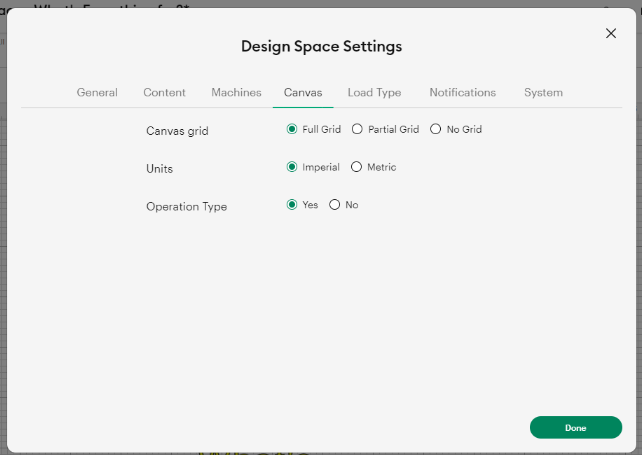
Note: On the settings option, you can change the visibility and measurements of the Canvas; this is explained better at the end of this tutorial when I explain all about the Canvas area.
f. Save
This option will activate after placing one element on your canvas area. Although Cricut has autosave, sometimes you can still lose some of your hard work; I recommend saving your project as you go.
g. My stuff
When you click on “My Stuff,” you’ll be redirected to your library of things you have already created; this is great because sometimes you might want to re-cut a previously created project. So, there’s no need for you to recreate the same project over and over.
h. Machine
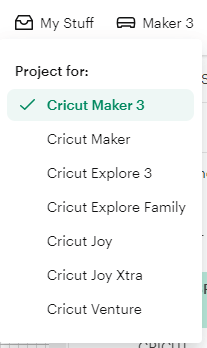
Depending on the type of machine you have, you will need to select the device you own; this is very important because each machine has different options and operations (covered later in this tutorial) it can perform.
For instance, if you have a Maker machine, you’ll have more options than when you have any of the Explore machines.
The same goes for the three series. You can cut matless and larger-sized projects with these new machines.
Cricut keeps coming up with new machines every day! When I first started, there were only two options: Explore and Maker.
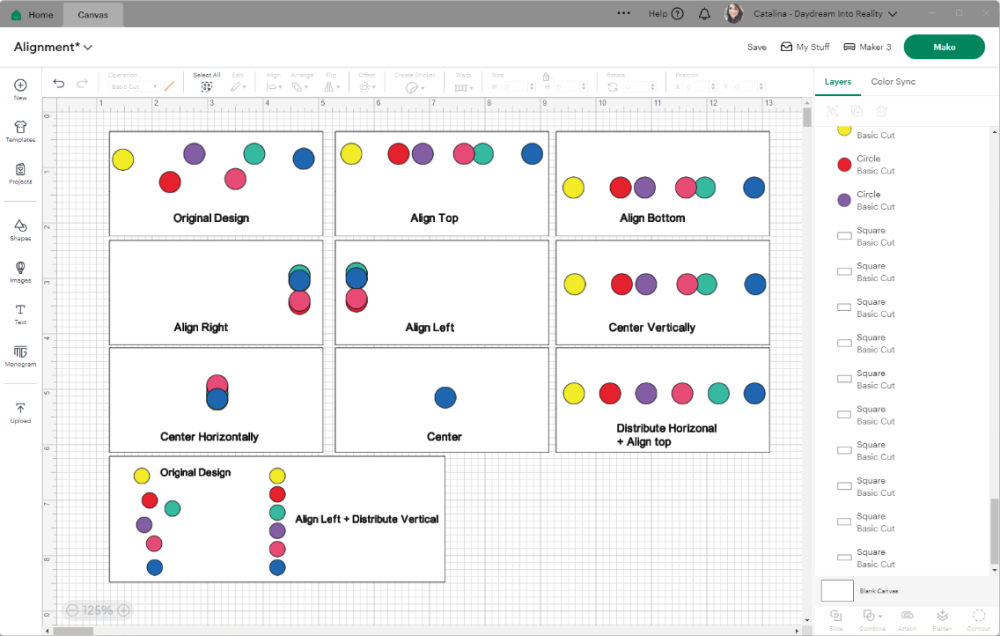
i. Make
When you’re ready to cut your project, click “Make” to send it to your machine.
Down below, there’s a screenshot of what you would see. Your projects are divided into mats according to their colors.
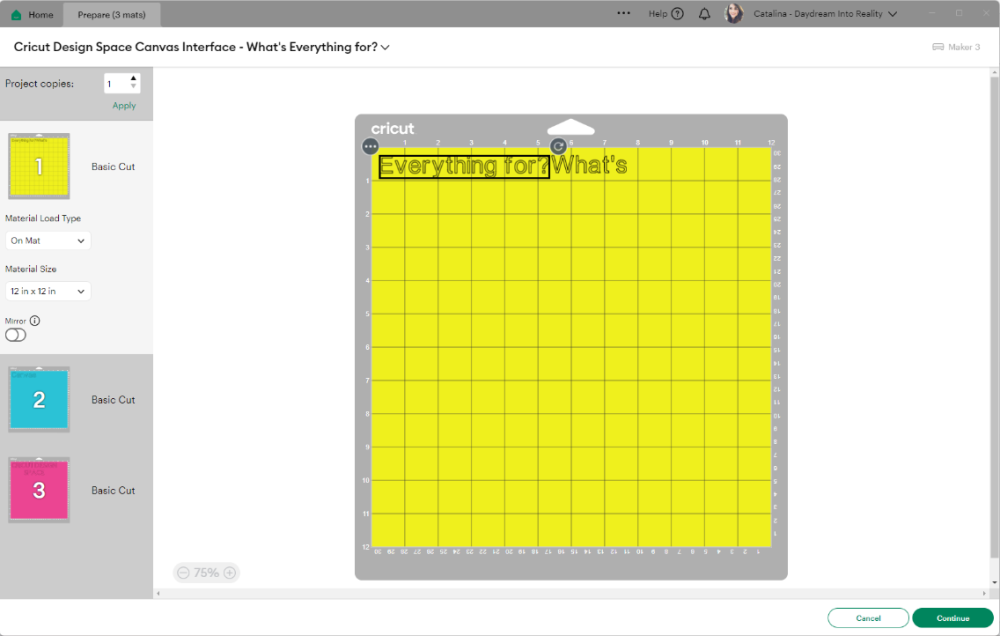
You can also increase the number of projects to cut; this is great if you plan to make more than one cut.
Note: some machines allow you to cut certain materials without a mat.
Subpanel #2 – Editing Menu
The editing menu will help you edit, arrange, and organize fonts and images on the canvas area.

a. Undo & Redo

Sometimes, while we work, we make mistakes. These little buttons are a great way to correct them.
Click Undo when you create something you don’t like or make a mistake. Click Redo when you accidentally delete something you didn’t want to delete or modify.
b. Operation
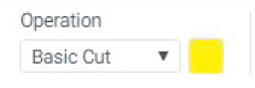
This option will tell your machine what tools and blades you will use in a project.
Remember that you will have different options depending on the machine you selected at the top of the window.
There are ten operations (basic cut, wavy, perforate, pen, foil, score, deboss, engrave, print then cut, and guide).
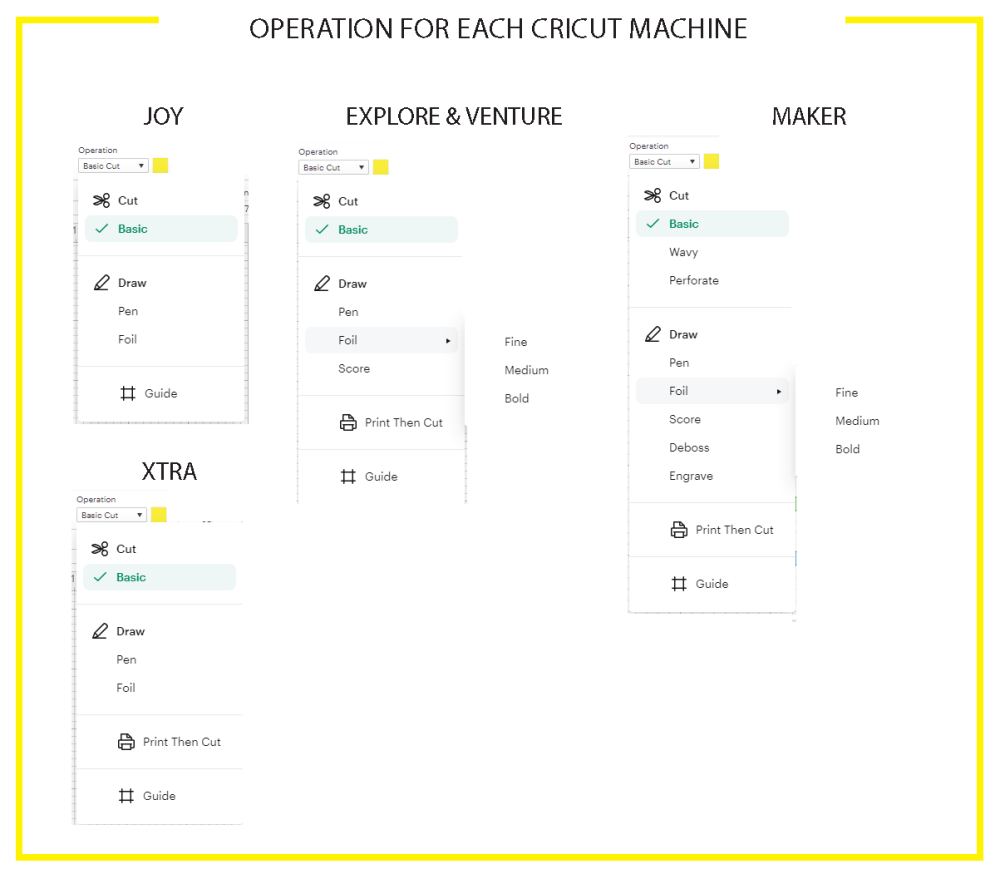
These are the operations you have per type of machine:
- Joy: basic cut, draw (pen and foil), and guide.
- Joy Xtra: basic cut, draw (pen and foil), print then cut, and guide.
- *Explore & Venture: basic cut, draw (pen, foil, and score), print then cut, and guide.
- Maker: basic cut, wavy, perforate, draw (pen, foil, score, deboss, engrave), print then cut, and guide.
Here is a more in-depth explanation of each tool.
*Note: Cricut Venture and all Explore machines have the same operations.
Basic Cut
Unless you uploaded a JPEG or PNG image to the Canvas, “Basic Cut” is the default operation that all of your canvas elements will have; when you press “Make,” your machine will cut those designs.
With the “Basic Cut” option selected, you can change the color of each layer to represent the materials you will use when you cut your projects.
I recommend this ultimate guide and tutorial if you need help learning about the Cricut Blades and their differences. It’s the best on the web, just like this tutorial!
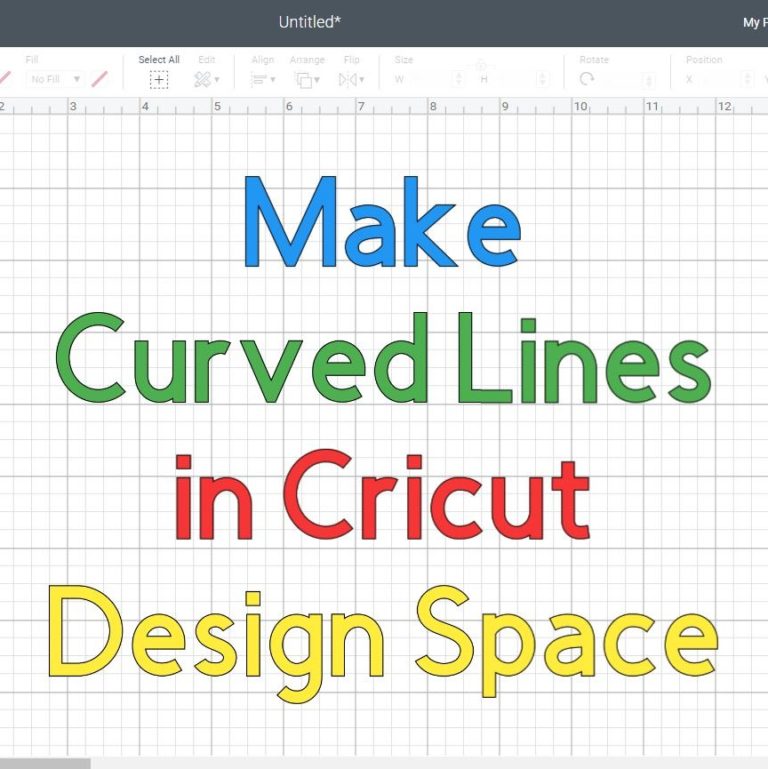
Cut – Wave
This tool will create wavy effects on your final cuts instead of cutting on straight lines like the rotary or fine point blade.
Getting curved lines in Design Space is complicated, so this tool will be handy if you like these effects.
Cut – Perf
The Perforation Blade is a tool that allows you to cut your materials in small and uniform lines to create perfect and crisp tear effects like the ones you see in raffle tickets, coupons, tear-out cards, etc.
Learn how to use the perforation blade
Draw – Pen
If you want to write on your designs, you can do it with your Cricut!
When you assign this operation, you will be prompted to choose any of the Cricut Pens you have (You need specific pens unless you have a 3rd party adapter). When you select a particular design, the layers on the canvas area will be outlined with the pen color you picked.
With “Pen,” when you click “Make it,” your Cricut will write or draw instead of cutting.
Note: This option DOESN’T color your designs.
Draw – Foil
“Foil” lets you make beautiful foil finishes on your projects with the Cricut foil transfer kit.
This operation lets you choose between fine, medium, and bold finishes.
Draw – Score
The Score tool is a more potent version of the scoring line on the left panel. All designs appear scored or dashed when you assign this attribute to a layer.
This time, when you click on Make it. Your Cricut won’t cut, but it will score your materials.
You will need the scoring stylus or the scoring wheel for these projects. However, keep in mind The wheel only works with the Cricut Maker.
If you have doubts about what materials you need, I suggest reading this article. It’s the ultimate guide for learning what accessories and materials you genuinely need.
Draw – Engrave
It allows you to engrave different types of materials. For instance, you can create monograms on aluminum sheets or anodized aluminum to reveal the silver beneath.
Draw – Deboss
This tip will push the material in and create beautiful and detailed designs. The debossing tip will allow you to customize your designs to a new level.
Imagine debossing a beautiful gift box with flowers, hearts, stars, etc.!
Print Then Cut
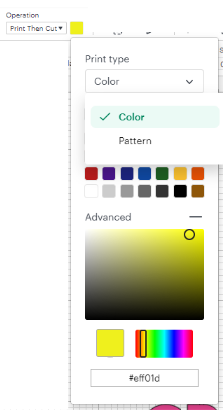
“Print Then Cut” is one of the best features Cricut has because it allows you to print your designs and then cut them; this is fabulous, and honestly, it’s what motivated me to get a Cricut in the first place.
I design tons of printables for kiddos and adults, and for taking photos – for my posts – I had to cut every little thing!
I seriously wanted to cry every time. I am a lefty, and scissors make my hands hurt. So the Cricut is a lifesaver for me.
Anyway, when this operation is active, after you click “Make,” you’ll send your files to your home printer and then have your Cricut do all the heavy lifting.
Another excellent option for the “Print Type” is “Patterns.”
You guys, this is so cool. Use Cricut’s options or upload your own; you can add a pattern to pretty much any layer.
The sky is the limit!
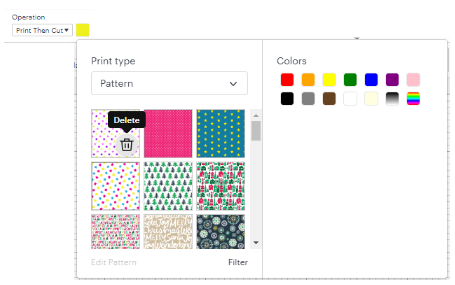
Let’s say it’s Valentine’s Day. You can make a beautiful card with an already-created pattern from Cricut Access (Membership, not free) or your own. Then, print and cut at the same time.
Tip: You can delete an uploaded pattern when you hover over it.
Except for the “Cricut Joy,” all other machines are compatible with “Print then Cut.”
Read my full guide on how to use Print Then Cut with your Cricut.
Guide
It’s a feature that allows you to add elements to the canvas as a reference on your project, but that won’t be part of it when you send it to cut.
c. Select All
When you need to move all your elements inside the canvas area, you may struggle to select them individually.
Click “Select All” to select all the elements from the canvas.
d. Edit
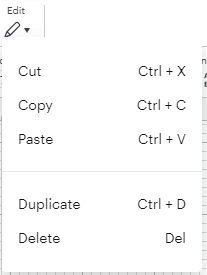
From the “Edit” tool, you can perform five different tasks.
– Cut removes an element from the canvas.
– Copy duplicates a layer on your computer’s clipboard.
– Paste a copied or cut element on the canvas.
– Duplicate an exact copy on the canvas.
– Delete an element from the project.
“Cut, copy, duplicate, and delete” will be activated when you select one or more elements from the canvas area. “Paste” will be enabled once you copy or cut something.
If some of these actions seem repetitive to you, it’s because they are. Some people are used to duplicating, while others prefer the old copy-paste. However, if you want to copy and paste between different Design Space windows, you must copy (or cut) and paste.
Tip: I suggest you learn the task commands to speed up your design process.
e. Align
If you have previous experience with other graphic design programs, most likely, you’ll know how to use this menu.
If you aren’t familiar with the align tools, let me tell you that the align menu is something you’ll want to master.
This handy tool allows you to align all of your designs, and it’s activated when selecting two or more elements.
– Align Left: All elements will be aligned to the left when using this setting. The furthest element to the left will dictate where all other parts will move towards.
– Center Horizontal: This option will align your elements horizontally; this will entirely center text and images.
– Align Right: All elements will be aligned to the right when using this setting. The furthest element to the right will dictate where all other parts will move.
– Align Top: This option will align all your selected designs to the top. The furthest element to the top will dictate where all other elements move.
– Center Vertically: This option will align your elements vertically. It’s convenient when working with columns; you want to be organized and aligned.
– Align Bottom: This option will align all your selected designs to the bottom. The furthest element to the bottom will dictate where all other elements move.
– Center: This option is a very cool one. When you click on “center,” you are centering vertically and horizontally, one design against another; this is particularly useful when you want to center text with a square or a star shape.
Distribute: If you want the same spacing between elements, it’s time-consuming to do it independently, and it’s not 100% correct. The distribute button will help you out with that. To be activated, you must have at least three elements selected.
– Distribute Horizontally: This button will distribute the elements horizontally. The furthest left and right designs will determine the distribution length, and the items in the center will be distributed between the most distant left and right designs.
– Distribute Vertically: This button will distribute the elements vertically. The furthest top and bottom designs will determine the distribution length; the items in the center will be distributed between the most distant top and bottom designs.
f. Arrange
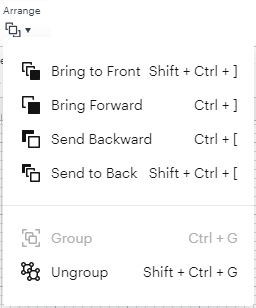
When you work with multiple images, text, and designs, the new layers you add to the canvas will always be in front of everything, and you may need to add them in a particular order as your project grows in size.
With the arrange commands, you can organize the elements very easily.
– Bring to Front moves the selected element to the front.
– Bring Forward will move the element just one step forward. Typically, you use this option when you have four or more items to organize.
– Send Backward will move the selected item just one step back. If you have a three-element design, It will be like the cheese in a cheese sandwich.
– Send to Back will move the selected element to the back.
– Group associates parts of a design that have similar characteristics. If you are working on a very complex and large project, you will want to group certain elements to change them in just a few clicks.
– Ungroup separates a selected group on the canvas.
g. Flip
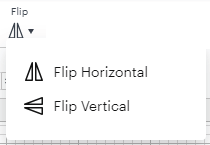
The “Flip” tool is a great way to reflect your layers in Cricut Design Space.
There are two options:
– Flip Horizontal: This will reflect your image or design horizontally. It’s like a mirror; It’s handy when creating left and right designs. Example: You are building some wings and already have the left side; with “Flip,” you can copy and paste the left wing, and voila! Now you have both (left and right) wings!
– Flip Vertical: This will flip your designs vertically. This option would be great if you want to create a shadow effect. It’s kind of like you would see your reflection in the water.
h. Offset
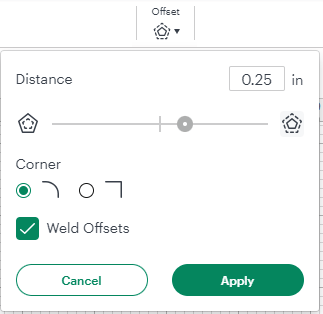
In Cricut Design Space, “Offset” is a tool that allows you to create a proportional outline inside and outside of text, images, and shapes.
The offset tool is handy when making projects like stickers, cake toppers, or any other design, for you may want to add a “stand-out” effect.
– Distance: It will determine how big the offset will be.
The max distance you can apply is 1 inch in both directions. If you move it to the left, you’ll make an inline; if you move it to the right, you’ll outline.
– Corner: You can choose between round and square corners when designing. I usually use the round option because it generates a better result.
– Weld Offsets: If you want your design to have a single outline, check the option “Weld Offsets,” If you want the outline of every detail of your multi-layer design, uncheck the option.
Check out my tutorial on mastering the offset tool in Cricut Design Space.
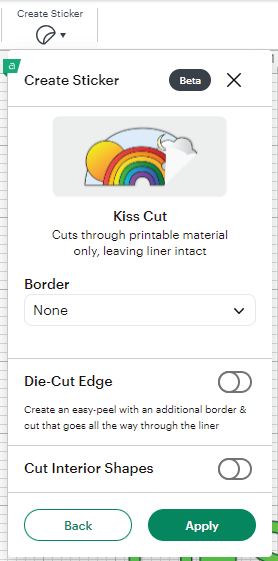
i. Create Sticker
The “Create Sticker” tool is one of Cricut’s new tools. However, it’s only available with their “Cricut Access” membership.
The tool will allow you to make die-cut or kiss-cut stickers. You can also add a border or offset.
If you don’t have Cricut Access, you CAN still make stickers with your Cricut machine. I’ve been making stickers without this tool for the last five years.
I have Cricut Access, and so far, I prefer the traditional way of making stickers.
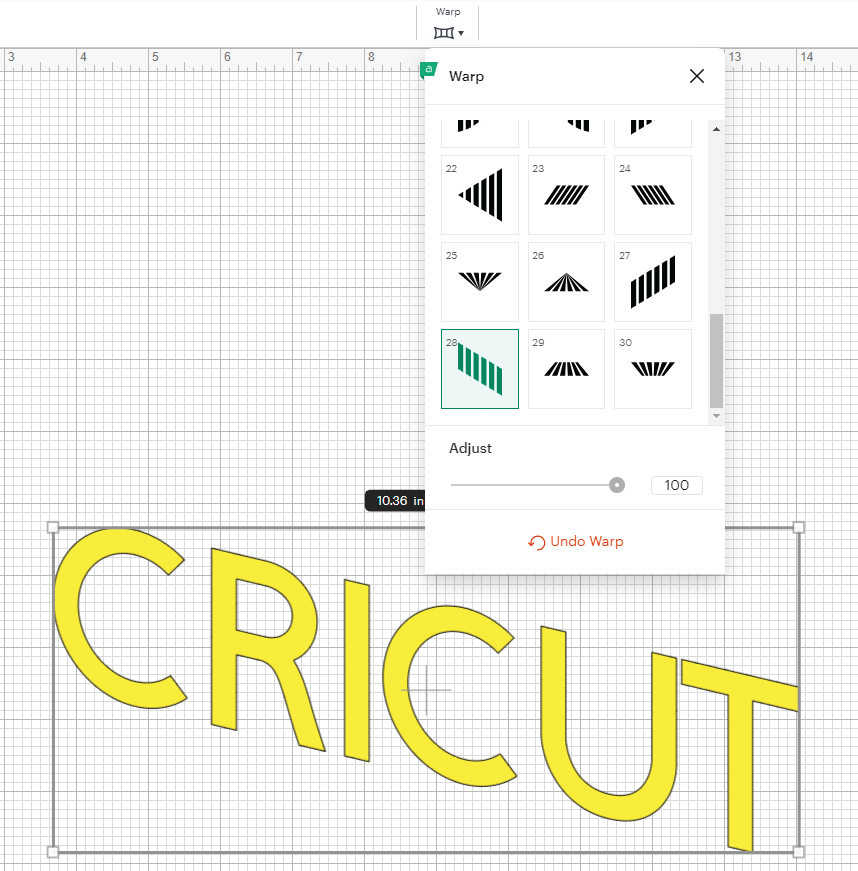
j. Warp
The “Warp” tool is a game changer and makes Cricut Design Space better in terms of design capabilities. However, it’s only available for Cricut Access members.
With “Warp,” you can reshape text and images in 30 different styles. You can preview the effect by selecting the warp type and adjusting the slider.
k. Size
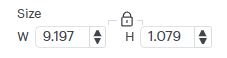
Everything you create or type in Cricut Design Space has a size. You can modify the size from the element in self (when you click on it). However, if you need an item to have an exact measurement, this option will allow you to do so.
The little lock is essential; you tell the program you don’t want to keep the same proportions by clicking on it. When you increase or reduce the size of an image, the proportions are always locked.
l. Rotate
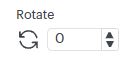
Like “Size,” rotating an element is something you can do quickly from the canvas area. However, some designs need to be turned on a specific angle. If that’s the case for you, I recommend using this function. Otherwise, you will spend much time fighting to get an element angled as you want it to be.
m. Position
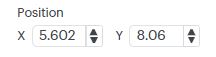
When you click on a specific layer, this box shows you where your items are on the canvas.
You can move your elements around by specifying where you want them on the canvas. It’s handy, but it’s a more advanced tool.
I don’t use it much because I can get around better with the above-mentioned alignment tools.
n. Font
When you click this icon, you can select any font you want for your projects. Cricut has powerful filters to find a font, and I recommend you click on anything that seems clickable to find the perfect font for your project.
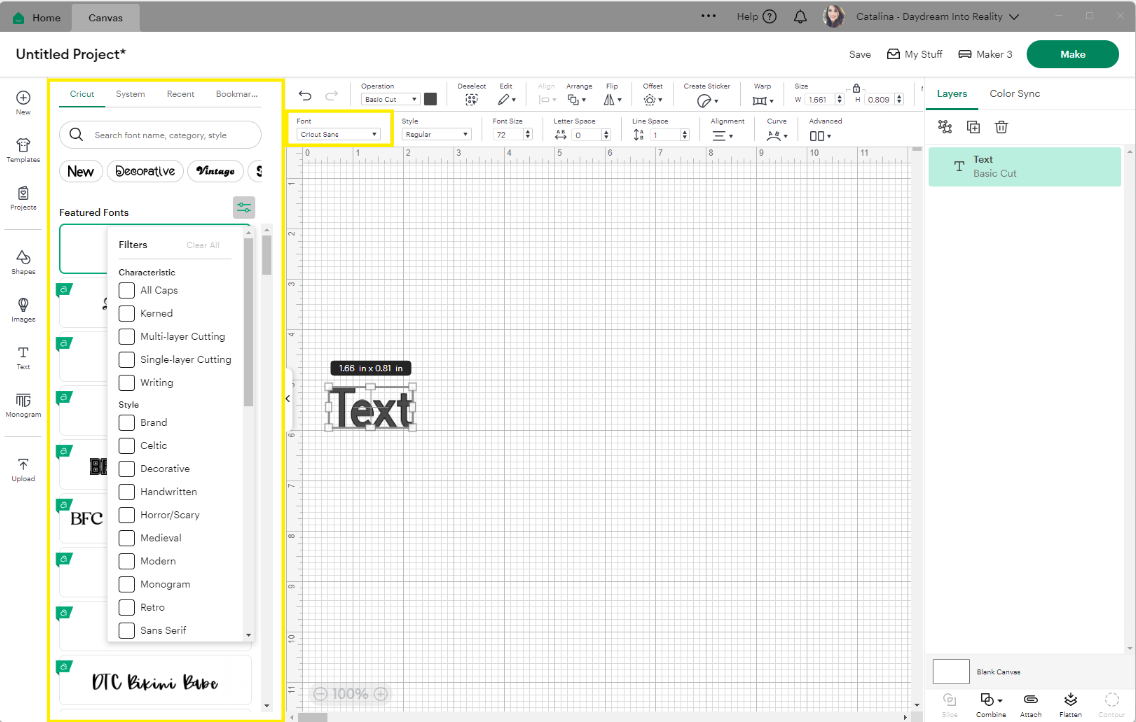
The “Font” window has different tabs.
– Cricut shows the fonts available if you have “Cricut Access.” Some cost extra money because they are “Premium Fonts.” If you don’t have Cricut’s subscription, you’ll be prompted to pay before you can make your project.
– System shows the fonts you have installed on your computer.
– Bookmark shows fonts you’ve saved for later use. Click on the little bookmark at the end of each font to find it under the “Bookmark” tab.
– Recent will show the fonts you currently use on your project and those you’ve used recently, even on different projects.
o. Style
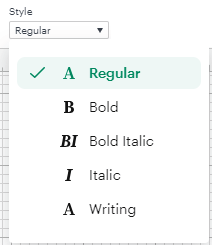
Once you pick your font, you can change its style.
Some of the options you have:
– Regular is the default font setting
– Bold will make the font thicker.
– Italic will tilt the font to the right.
– Bold italic will make the font thicker and tilt to the right.
– Writing: font style design to use pens, foil tips, etc. It will make your project look like you wrote it.
– Writing Italic: This style will make your project look like you wrote the text in italics.
Note: not all fonts have the same options.
p. Font Size, Letter & Line Space

I can’t express enough how AMAZING these options are—especially the letter spacing.
Font Size: You can change it manually from here. I usually adjust the size of my fonts from the canvas area.
Letter Space: Some fonts have a considerable gap between each letter. This option will allow you to reduce the space between letters very quickly. It’s seriously a game-changer.
Line Space: this option will tackle the space between lines in a paragraph; this is very useful because sometimes I am forced to create a single line of text because I am not happy with the spacing between lines.
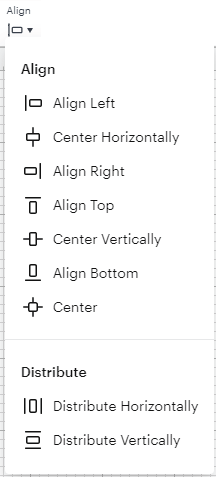
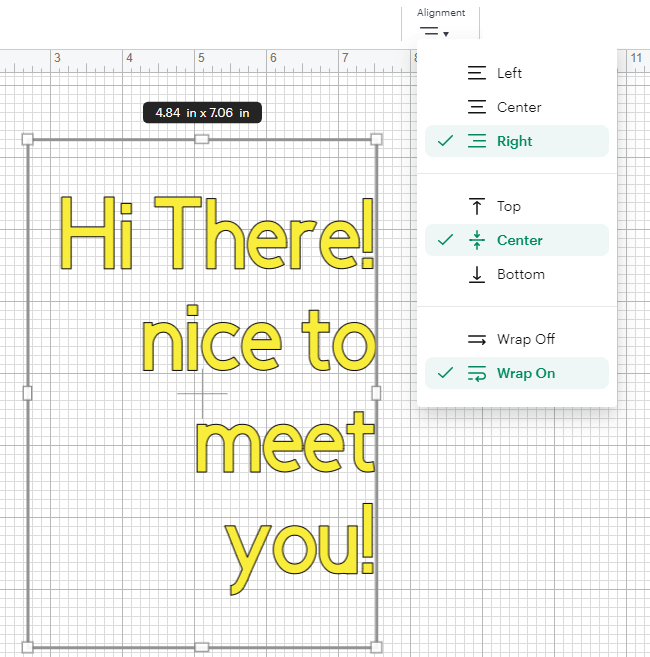
q. Alignment

This Alignment differs from the “align tool” I explained above. This option is for paragraphs.
These are the options you have:
– Left: align a paragraph to the left
– Center: align a paragraph to the center
– Right: align a paragraph to the right.
– Top: moves text to the top of the bounding (text) box.
– Center: moves text to the center of the bounding (text) box.
– Bottom: moves text to the bottom of the bounding (text) box.
– Wrap Off: displays text on a single line.
– Wrap On: divides the words into different lines as you resize the text box.
Here’s a quick example of my alignment settings for the following text.
r. Curve
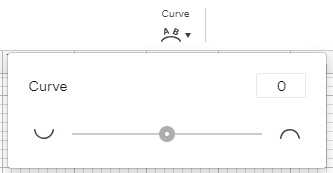
This option will allow you to get extra creative with your text!
With this function, you can curve your text — the best way to learn it is by playing with the little slider.
Moving the slider to the left will curve the text upwards; moving it to the right will bend the text inwards.
Note: if you move the slider entirely to the left or right, you will form a circle with your fonts.
s. Advance
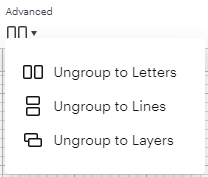
Advance is the last option on the editing panel.
Don’t be intimidated by the name of this drop-down menu. Once you learn what all options are for, you will see they are not that hard to use.
– Ungroup to Letters: This option will allow you to separate each letter into a single layer (I will explain more about layers below); use this if you have plans to modify every character.
– Ungroup to Lines: This option allows you to separate a paragraph on individual lines. Type your paragraph, click on ungroup to lines, and there you have it: a separate line you can now modify.
– Ungroup to Layers: This one is the trickiest of these options. This tool is only available for multi-layer fonts on individual purchases or Cricut Access.
A multi-layer font has more than one layer; these fonts are great if you want some shadow or color around them.
What if you like a multi-layer font and don’t want the added layer? Select your text and then click on ungroup to layers to separate every layer.
Learn how to Edit Text in Cricut Design Space
Left Panel – Insert Shapes, Images & More
With the top panel (that I just explained in detail), you will edit your designs. But where do they all come from? They all come from the left panel.
This panel is about inserting shapes, images, ready-to-cut projects, etc. From here, you will add all of the things you will cut.
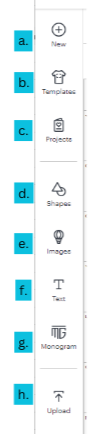
This panel has seven options:
a. New: create and replace a new project in the canvas area.
b. Templates: guide you on the types of things you will cut. Let’s say you want to iron on vinyl on a baby suit. When you select the template, you can design and see what the design would look like.
c. Projects: add ready-to-cut projects from Cricut Access.
d. Shapes: insert all kinds of shapes on the canvas.
e. Images: pick single images from Cricut Access and cartridges to create a project.
f. Text: click here to add text to your canvas area.
g. Monogram: create a beautiful design using your initials.
h. Uploads: upload your images and cut files to the program.
You need to consider something fundamental on this panel; unless you have Cricut Access, most images, ready-to-cut projects, and Cricut fonts cost money. If you use them, you will have to pay before cutting your project.
If you still have doubts about Cricut Access, do yourself a favor and read this ultimate guide I put together to find out whether you need it.
Now that we saw a little preview of what everything was for on this panel. Let’s see what happens when you click on each of those buttons.
a. New
When you click on NEW, and if you are already working on a project, you will receive a warning on top of the window asking whether you want to replace your project.
If you want to replace your project, save all the changes from the current project; otherwise, you will lose all that hard work. After you save, a fresh, empty canvas will open up for you to start a new project.

b. Templates
Templates help you visualize and see how your project will fit on a particular surface. I think this feature is just out of this world.
If you want to personalize fashion items, this tool is marvelous because you can select sizes and different types of clothing. Plus, they also have a lot of various categories that you can choose from.
If you want to learn more about templates and how to use them, I recommend reading this post.
Note: templates are just for you to visualize. Nothing will be cut when you finish designing and send your project for cut.
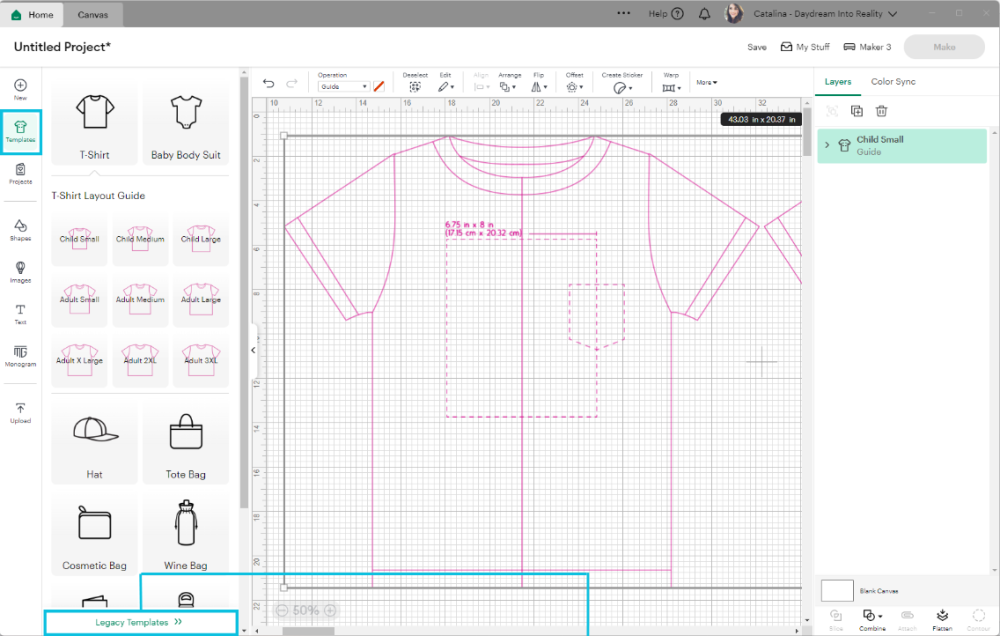
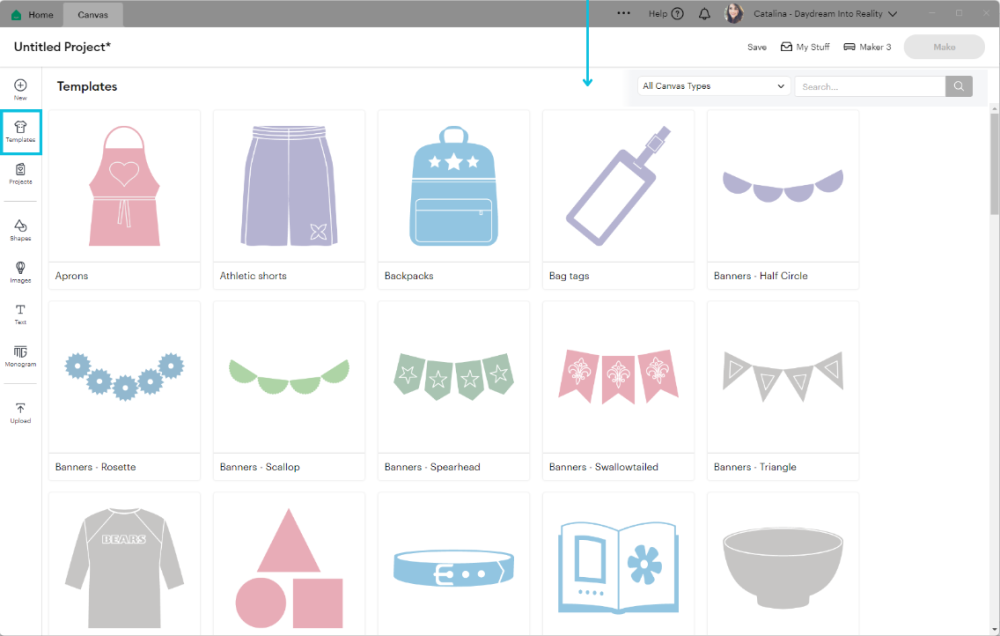
For more templates, click on “Legacy Templates.”
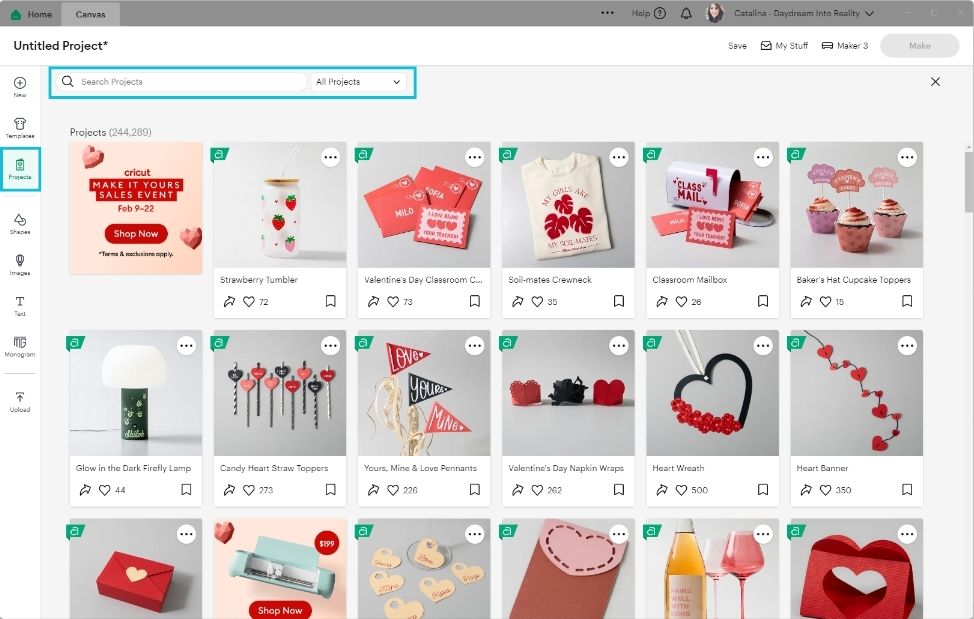
c. Projects
If you wish to cut right away, then “Projects” is where you want to go! Once you select your project, you can customize it or click “Make” and follow the cutting instructions.
Tip: Most projects are available for Cricut Access members, or you can purchase them as you go. However, a handful of projects are FREE for you to cut, depending on your machine. Just scroll to the bottom of the categories drop-down menu and select the device you own.
No excuses!
d. Shapes
Being able to use shapes is essential! With them, you can create simple, less complicated, and (also) beautiful projects.
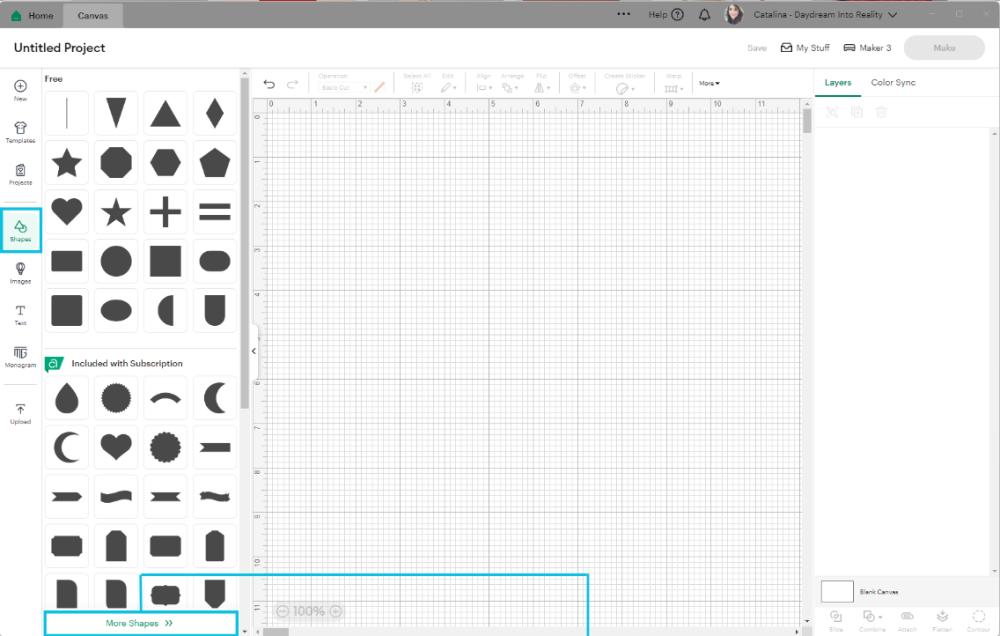

There are multiple shapes you can choose from. The first option is not a shape but a fantastic tool called “Score Line.” This option allows you to create folds and score your materials to make cards, boxes, etc.
If you want to create boxes or love everything about card making, the Score Line will be your best friend!
Learn how to edit shapes like a pro!
Note: The first shapes section is free, and the second is included with Cricut Access.
e. Images
Images are perfect when you are putting together your projects; with them, you can add an extra touch and personality to your crafts.
You can search by keyword, highlighted categories, subject, graphics, themes, and brands.
Most of these images are included with “Cricut Access”; however, Cricut has some free images as well!
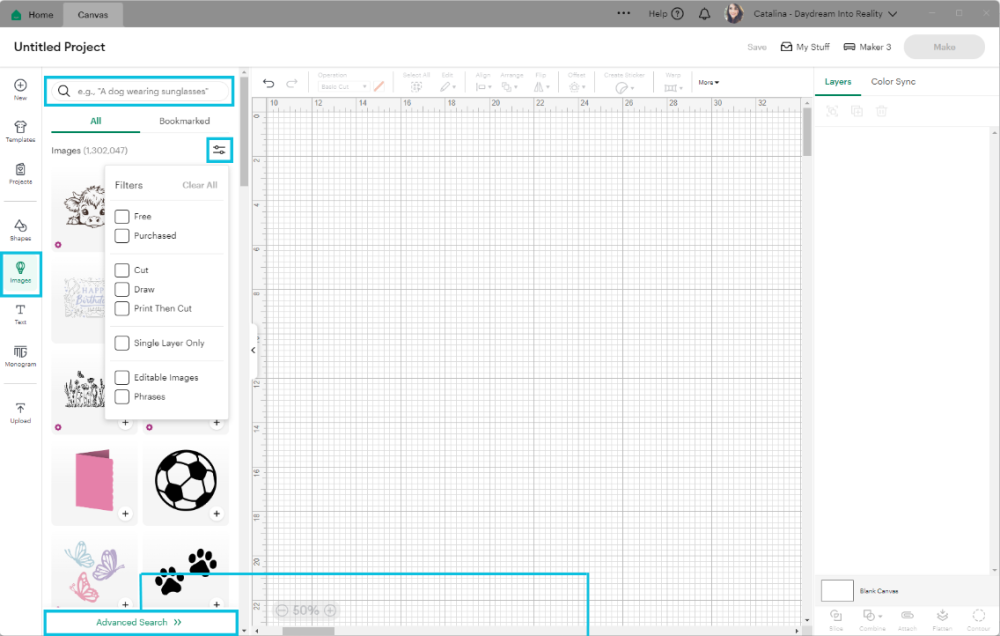
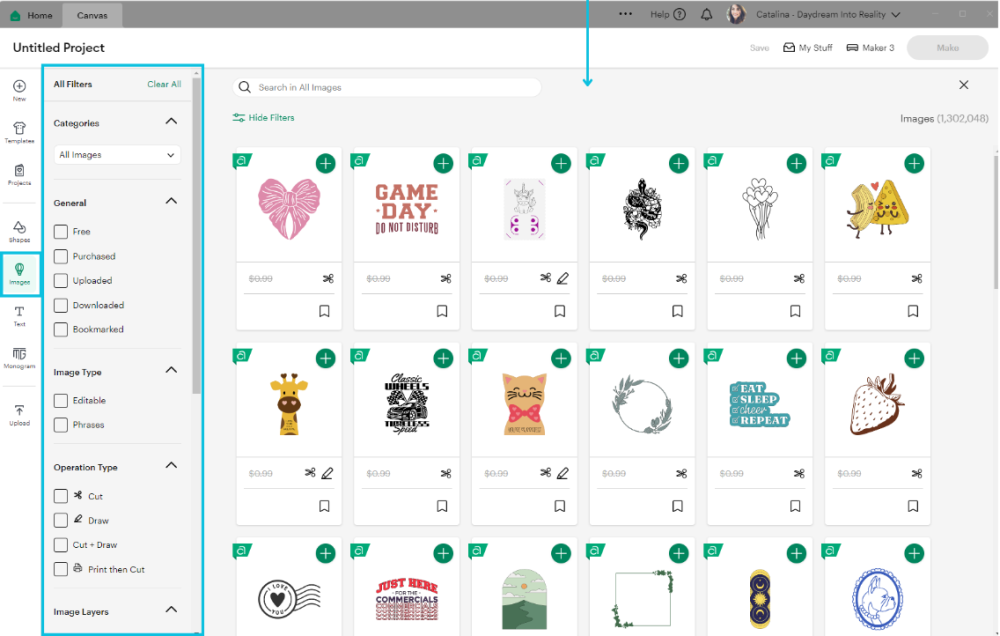
Under “Advanced Search,” Cricut has more powerful filters for you to find the perfect illustration for your project.
I suggest you play with these filters to find images more efficiently.
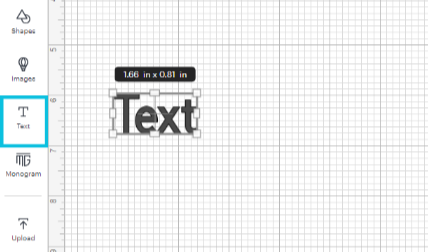
f. Text
Anytime you want to type in the Canvas area, you will need to click on Text. Initially, the word “Text” will appear on the canvas; click on it and write the text you want.
You can exit the “Text” by clicking on an empty space on the canvas and reenter it by double-clicking on it.
Learn how to edit text like a pro in my excellent guide!
g. Monogram
A monogram is a design that combines the letters of a name, last name, company, etc. They are super popular, and the possibilities are endless.
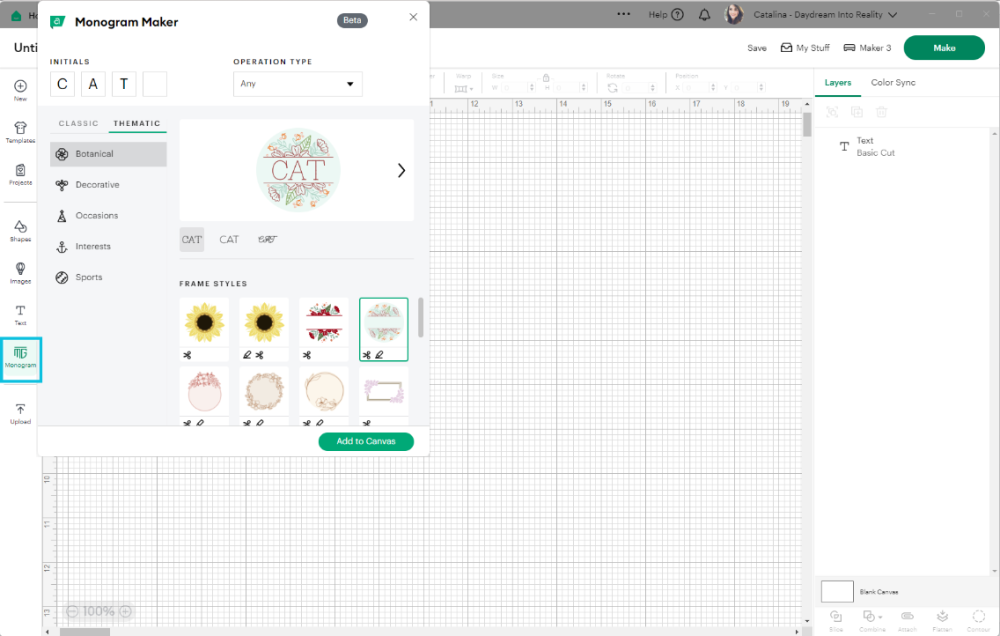
Cricut’s “Monogram Maker” is only available to Access members. You can play with the settings and make cute designs; however, when you send the project to cut, you’ll get a warning that says the project is only available with their subscription.
Learn how to make monograms in design space using your own fonts!
h. Upload
From this icon, you can upload your files and images. The internet is filled with them; tons of bloggers create projects for free.

Oh!
Just so you know, I also have a library full of free SVG files and Printables for all my subscribers, a.k.a. Daydreamers. You can see a preview right here or get access by filling out this form.
Learn how to upload images in Cricut Design Space.
Right Panel – Learn All About Layers
To set you up for success, before I explain what every icon is all about on the layers panel, let me introduce what a layer is.
Layers represent every single element or design that is on the canvas area.
Think of it like clothing; when you get dressed, you have multiple layers that make up your outfit; depending on the day or time of year, your outfit can be simple or complex.
So, for a freezing day, your layers would be underwear, pants, a shirt, a jacket, socks, boots, gloves, etc. You would only have one layer for a day at the pool: a Swim Suit!
The same happens with a design; depending on the project’s complexity, you’ll have different types of layers that’ll make up your entire project.
For example, let’s pretend that you are designing a Christmas Card.
What would this card have?
Maybe a text that says Merry Christmas, a tree, the card itself, and perhaps an envelope?
All the tiny designs and elements of that project are layers.
Some layers can be modified; others, like JPEG and PNG images, can’t because of the file’s nature or the layer itself.
For instance, a text layer can be converted into other types of layers, but you’ll lose the ability to edit that text when you do that.
You will learn more about what you can or can’t do with layers as you go.
I hope that gave you a good idea of what a layer is! Now, let’s learn what every icon is for on this right panel.
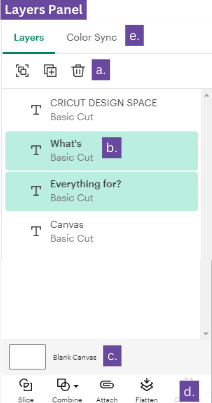
a. Group – Ungroup, Duplicate, and Delete
These settings will make your life easy when moving things around the canvas area, so play around with them.
Group: Click here to group layers. This setting is handy when you have different layers that make up a complex design.
Let’s say you are working on an elephant. Most likely (and if this is an SVG or cut file), the elephant will be composed of different layers (the body, eyes, legs, trunk, etc.). If you want to incorporate different shapes and text, you will most likely move your elephant across the canvas area.
Therefore, by grouping all the elephant layers, you can ensure that everything stays organized and nothing will get out of place when you move them around the canvas.
You can ungroup any grouped layers from this icon as well. Cricut will know you need to ungroup.
Duplicate: This option will duplicate any layers or designs you have selected on the layers panel or canvas.
Delete: This option will delete any elements you have selected on the canvas or layers panel.
b. Layer
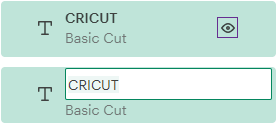
Every layer on the panel represents an element of your project. You can easily change its name when you double-click on it.
The little eye that appears when you hover on a specific layer represents its visibility. When unsure whether an element looks good, click on the little eye to hide that design instead of deleting it.
Note: When you hide an item, the eye will have a cross mark.
Tip: By clicking on a layer and dragging it, you can move a particular design on top or under; you could say that this works like the Arrange option (sent to the front, back, etc.).
c. Blank Canvas
This tool allows you to change the color of your canvas. This setting is also used with the “Templates” tool.
e. Slice, Combine, Attach, Flatten, and Contour
These tools you see here are essential! So make sure you master them to perfection.
I won’t go into much detail about them because they deserve tutorials on their own.
However, I will give you a brief explanation of what they are all about by using the graphic down below.
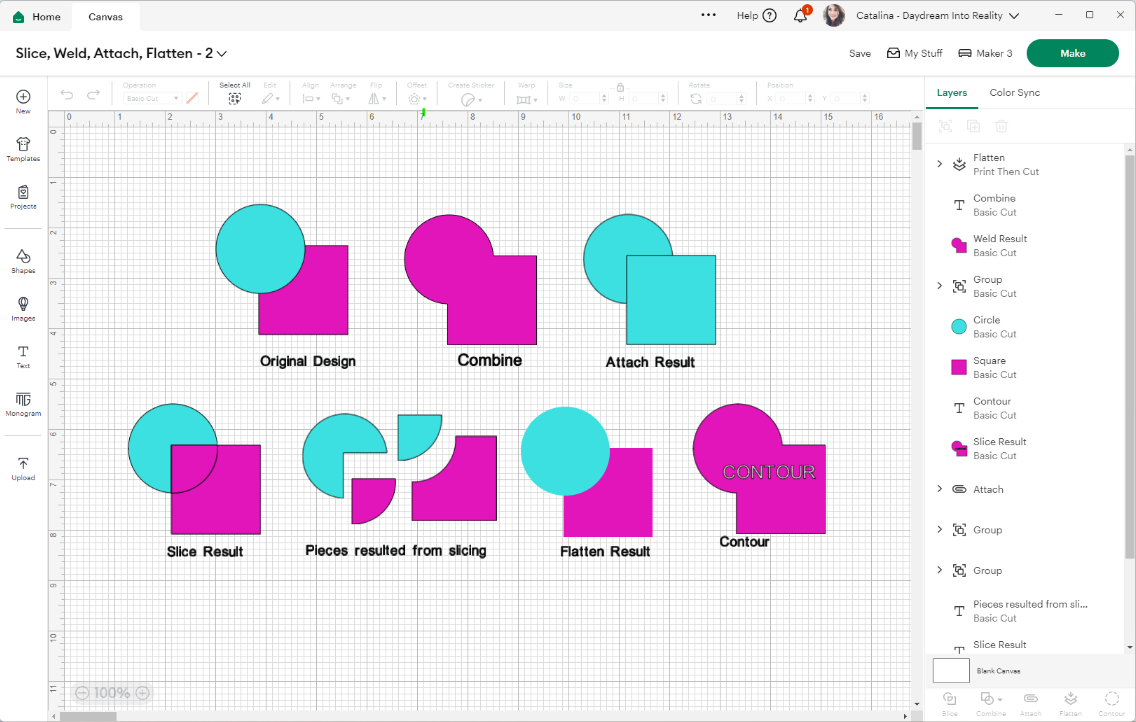
Slice, Weld, Attach, Flatten, and Contour Info-Graphic
As you can see in the graphic, the original design is a pink circle and a teal square. Now, let’s see what happens when I use these options.
Slice
The “Slice” tool is perfect for cutting out shapes, text, and other design elements.
When I selected both shapes and clicked on “Slice,” you can see that the original file got all cut up; to show you the outcome, I copied and pasted the “Slice Result” and then separated all the pieces.
Learn more about the slice tool.
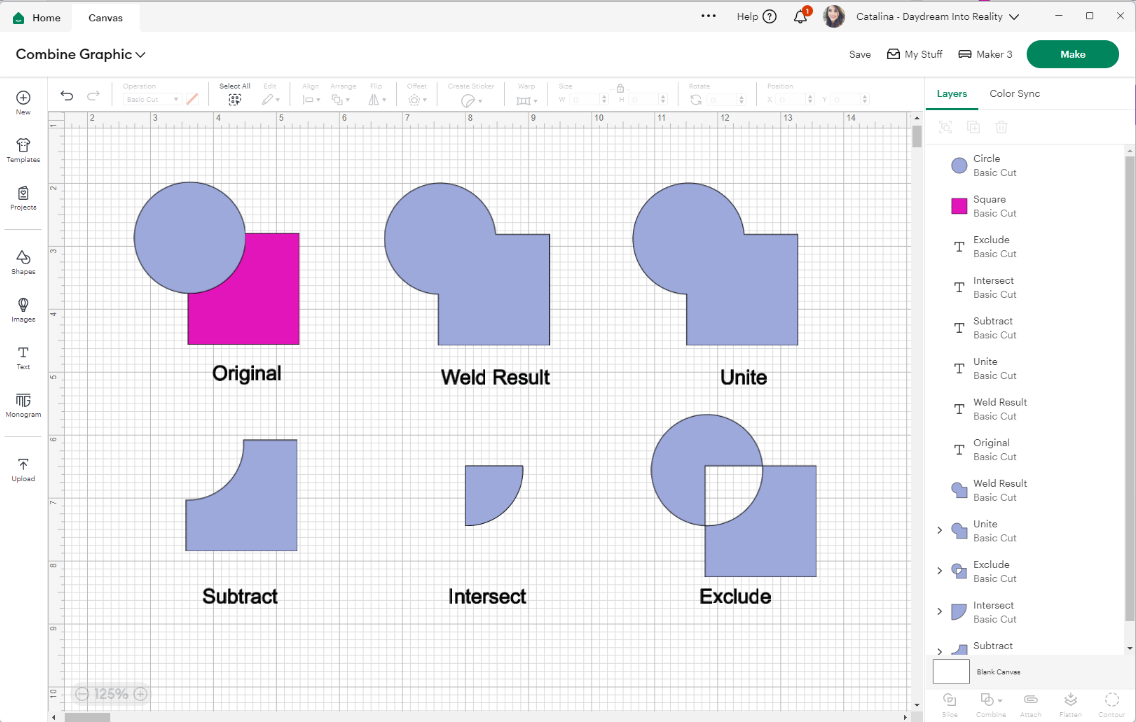
Combine
The “Combine” tool allows you to combine two or more shapes in one.
In the past, “Weld” was the only option to join two layers. However, Cricut has added other ways to edit shapes and images under the “Combine” tool.
Check out the following image to see all the options you have to edit your project.
Attach
Attach works like grouping layers, but it serves a very important purpose.
When I selected both shapes and clicked on attach, you could see that the layers just changed color (determined by the layer on the back). However, the shapes are connected, and this attachment will remain in place even after I send my project to be cut.
Learn more about Weld and Attach.
Flatten
This tool is extra support for the “Print Then Cut” tool.
When you have “Print Then Cut” activated, that change applies to just one layer at a time. But what if you wish to do it to multiple shapes simultaneously?
When you finish your design, select the layers you want to print together, then click flatten.
In this case, the design went from “Basic Cut” to “Print then Cut,” and that’s why it isn’t showing a black edge anymore.
Learn more about “Flatten” and “Print then Cut.“
Contour
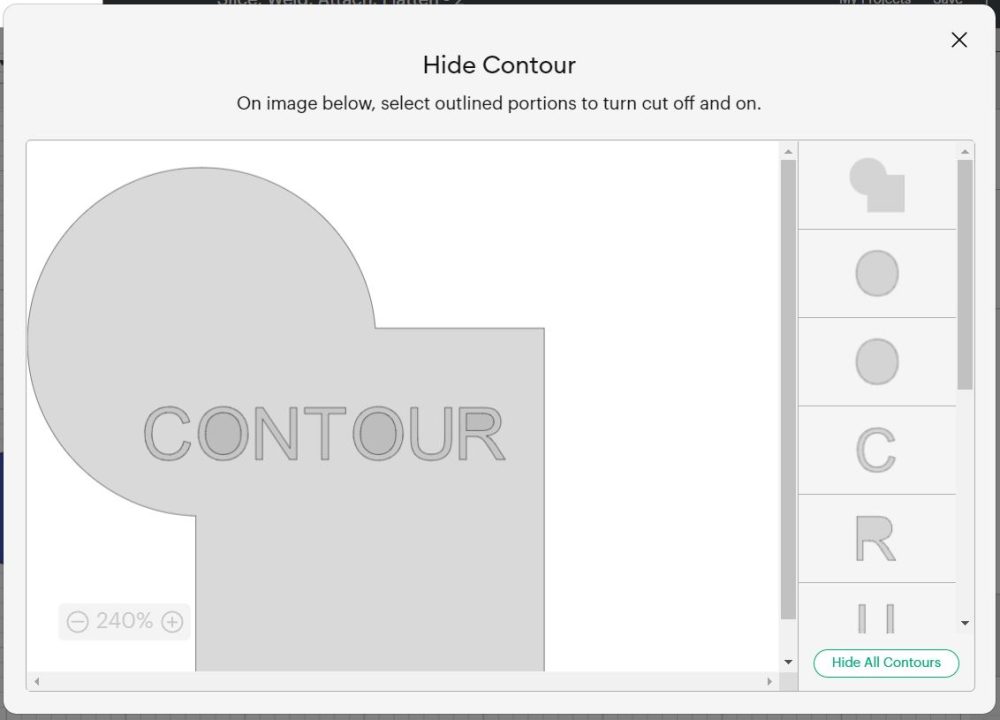
The Contour tool allows you to hide unwanted design pieces, and it will only be activated when a shape or design has elements that can be left out.
For this example, I combined the original design in one shape with the combine tool; then I typed in the word contour, sliced it against the new shape, and used the contour tool to hide the inner circles of the two letters O and the inner part of the letter R.
Learn more about the contour tool.
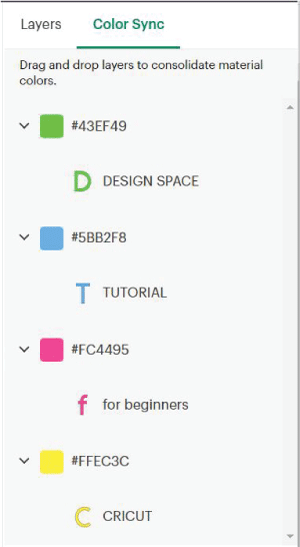
f. Color Sync
Color Sync is the second tab on the layers panel.
Every color on your canvas area represents a different material color. If your design has multiple shades of yellows or blues, do you need them all?
If you only need one shade of yellow, click and drag the tone you want to get rid of and drop it on the one you want to keep.
Learn how colors work in Cricut Design Space.
Canvas Area
The canvas area is where you see all of your designs and elements. It’s very intuitive and easy to use!
a. Canvas Grid and Measurements
The canvas area is divided by a grid; this is great because every little square you see on the Grid helps you visualize the cutting mat. In the end, this will help you to maximize your space.
You can change the measurements from inches to cm and turn the grid on and off when you click on the top panel toggle and select Settings. (You can see this toggle menu at the beginning of this tutorial).
A window will pop up with all of the options.
b. Selection
Anytime you select one or more layers, the selection is grey, and you can modify its size from all four corners.
If you move the cursor about 0.1 inches of each corner of the selection, you can rotate the layer. This rotation is a bit glitchy, and it doesn’t always work.
c. Zoom In and Out
Last but not least. If you want to see your project on a bigger or smaller scale (without modifying the actual size of your designs), you can do it by pressing the “+ and -” signs on the lower-left corner of the canvas.
That’s it – You are not a beginner anymore!
I hope this tutorial was helpful to you! If you read it and studied it consciously, let me tell you something: you are not a beginner.
You have graduated!
Do you know it takes me over 25 hours to complete a single Cricut article? I know it’s wild, but I want to make sure you understand everything!
I would appreciate your support on Instagram , Pinterest , and YouTube as I try to grow my audience and continue producing great content!
If I am missing something, please let me know in the comments below so I can add the information to this tutorial and have it be the most complete on the internet.
I’m so glad I stumbled on this post! I just bought a Cricut 2 weeks ago for the first time and, to be honest, I had no idea what all it could do. Needless to say I’m ordering some blades and other supplies so I can start playing. Thank you for this informative article!
Are these great instructions on a pdf that I can print out?
Not at this time 🙁
Thank you so much! I have learned so much from your simple diagrams and instructions
Oh my goodness! A 14 page printed tutorial, but bless your heart as I have no idea where to start. I’ve had my new cricut explore 3 for 3 days and I have yet been able to access any of the features. Everything, and I mean everything, is greyed out. They’re getting a phone call from me tomorrow. In the meantime, thank you so much for your detailed tutorial. All I wanted was to print one simple design and I haven’t been able to do that yet. SMH.
Thank you so much! Great instructions and easy to understand!
I just got the Explorer 3. This is a wonderful ltutorial. Can I print it out? I will be following you. Thanks so much.
This is so great! I’m a hands on type person. Do you have this as a printable pdf so I can keep a copy next to my cricut?! Thanks for your work in putting this together.
I don’t. Since Cricut updated the software all the time, I only keep updates on my blog.
Thank you. Great information.
Your explanations are truly so clear and understandable. Thanks! I recently bought and downloaded a file marked “black.png”. The colored images are encased in a black rectangle. I cannot print and cut this file and have searched but cannot find any instructions for doing this with Design Space. I use an Explore 3. Can you help? Thanks.
My Print then Cut tutorial may help you understand how to edit PNG and JPG images.
Very informative and easy to understand. Thanks for taking the time to share.
Thank you again for another great tutorial!
Very Informative!
Thank You
Thank you! this was great and very easy to understand. I have been looking for something step by step to learn the aspects of Design Space, this is a great start.
You can now go back to the old way of changing the grid size or delete it completly. In the upper left hand side of the screen go to the little white square that is in the grid between the 2 zeros, click 1,2 or 3 time for changes.
Also if you want to have vertical text of one line you can use the new function of wrap on or wrap off in the text alignment bar in the tool tab. Type in word and Click on wrap off, then use the side handles on the text box to make it into one vertical line. Keep pushing in the box and the letters will be moved to the next line. Took me a while to figure out but is very cool.
THANK YOU! YOU ARE THE BEST!!!
You’re welcome 🙂
Thank you, so much. This will help a bunch!
Thank you, very good article
Loved it it is very helpful and on point
This is so good! I dove into making my first project, head first. I got it done. But this was so helpful explaining all the icons!
Hello and Thank You for this tutorial, but I do have a question!!! I am using DS on my iPhone and when I select an image I’m working on in the canvas, I am not getting the box around it with the icons to delete,lock, rotate, change the size, etc. but instead I’m getting 4 boxes at each corner with no icons to edit the image as noted above!! I recently watched another YouTube tutorial for use of DS with an iPhone or iPad and the selected image had this edit icons!! I’m not sure why I’m not getting those edit icons and only getting 4 blank boxes at each corner!! Can you provide any assistance?!! Thank you in advance!!
Cricut had an update and this article is on my list to work on. In the meantime, you can use each corner to increase the size of the layer, but to delete it you need to go to the layers panel, and to unlock the proportions you need to find the little lock on the “edit menu.”
Thank you for your Tutorial. I believe that I have gained enough knowledge to enable me to make my first attempt at producing something on Cricut. I’ve come a long way from standing on a scaffold with a trowel in my hand. If only………….
I have designed a baby shower invitation. I’m not sure how to print and cut it out.
Check out my print then cut tutorial.
Thank you so much! that was very helpful!! I appreciate the detail you go into for every element. 🙂
This is so helpful!! Thank you!! I just wish I could print it out
You might consider doing a beginner’s troubleshooting guide.
I opened our maker and have had nothing but frustration with it. The introductory project that Cricut offers – cut the snowflake out of the paper they provide? It wasn’t obvious to me that there was clear piece of plastic over the mat. It did seem strange that the cutter pushed the paper around. I do have a nicely cut clear plastic snowflake.
The really annoying problem: Their welcome never mentioned that you might be well advised to calibrate the machine and fine knife, especially if you want accurate cutting. I figured out how to calibrate. Got into the procedure and the software told me something like it could not see the knife. Two minutes ago the machine used that knife to cut misplaced and misshaped figures. Somebody suggested I update the firmware. I figured that out. Still can not calibrate the knife.
It just seems like a lot of money for something that has significant problems right out of the box.
I read your tutorial because I prefer text to video. You did a nice job as far as you went.
Thank you for your suggestions. I may work on this soon!
Thank you SO much for your tutorials.They are very helpful. ????
Thank you for the extensive information…excited to get started!
Thanks for the tutorial I have the first generation cricut and my husband got me the maker 3 , going to read this again and try designing something on my own I feel like I’m ready thanks Bonnie
Hi Catalina, I wanted to send you an BIG THANK YOU and tell you how AWESOME you are! You are certainly prolific and you make your info available and it is detailed and thorough. For sure you will be my ‘go to’ teacher as I walk through this Cricut journey. ????
I really appreciate the attempt but you never said (at least in the beginning) what platform you’re giving this “tutorial” on. I have an iPad, a Mac Pro Book and an iPhone and none of mine have the icons I noticed you referring to. Therefore I didn’t feel like I needed to keep going. If you’re talking to beginners maybe tell them what you’re using. So many people but not everyone has the same computer that you have. Hopefully this makes sense and doesn’t seem mean. It’s more frustration from trying to learn and I can’t find help.
I understand. Thank you for your feedback, I’ll keep it in mind for my next tutorials.
I use the design space for the maker on my iPad. Some of the features you mention are not on there. Are they only available on the desktop version? Or do you have an iPad tutorial?
Some options are only on desktop :/
Great information! I’m brand new to this. Just took my maker out of the box after seeing it sit on my table for 6 months! Thank you for this tutorial.
Is there a way to print this tutorial without all the ads. Thank you.
Hi! I have an Ebook where I cover all this info plus more!
I would like to know how to add more fonts for free, I have a lot in Pinterest but don’t know how to transfer from my phone to fonts in design space
I recommend you search for a “how to install fonts to your phone” on google!
Hi Catalina! Thank you for your awesome introduction! I recently got my maker and have been freaking out and not using it because i’m feeling overwhelmed by the tons of options. So now I’m giving it a try 😉
Thanks! and I’ll follow you on social media. I got here from pinterest
Hi . I use procreate to make my leather templates . The problem I’m having is I’m designing them on an a4 size page but when I upload to design space they show as much bigger . This is causing me a problem as I have to have them an exact size .
Please help
Rob
If the resolution of your design is quite big then, the design will look bigger in Design Space.
Can I do my designing in Adobe Illustrator and bring it in to Design Space for cutting with Cricut?
Yes, you can!
AWESOME article! I’m struggling for real but your article just gave me some much needed clarity on some things that’s kept me up at night! Love all the detail, now that’s what I’m talking about! Thank you immensely for making my afternoon sooo much better! You have my full attention & that is usually no easy feat! As I often call myself Side tracked Sally… it’s rare for me to make it to the very end of and article much less leave a comment to boot! Upmost respect for you my new friend, Kudos!Have a wonderful day!
Wow! This makes me really happy.
Thank you so much, this is awesome – I have actually paid for a couple of courses & I have learnt so much more from you!
Yay! I am very happy to hear 🙂
I am going to buy the Cricut machine to start. Thank you for all inf
You’re very welcome 🙂
Thank you Sooo much. Very helpful.
You’re welcome 🙂
I’m still thinking of buying a Cricut machine. I want to open a sticker shop. Which machine should I buy?
It depends on your budget. I would definitely buy one of the newer machines [eafl id="11895" name="Cricut Explore 3" text="Explore 3"] or [eafl id="11896" name="Cricut Maker 3" text="Maker 3"]. If you ever think you may want to explore more beyond stickers I would, invest in the Maker 3. (These are affiliate links)
thanks for sharing,this has truly helped me learn more things and how to us them on my cricut machine. still dont know how to do my pictures and print out on my machine ,
Check out my Print then Cut tutorial.
I am trying to cut out cookie stencils and my blade is only lightly cutting. I bought the deep cut tool and I am using craft plastic sheet .007ml. It I took it off I would have to cut these out myself and I know I am doing something wrong. Please help!
You should be able to cut it with your fine point blade. What material did you select? I would pick something like acetate. Let me know if it works 🙂
Beautifully explained. Thank you for this guide.
You’re welcome 🙂
Thank You for your time…Perry
You’re welcome 🙂
I have a question about the possibility to import CAD file such as .DXF or another format.
you can upload .dxf files to Cricut!
Can I print a hard copy of this (or any of your) tutorial(s)? Having a printed copy in front of my while in Design Space would really help.
I am working on an Ebook right now, you can print this article by sending it to your home printer!
@Catalina, How do I get the Ebook?
coming out in the next couple of days!
Was there a change with the update or does iOS work differently? I recently got a Macbook Pro, and when I used to be able to upload PNGs with transparent backgrounds and it JUST WORKED, not Design Space adds in a white background that I have to go in then and get rid of.
Help!! I can’t find anything online about this.
It doesn’t work differently. I just tried this and it’s working on my end. Are you sure it’s a PNG and not a JPEG file you’re trying to save. Also sometimes, even if an image is saved a PNG, it could have a background.
I love this tutorial, the only thing I have not used my Cricut Maker yet, but with these instructions they are all straight forward and easy to follow from what I have read. The only other thing I wish is that I could print all this out so I could keep it right by my machine and to use when our very spotty internet is not working. Do you have an option to print all these instruction and pictures?
An E-book is coming soon! 🙂 You can just hit Ctrl+P to print this page, though! 🙂
Hi Catalina, I have a Cricut Air and I need help trying to get my letter logo to print on the Cricut on HTV. It is on print to cut and I want to cut but it is only showing the silhouette instead of my wording on the image. Can you help me to get the answers and resolve this issue? Please I would so appreciate it
You need to upload the image as a ‘Print then Cut file” not as a cut image. Check out my print then cut tutorial.
Your guidance is well written and organized, thank you.
I want to use my Cricut Maker to cut very small paper-based quilt pattern pieces from template plastic, which I’m currently doing by laying the plastic over the paper pattern, tracing the outline in pencil, then cutting it with scissors, it’s time consuming, difficult, and not fun, I’d rather use the time to sew instead of cutting plastic pieces. I have tried scanning a few of the patterns and uploading them into my Maker but the edges are wavy, is that something that can be fixed? Also, I think I have to put a 1-inch test square with the pattern when I scan it to ensure the uploaded pattern is the right size, do you agree with that? Most of these pattern pieces are not regular squares or triangles and many have curves.
Also, do you have to specify an upload is complex in order to see the numerous options like layers, flatten, etc. I have specified the upload is simple and I don’t see those options.
For something that requires a lot of precision, you need to make a custom SVG file on a more powerful program like Inkscape or Adobe illustrator. Or have a high contrast image that you draw to perfection (save as simple.)
You can add the 1 in square and also a one without the square and resize both in Design Space, if they both match, then drop the square next time. 🙂
I got my Cricut just before the shut-down and the classes at our community center were cancelled. I need oval shapes, but that is not an option in Shapes. Is there a way I can have one and then size them to whatever I need. Would love to see more shapes – like the rectangle with corners cut out – more like the die cuts and punches.
Yes! Check out my “How to edit Shapes in Cricut Design Space.” tutorial.
I bought my maker in December 2020. I didn’t start playing with it till February of this year. Since than I have already taught myself to do a multi layered car sticker for friends from a picture. Also copied and perfected a sticker for others. But finding your tutorial has been very informative and will make everything faster for me. Thank you : ) I didn’t quite understand print then cut and patterns with print then cut. Also do you have anything on making monograms?
I don’t have monogram tutorials yet! I am very happy I was able to help!
HI I just bought the Cricut Joy recently. My question is do I need to mirror the image every time?
Hi! You need to mirror when you are using Iron-On and Infusible Ink materials.
Thank you very much for all your hard work in putting this in-depth website together. For many years I have had a cricut machine, however confusing got in the way.
Then I found you!! I have the confidence to dive in and see where my creativity alongside my trusted cricut can take us.
YES!!! found you on instagram as well!!
Many blessings.
Yay! This is awesome. I am glad I am building your confidence.
This is a fantastic tutorial ! I purchased my Maker about 18 months ago, excited that it could cut fabric. Wow, I was totally blown away. I am not at all computer savy, I had no idea it was sooo involved. So, I put it away, having know idea what I was suppose to do and how to do it. Well, I finally decided to bring it back out, more determined this time, to try and understand how this machine operates. After reading and watching several articles and videos, I was still confused. I thought I had wasted my money. Then I saw this tutorial and the title is what caught my attention. I started reading and low and behold, I started to understand. Thank you so much for breaking it down step by step.
I am happy I was able to help! Determination is key 🙂
Thank heavens I found you!! My sister just bought me a cricut and I am totally lost. I have read part of your instructions and am so relieved to find someone willing to explain in such detail. I am a visual learner so this is fantastic. I am so grateful. Thank you !
You’re very welcome! I am very happy I can help.
Thank you SO much for this post! I’m a newbie, and find there is so much information but i couldn’t find a place to start UNTIL I found this post! It must have taken you a long time, I really appreciate it!
So happy I was able to help!
Your post was very helpful. I just started using my cricut maker this month, so I am still learning.
I am having problems with printing and cutting a family photo with the shape icon. I can print my image but when the machine cuts the image it cuts it in a square. Is there away where you can cut a photo in a heart shape.
I am also having trouble with the top panel, it does not show all the features, for example the curve icon does not appear all the time. Is there a reason for this.
I sure appreciate any help you may have.
Thank you
Check out my “Slice” tutorial where I show how to crop images in different shapes.
Hi
How do I get a copy of this awesome information about Cricut.
Bless you
Working on an ebook!
Yes!! Still learning about the Cricut and deciding if I would use it often enough to warrant the cost. I have 3 great grands so I’m sure I’d figure out something! How will you let us know when its available?
You need to check every day. Sometimes they come out, but the run out pretty much the next day.
Catalina,
I am new to the Cricut family and want you to know how much your blog has helped me.
I was getting very frustrated trying to add tex to an already design and it wasn’t working until I read this blog. You made it so easy and my project came out beautiful.
Than you again and keep up the great blog for all of unbees.
You’re very welcome! I am glad I can help.
Thank you so much for your tutorial I’m still a newbie with my Cricut Maker. I have been making Christmas cards and would like to add text inside. I have prepared all of my greetings on one canvas to save myself time by using the duplicating icon and adding my appropriate name Gramma, mom etc. Now I’ve been trying to figure out how I can cut each saying and put it onto a new canvas so that I can put it on to individual cards. Thank you in advance for your help.
Regards Francisca
Unfortunately, at this time you can’t copy from one project to another one. You can, however, save the same project as a different one (creating a copy) and delete what you don’t need.
Hi – I just purchased my Cricut Air 2 – used but it is in great condition, I am planning to purchase the Bluetooth flash drive so I can use my iPad, however, I was looking at your Article and you did say that the Software for Designing on a Windows Laptop was free and I am also hoping it is free also for the iPad. But I noticed you did not say much on how to download the software and from where? Or did I miss that information… Also does Cricut make that software? and does other software programs do the same or better and do you know what they are? Lots of questions toward this subject… 🙂
Please let me know… where I can get the software program for my Windows Laptop, and the Apple iPad
If you have an Air 2 you shouldn’t need the Bluetooth adapter because that one is Bluetooth capable. Also, for the iPad is free as well you just need to download the app (read my iPad tutorial). To learn how to install and pair your Cricut, check out this article.
Very helpful! Could you please tell me how to change the default print page size? It defaults to Letter, but I live in Australia, so we print on A4 paper. There’s no way to change the material size on the page where you see the preview and select the number of project copies. Very frustrating!!!! Thank you, Deb.
As far as I know, You can only print then cut on Letter size. You can still use A4, Cricut will read the black guidelines as a reference, just make sure that your design will fit your A4 paper.
I have used design space for years since I got my Explore about 4-5 years ago. I just got the maker and I’m super excited to start making more stuff. We used it so much for my daughters wedding. It was great. The tutorial seems very thorough. I would like to dive in completely but for now I just skimmed.
One comment I would like to make is that it looks very different on the IPad or IPhone. It is way easier to use on a computer. Also there r things that I haven’t figured out how to do on iPad or iPhone like download fonts for use. I used a bunch of fonts for my daughters wedding from dafont and it worked great on the laptop but I can’t add a font on my iPad. So if anyone else is having this type or issue or are having problems with iPad use know u aren’t alone. They menu of edits and alignment and such are in very different places and many are hidden.
I agree things change when going from PC to App! I have an iPad tutorial too that shows where every icon is!
I would like to know if I can purchase a ebook or book from you.
I am trying to work on it! I just keep getting insecure about it lol. It’s coming soon, though!
Thank you for this tutorial,it was very informative , I plane on checking out the other ones as well . This is my first cricut machine .
You’re very welcome! I am happy to hear you like this tutorial!
This tutorial was very helpful, but the one thing I DIDN’T see mentioned was how to utilize all my paper – for instance on a 12 x 12 sheet. I may cut out a few things and then have plenty of paper left over. Instead of completely removing the sheet and then replacing it on the ‘unused’ part – is there a way to set it up on my canvas for it to cut in that unused area???
Yes! You do this when you are on the mat preview you can move things around so can cut wherever you want.
Oh yes!! How’s your Ebook coming along? I would do better with that! ???? Will you have an Ebook for all your tutorials? Thanks for your hours & hours of work!
I don’t know if it will have all the tutorials, but it will for sure empower you to tackle most projects!
I started to look at your tutorial on using design space for beginners. It looks like it would be very helpful but your icon panels on your computer don’t look anything at all like mine. I am using an apple I pad with my cricut maker. I don’t have as many icons as you have and I don’t have a template icon. I am also using safari. What am I doing wrong?
You’re looking my desktop tutorial! Checkout my phone app tutorial!
U aren’t doing anything wrong but I will tell u it is by far easier to work on a desktop than an iPad or iPhone. I do both but the more technical things I try and use a computer for that reason. Things are more offensive on the ipad
Catalina, are your ebooks for this available yet?
Not yet :/ I get so overwhelmed that they won’t be good enough lol. I really have to work on them!
I am a brand newbie and your tutorial was very helpful to clarify some of the ideas I thought I understood just checking out the tools. One thing I can’t figure out is how to make the font draw in a solid line instead of being outlined. Thanks.
Check out my Cricut Pen tutorial! It will show you how to do it.
Tks for the tutorial very helpful
This is very helpful and easy to understand. Thank You
You’re very welcome 🙂
I just purchase my Cricut Maker v5.98 and I do not see the layers options? I only see cut and it does not appear like your colored circles in your layered right side?
What colored circles?
Thank you so much for this project it was very comprehensive and so useful as a cricut newbie. Thank you so much for putting it together. I have subscribed to your page.
You’re very welcome! I am glad I was able to help.
Looks like this is just what I need! Starting today to learn how to use Maker. Been years since i had the original cricut. Quick question I know you generate your income from the ads (I read all the disclosure info) & I can appreciate that. However the ads keep popping up & with my ADHD it is totally braking my concentration….they seem to come from everywhere & it is killing my senses. Can I pay you for a version that I can download??? Not to insult but this info is so important & I am ready to embrace all of your hard work but can’t seem to move ahead with all the distractions. Name your price! Thx for any consideration.
Hi Junell. Ads should load within the content. Not pop up. In the future, I’ll have an ebook coming! I know ads are annoying, they are for me too! But it’s the only way I am able to provide these tutorials.
Hello there! ????♀️
My daughter and I are very new to Cricut and we are trying to get familiar with Design Space. Can you please tell us how to delete uploaded patterns? We accidentally uploaded the same pattern multiple times and would like to delete the extras. We cannot figure this out.
Thank you! ????
I’ve been wondering this myself! I don’t think you can right now 🙁
If you go to the upload panel, every design has a small (i) icon. Click on that, then you can see an option for delete!
In the uploaded section, where the picture of your upload is, on the bottom right hand corner of the white box you will see a “i” in a circle. Click on that and it gives you the option to delete. Hope that helps!
You click on the image you want ton delete and on the top left corner of the image there is an x in a red circle and you click that and it will get rid of it for you.
There isn’t a way to do it. Design space is not a very good tool from what I have seen, but it does the job. All these suggestions are for deleting images.
Do you have this available in a PDF?
An Ebook is coming soon!
OMG this is so perfect. I just got my Explore Air 2 and Design Space is so intimidating lol. Your tutorial has eased my mind and help me gain confidence that I can concur this! Thanks a ton!
You will conquer for sure! I am glad I was able to help!
Thank you so much!! You have been a GOD SEND!! Not even sure how I stumbled upon your blog! But you tube videos weren’t cutting it. They are too long with useless dialogue. I hope that didn’t sound mean!! I just don’t want to sit through over an hour long tutorial. I don’t have the attention span!! Thank you again for taking the time to explain The Cricut!!
You’re very welcome. We all learn differently.
With the newest update (v5.8.15) they changed image search filters and I can’t figure out how to access my linked cartridges anymore. Have you had any better luck than I have in finding specific cartridges?
They did. I have to update this article. I don’t know how the cartridges will look in the search. I own 0. I am sure customer service can help.
Please help! I have updated Design Space and now can’t find the option to search in images. They didn’t really take it did they?!
Hi Allie it’s still working but the window changed. You just need to play around. I am planning on updating this tutorial soon.
I am struggling with this same issue right now. Any luck figuring out how to access linked cartridges in this new version (v.5.8.15)?
Not really, I don’t own cartridges. :/
Cartridges are now called “image sets”. Click on image sets and then use the filter for ownership and select purchased. This should pull them up. I recently stumbled on this so I understand.
So helpful! Thank you for taking the time to create this Tutorial!
You’re very welcome 🙂
Fantastic Tutorial! Thank you so much for your time putting it together xx
You’re welcome 🙂
Hi Catalina I have a question that I haven’t seen addressed in your tutorials. How can I tell Design Space that I will be using the l1 x 24 inch mat?
When you click on “make it;” on the mat preview there’s a drop-down menu that says “Material Size,” click there, and select the 11x24in mat. I hope this helps 🙂
I have a cricut maker. I have the cricut design space app loaded on my iPad and on my computer. If I create something on my computer and save it or upload something I can’t ever get to it on my iPad. Can you help with this? And for some reason if I create a project and save it on my computer and have no way to access it from my iPad. There is no place to click “my projects or saved” on my iPad…..please help.
Check out my how-to open and edit projects in Cricut Design Space. I think you’ll find the answer there.
Please I would want to learn about the Cricut machine but I don’t know how to go about it
This is a great article to get started.
Catalina this is just fantastic!
I have had my Cricut for around a year now, and honestly after feeling so overwhelmed in the beginning I gave up! I watched so many Youtube videos that claimed to be for beginners, but none that really were!
Thank you so much for this, I have had my Cricut out again for a couple of weeks and your tutorial helped me so much!
You’re very welcome! 🙂
A great read and I’m sure it is going to be a great learning tool for me.
I’m exploring shadowing , added bleed but I can’t “save image as” to my MacPro. I try right-clicking on the image but nothing happens. Please advise.
Unfortunately, Cricut disabled the “Save as” option. I have a tutorial on how to make outlines in Design Space.
Julia you have to go into setting on your Mac Pro and change the right click option on the mouse or keyboard pad.
Thank You for this VERY helpful tutorial. I am brand new to Cricut Maker and this has helped me immensely.
Happy to hear!
When uploading images, we have the choice to trim around them if we like. I have a Bamboo Ink Pen, that goes with my computer. I can not get it to work with My Cricut Design. Any ideas? I don’t mind using my finger, but i would like to use the pen to make it easier.
Hi Emma, Cricut doesn’t work with these types of pens. (Wouldn’t it be awesome?). If you have more questions about Cricut Pens, I have a handy tutorial.
Hi –
I got my cartridges transferred but not everything from each cartridge is there. Example – Hello Kitty Font cartridge (there are some some characters too). Only the characters are on cricut design space under my cartridges, not the fonts. When I look up the cartridge, it shows the alphabet, and characters, then says the number of images transferred. I can’t remember off the top of my head, but it’s just a handful. Not even enough to be a full alphabet let alone the upper, lower and variety of styles that were on this cartridge. The fonts were the reason I bought it to begin with. They are not listed under fonts either, I double checked there.
Not really a “how to use your cricut” question, but hoped maybe you’d know the answer.
Hi Tracy! I am sorry about this. I got in the Cricut world after physical cartridges were discontinued. I suggest you call customer service. They are very helpful!
I was hoping for a tutorial on the new 2020 features.
Hi Anna. This tutorial is up to date (I checked today). As new things come around I am committed to keeping this article up to date. It may take a little time while I edit it. May I know what is missing?
I know Cricut is changing from web to desktop, but the program looks the same, and this is not the article to learn how to install DS, I’ll be working on it. Trying to get my hands on a Mac PC so I can offer both ways.
Have a lovely day!
Do you have an updated tutorial on how to upload jpeg’s to the cricut design space and convert them to SVG’s? I just did a project and it was VERY time consuming to do it their way and not all of my layers matched despite my careful editing. Suggestions?
Not at the time 🙁 I’ll have it on my list of projects to write.
Your tutorials are an immense help! I do have one basic question. I add a sentiment text to the Canvas, placing it so that it would be drawn in the appropriate place on an imagined card base. (My card base is already cut and ready to put on my mat, so I don’t need to create a card base in Canvas.) If I was cutting a card base along with the sentiment, I would simply attach the text to the underlying card. Without it, however, when I click on “Make It”, the text jumps to the upper left corner. How can I keep the text in its original placement?
You’re very welcome, Marci!
You need to make sure you attach your text to the underlying card. I have a nice Card tutorial if you still have doubts.
My wife just got her first cricut machine. The only thing I see a problem with is whenever we import a pic say of a coloring image and we click draw it will make double lines instead of a single outline. I tried thinning out the images before importing but it still does that. Even with their own images. I wish i could delete one outline , have a fill option or draw between the lines instead.
Hi Brian! The reason for this is because images are designed as vector shapes and they have a length and width. If you want single lines, you need to have a design that is in vector lines. But then you will run into another problem, you can only cut or draw on those lines.
Cricut’s library has multiple drawing images, though! I am sure that when they Design them, they only do the drawing in vector lines.
I hope I make sense.
This is wonderful. Thank you so much! I have been trying to follow the tutorials and twice today I was instructed to press the color circle beside the blank canvas at the bottom of the layers column. I do not have a circle beside the blank canvas. I was trying to change the color of my mat for multiple layers. And earlier, same thing, told to press the color swatch circle to change colours of my registration marks. No color circle anywhere,. Has it been turned off??? How do I get it back?? Any ideas/recommendations?
Really appreciate your taking the time to help me with this. Thank you!!
Hi Laurie! I am glad I was able to help. Regarding your question I really don’t understand it very well. Where are you trying to change colors? On the Canvas are or after cutting? There are no circles colors that I am aware of.
Hi!! Simple question: can I do All of this with a Cricut Explore and a laptop/chrome book?
As far as I know, you can’t use Design Space on a Chrome book. It has to be a laptop or Desktop computer.
Lisa —
I am using DS on a Chromebook. I had to first install it on my phone running Android, then connect to laptop by way of Bluetooth. This is a work-around but I believe everything is working correctly and am creating my first design. I am still in the learning stage.
That’s awesome Patricia! Happy to hear 🙂
You are absolutely fantastic! Thank you so much for this tutorial! I also own a Zing cutter which has some easier features but also some that are many more difficult. My zing justdoent work like it used to. That’s why I got the Explore Air 2 for Xmas! I find some of the features confusing. I want to use HTV to print a design on a shirt for my son, but is requires 2 different colors. I don’t know how to move the 2 graphic elements to the second mat. Any help would be greatly appreciated. I am also older–65 years old! YOU ARE NEVER TOO OLD TO CRAFT is my mantra! I make a number of Xmas presents by myself. I was raised that a hand made present held much more meaning! Like the time I was 12 and made my Dad a set of PJs (with help from my Mom)–I sewed the cuffs on the wrong sleeves!! My Dad wore those PJs until they fell apart!! What a wonderful childhood memory. I am working hard to instill this same “handmade is better” to my children. They are getting it & enjoying it! Let us know when your E-Book is available–I definitely want to get one! THANKS AGAIN!!!
I am so happy to see you learning no matter the age! For Printable HTV Vinyl, you need to use Print then Cut, and use flatten. I’ll have a tutorial coming out soon for this, though!
I have enjoyed your tutorials they are very easy to understand and a great education for us new Cricut users however I could not find how to find the name of the font I used in a previous project .. I love the font and want to use it again. I have Cricut access and a Cricut explore Air 2.. please help!
Hi Angela, to find the font. Open the project you used, then go to the layer where you used the font and right-click on it, then you’ll the info. You can also find it in “My projects” window, I cover this topic in this tutorial.
My layers panel has gotten to large and takes up a good portion of my canvas, also can no longer move my canvas down to see the upload bottom. I don’t seem to have the arrows any more can you help me?
Hi Sue, I don’t know why this is happening to you. Did you try to Maximize your window? how big is your project? Will you send me a screenshot to daydreamintorealityblog@gmail.com
Hello. Thank you so much for sharing your knowledge in a very simple way. Now I can do a bit more with my new Maker. I do have a question, can I cut out a sentence as one piece instead of each individual letter if the font is not cursive?
Thank you
Sam
Yes, but you need to cut-out that sentence from a shape. Therefore the shape will contain that text. You can see this in my tutorial on how to edit shapes in Design Space.
Hi!
My kids gave me a Cricut for Christmas and now I am doing a deep dive
on Pinterest and found you ! Thank you for all the info. My daughter helped me yesterday
to set up and get my Cricut going and I just got back from Michaels. I hope I will be able to learn as I go
and will use you for a major resource!
Thanks
JeanAnn
You’re very welcome JeannAnn! I am so happy I can help you on your Journey.
Thank you for this awesome tutorial! I’ve only had my Cricut for one month and it can be a bit overwhelming. Everyone says “just look on YouTube for instructions” but that’s not always easy to do when you don’t know what your searching for. Your tutorial will definitely help me.
I am happy I can help! I agree Youtube can be overwhelming when you don’t know where to start. Plus I keep this article up to date, so win-win!
Every time I go to cut something it changes the order of everything. For instance, I was doing multiple monograms and it switch the order of letters when I went to make it. Any suggestions? I have to go to edit and move them back. Not sure why it changes how I laid it out?
Are you attaching your layers? Check out my Attach tutorial.
What great tutorials you have!! Your explanations are so easy to understand!! I see why each tutorial takes you 15 hours.
From a newbie, than you!!
You’re very welcome! I am glad I can help 🙂
Hi Catalina. Thank you so much for this wonderful tutorial!! I was trying a different tutorial and things be taught in that one just weren’t lining up for me. Your tutorial answered many of the questions I had swirling around in my little head. I have a little hint I hope might help others – when doing the tutorial, I had the tutorial up on my iPad, and had Design Space up on my laptop. That was I didn’t have to keep flopping back and forth. It made it much easier to follow. I am looking forward to going through all the tutorials you have a graciously made available to everyone!!
That’s awesome Sharon! Thank you for sharing how to be more efficient! I am glad I can help 🙂
I am trying to find where the option to cut one color at a time is on my app. (Simple, moderate complex, complex). I have an iPad and an iPhone and i just can’t figure out how to get to that screen.
Any help would be appreciated!
Thank you
Hi Rosaxe, these options are when you upload an image in Cricut Design Space and it’s for Print then Cut. It won’t appear on your mat, but when you upload a JPEG or PNG image.
I hope this helps!
I have been listening to many a tutorial on using the cricut. I found yours most useful and educational! Thank you!
You are very welcome! I am happy to help 🙂
Wow! This was exactly what I needed! I just unboxed my Maker a couple days ago. I have been “playing” but it is all pretty overwhelming as I’ve never used this kind of program before. THANK YOU for taking the time to post this element-by-element tutorial! Absolutely wonderful!
You’re very welcome Lucy! I am glad this helped you!
hello and thank you for you great file here, do you know a way to download this tutoril, so I can see it if I have more time?
Hi Magda, at this moment there’s not a way to do it. I will have an ebook coming soon!
I added a cricut file into my favorites and added link under that so when ready to go over when I unbox my maker, I can easily access.
I really liked this totorial! I am a new cricket user. I am 83 years old, and just set up my craft room. Looking forward to using it! Is there a way I can get print out? I sat and used my phone and took pictures of everything. But, I don’t know how to Send it to the computer and printer. I have a new computer which is a 10. I would really appreciate your ideas for the information printed out. I am very new in the computer, I had a XP, but needs work on, but everyone tells me to throw it! I have saved all my information on a saving device, as all my embroidery designs and inventory information , can you help me to transfer your to my computer by message? If not I would be willing to pay for it. Loved all the work that you have done for all us newbies. Thank you very much for your help and time. I hope to hear from you when you have time. I live in Sebastian, Florida.
Hi Elsie, I am so happy you are learning how to use the computer and machine! You are the reason I make this tutorial. I don’t have my tutorials for printing right now 🙁 But there’s an ebook coming soon and I would love to print it and send it to you when it comes out.
Hi Elsie! How inspiring you are! Thank you! I am 57 and just beginning this adventure, too. If you are viewing this article on your new computer (not your phone), look to the bar on the very top of your screen and click on “File”. A drop-down menu will appear, and somewhere within that menu (on my Mac it is the bottom option) will be “Print.” As long as your new computer is paired with your printer, and your printer is turned on, you should be able to click on the print option, have the menu for your printer pop up, and you can select to print. I hope this helps!
Hi
Hope you can help me out. Small letters seem to be a challenge with cricut. They pull off as they get cut
Any ideas how to cut 1/4 any style letters?
Hi Nadine,
Small letters are a pain, I feel you! For best results make sure you are using a sharp blade and a new mat (Make sure your paper or vinyl has well adhered to the mat). If your machine is making to cuts change the pressure for more and pause the cut when the machine is done with the first pause.
I hope this helps.
Wow! I found you this morning and love this tutorial. I’m new to the cricut world and crafting. I was not blessed with creativity and need lots of help. Feeling overwhelmed with all the crafting possibilities. Your tutorial is going to be very helpful. The Weld & Attach file opens to the Contour Tool file. Is the Weld & Attach file available? I will definitely follow you. Thank you so much! 🙂
You are welcome, Karen. thank you for pointing out the mistake, I just corrected it!
So glad I was given this site . Thank you I look forward to reading more.. thanks for all the help.
You’re very welcome 🙂
thank you so much!!! this is by far the most clear and informative information I have obtained pertaining to cricut!!! I can’t wait to see more!!!!
You’re welcome!
Hi Catalina!
I was going through your Cricut Design Space Tutorial. I was able to open everything accept “Learn about Flatten and Print then Cut”. Is this no longer available?
Thanks!
Hi Karen! It’s still available.
Thank you!
Hello Catalina! I really enjoyed your tutorial, Congratulations!
My name is Renata and I’m from Brazil, I recently bought a cricut, I’m researching a lot to use it and I’m slowly managing to do some projects. But, I still have a question, I’d like to know if I can do two types of cuts in the same project. For example, I have a sticker pack design, I want to make the half cut for the stickers and also the full cut for the carton sides and thus form the sticker pack. Can you tell me how to do it?
Hi Renata! Welcome to the Cricut world! So, you want to cut the same design on two different surfaces right? You can do this on the same step but you need to use different Mats because of the pressure the blade needs to do on each material.
Is this what you want to do?
I hope this helps!
Hello Catalina,
I just came across your website. First I want to say I am a Christian also and I thank God that you were not a shame to let everyone know that fact! Your explanations on how to use the Cricut were great; I purchased one over a year ago and because I didn’t understand how to use it; it has seen been collecting dust. I like one of the other individuals who made a comment; I would also like to know how I could get this in a form where I can print it out and have access to it while trying again to use my machine. I would also be willing to pay for this. You have explain everything so good; I am now for sure I can master it.
Thank you so much! I am glad you found this tutorial helpful! I will be creating an ebook at some point! God bless you too!
this is such a great tutorial. thanks for taking the time to help others. I read the whole thing but I will be referring back to it often when my project requires one of the features. and you covered EVERY feature. I look forward to others as well. I am making my Christmas cards this year and they look so professional.
You’re welcome. Yep, this tutorial will be up here whenever you need it!
Hi Catalina,
Thank you so much for taking the time and effort to share your knowledge of the cricut machines and instructional programs and especially the Design Space information. I do have one question and I did look at all the instructions but I guess I must have missed it so my question is, How do you know the size to make an image when you are making a card or working on any project? and how do you adjust the size?
Also I want to thank you for giving your testimony about being a Christian. I am too and I do appreciate you sharing that.
Hi Carol!
Thank you for your kind comment! The size is on the top panel area. However, I have a really cool tutorial on how to make cards that explains all of that as well!
I hope this helps! Happy cutting:)
God bless you
What a great teacher you are! I will read this and the others again and again as I continue my journey in Maker Land. As amazing as the Cricut Maker is, it is not available on all platforms. For example, I want, REALLY WANT, snap mat, but the laptop camera is a stranger to Cricut. Argh! The argument in my head is do I wait for Cricut software engineers fix that lapse? or do I go out and buy a smart phone? Any advice?
Thanks again for splendid tutorials!
Hi Sarah!
Unfortunately, there’s no Snap Mat on the computer. Only the phone App. I don’t think they will add it to desktop. Maybe buy a very cheap smartphone? Preferably Apple because the Android app doesn’t have all options.
What a wonderful tutorial! Thank you so much. I’ve been using Cricut Design Space for quite awhile and I still found your tutorial very helpful.
You are welcome Betsy – I am happy I can help!
Wow I just found you and your explanations are spot on Nice Job being a caring sharing person!
Of course April!
It’s my joy to teach you everything 🙂
Wow! What an undertaking. Thank you so much for taking the time to explain in detail each piece of the Cricut Design Space. I am feeling a little less intimidated – and so much more excited to get started. I am looking forward to checking out a few more of your tutorials and to subscribing!
Thank you Cheryl for your kind words. Welcome to the Daydreamer Family!
I have had my Cricut Maker for 2 days and have not yet been able to figure out what you mean by cut & print or print & cut. What the heck does print mean. This machine is not a printer. Does print just mean what I have on the canvas?
Hi Cynthia!
I understand your frustration. Print then Cut is an option for you to print your designs and then cut them.
Check out my Print then Cut tutorial if you want to understand this better!
Glad I found your site. I’ve had the machine for 2 weeks and was having no luck finding instructions I understand. Was beginning to think I made a mistake. Thank you!
This is the reason why I spent almost 15 days writing this article! I am so happy you feel comfortable to use your machine 🙂
I’m not sure if this question has already been asked and I missed it or if I’m the only person who has not yet figured it out. I’m relatively new to Cricut. I really want to have multiple layers using fonts and someone said buying Cricut’s Plantin Schoolbook will give me the the option to do that but it seems as though other fonts should be able to do the same thing. All the other tutorials I have watched show a different design space screen then what I have and it gets very confusing. Do you have any pointers or a tutorial on how to have multiple layers with font?
Hi Andi. Do you mean a multilayered font? If that’s the case I do have a tutorial about text and it’s updated to the earliest Design Space version.
Let me know if that helps 🙂
Hi
Thank you so much for this tutorial it’s amazing. I’ve been looking for something that is easy to read and understand. I’m in the UK and only got my explorer at the beginning of April 2019 and have been slightly intimidated by it. I had a lovely lady visit me in my home from a Facebook group who lives 5 minutes from me, and I was amazed at what the cricut can do. I’ve only done a couple of basic cuts and made a birthday card for my sister in law. I now feel that if I struggle with anything I can look here for some answers. So thank you very much I’m going to have a think what I want to do. Karen xx
I am so happy I am able to help in your Cricut Journey!
Feel free to check all of my tutorials, All of them are very meaty and easy to follow!
Hello Catalina,
Thank your your generosity in putting together this tutorial. I do not have a machine yet, but I am trying to learn more about the Design Space and see if the machine would be the best investment for me. I like to cut image that either I create or stamped. I am not sure if I can do that at all, and want to ask you if you have any tutorial for using the contour tool to cut images uploaded to the app.
Again thank you. Your tutorial is really awesome and I have already learned few things.
Thanks again. Be well
Miriam
Hi Miriam I am very happy I could help put! I will be creating a post about Contouring very soon… About images you can upload your own as well and edit them. There are a lot of tools that will allow you to make pretty much anything!
Oh, my!!!! Found THE perfect woman to teach me! Godly and knowledgeable about all things Cricut!! What a powerful combo! I’d like to print your e-book, if you’ve created it. Could you direct me as to where I could find it? Or send me a link to download this whole tutorial so I can print it out?! I am so amazed at how thorough you are. The detail you’ve put into this, for the least of us. Sure would love to meet you, chick. God bless you, woman.
Thank you Tonja! That’s so sweet of you! I haven’t created the final Ebook, but I hope to do it soon!
I have a Cricut Maker that makes me a prisoner of frustration.
By far your site (found on a random Pintrest post) are the best Cricut tutorial ever.
Clear, precise not wordy.
Thank you so much.
Hi Den!
Thank you so much. I know it can be frustrated at times. That’s why I am here to help.
Dear Catalina,
Hi, I’ve e-mailed you last year in hopes to get a copy of your circuit “what is everything”. My husband have tried numerous ways but have had zero luck. I have Windows 10 if that helps. I was hoping to put it on a thumb drive and take it to a office supply store to have it printed and put in a spiral binder. I really need it to reference back to. I’m so impressed with all your hard work and wit. My offer still stands to pay you for the copies and shipping. Is there anyway you can please help me out. There are other tutorials out there but to be honest they don’t compare to yours. Thank you for your time.
Fondly Kim
Hi Kim! I sent you an email!
Catalina – I am also having a hard time learning this wonderful machine after over a year and because I’m using a iPad and iPhone it seems like this all applies to everyone but us iPad users. How can I get a copy also of your instructions I have spent months nights days trying to research and I also learn by reading and then applying it to what I have in front of me. U tube is not working for me. Could you pm me as I’m just lost but your detailed instructions have kept my attention and you may be the person I will finally understand and become friends with my cricut.
Just read more comments and am wondering since tonight is the very first time I have what feel like found a “cricut angel” in you and your ebook do you have any other info I can buy or download to even start to learn step by step anything using a iPad or iPhone . Thank you I’ll keep reading and hope to hear from you.
Thank you so much pammy
Hi Pammy! I am so sorry to hear! I have this tutorial on Iphone and Ipad too! Just as complete 🙂
I hope this helps! I know tutorials from phones are harder to find. However, if you read my tutorial the one I just linked and then try to apply that to other tutorials that will help a lot too. On that article I also explain what things you won’t find on your iPhone because are only on Desktop (so you don’t loose your mind trying to figure it out lol)
I hope you become best friends with your machine. Gosh… I got into a fight with mine today, but after amazing results I am still faithful to my Cricut!
hi,
thanks for this tutorial I’m a dog lover. I rescue dogs from the streets in Mexico and I have too much ideas to do. because rescue dogs is VERY expensive, I already have my cricut explore2 and my easy press too and I can wait to start… you’re the best
Hi Nancy!
I am very happy to hear this tutorial has helped you. That’s so sweet of you that you rescue dogs from the street!
I read some of your message. I’m a newbie to Cricut. I was totally intimidated by it until I took a class. The one thing most of you people don’t tell newbies IS You can learn faster with a laptop or desktop. Maybe I’m just old and not tech savvy. Remember nothing is gonna to be perfect the first time you try it.
Hi Sue! I totally agree with you. I think learning on Desktop is so much easier than learning from my phone.
I am running out of patience. I am new at this and I do not feel that it is user-friendly. I’m 62 years old and want to make my own cards for people I love. I have selected an envelope that I like and feel I can use it over and over. What I am not able to do is change the address on the envelope. I am very frustrated. Can you point me in the right direction? Thank you very much for your time. Kim Schott
Hi Kim! I am sorry you are feeling frustrated. I do have a very complete tutorial on how to make a card.
I don’t know what design you are using? Try double clicking the text (only) and the type it again.
Most likely is that the envelope and the text layer arr attached and that’s why you can’t edit them.
I address this on the following tutorial. Don’t get frustrated. You got this!
This is the link: https://www.daydreamintoreality.com/make-card-cricut-maker-explore/
Please Let me know if you were able to figure it out!
For responding so quickly. Tomorrow I will attempt this and get back with you. Have a blessed evening, and again thank you for responding so quickly.
You’re very welcome Kim! I am happy to help you on your Cricut Journey.
I know it’s hard I understand. I am here to help!
Thanks for a great tutorial! My one question at this time is: is there an erase tool that can be used to erase a portion of an image or design? Example I print and cut out some text and somehow lost the dot for the letter i when I was weeding it. I want to print and cut just the letter i again so I can fix my project. There would be other reasons to have this capability. Help please!
Hi Pam I am happy I can help! This happens so often lol! You can use the countour tool on the layers panel.
Or open a new proyect and just type the letter i (same size and type of font) and then print the cut!
I hope this helps
I love how in-depth this post is. Thank you so much for this. I bought my cricut last year and did a few projects…got sidetracked and started again. I was trying to remember what I had learned, but found your post ad it brought everything back to me, except for flatten. I never had a clue what that was even for. LOL
You are more than welcome Stacey, I am really glad I can help. I will be posting about flatten sometime soon.
Have a great day!
Oh dumb me I didn’t have my text up on my canvas. LOL
Hi I received my cricut maker for Christmas and have been having a lot of fun with it. I love your tutorials, however I am stumped. On your tutorial you have a second line in your edit bar. I can’t find where one can resize the fonts and other things in this line. I guess it is updating the tutorial space. How do I do this. I have gone into a place where it says it will up date my machine and it says my machine is up to date. But nothing has changed since I got my machine in December. What do I do to update the tutorial space.
I see you already found out how to solve this. To have the Text options activated you need to have – and select – text on your canvas area
Thanks for the great tutorial, it explains a lot to me. But, problem is that I only have a Chromebook and small Android tablet, not realizing Design will not work on these! Do I have to go buy a new laptop now, since I have invested in Explore Air 2 machine, tools and supplies? Help, I could just cry!
Hi Vicki! Unfortunately Design Space doesn’t work on Chromebooks. Have you tried downloading the app on your Android Tablet? Also if you have an Iphone or Android phone you can install the app as well. I hope this helps.
Hi
Did I miss something in your post on how to select then attach?
I want to put text in a square but don’t know how to select both images then attach
Hi Margaret. Click on one shape and the press control or cmd key at all times and click on the other shapes you want to select. I hope this helps 🙂
Thank you, thank you, thank you. You are the first person I have found that has been able to explain the design space in a complete and organized way. I finally understand the correct way to create a project! I was almost ready to throw in the “Cricut” towel but this tutorial has given me the answers I was looking for! Again, thank you for creating this post.
Hi Shannon I am so thrilled and happy that this tutorial was useful for you! I am sure you will be making beautiful projects! Thank you for taking the time and commenting as it encourages me to write more!
This is an awesome tutorial with everything that I have been trying to figure out all in one. Making cards to learn how to do things but still questioning myself. Printed this out so I can refer to it as I am learning since I need to have it in front of me as I learn along with hands on. The last few days I keep having questions and they were all answered in this tutorial.
I don’t like YouTube – I need written instructions. So many of the YouTube videos are outdated so glad to have an up to date tutorial.
THANKS!!
Hi Jan! I am so happy yo hear this…. I also needed to learn and couldn’t find many answers, I will always have this tutorial updated! Happy Cutting 🙂
Do you know why my Design Space does not have the “Curve” edit option for lettering etc? I would so love to have that option! Mine looks a lot difference than yours. (Using an iPad.)
Hi KL! Ipad doesn’t have the curve option! As I reply to this I am also working on the Ipad/Iphone tutorial! It’s been such a big request. It’s going to be as complete as this one! It will go life Next Wednesday at the latest!
THANK YOU SO MUCH!!!! Is there a way to print all these wonderful explanations without all the advertisement?
Hi Susan!
I am glad this tutorial is helpful for you. Right now there’s no way to print it without Ads, as they allow me to bring this sort of content for free. However, I will be working on an Ebook where I will cover more in depth everything.
Have a lovely day
Wow!!! Few people in the ciber world like you!!! What organization and clarity!!! Thanks a lot for this!!! God bless you!!
That’s so sweet of you! Thank you so much Pao! Have a lovely day and blessings to you too!
I would love to print this out can you sent it to my email?
Hi Jennifer, in the next couple of months I may work on a little E-book!
Have a lovely day 🙂
Ebook would e wonderful
Will be working on it soon!
Hi, I just subscribed to your page and confirmed my email but I do not know what password to use to access the images.
Thank you for putting this page togwther to help us newbies!?
Did you check the Spam box? It could’ve gone there!
Thank you so much for taking the time to help us
Ramona you are very welcome! We are in this together.
Happy cutting 🙂
Catalina,
What a blessing this tutorial has been. I’m a new Cricut user, and an excited one at that! I was ready to just “dive right in” the moment I opened the box. And I did… I made a t-shirt on the first day. (I followed the set-up instructions that came with the Cricut. It advised me to do the project they included in the box…(check); my daughter was reading a book and said, “Make me a bookmark” (check); then on to a t-shirt design I went! I must say, God’s grace WAS sufficient! All three projects came out perfect! However, I know that there are so many things I need to learn if I’m going to truly get the most out of this great machine. And while on my 1st favorite hobby (Pinterest), I ran across you!
Thank you for taking the time to do this for people like me. I can’t wait to use my machine on a regular basis without being nervous (LOL). Thank you, also, for your relaxed spirit. I love to read serious things that are intertwined with humor! So… with all that being said, I subscribed to your site and can’t wait for updates! Blessings to you and your family!
~ Holly (Huntsville, AL)
Hi Holly! Amen, I am so glad that everything is going well, I went for it too!
I am so happy that my tutorial has helped you, I literally worked on it for like 2 weeks and I am about to update as well! I truly appreciate your comment! It encourages me to keep going God bless you!
Will this be updated with the new January 2019 update?
Hi Jan! Yes I will updated in the next couple of weeks! I want to keep everything up to date!
Thank you so much for this, it a lot and i still have questions.
Hi Sandra! I am glad it was helpful
Let me know your questions. I want to create more tutorials 🙂
Wish I had this when I first got my Cricut a year ago 🙂 Found some things in this tutorial that I didn’t know. Thanks so much for sharing this. Great job!
You are so welcome Genelle! Stay tune for more tutorials 🙂
Catalina, thank you for taking the time to put this tutorial together. I am sure it will be of great help to me as I start to create new projects. Have a great Vacation.
You are more than welcome Cathy! I am sure all of your projects will look lovely 🙂
Great tutorial. I do have a question since I have been using my iPad to create my projects. The canvas area is totally different. Am I missing something? Their is no template option and I can’t find the zoom in/zoom out +/- .
Please help.
Jessica
Hi Jessica! I am on vacation right now, but once I return I will put a whole tutorial for Cricut Design Space on Ipad and Iphone! It’s a little bit different. I just recommend you to play with it and have fun! I’ll personally email you when the tutorial is ready! Happy new year!
I desperately need this too! Thanks
It’s coming soon!!
I’m looking forward to this tool too for my ipad. I’ve just through all your helpful blog above and looking forward to getting started.
I am glad I was able to help on you on your Cricut journey
Glad I found your website❣Thank you for this detailed post and also for including images which is a plus! My husband recently bought me the Cricut Maker with a few supplies ( so excited)…I’m a bit hesitant to use it but after reading your post I think I will give it a try.
Sonia, you just made my day!
I am so happy to hear that this post is going to help you on your Cricut Journey… I know it seems complicated a little bit, but once you get going there’s no coming back lol! I have tons of other tutorials, plus a growing library of SVG files and other printables.
Thank you for commenting too! it makes me feel I am not just talking to the wall!
Have a lovely day 🙂
I tried several times to subscribe but I’ve had no luck.
Hi Kim! I am sorry to hear this. Have you checked your SPAM inbox? I will send you the passwoord from my email 🙂 I want you to have access.