

Hello Daydreamers!
Today you are going to learn how to use Cricut Pens with your Cricut Maker or Explore!
Seriously!
If you follow along, by the end of this tutorial, you will be a Cricut Pen expert!
Tip: This tutorial builds upon the skills I teach in every step. If you’re just starting with your machine, I suggest you read and follow each step.
In a nutshell, these are the topics I will be covering:
- Cricut Pens Basics: types of pens, which one you should use, how to install them etc.
- How to tell your machine to draw/write.
- How to use Cricut Pens with fonts.
- How to use Cricut Pens with images.
- Step by step tutorial of using different Cricut Pen Colors.
If you are a beginner still figuring out Cricut’s software, I recommend this comprehensive and easy Design Space tutorial.
Are you ready?
Let’s Daydream Into Reality!
Cricut Pens Basics
Learning about Cricut Pens is more than just the steps you take in Cricut Design Space (which I will explain later on).
There are many things about Cricut Pens that you need to know if you genuinely want to take advantage of your Cricut.
Let’s start from the beginning.

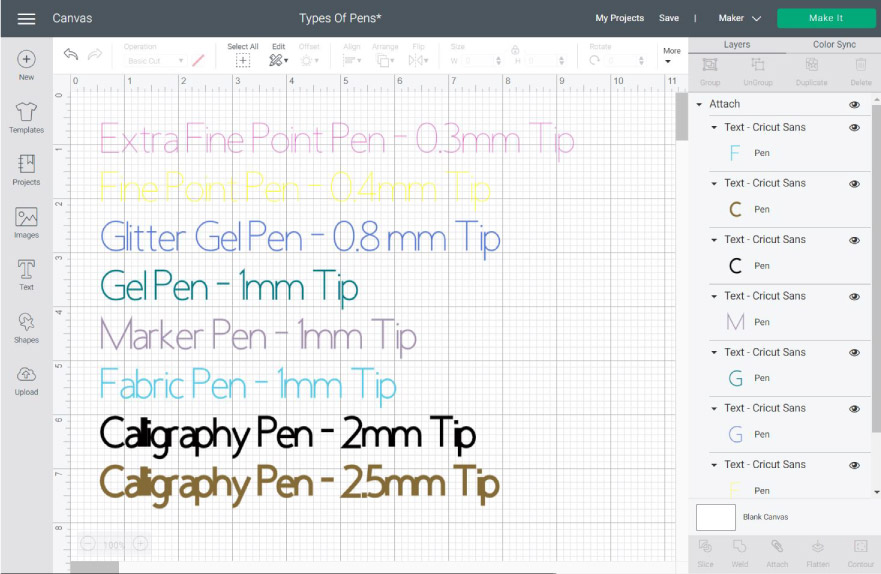
Types of Cricut Pens & Markers
Cricut Pens usually come in packages of five, although you can also find them in a box of 30.
According to Cricut’s shop description, all Pens (except the glitter gel) are permanent after dry. They are also meant to be used on paper and non-coated materials. (Vinyl, glitter cardstock, and other coated and glossy materials don’t work with Cricut Pens)
There are countless colors and different finishes like metallics, glitter, gel, etc.
It’s very easy to get lost with so many options! Nonetheless, each pen has its name on the side and a letter at the bottom that allows you to quickly identify the type and size of the pen you have on hand.

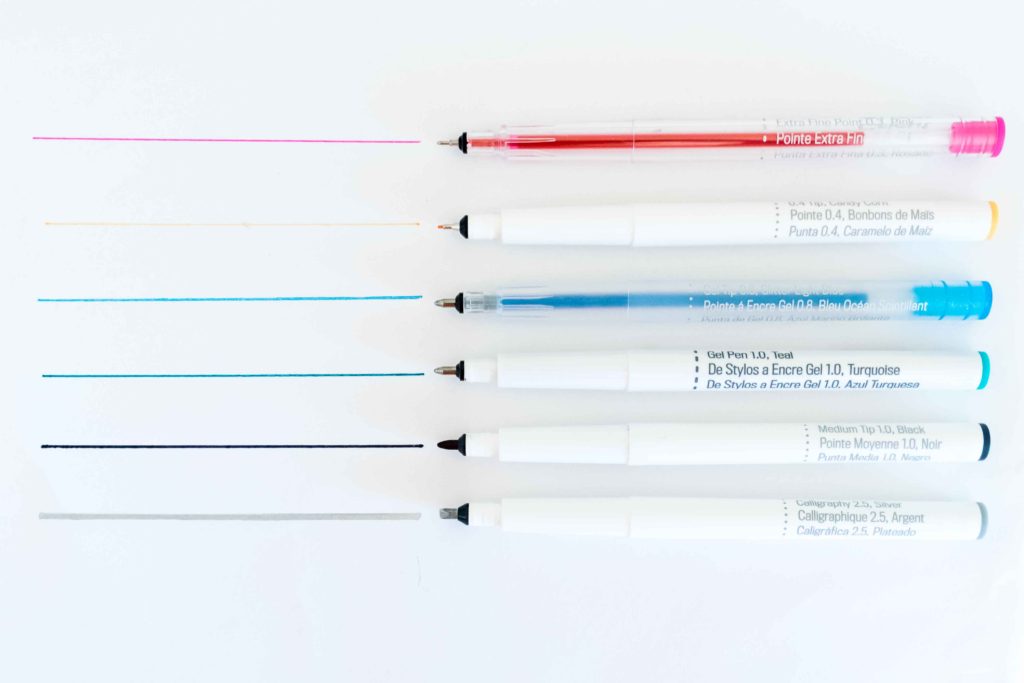
Cricut divides their pens into five different categories, and, in those categories, they have a wide variety of colors and options for you to choose from.
Extra Fine (XF) 0.3 mm
Extra Fine Pens are great for projects that have very intricate designs. For example, Small flowers that are next to each other.
The body of this pen is transparent, and it has an XF at the bottom. There are not many colors available, but I like the finish of them.
Fine (F) 0.4 mm
Fine Pens are the most common ones. Any color you can think of, Cricut has it on this particular size. The body of this pen is white, and it has an F at the bottom.
These pens are quite versatile, and you can use them to make gift tags, cards, coloring pages, invitations, etc.
On the 0.4 Size, you will also find the Cricut Infusible Ink pens. Unlike regular pens that you use for your paper projects, Infusible Ink Pens are for transferring (with your Easypress) to polyester coated materials like T-Shirts, Coasters, Totes, etc.
You can learn how to use Infusible Ink Pens with T-Shirts on this tutorial. Or you can learn more about Infusible Ink on my helpful guide.
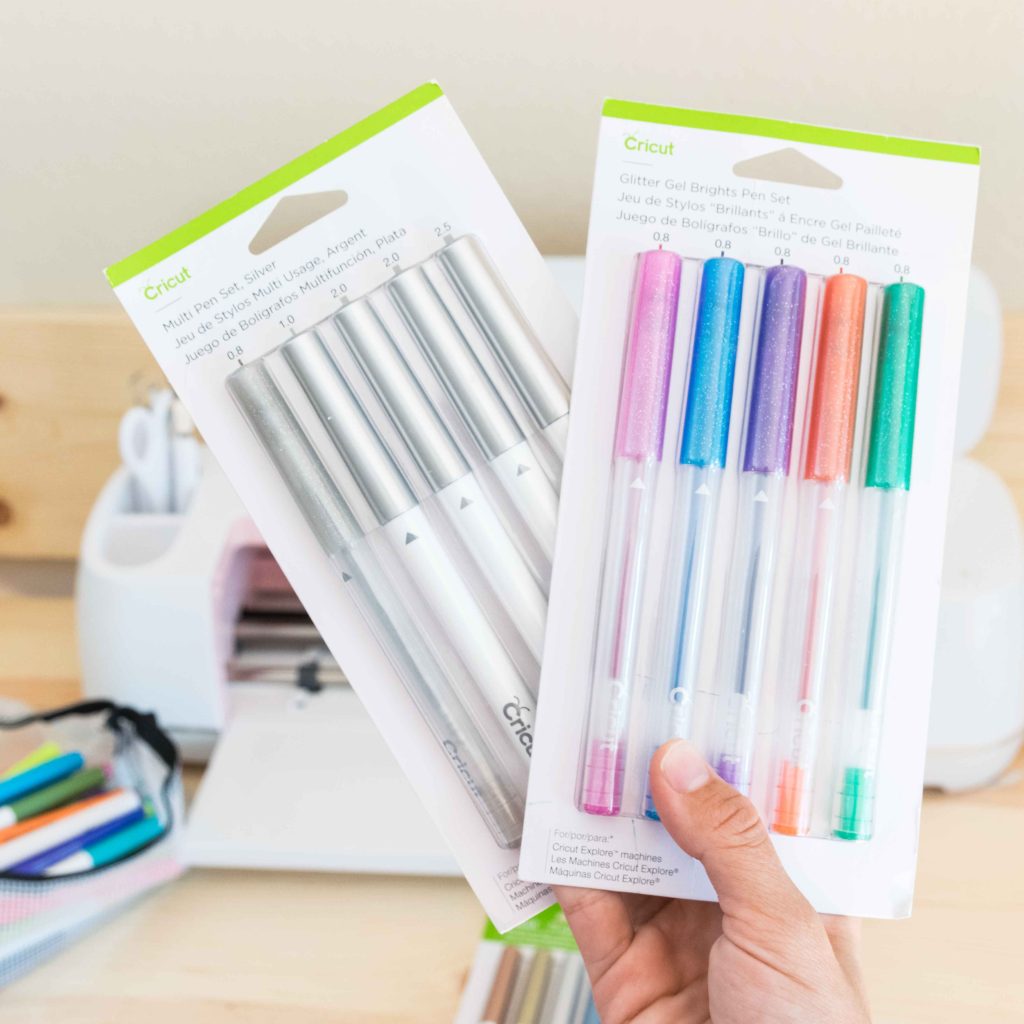
Glitter Gel (GG) 0.8 mm
This pen has a beautiful and glittery finish. It’s smooth, and it’s perfect for adding extra details to your projects.
The body of this pen is opaque, it’s cap has a glitter finish, and the bottom has the GG letters.
Gel (G) 1 mm
These pens are quite smooth and silky. The body of this pen is white, and it has a G at the bottom.
You can use them to make very colorful and bright birthday party invitations, or any other project you want to add a silky like finish.
Marker (M) 1 mm
Cricut Markers are one of my favorites! The body of this pen is white, and it has an M at the bottom.
Markers don’t come in a whole variety of colors, though. Mainly you will find them in black, gold, silver, and other metallic colors. They are perfect for wedding invitations and projects were you need a classy and edgy finish.
On this Pen Size, you will also find the Fabric Pen and the Infusible Ink Markers, these work just as the Infusible Ink Pens.
Calligraphy (C) 2.0/2.5mm
Calligraphy pens are quite different from the rest of the other pens and markers that Cricut has.
They come in size of 2 and 2.5 mm, and just like the markers, you will find them in black and metallic colors. The body of this pen is white (black calligraphy pen is grey), and it has a C at the bottom.
Use these pens on projects with Calligraphy of handwritten fonts from Cricut Design Space.
IMPORTANT: The right way to use your Calligraphy pen is by tilting on a 45° angle during the installation process.
Pens come with a little triangle that points the direction on which you should install your pens. This little arrow doesn’t matter on any of the other pens, but it does with the Calligraphy Pen!
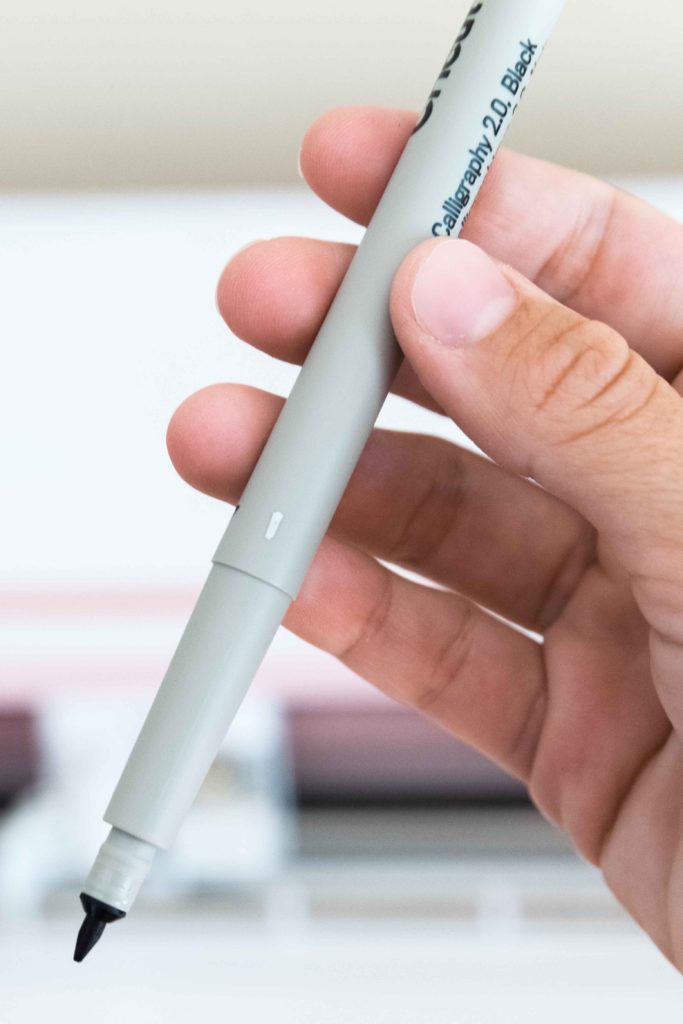
Tip: Using the arrow mark of your pen, tilt it 45°, and use a different marker to add a mark. Use this mark as a reference point to install your Calligraphy pen on your Cricut.
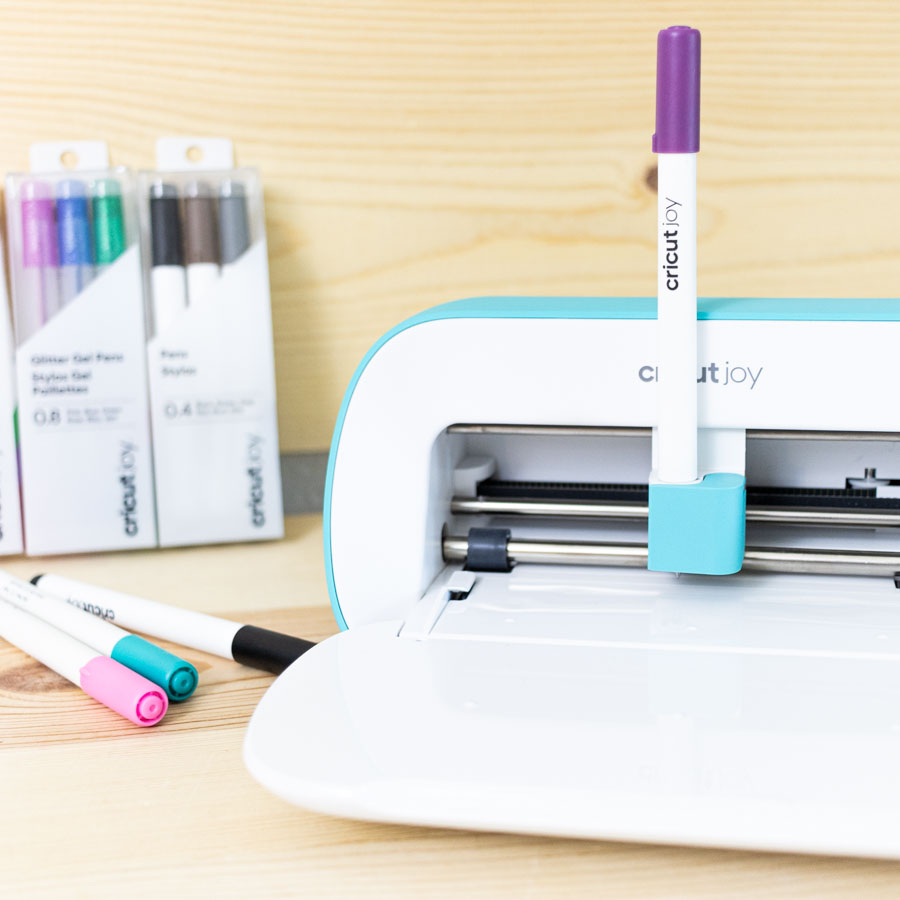
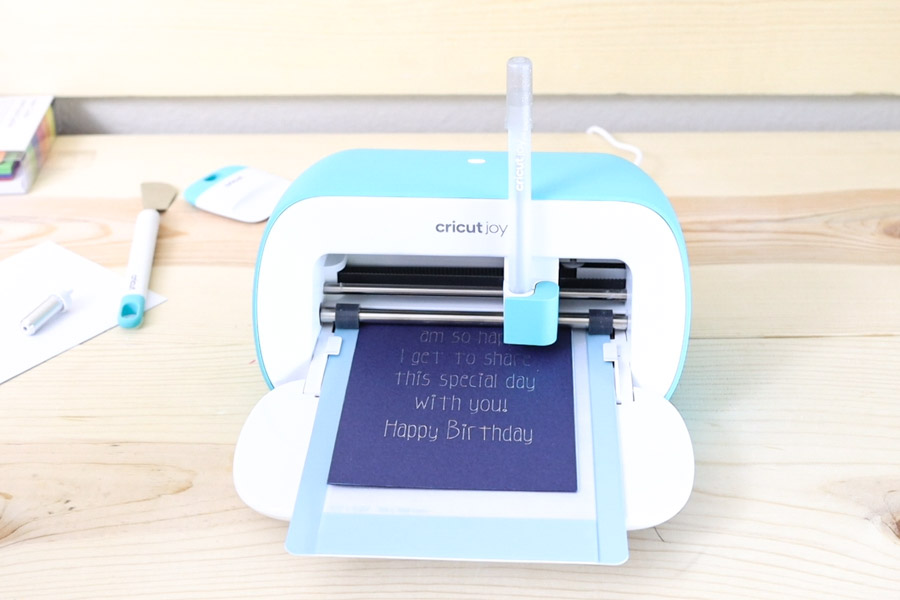
Cricut Joy Pens
In 2020 Cricut released the Cricut Joy. A teeny tiny home cutter machine that also allows you to write and draw.
The Cricut Joy Pens look quite different than the regular pens, and that’s because the tool holder of this machine is smaller.
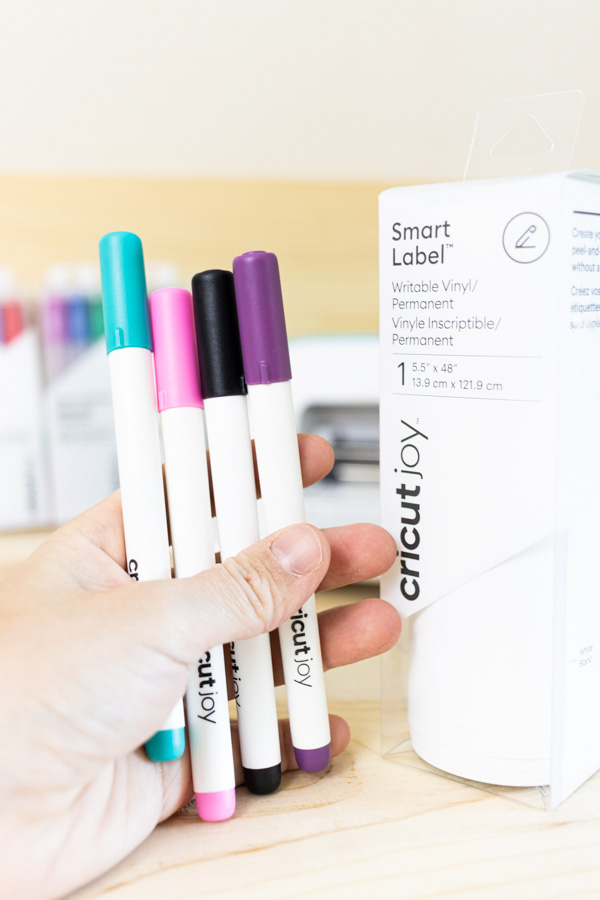
These are the types of pens are markers you’ll find with the Cricut Joy:
- Extra Fine Pen 0.3
- Fine Pen 0.4
- Glitter Gel Pen 0.8
- Gel Pen 1.0
- Marker 1.0
- Infusible Ink Pen 0.4
- Infusible Ink Marker 1.0
There’s no calligraphy for the Cricut Joy.
The only difference between the regular Cricut pens/markers and the Cricut Joy pens/markers is the size. The steps in Design Space are identical, therefore the tutorial on this article will work for you.
Of course, the size of your project will be smaller.
Related: Make Cards with the Cricut Joy
Writing Test with Different Cricut Pens and Markers
In the following screenshot photo, you’ll be able to see how fine and thick, different types of pens and markers look in Design Space.
And this is how the pens look after drawing with the Cricut.
I ran into some trouble with the Glitter Gel and the Gel pens; as you can see, I had to complete the initial letters of the pens because they were new and the ink wasn’t ready to come out yet.
I was going to repeat it, but I figured you would benefit from my mistake by learning from it and not making it!
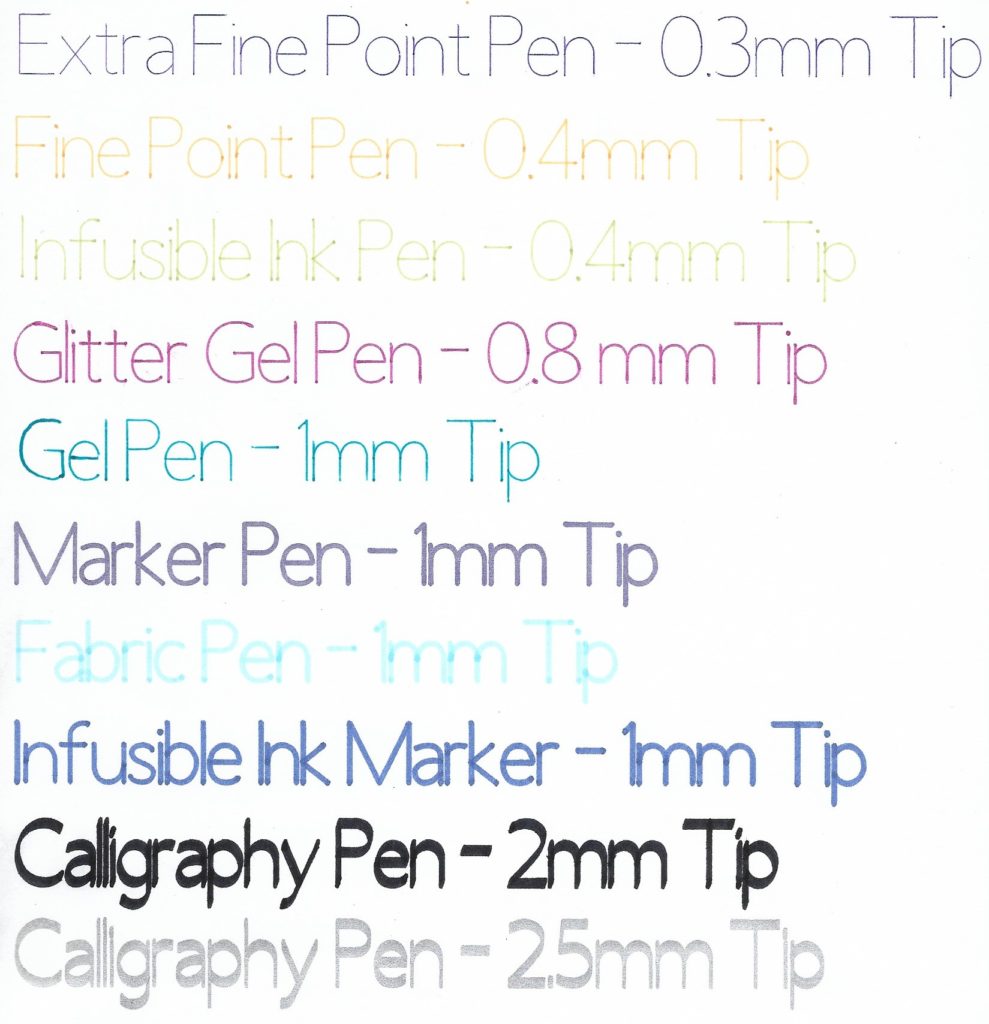
Tip: Before using markers on your project, make sure to test that the ink is coming out on a different piece of paper; this is especially important with Glitter and Gel pens.
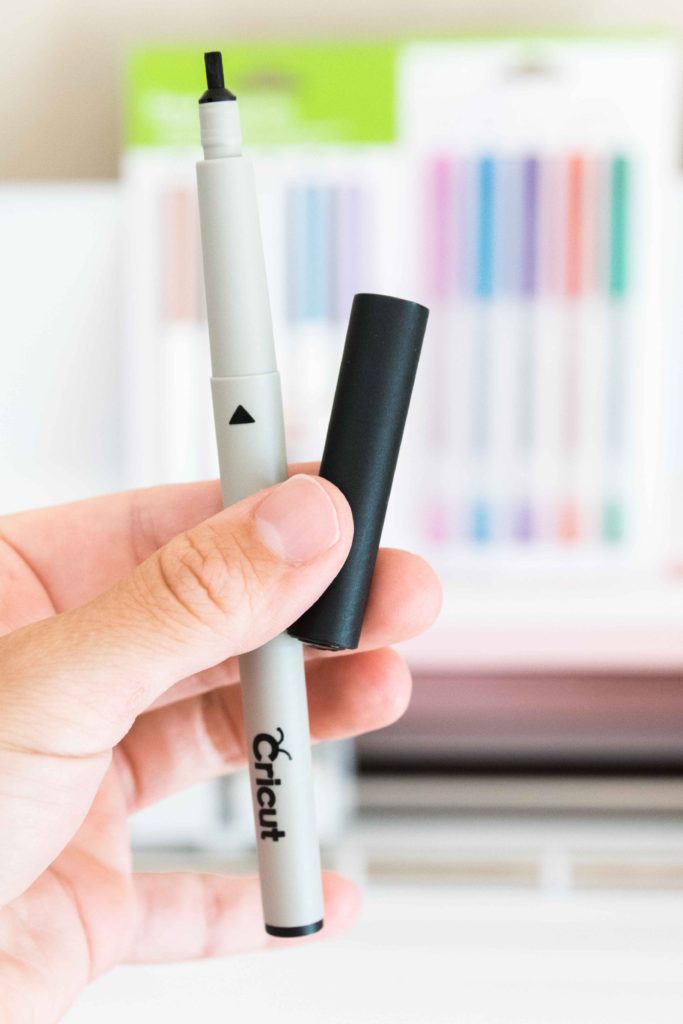
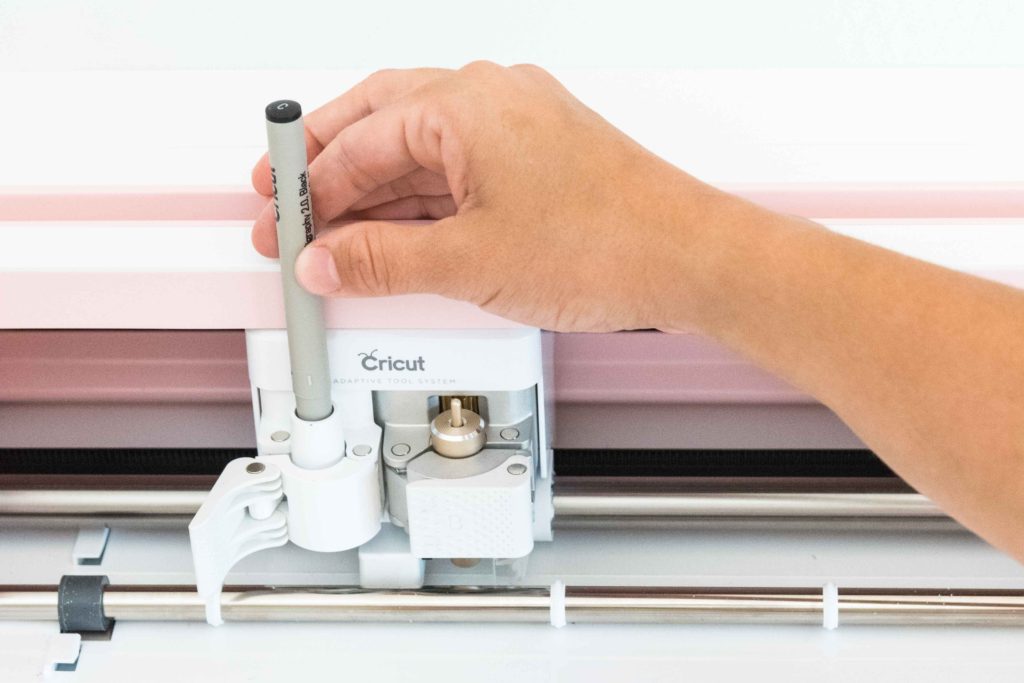
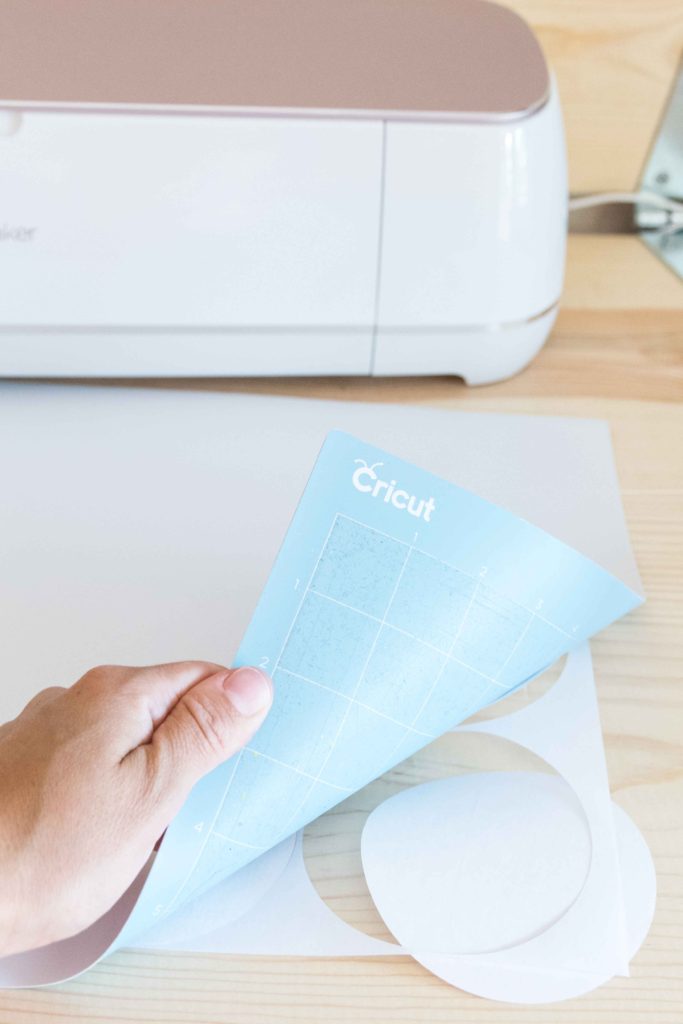
How to Install Cricut Pens on your Cricut Maker or Explore
Installing pens on your Cricut is quite easy. But sometimes, especially if you are a newbie, it can be tricky.
Not to scare you, but my Cricut Pen adapter broke one day when installing the Scoring Stylus. I am sure I was careful, but after that experience, I am extra careful to install my pens. (I called customer service, and they replaced that part)
Pens always go on the Clamp A of your Cricut machine. To install a pen, open the clamp, then insert it.
There’s always going to be a little bit of resistance when installing the pen, so you need to make sure it clicks. Be firm, but also gentle. Once the pen clicks, close the clamp.

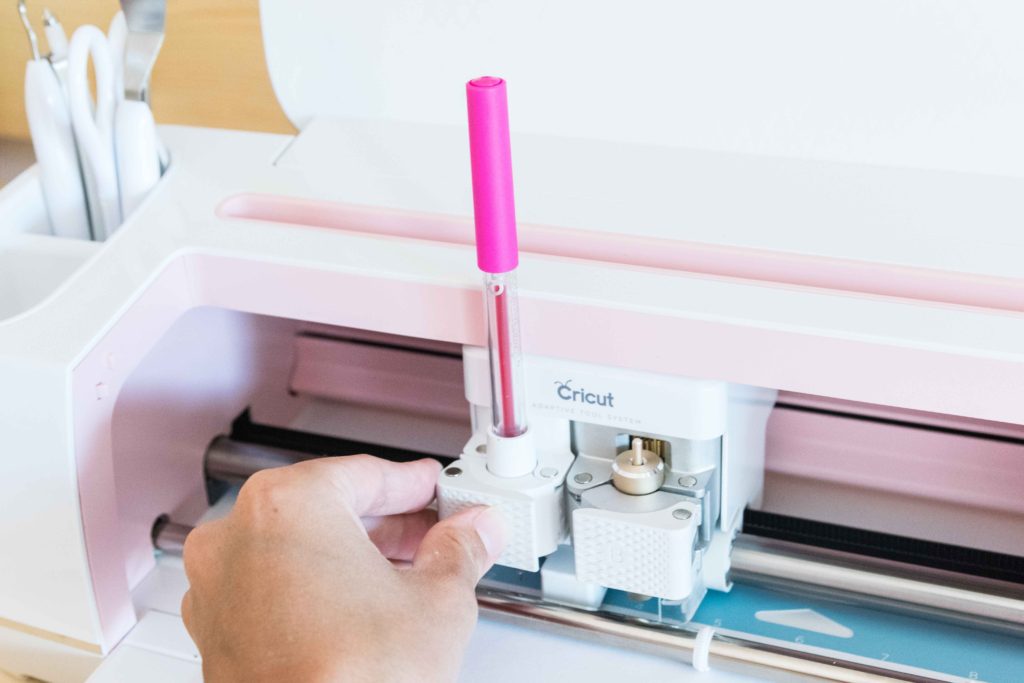
Note: If you have a Cricut Explore One, you will need a Cricut Pen Adapter to install any Pen.
Using Pens in Cricut Design Space
At this point, you should know what types of pens. Cricut has, how they look, and how to install them on your machine. Now you are going to learn all the necessary steps you need to know to use them with your Cricut Machine.
As we go, I will be showing you the essential things to learn and to keep in mind. But, I will only be covering the drawing (and cutting) process on the final practice Step by Step tutorial.
Let’s start from the beginning!
How to Tell your Cricut Machine to Write and Draw
Pretty much everything you add to Cricut Design Space is set to cut; therefore, you need to tell your machine if you want to use pens.
First, start on your Cricut Design Space canvas area.
Note: Make sure the on the upper right upper corner of the window, you have selected the machine you own (Maker, Explore, or Joy).
Then, select the layer (text or image) you want to use pens with and change the operation to “Pen.”
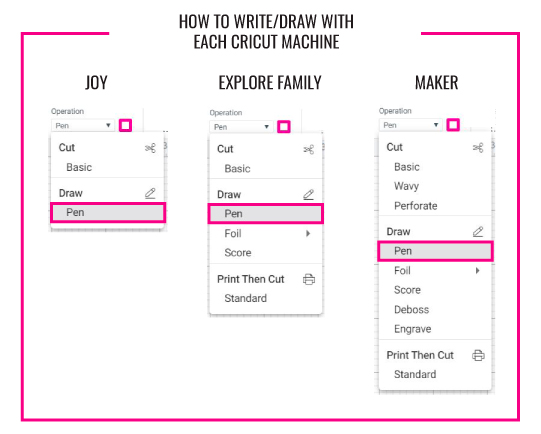
By default, when you select draw, your Cricut will use the Black Fine Point pen. To change this, click on the little color box next to “Operation” and select the color and type of pen you want to use.
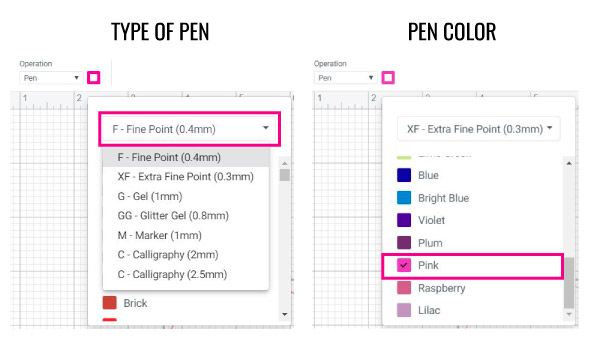
Important: When you are working with more than one color, it’s always a good idea to select the type of pen and color you will be using. Cricut uses very random orders to color, so if you don’t assign them right, you may use the wrong pen.
Not all Pens are in the System: I love Cricut, but sometimes I do run into some troubles, and I don’t want you to feel the same frustrations I do.
When choosing the pen color, try using the size and the color that matches your pen to the best of your abilities. Right now, not all of the pen colors match the Pen name, or they aren’t even available.
For instance, the Silver pen doesn’t appear at all when you choose the Calligraphy pen.
That doesn’t mean you can’t use the Silver Calligraphy Pen. But it does mean that you will need to select a silver color from different a size.
I did submit feedback and let’s hope for the best!
Note: Even though I sometimes get a little frustrated, I still love Cricut and recommend it all the time. I come from a family of engineers, and sometimes, getting everything right in the software is hard. So, let’s be patient!
How to use Cricut Pens with Fonts
Most people like using Cricut Pens with fonts!
Why not?
Your projects will look so beautiful, and people will think you have terrific hand-lettering skills.
I won’t go into details on all of the things you can do with text (I do have an amazing Cricut Text tutorial) but I will show you what you need to know about fonts and pens.
You first need to consider the type of font or effect you want for your project.
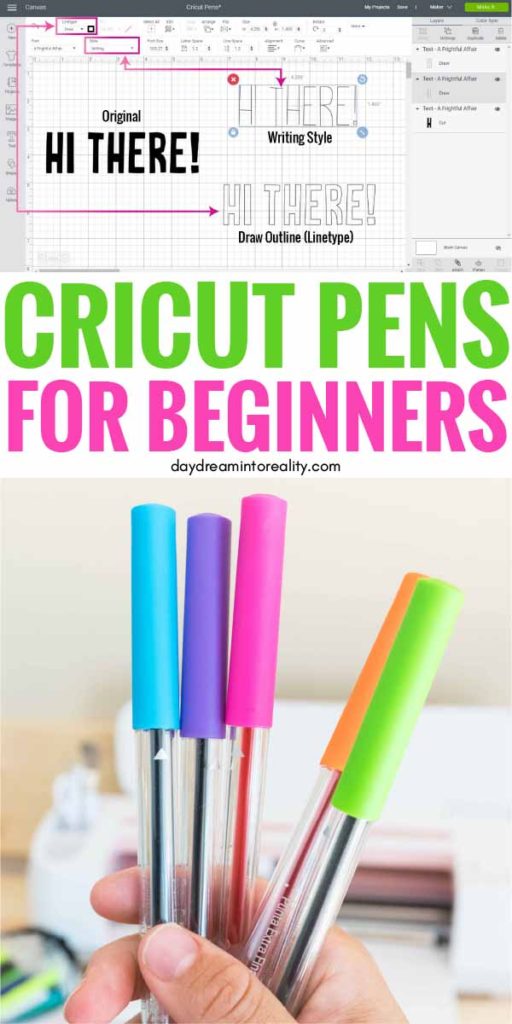
Do you want a Writing (handwritten) or Outline style?
Outline Fonts:
Pretty much all fonts can be outlined. For sure all of the ones you have on your system.
First, you need to type in your text, then select it and change the operation to “Pen.”
Easy Peasy. Right?
Writing Fonts
If you want your pens to write fonts in a handwritten style, you need to use Cricut’s Fonts.
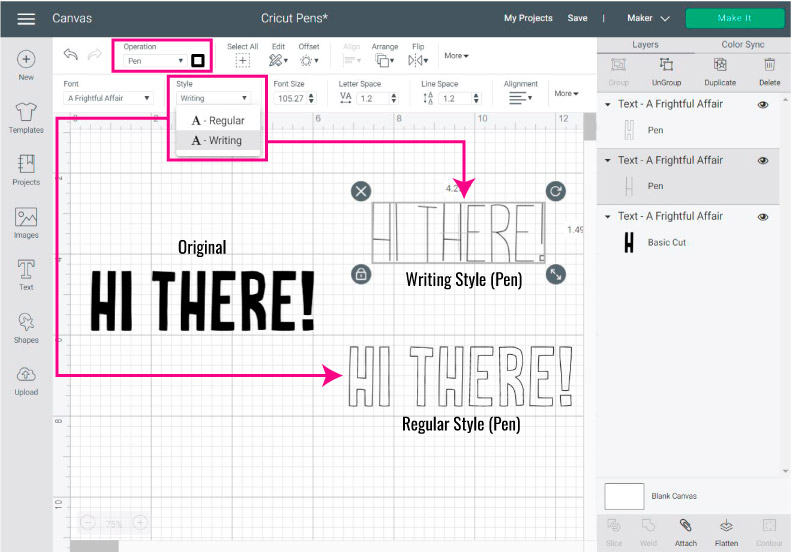
You can see very quickly if a font has a writing style by selecting it and then clicking on the Style drop-down menu on the canvas’s top panel. If the font has the Writing font, you know you can use it for handwritten style projects.
When you choose writing your Cricut will automatically change the operation from “Basic Cut” to “Pen.”
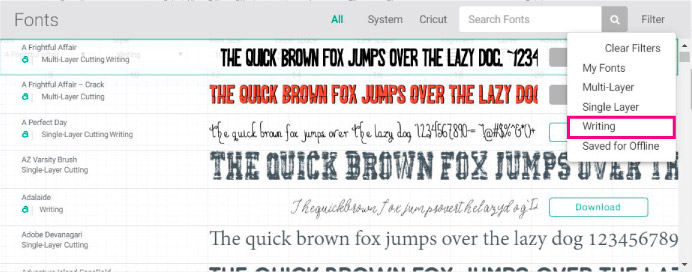
To find all these types of fonts, write your text and then (while still selected) click on the font icon located on the top panel.
There you can filter your fonts by writing.
These fonts aren’t usually free, but most of them can be used with the Cricut Access membership, or by purchasing before cutting/drawing.
Note: Your machine does come with free fonts; to find them, select both, the Writing and My fonts options.
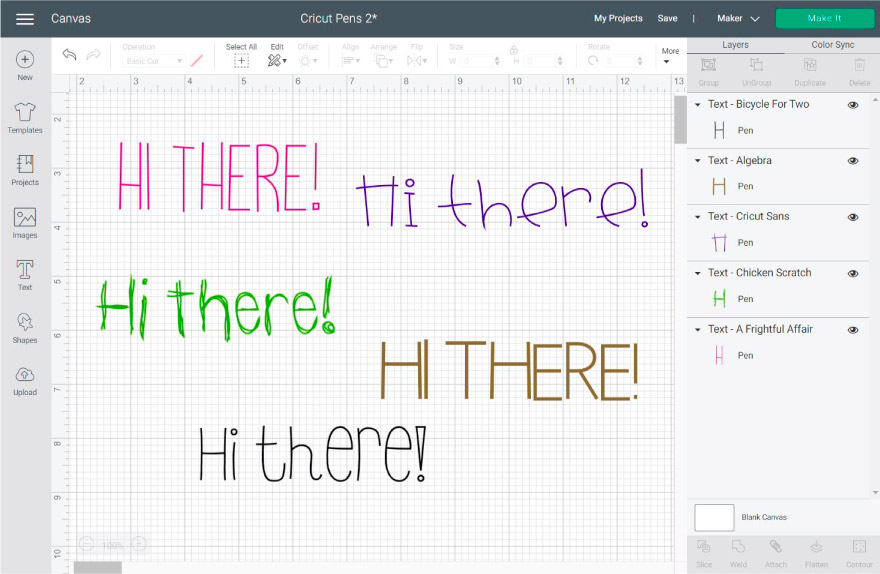
Check out more examples of writing fonts on the screenshot down below.
Fixing Cursive Fonts to use with Cricut Pens
When working with Cursive fonts in Design Space, you will notice that they are disconnected from each other.
Why? I don’t know.
But what I am sure of is that you don’t want to use Cursive fonts all separated. Right?
Check out the following screenshot and let’s chat about ow to fix script fonts.
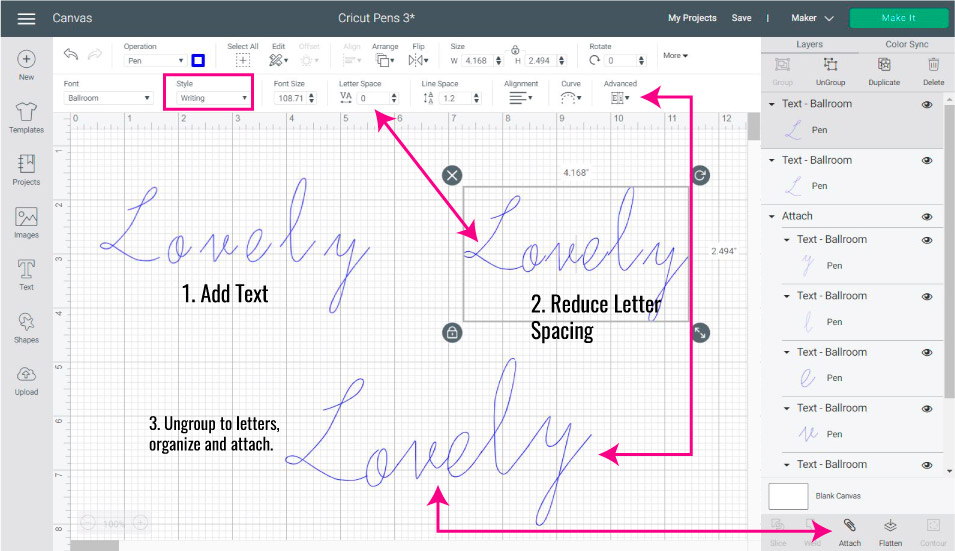
First, you need to add your font and change it for a writing font (I used the font Ballroom).
Always start by reducing the letter-spacing located on the panel’s top menu (your text needs to be selected). Most times, letter-spacing will fix any cursive issues, but sometimes it’s not enough.
If your font doesn’t look good enough, select it and click on the advanced menu (on the top panel) and then click on “Ungroup to Letters.”
After ungrouping (you will be able to move each letter on its own), organize each letter, so everything looks even and smooth.
Important: When you are done organizing your word, select all letters and click on attach located at the layers panel’s end. (You can’t weld writing fonts)
Learn more about attach, group and weld on my friendly tutorial.
Tip: Unless you want to fix each letter, I recommend you using Cursive fonts with small words or short phrases.
How to use Cricut Pens with Images
Did you know you can use Pens with your Images (SVG files), or with Cricut’s images?
I can’t tell you enough how cool this is!
You can personalize invitations, cards, gift tags, and more with all of the images Cricut has.
Note: You can also use pens using “Print then Cut” check out an example on this Card Tutorial.
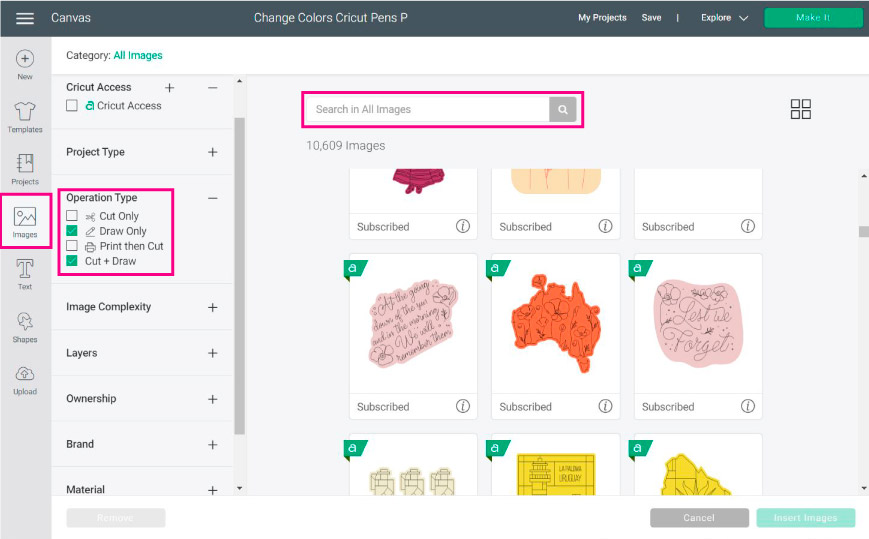
You can also use images that are specifically designed for drawing with your pens. To find them, click on images (located on the left panel of the canvas) and then under “Operation Type” check the “Draw Only” and “Cut + Draw” boxes.
You can further your search by typing in the search box something you’re interested in like: Mandala, Mother’s Day, etc.
There are so many images you can use!
Seriously, experiment and don’t worry, your computer or phone isn’t going to break!
Using Cricut Pens in a Single Image
Now let’s see how to use Cricut Pens in a single image (layer).
For this mini-tutorial, I decided to add an elephant from Cricut’s Library. If you want to follow along, click on images (like the previews step) and then type in the code #MCE354A.
When the elephant appears, click on insert images and voila!
Although this elephant is made out of many pieces, all of those pieces are combined in a single layer. So, to draw this elephant, you will select it and then change the operation from “Basic Cut” to “Pen.”
After setting “Pen” as the Operation, you can change the color of the pen you want to use.
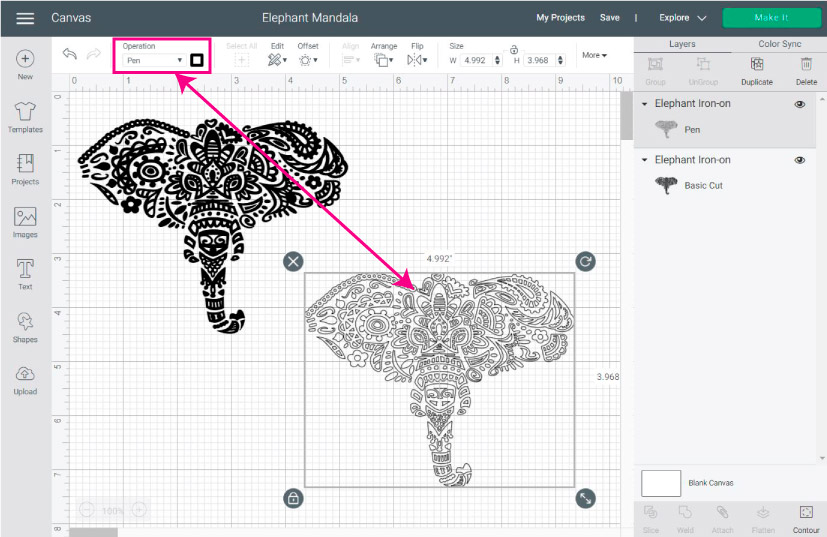
Note: You can add different colors to your image using the contour tool. I will show you how to do this in the full step-by-step tutorial.
Using Cricut Pens in a Multi-layer Image
Multi-Layer images are the ones that are made of more than one layer. You can distinguish them from single-layer images because they have different colors.
In Cricut Design Space, every color represents a material you are going to use (paper, cardstock, iron-on, etc.). Typically, most of the images are set to cut.
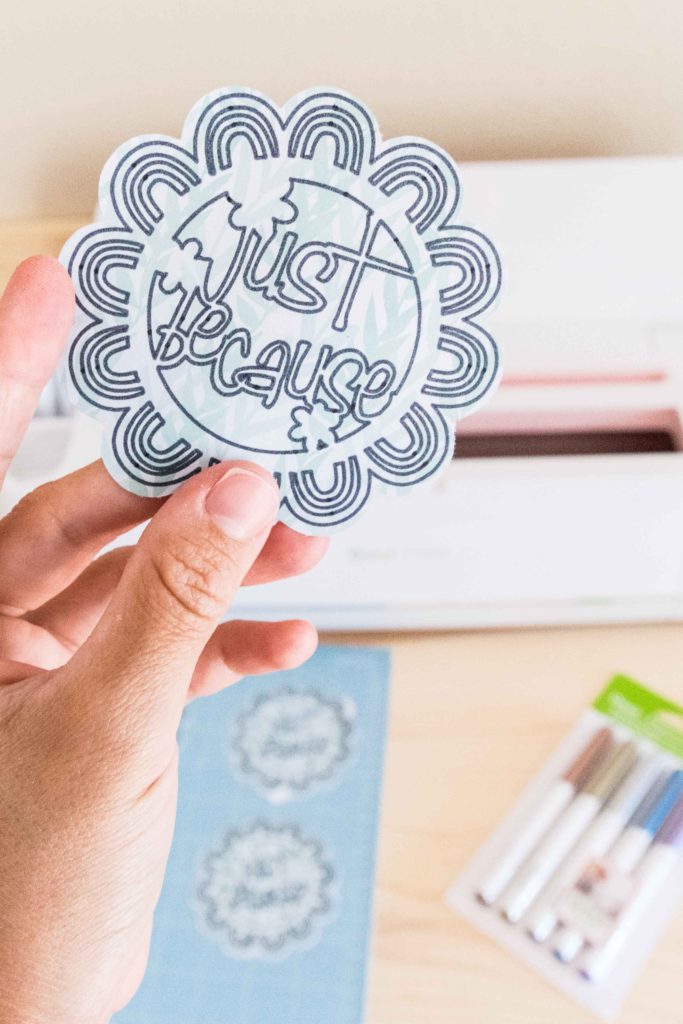
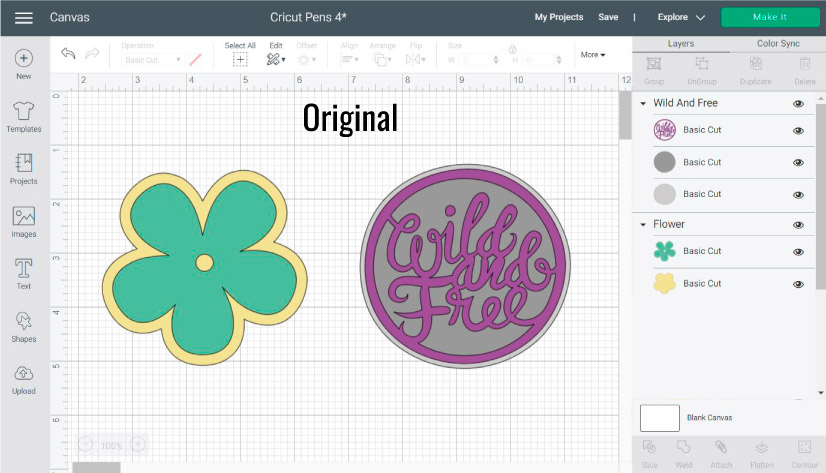
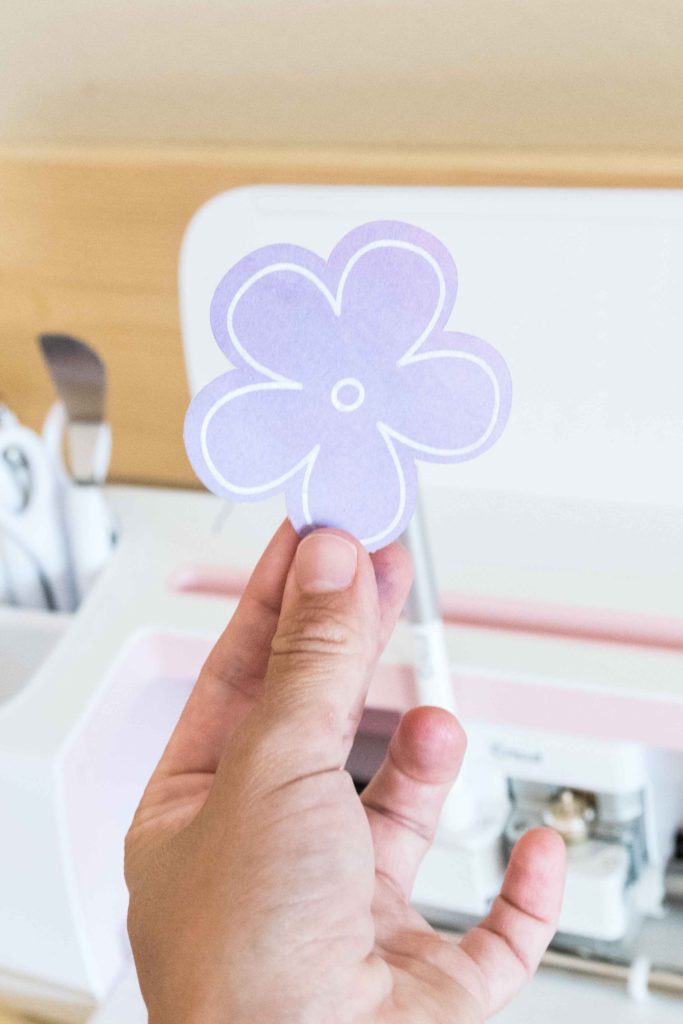
Look at the following image (Code #M44441) and let’s talk about it.
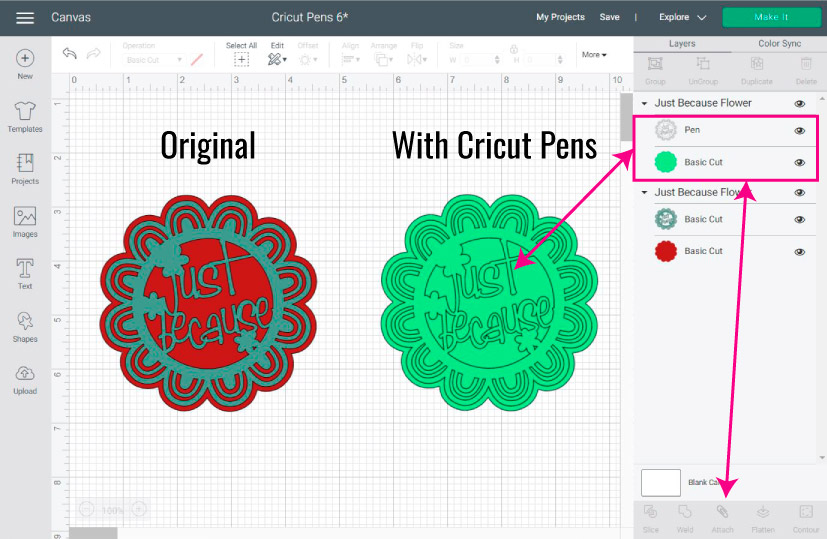
As you can see, the original design is red and sort of like a grey. If you want to use the Pens with this image, you have two options.
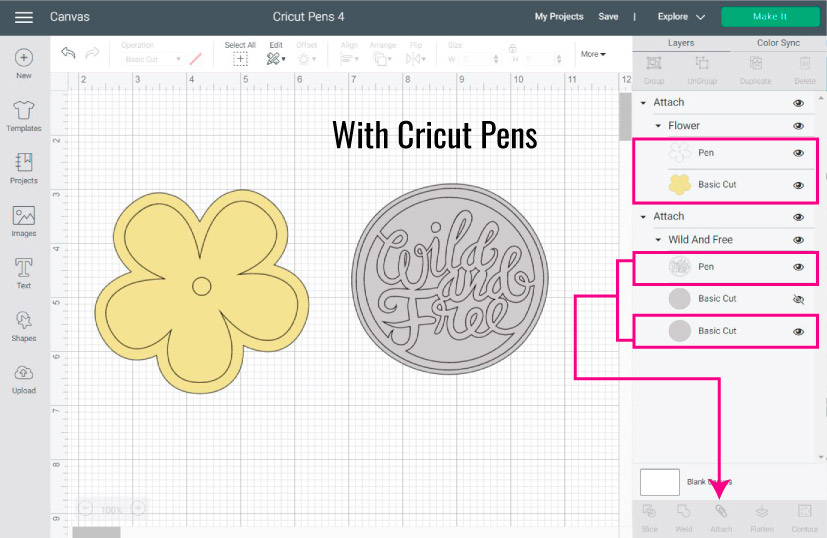
The first one is to change both layers to “Pen”; this means that you won’t cut anything, and you will be drawing a flower with the “Just Because” design.
The second option (and the one I chose) is to cut the flower (green) and draw the “Just Because” design with the pens.
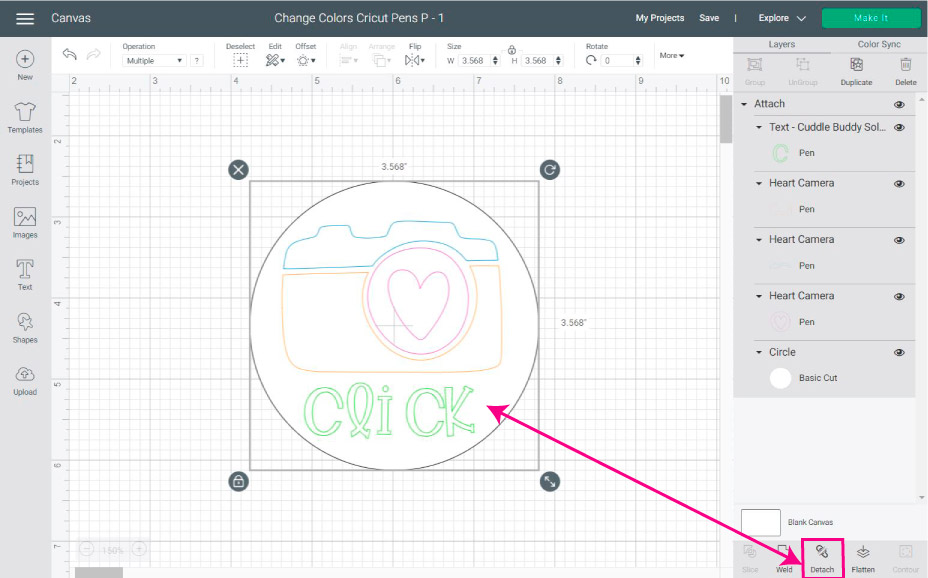
Important: When you are cutting and drawing simultaneously, make sure you select both layers and click on the “Attach” button located at the end of the Layers panel. If you don’t attach, each design will be on a different cutting mat.
Note: Most Multi-Layer designs are grouped. To edit a single layer’s operation from the group, you either have to ungroup layers and select them from the canvas. Or keep the group intact and choose the layer of the layers panel.
If you feel confused about that check my weld, attach, and group tutorial.
Doesn’t it look pretty?
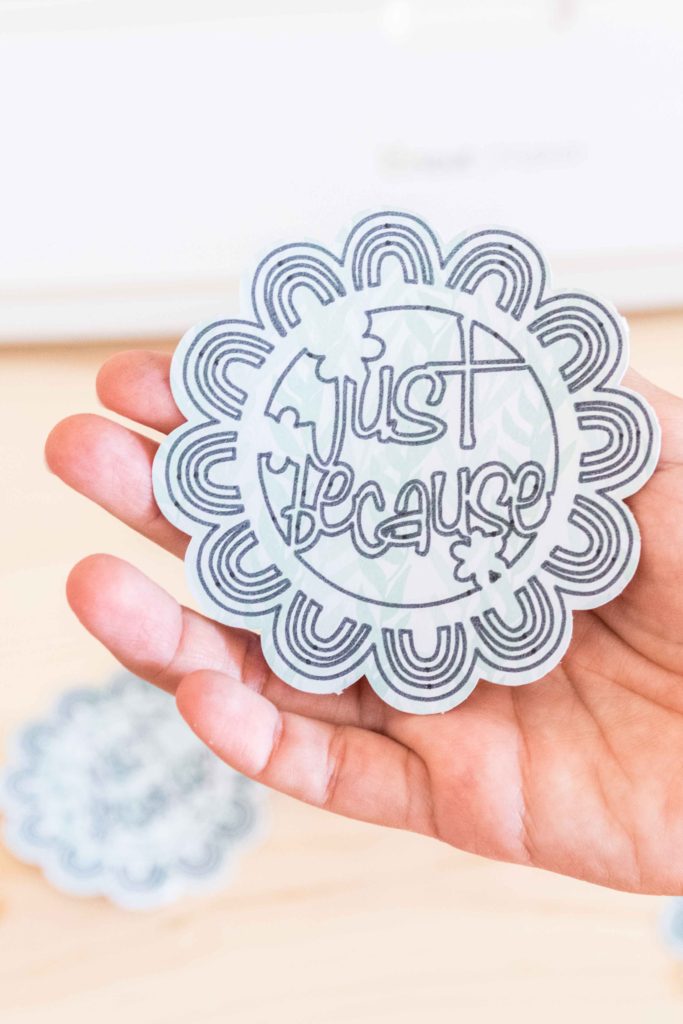
Look at these two other examples as well (Codes: #M3F100 and #M9F3B8D). I used simple images, and I just changed the operation of the internal design to pen.
It’s so simple, and Cricut has thousands of options for you to create this sort of effect. Again, don’t forget to attach the Cut and Pen layer.
I decided to cut and draw the flower and see how beautiful it looks!
Let’s practice – Cricut Pens Step by Step Tutorial
At this point, you should know the basics of the Cricut Pens. Now we will be applying everything you just learned, plus how to change colors of a single layer image, and finally, how to proceed after you click on “Make it.”
Let’s do this!
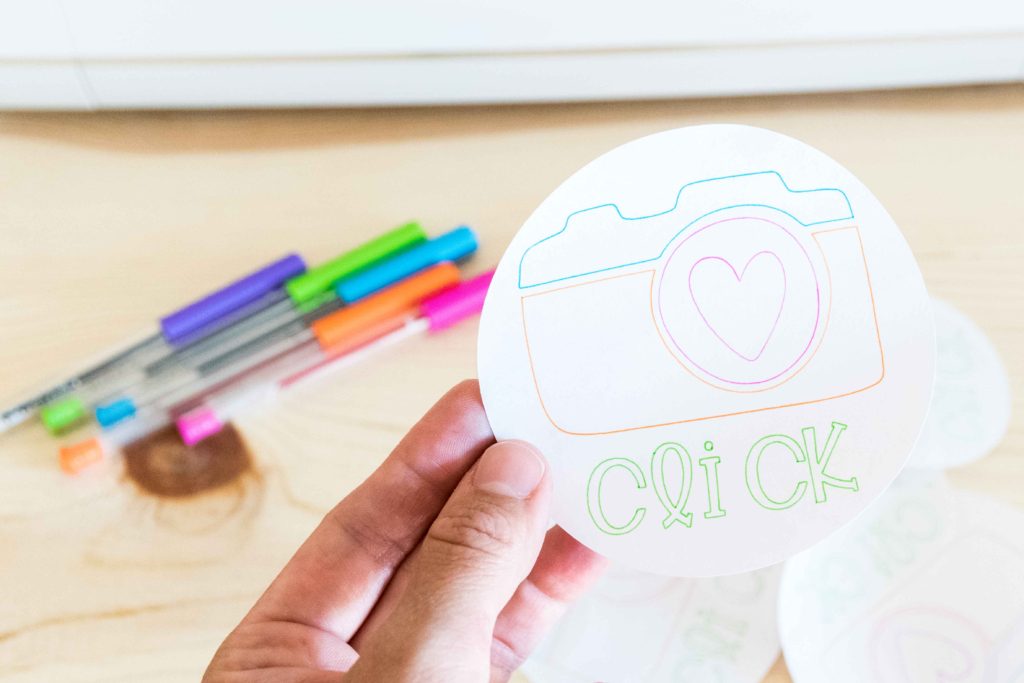
Step 1 – Add Image
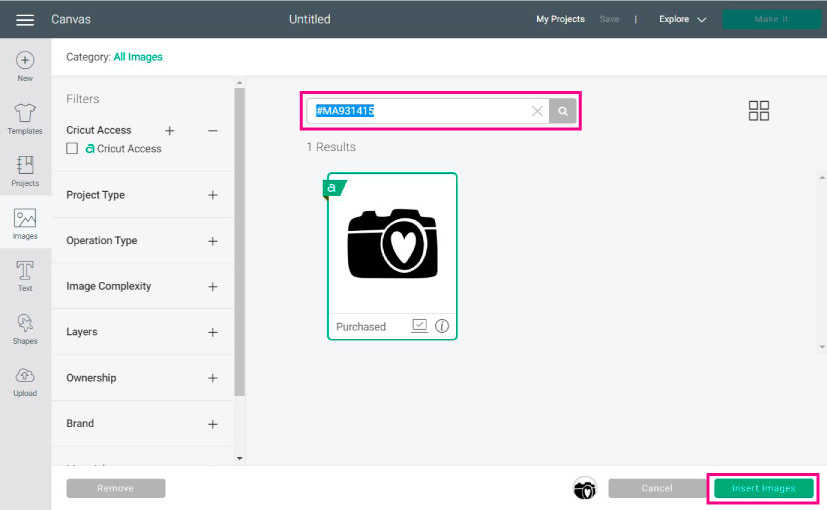
To follow along, log in to your Cricut Design Space canvas area and click on images, then type in the following code #MA931415.
When the “camera” image appears on your screen, select it and click on insert images.
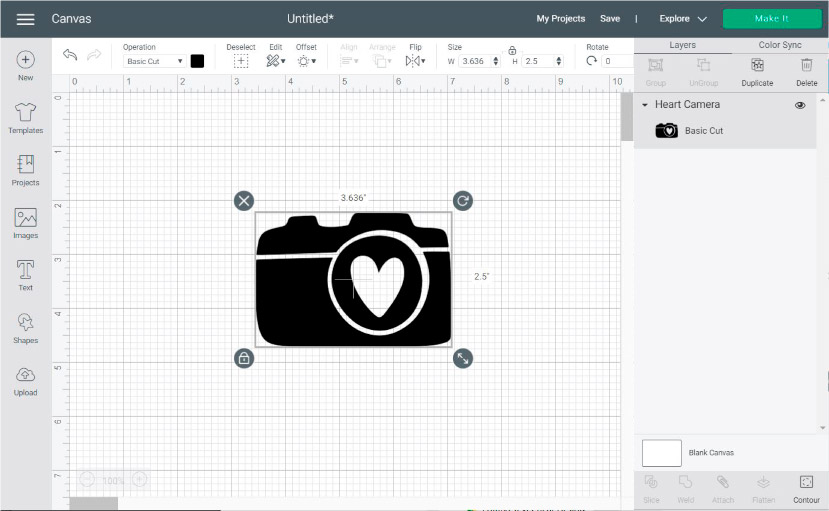
The screenshot down below shows how the camera should look after you insert it. As you can see, although the image has different components, everything is in one single layer.
If I were to change the operation to “Pen” and send my project to my machine, I would only need one pen. But, in this case, I want to use different pen colors.
How do I do that?
Very simple! You can use the Contour tool.
Step 2 – Change Colors
There’s a little trick to change colors of one image!
The tool behind this trick is called “Contour,” and once you use this technique, you won’t stop playing with images and Cricut Pens.
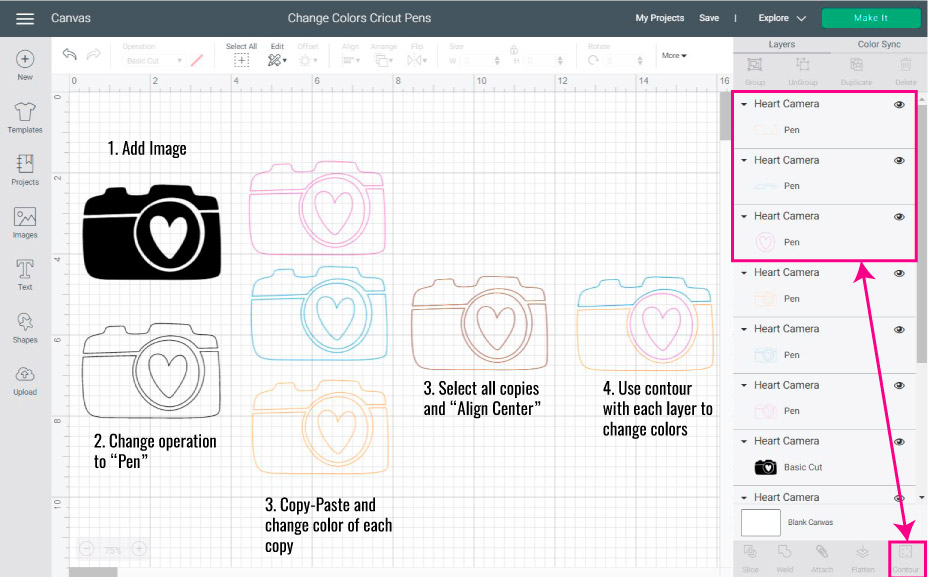
Follow the next steps to change colors:
- Add the image you want to use.
- Change the operation from “Basic Cut” to “Pen.”
- Duplicate (located on the top of the layers panel) the image until you have a different image layer for each pen color you want to use. For this design, I used the Extra Fine Point pens.
- Select all layers, click on align (located on the top panel of the canvas), and select the option “Align Center.”
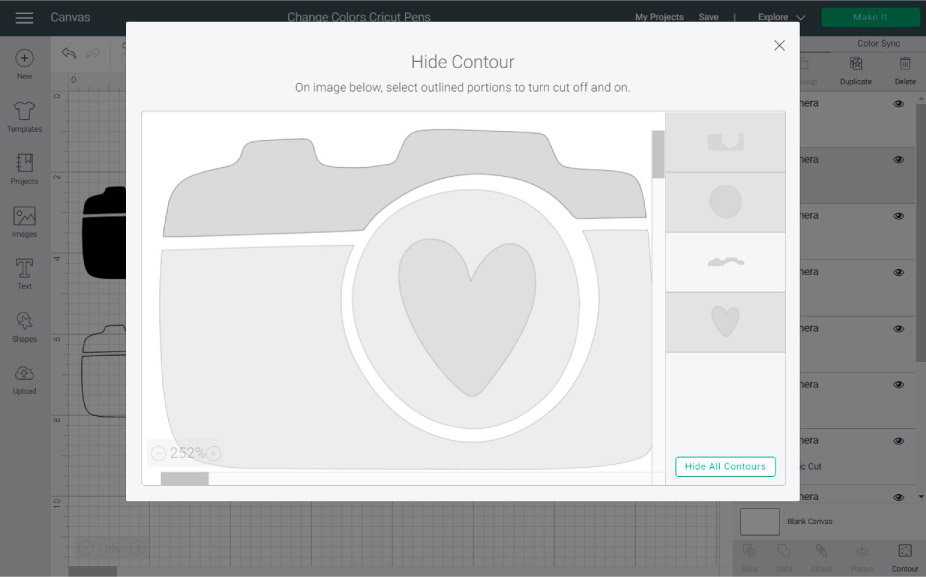
- From the Layers panel, select each layer and click on Contour (located on the bottom of the Layers panel), and hide the elements you don’t want to use for each color.
- When you are done changing colors, select all layers and click on attach. Very Important!
If this sounds a little complicated, make sure to read my How to Contour in Cricut Design Space. I have tons of screenshots for this sort of technique.
Step 3 – Add Text
Now let’s add a little text!
The Text option is located on the left panel of the Canvas. When you click there, a box will appear in the design space area where you can type in.
I used one of my systems fonts; however, you can use any of the ones Cricut has, or your system fonts.
Since I used my fonts, I can’t use a writing style. Therefore, the only way to use pens is by changing the operation from “Basic Cut” to “Pen.”
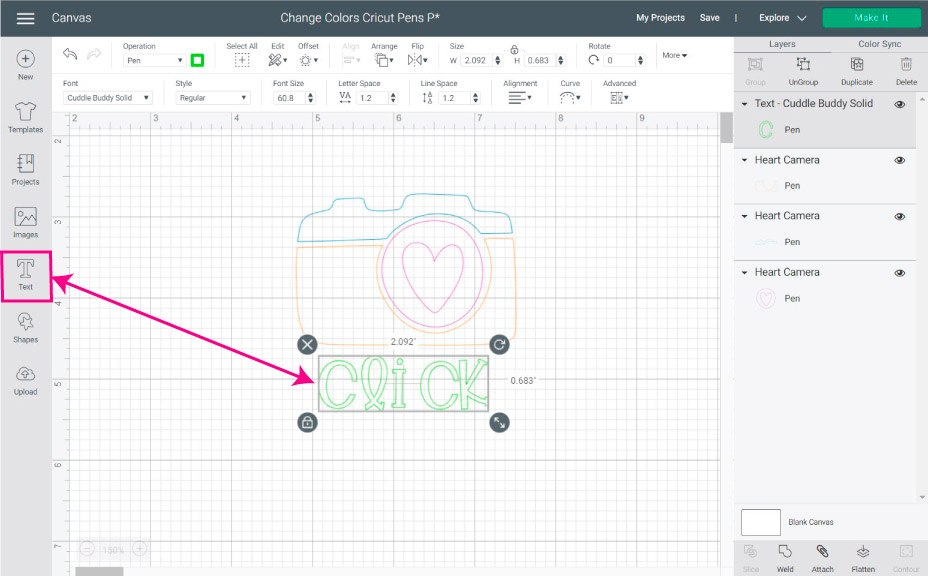
As you can see, the font looks outlined.
Oh, and for this text, I used the Lime Green Extra Fine Point pen.
Step 4 – Add Shape and Attach
You can use the pens on a single piece of paper without cutting. But, to show you all the possibilities, we are going to draw and cut.
Related: Read my how to Write and Cut with your Cricut
For this tutorial, I decided to draw my design on a circle. To add a circle, click on the shapes icon (located on the left panel) and select the circle option.
You can change the color of the circle, just like you would do with pens. However, leave the operation in the “Basic Cut” option.
Since the circle is the newest layer, all of the other elements will be in the back. To rearrange everything again, select the circle, click on the arrange icon (located on the top panel), and select the option “Send to Back.”
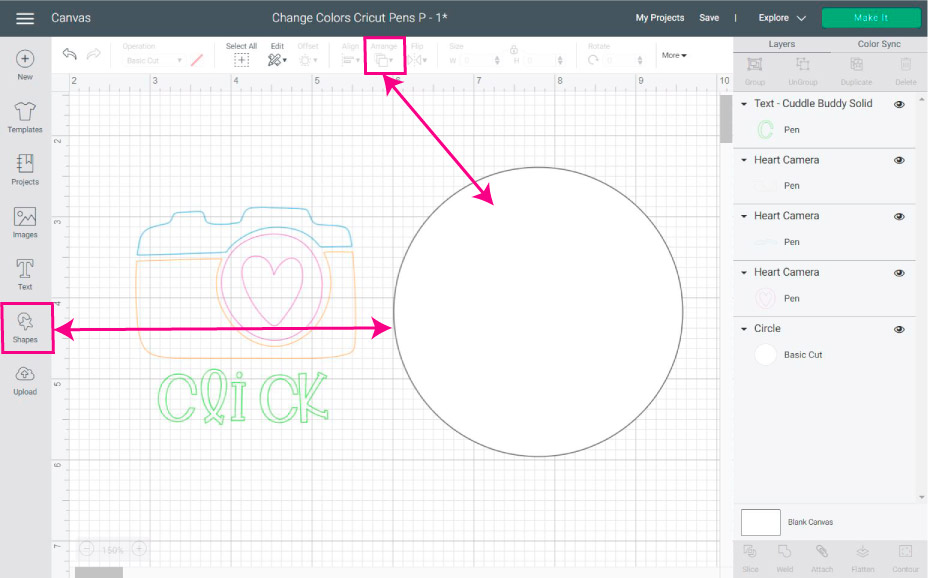
Once the circle is in the back place, select the camera and text layers and place them on top of the circle.
Last but not least, before you draw and cut, select everything on your canvas and click on “Attach.”
Step 5 – Duplicate & Attach
You don’t have to do this part! But since I love showing you more options, you can also duplicate the design to create more copies.
Making copies is extra helpful if you are creating invitations, gift tags, and even stickers (can you imagine stickers with Cricut Pens!!!).
To do so, select the previously attached design and duplicate it until you have the number of copies you need. Then AGAIN, click on Attach.
Before you click on Make it, make sure that your final designs aren’t larger than 11.5 x 11.5 if using a 12 x 12in Mat. Or 11.5 x 23.5 is using a 12 x 24 in Mat.
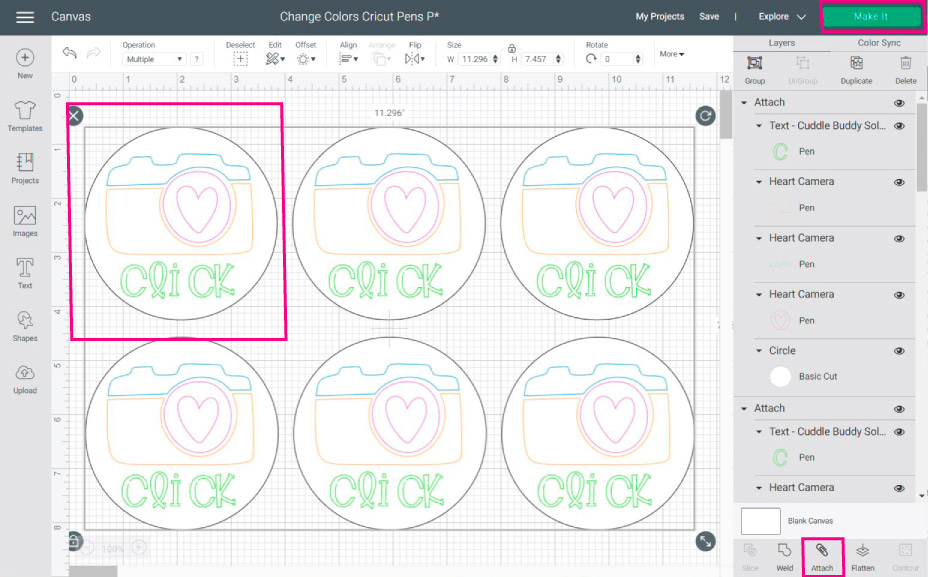
When you are ready to draw and cut, click on Make it!
Step 6 – Send to Cut and Draw
If you followed all the steps, everything should be in order and ready to go like the preview shows.
However, if you didn’t attach, everything will be in different mats and a whole mess (If that’s the case, go back and attach :P).
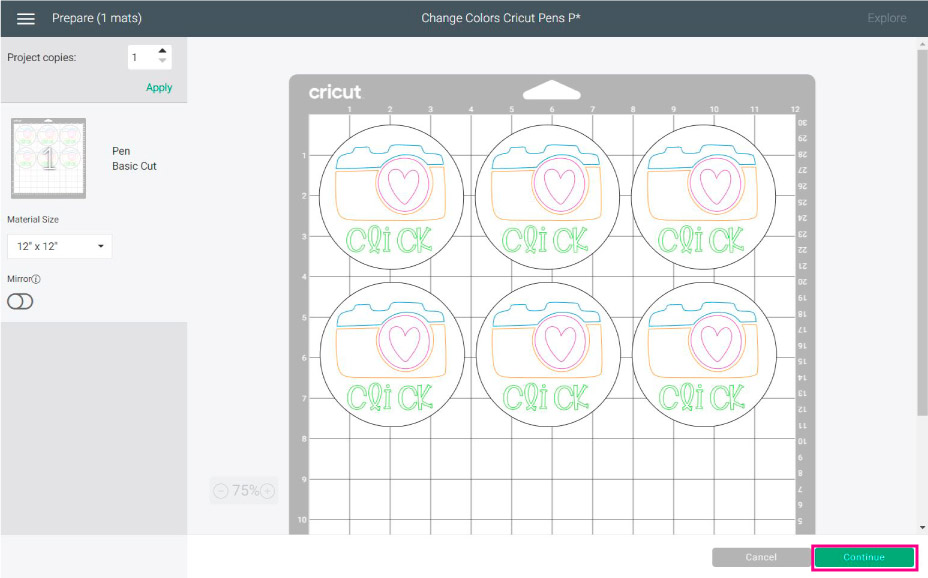
If everything looks right, click on the continue button and go ahead and select your materials.
For this tutorial, I just used regular Copy Paper. If you have an Explore Machine, move the Smart Set dial to paper, but if you have a Maker, browse the materials and select paper.
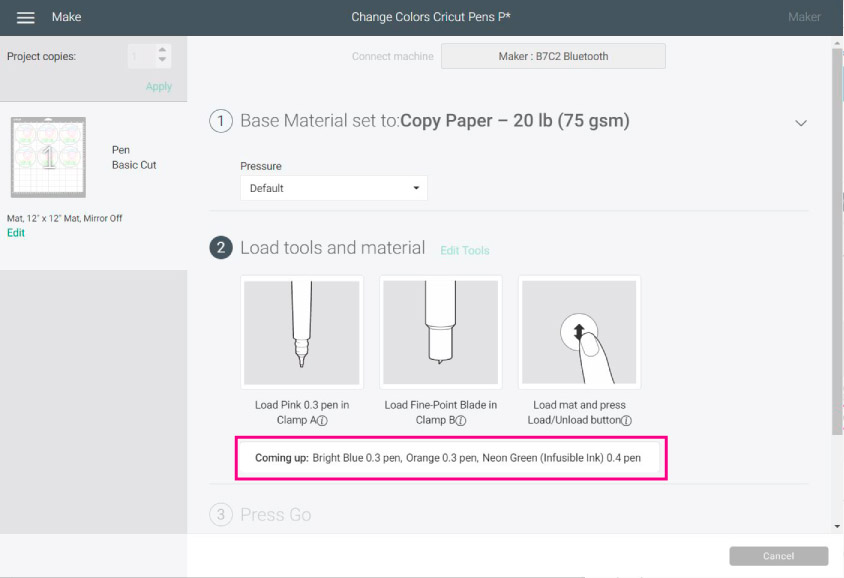
After selecting the material, install the Fine Point Blade. For the pen, Cricut will tell you which one you are going to start with.
It’s always a random Pen, so make sure to install the correct one. Cricut will also tell you what other pens you will be using, but when it’s time to change them, usually you will only see the color.
———
Super hyper mega important tip
If you think you will be using more than two or three hues of the same color (blue, pink, orange, etc.) or different tip sizes (0.3, 0.4, 0.8, 1, 2, 2.5) of the same color, I recommend you assign a different color on Design Space for each size or similar hue that you can identify when Cricut brings it up in the drawing process.
The reason is that sometimes Cricut will tell you to install the black pen, BUT NOT THE 0.3, 0.4, 1, or 2.00 mm, and if you have different sizes of black… Well, you won’t know which one to install!
So, if you assign, let’s say, blue as a color when Cricut says install blue, then you’ll know that that blue color is one of the black pens.
I hope this makes sense!
Now that I got that out of my chest, let’s continue with our tutorial!
———
In this case, Cricut decided to start with the Pink pen.
Go ahead and install the pen following the instructions I gave you at the very beginning of this tutorial, then load the Mat to your Cricut and press the flashing Go button.
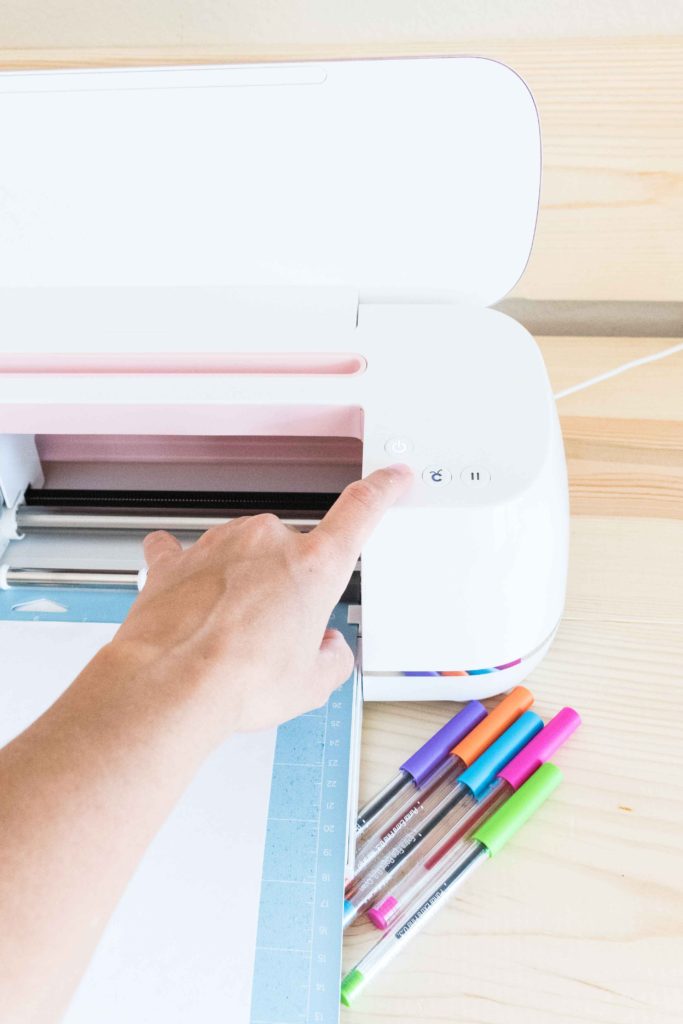
When Cricut is done with the first pen, a little window will pop up, asking you to change the pen.
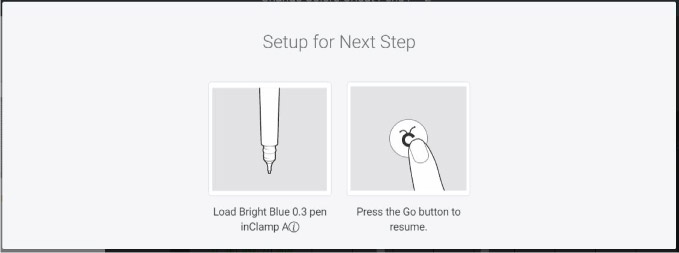
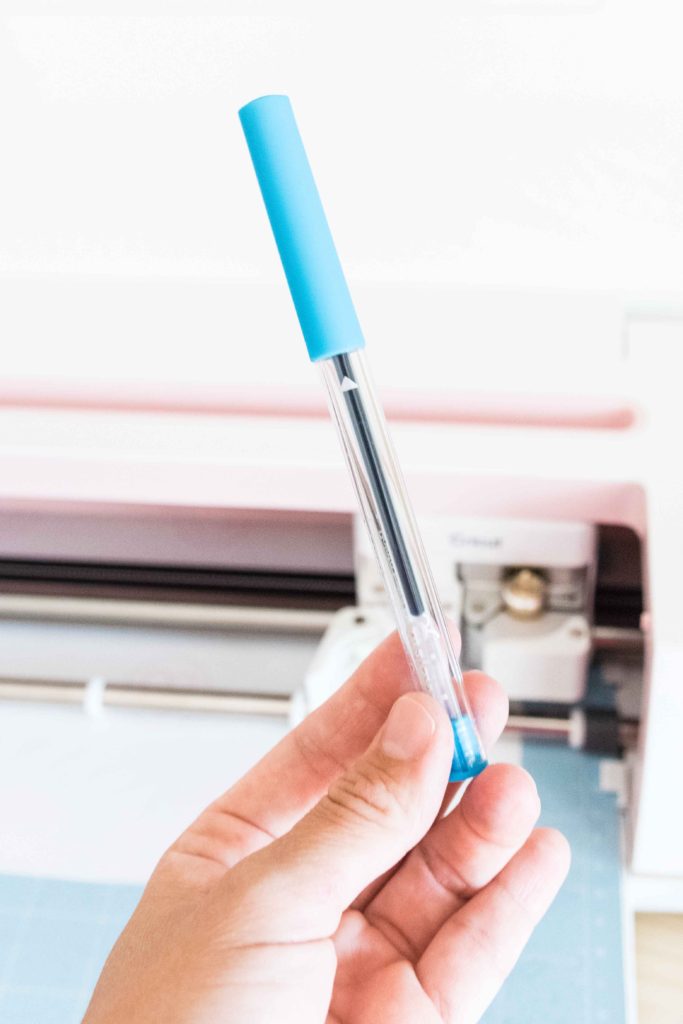
This time, Cricut asked for the blue pen. After installing the pen, Design Spaces requires you to press the Flashing Go button again to resume your cut.
Repeat this process until your Cricut is done with the drawing process.
When your machine finishes drawing, it will finally cut the circles.
After the drawing and cutting process is done, unload the Mat from your Cricut and remove the design by bending the Mat.
There you have it!
A simple and beautiful project made with Cricut Pens.
Sharing is Caring!
Congratulations. If you followed this tutorial to the tee, you are a Cricut Pen expert.
I am so happy to help you with your Cricut journey!
Also…
Do you know it takes me over 25 hours to complete a single Cricut article? I know it’s wild, but I want to make sure you understand everything!
I would appreciate your support on Instagram , Pinterest , and YouTube as I try to grow my audience and continue producing great content!

Was soooo excited that I got to use pens! Thank you so much for teaching your skills to others and taking the time.
Excellent article with great illustrations. I appreciate how much time it takes you to teach us!
You’re welcome 🙂
Great article! I love how you go through every step and do it in terms we can understand. Thank you!!
What paper do I need to use for drawing
I’m after doing pictures in frames for my mum
Any Cardstock would work. Stay away from reflective materials unless using writable vinyl. Also, I’ve noticed that some markers take a while to dry on some types of cardstock. You can do a test on a small corner before committing to a large project.
Hello can I download svg files onto my I pad or I phone ? I also have a chrome book . I’m in sure how to download these and use all your wonderful project ideas .
I think you should be able to. I need to write a tutorial!
If I missed this in your tutorial, I apologize. When I add text and work with it in design space it looks filled, but then when I selected pen it was just an outline. I am making numbers for reception table numbers and they need to be filled for visibility. How do I fill or at least make sure the numbers aren’t just outlined? Thank you for your time!
I cover this issue in the subheading How to use Cricut Pens with Fonts in this tutorial. You’re better off cutting your numbers on solid material and gluing them to whatever paper you need.
Is there anyway to print out your tutorials? It sure would be easier to have it next to me as I learn as opposed to clicking back and forth. Thank you
Press Ctrl + P to send the project to print.
Thank you for the info! Curious, why can’t I find any info (anywhere) on how to write and cut on sticker paper? Is it not possible to follow this article but use sticker paper and set the material to “sticker paper”. I read your Print and Cut article, but if I am interested in simple single color small labels, can I do it all on my cricut without a printer? Thanks!!!
Of course, you can do it. But make sure to test first the material. I also have a sticker paper tutorial.
THANK YOU!! i’m trying to use my markers, but i don’t have any idea where to say that i want to print before cut??? i am so confused. i’m sure that i’m missing an easy step. HELLLLLLP
Check out my Print then Cut tutorial.
Wow, thank you so very much for this valuable article!!!!!! I have never seen an article so thorough as yours. I have so much understanding now. Now I can do a better job creating greeting cards and how to use different colors!!!! Wow, Thank you, thank you and I can’t thank you enough!!!! Your article is a blessing to me!!!! Have a great night!
I’m trying to write small (for a label on a deck of cards) 3.5×2.5 – my font is coming out almost so you can’t read it and looks different than it does on cricut design space. I have tried different fonts and that doesn’t seem to matter. I do have text on the top, middle is image and bottom is more text. Help!
Are you using a marker or a pen? Also, how big is the font? Have you resized so the image fits inside the 3.5×2.5 card?
I’m ready to pull my hair out. I want to perforate squares with words. I’ve done everything I think I’ m supposed to do. When I click on Make It I’m told to put the cutting tool in Clamp A. I have the new Explore 3 and only pens go in Clamp A. What am I doing wrong? I am so frustrated. Any help is so very much appreciated.
Are you trying to perforate with the Perf Blade? That blade is only compatible with the Maker machines. If you want to cut letters out of the squares, then use the slice tool.
Thank you for sharing hope to be able to draw some card fronts now with different colours
You’re welcome 🙂
Thank you so much! I am so excited to try this, but I am going to watch more tutorials (from you) first!
Thanks again!
You’re welcome 🙂
Thank you so much for being so thorough!!! I don’t think I’m terrified anymore. I think if I print your instructions out and keep them in a notebook for reference I’ll be a pro in no time!!
You’re very welcome 🙂
I find you to be very helpful I honestly did not have much idea how to do everything my joy but through your helpful tutorials I am doing really good so thank you very much.
Yay! I am happy to hear.
I’m making 25 gift tags for a 2 year old bday party, is there a way to set up writing their different names on each with the pen function? Thanks so much, these are great!!!
Yes, you just need to write in Design Space the name of each child, then attach and sent to cut and draw.
So at the risk of sounding dumb.. lol how do you remove the pen once you’re done…? My husband and I got a cricut this week and was using a pen and couldn’t get it to come back out… we still aren’t sure how he was able to finally get it to release. ????♀️ Everything tells you how to put the pen in and how to secure it but no one tells you how to get it back out without feeling like you’re going to break something… ????
Good question! You can remove it by pulling the pen from the top and pressing the pen upwards with your other hand underneath the tool holder. I hope it makes sense.
Thank you so much for all your help. This article was so helpful. The only thing I was wondering is can I color in a picture with the pens? Do I need a certain file? Thank you again for all the wonderful information.
There’s no way to color inside a picture. There are tricks, I am planning on having a tutorial for filling shapes with pens soon.
Hi, I just wanted to know why your Cricut space is different from mine?? I don’t have none of this on my Cricut space. PLEASE HELP!!!
Are you on your phone/tablet? This is the desktop version.
I want to write on a picture that I want to cut out. I am new to cricut and never used pens yet. Just want to make sure I need to do the draw then cut the images out?
I don’t know what design you have. But I do have a tutorial at the end of this article that can help you to understand the concepts of cutting and drawing.
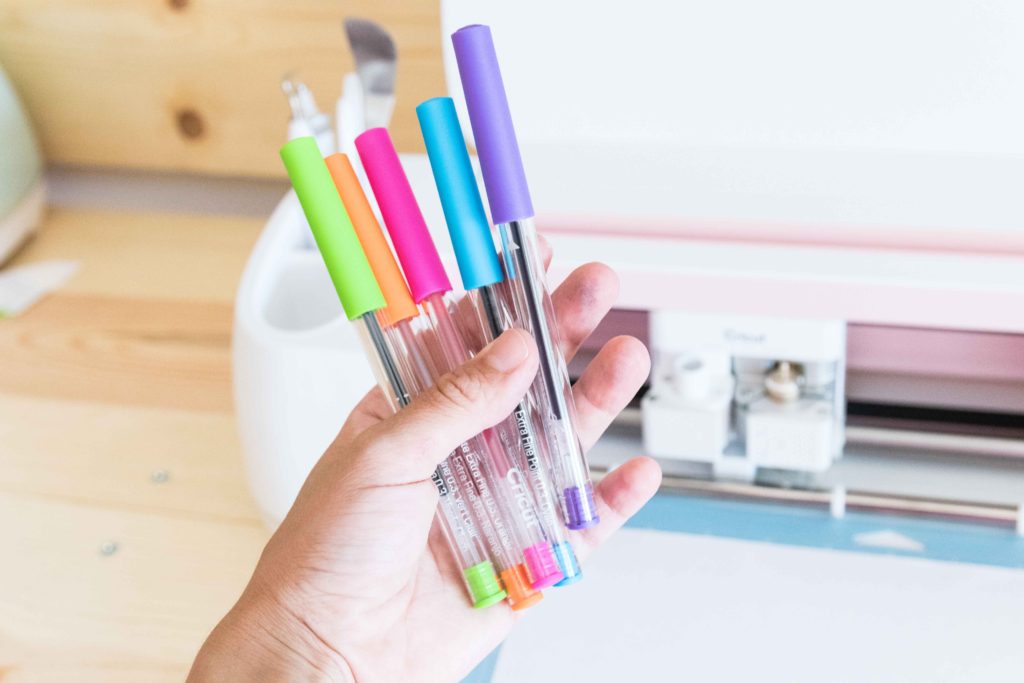
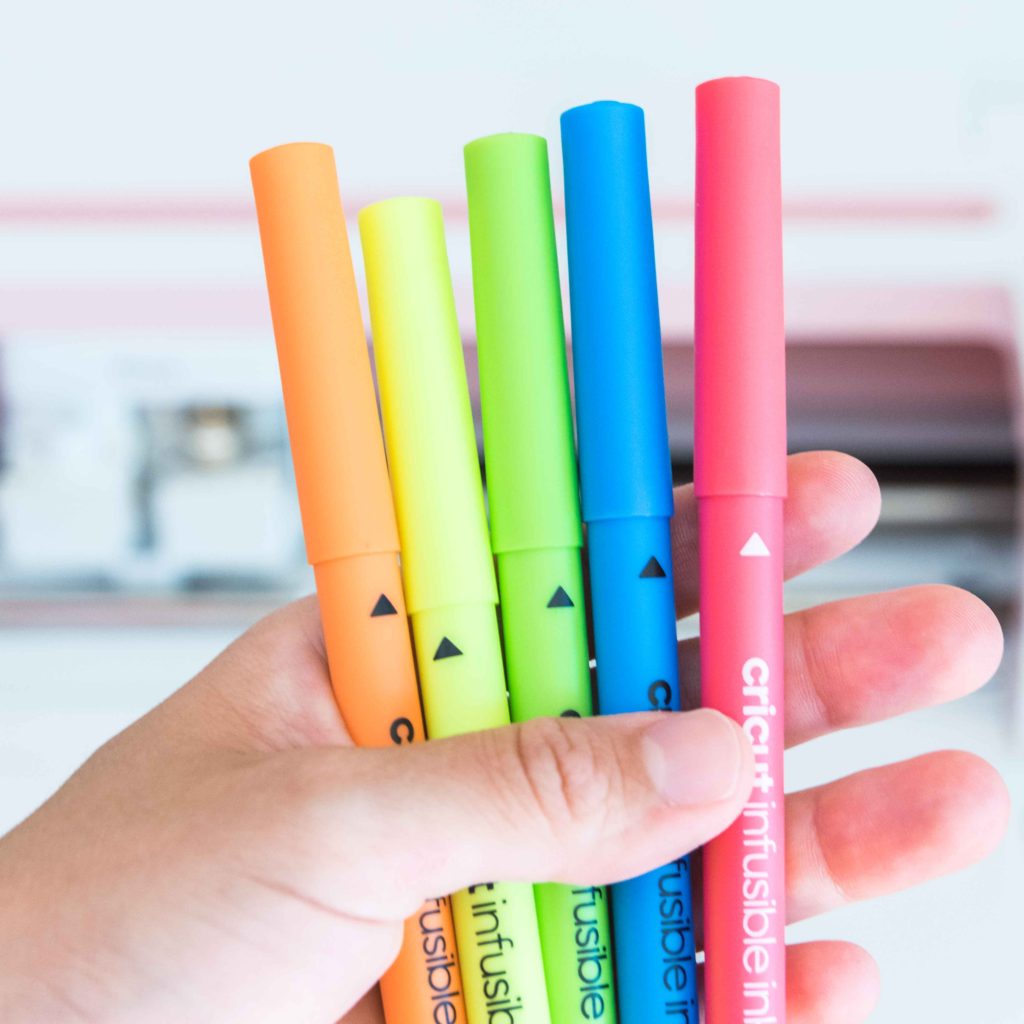
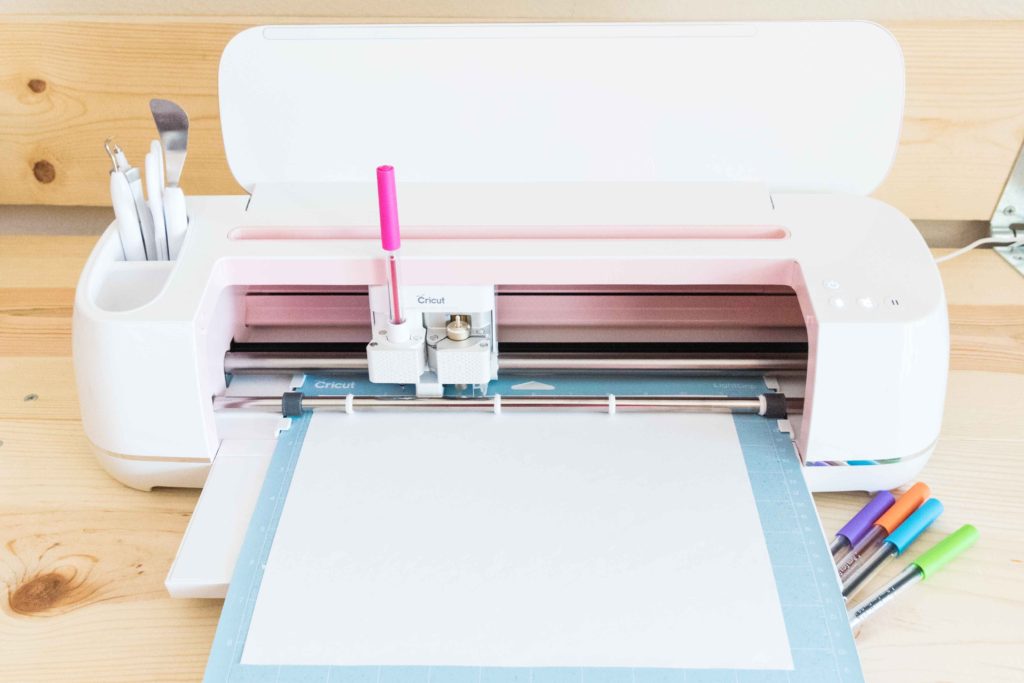
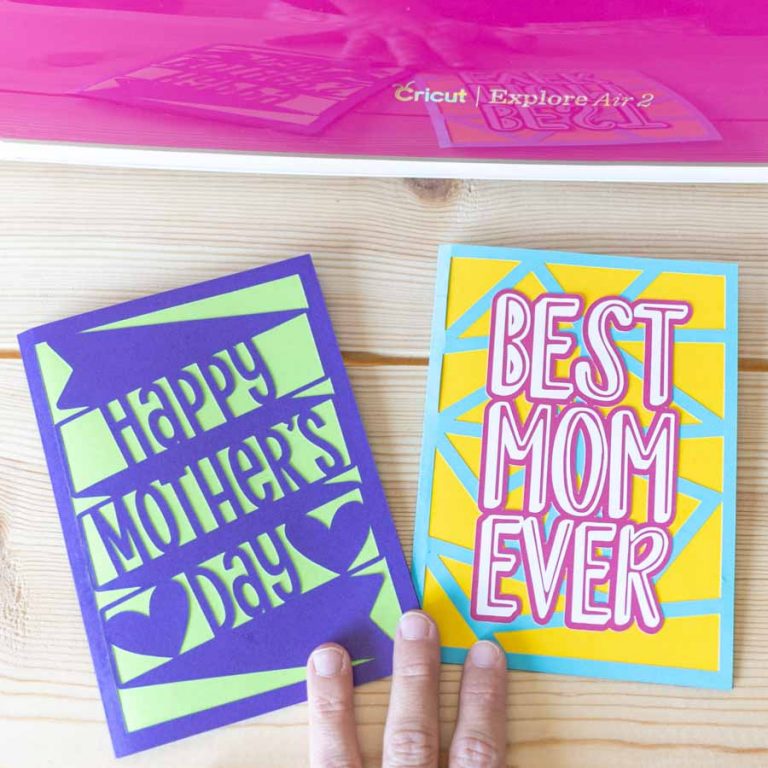
Hi! Sorry if this has already been asked and answered but can you tell me the names of the bright neon pens in the main picture? Or if they come in a package together? 🙂 thank you!!!!
They are called Extra Fine Point Pen Set, Brights (5 ct.)! They are lovely, aren’t they?
This is great, but I’m 75 and do better being able to read hard copy as I am working. Is there a pdf version of your notes that I could print?
No at this point! I am working hard on an ebook, though!
I am brand new to Cricut (Cricut Maker) and wanted info on the different pens and what they do. Your article was perfect. Thanks!
I am happy I was able to help! 🙂
Thank you for your tutorials, they are very helpful. I’m new to Cricut and have learned a lot from you. I find them very well thorough and well written. Great Job! Thanks so much!
You’re very welcome 🙂
Thank you for sharing. This is super helpful!
You’re very welcome 🙂
I love all your tutorials. I seem to actually learn and understand things better than the people who are making videos. thankyou
You’re very welcome! 🙂
I am new to Cricut, so just learning and really enjoyed this!
I’m 86yrs old so I need a lot of help????.
Making T-shirts for our family camp, sure help.
That’s the attitude. Age is just a number! 🙂
I want to use the draw function for a flower line drawing that I want to place in an IKEA frame and hang in my daughter’s minimalist bedroom. The frame is about 11 1/2 x 15 1/2. Will a construction cardstock at 330 gsm work for this? Also, will I require a different mat at 12×24? I have only used my cricut for vinyl and iron on, so this is a new adventure for me…I thank you so much for all of the information you provided!
I don’t see the problem. Cricut can cut virtually any type of cardstock. And you’re correct you need a 12x24in mat.
This was a great write-up! I have an Explorer 2. I use it to cut vinyl. I used the pens once for a batch of certificates. It took me hours! Wish I had read this before then. However, I’m now confident enough to try my hand at some cards. Thank you so much!
I agree pens can take a lot of time sometimes. I am glad I was able to help!
Hello i just purchased a bunch of the glitter and gel pens for may maker but i can’t seem to find the colors listed in the drop box of color lists 🙁
Sometimes the colors are not in Design Space :/ it’s such a bummer, I placed a suggestion. I did mention in this article about this problem. I hope they add them.
Do the pens work on dark-colored paper?
Yes, but with any dark paper and any pen, the color won’t look vibrant. The best pens for dark paper are metallic colors.
I would like to use the cricut to draw images for hand embroidery on cloth and not get the double lines when you upload the images. How does Cricut make the draw images.
You need to use images from Cricut that are specifically designed to draw. You can filter them in images and also type in “draw.” The double images will happen if you upload your own images. It has to be with the way the file was designed.
I hope this makes sense.
I cannot thank you enough for this! I have been searching for days trying to figure out how to write with the pens then cut. I just did my first card because of this, thank you, thank you, thank you!
Yay! you’re very welcome, Ellen! So happy to hear!
I love using my pens but find that for some fonts, only outlines show up rather than filling in the whole letter/word. Have you found a way to get around that yet? I used a font for my Christmas cards and ended up having to manually color in the thicker parts of the letters because they only appeared as outlines.
Hi Meredith, you need to use writing fonts. I cover this topic on the article! Have a lovely day.
I didn’t see any mention about how to store the Cricut pens, so the pens do have the gel & glitter pen issues you did mention Cricut recommends storing ALL Cricut pens tip down (the way you would have it in the machine) to ensure the ink is at the tips when you are ready to use them.
Thank you, Kym! I will add it to the article at some point. I store them in a pen case, and I just make sure the ink is ready to go before I use them. But for the glitter and gel pens, this is a great way to do it! Thank you for your input.
I have the five pack of 0.3 fine point pens. Was hoping to create business cards. Anyhoo, it seems no matter which pen i use or which setting i use, being paper or cardstock plus, there will always be a letter or couple lines that does not take. very frustrating to say the least.
Hi Cat, this happened to me with the glitter pens, you need to make some strokes in a piece of paper if they are brand or haven’t been used in a while. Have you tried Print then cut for your business cards instead? Pens are awesome, but can also take a long time.
I received an original Cricut machine last July. I knew they could cut lots of great shapes, patterns, images and letters from paper, but had never used one myself. I was instantly addicted! I upgraded to the Cricut Explore Air 2 just after Christmas- I got a great deal at Joann! ?
I know a little more than the basics but I struggle to find great resources online when I’m trying out something new like attaching or welding. Not only did you just teach me more than I knew about the pens, but you also shared some really great ways to use them! I love that you took the time to actually explain how to do the attach and weld. It’s so helpful to have this written out rather than watching it on a YouTube video. Thanks to you, I understand these much better and I can’t wait to put the kids to bed tonight so I can head to my craft room and try these out. Keep up the great work!
Hi Erica,
I am so happy I was able to help you with your Cricut journey! Comments like yours truly motivate me to keep writing.
Thank you so much!
I just purchased a cricut maker and this was INSANELY helpful!
I am glad I was able to help!