Hi Daydreamers!
Today you are going to learn how to make the most beautiful gift tags with your Cricut (Maker or Explore).
By the way, not only will I be showing you how to make Gift Tags from Cricut Design Space, but I will also provide you with 10+ Free SVG Gift Tags templates.
I assure you that if you read and apply this tutorial, you will be ready to make the MOST astonishing Gift Tags for any (Yes Any!) occasion.
Ideally, you will read this tutorial from the beginning because as we go, we will be implementing the concepts mentioned in the previews steps.

In a nutshell, these are the techniques you will be learning today:
- How to make gift tags using basic shapes in Cricut Design Space
- Learn how to find ready to cut gift tags
- How to make gift tags using Cricut Fonts
- Making gift tags with Print then Cut
- Making fancy and spectacular gift tags with the templates, I provided you with.
- I will only cover the cutting process of the last technique; however, you can still apply it to all of the other methods I will be showing you.
Are you ready?
Let’s Daydream Into Reality!
Note: In this article, I assume you know some basics like changing colors, resizing an image, etc. I do my best to cover everything you need to know, but if you feel lost at some point, please check out my full Cricut Design Space tutorial.
How to Make Gift Tags Using Shapes
The easiest way to make gift tags in Cricut Design Space is by using shapes. If you are in a hurry and want to cut something really quick, this is the option that will help you get the job done, fast.
Step 1 – Add shapes and create the tag
To add a shape, click on the “Shapes” button located on the left panel of the canvas and select the option you want to use (I choose a circle), then repeat the same step and add a circle for the tag hole.
Resize the shape (you want your gift tag to be) and the tag hole circle and place it on top of the shape.
When you are happy with the location of the hole, select both shapes and click on the “Slice” button located at the bottom of the Layers panel.
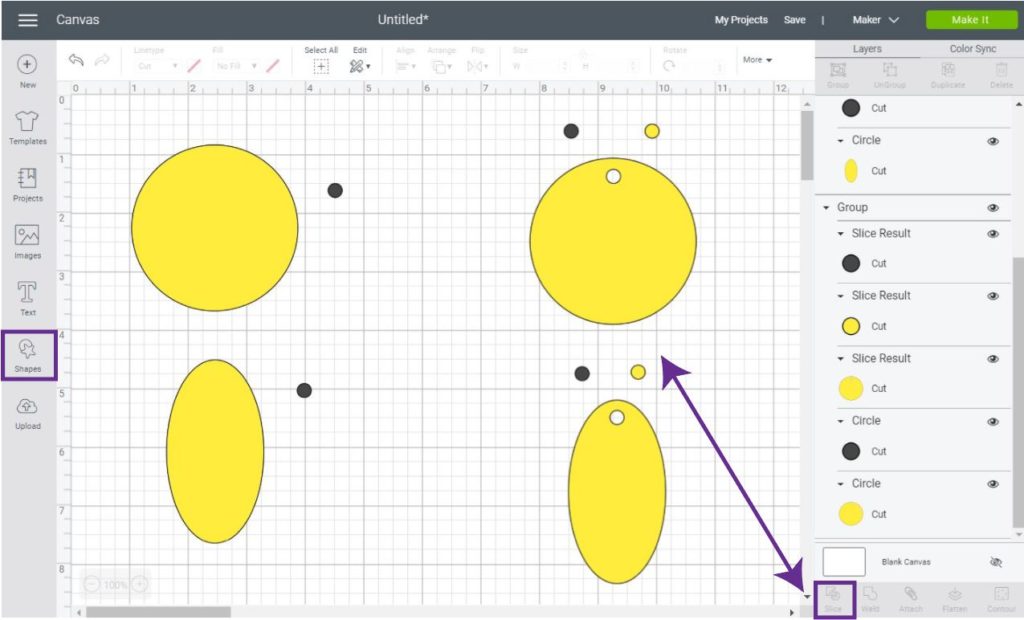
When you are done Slicing delete the unwanted parts, and now you have the body of your tag.
Tip: Explore and create more gift tags variations by unlocking the proportions of your shape (select it on the canvas and click on the little lock of the right-hand corner of the selection).
Step 2 – Add Text to your Gift Tag
Now it’s time to add text to your gift tag.
When you add text, the default setting is “Cut”; but the idea with the tags is to write on them.
Right?
To tell your machine you want to draw you need to change the “Linetype” (located on the top panel of the canvas) from “Cut” to “Draw.”
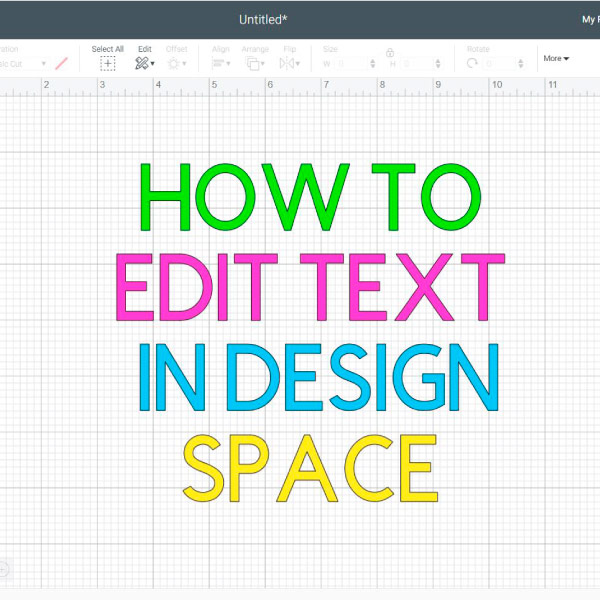
Learn more about fonts on my How to Edit Text in Cricut Design Space
Here’s the caveat though, if you change the font’s linetype from “Cut” to “Draw,” you will have an outlined font.
What if you want your text to look hand-drawn?
If you want to write in a handwritten style, you need to use Cricut’s Fonts.
You can see very quickly if a font has a writing style, by selecting it and then clicking on the Style drop-down menu on the top panel of the canvas. If the font has the Writing font, then you know you can use it for handwritten style projects.
When you choose writing your Cricut will automatically change the linetype from Cut to Draw.
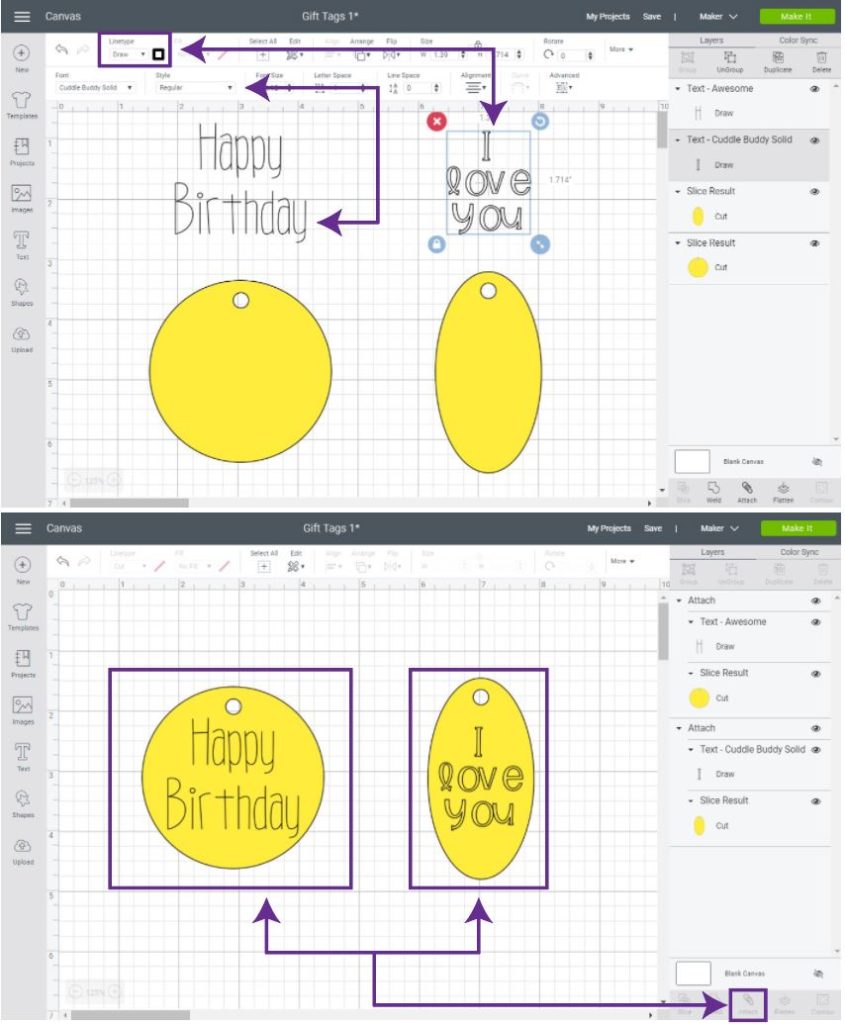
When you are done with your text, place it on top of the gift tag, then select both layers (text and shape) and click on “Attach” located at the end of the layer panel.
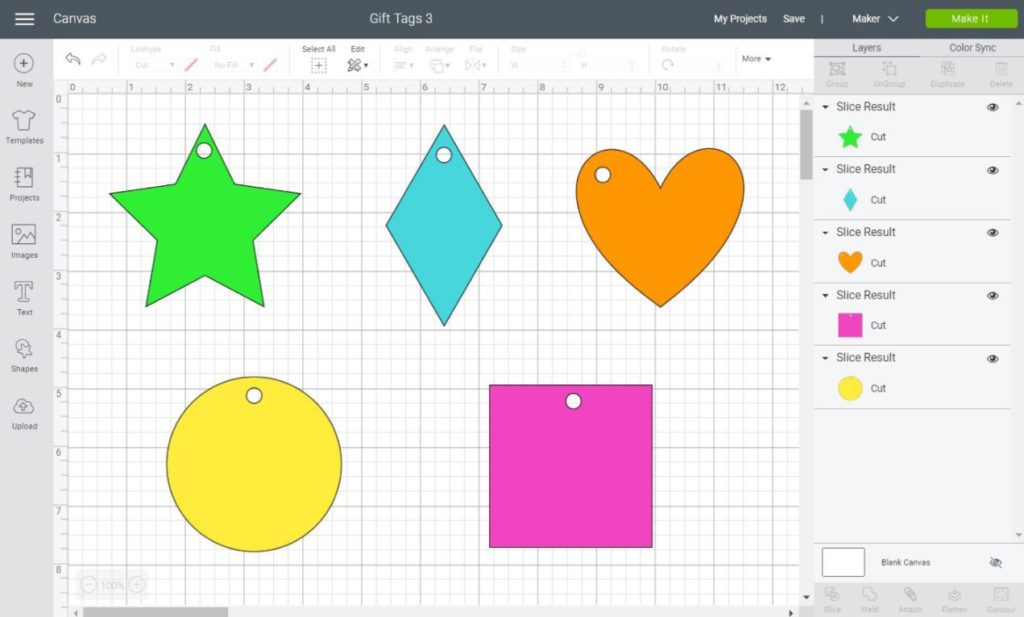
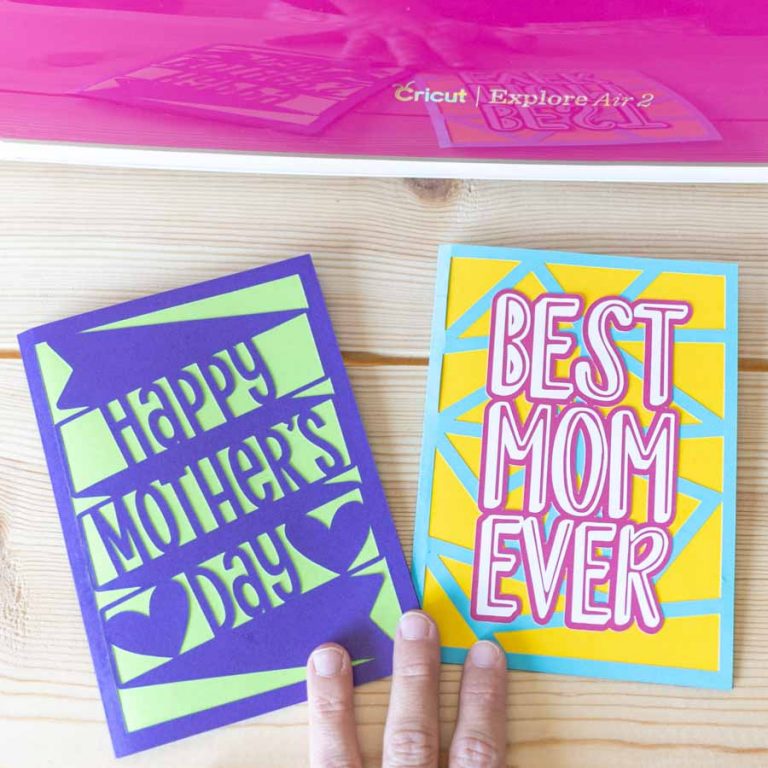
Check out how different shapes would look like if you were going to use them as Gift Tags!
Aren’t they cute?
Step 3 – Use Shapes to Create custom Gift Tags
Although making tags with shapes is quick and easy, they can be quite plain as well.
Let’s add an extra touch of creativity!
After all, Isn’t that the reason you got a Cricut in the first place?
On this step, I want to teach you how to make a custom gift tag using simple shapes.
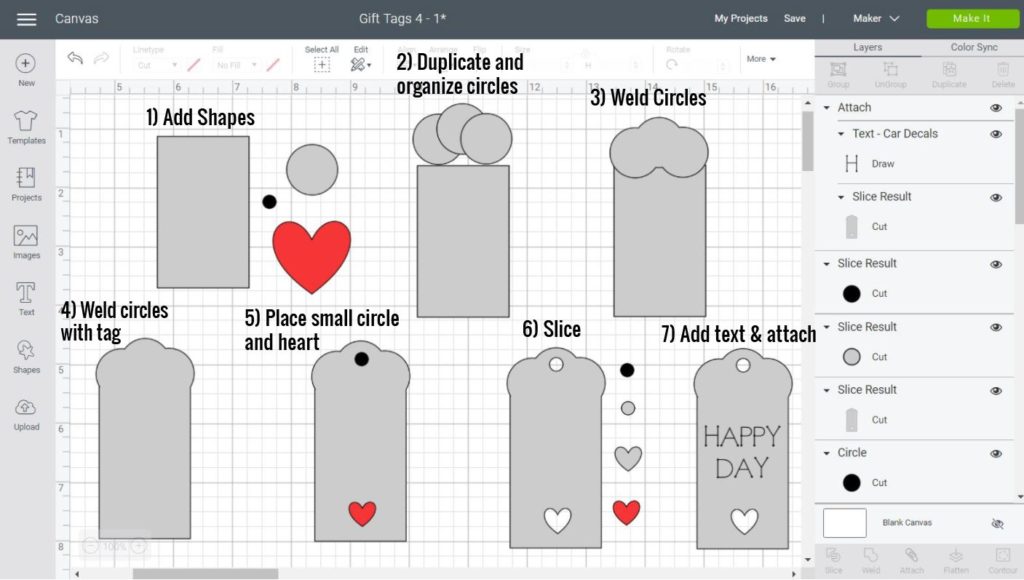
Step 1: Add rectangle (need to unlock the proportions of a square), two circles, and a heart.
Step 2: Resize one of the circles and copy-paste it (Ctrl + V/Cmd + V) until you have three exact copies. Then arrange the circles like the screenshot right above.
Step 3: “Weld” circles and overlap them (two thirds in) with the gift tag. Make sure that they are aligned to perfection. Note: Weld is located at the bottom of the Layers panel.
Step 4: Select welded circles and rectangle and “Weld” again.
Step 5: Resize the heart and second circle. Use the circle at the top for the gift tag hole, and the heart for the bottom decoration.
Step 6: Select the tag and the circle and click on “Slice.” Repeat with the heart. (Delete unwanted pieces)
Step 7: Add text, then select tag and text and click on “Attach.”
Easy, right?
Make Ready to Cut Gift Tags
If you have Cricut Access or like buying images from Cricut’s Library, you can find ready to cut gift tags.
They are beautiful, and they have hundreds of options for you to use!
To find ready to cut gift tags, click on the “Images” button located on the left panel of the canvas and type in “tag” in the search box on the right-hand of the window.
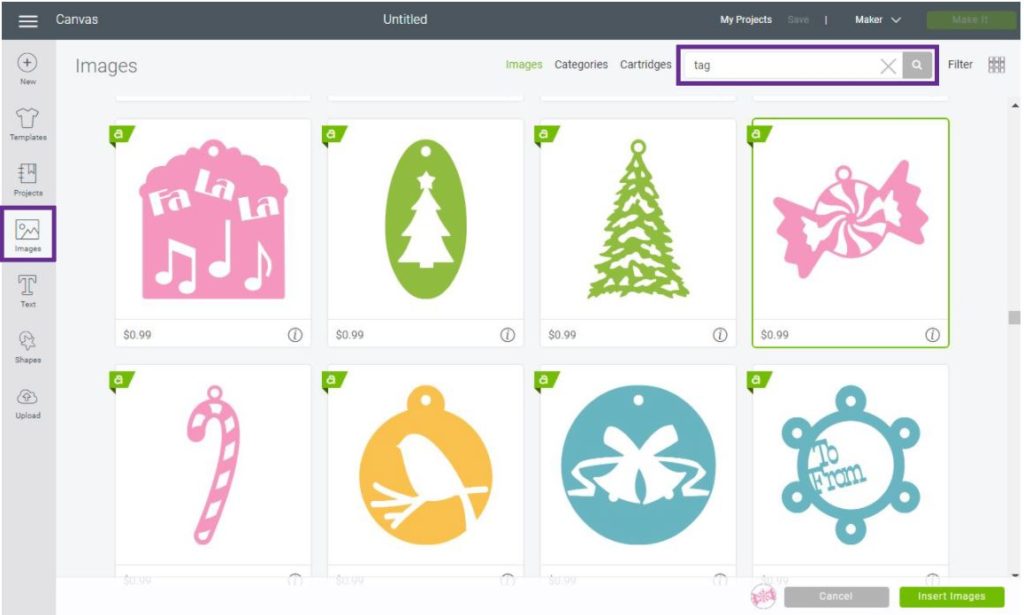
By filtering with the word “tag,” you’ll find tons of options. Don’t be limited, though; I encourage you to also use words like Christmas, Valentine’s Day, Birthday, etc.
Tags a very easy to identify!
When you find the gift tag, you want to use, click on it and then click on “Insert Images” to insert them on your canvas.
At that point, you can add text as I showed you above, or click on Make it, to cut them right away.
Make Gift Tags Using Fonts
You can also make Gift Tags by using fonts. They are cute, but honestly, I don’t recommend you using this method.
I love it when you are making banners (read my tutorial) because Cricut Access has “banner fonts,” nevertheless, the tag fonts in Design Space are premium fonts, and I think you can get so much more from Cricut images.
If you still want to use this technique, first you need to find the right fonts. Start by adding a single word, then, click on the font menu and type in “tag” in the search menu and select the one you like.
When you choose the font you like, follow the next steps.
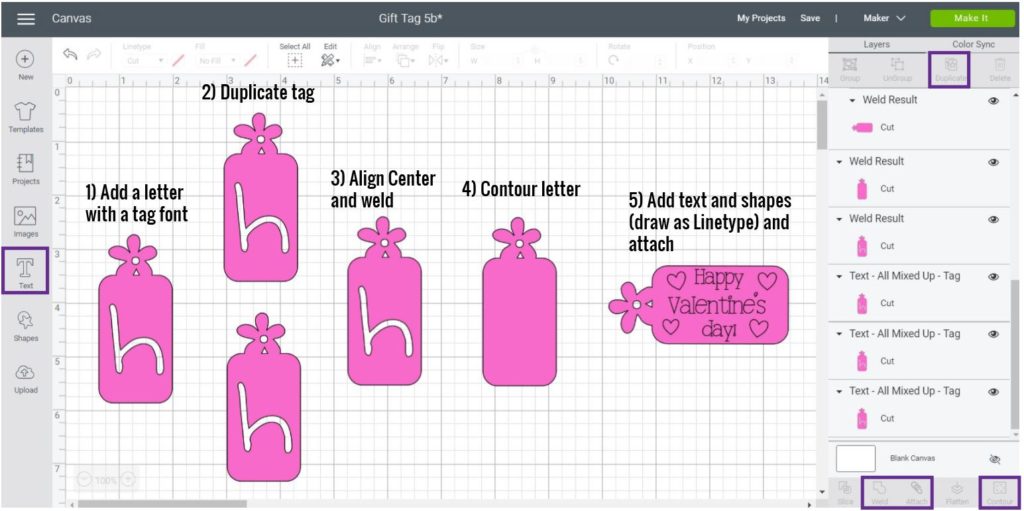
Step 1: Add a letter and choose the tag font you would like to use.
Step 2: Duplicate (or copy-paste) tag.
Step 3: Select both copies and click on “Align” located on the top panel and select the option “Center;” once centered select both copies and click on “Weld.”
Step 4: Click on contour (located at the bottom of the Layers panel) and hide the letter. Learn more about “Contour” on my helpful guide.
Step 5: Add writing style text and other shapes you want to use (change shape Linetype for “Draw”).

I bought the font, and this is how it looks once cut.
Isn’t it cute?
I used an ocean style pink paper.
Make Gift Tags with Print then Cut
Another technique and one of my FAVORITES is to make gift tags using the Print then Cut setting in Cricut Design Space.
In Cricut’s library, you’ll find the most beautiful images and quotes to make your gift tags, and then you will print them with your home printer and cut them with your machine.
I won’t go into all of the details on how to use Print then Cut in this post, but if you have any doubts, I have a handy Print then Cut tutorial for you to learn how it works.
Note: If you don’t have Cricut Access and use multiple images this project can be a little expensive (like 15 dollars); though, if you only use a couple of images it can be anywhere from 2 to 5 dollars.
Learn more about “Cricut Access” on my helpful guide.
Step 1 – Add Images
Log in to Cricut Design Space and go to your canvas. Once there, click on images (left) panel and then look for all of the images you want to use.
You can find images by typing in the search box the topic you want. For instance, if you’re going to make birthday tags, type in cake, balloons, birthday, candles, etc.
In this search box, you can also type in the codes of a particular image (I will give you the codes of the images I used in this project in the following step).
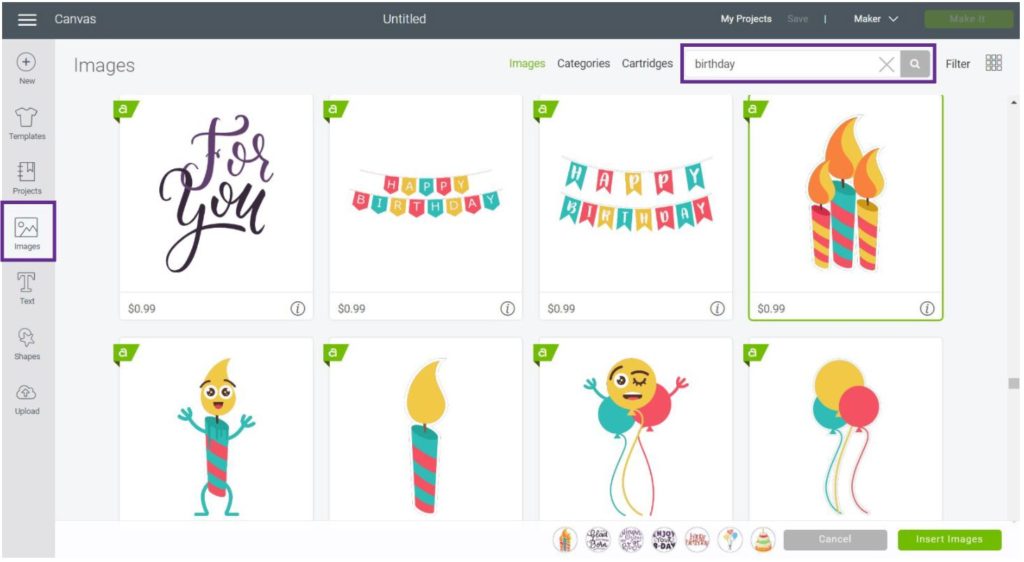
You can also type in husband, wife, mother, Valentine’s Day, Christmas, etc. Try using different words for each set of gift tags so you can find various options and make your gift tags extra fun and vibrant.
Don’t choose illustrations only; try picking quotes as well. Oh, and you can also add text as I showed you in the previews steps.
After picking all of your images, click on insert images.
Step 1 – Add a Gift Tag Shape
Add a gift tag “body” to place the images on top. I added one using the method I showed you above. But, you can also use simple shapes or even a tag shape from Cricut’s Library.
Tip: While you are inserting images and tags, items will be in a different order. To bring an element to the front or to send it to the back, select it from the canvas and right-click on it to arrange it in the right position.

Step 3 – Finish Gift Tags and Flatten
Look at all of the images and tags I ended up using!
Again, mix and match quotes with illustrations, change colors, and follow your (creative) heart.
If you want to recreate this project, here are the codes of the images for you to find them:
- Enjoy your Day: #MB157D84
- Candles: #MD6EF570
- Create a life you love: #MCD7EDAB
- I am glad you were born: #MB157B4D
- Cupcake: #MB57612C
- They say it’s your birthday: #MB157C7B
- Cake Day: #M8B3C692
- Happy Birthday: #M2F0AB
- Cake: #MB43A156
- Wishing you the Best: #MB157CB4
- Cake Slice: #MB576137
- I love you more: #MBE375F9
- Birds: #MBFDAD29
- For my husband: #MBD2BF16
- Love to the moon and back: #MBD2BFA0
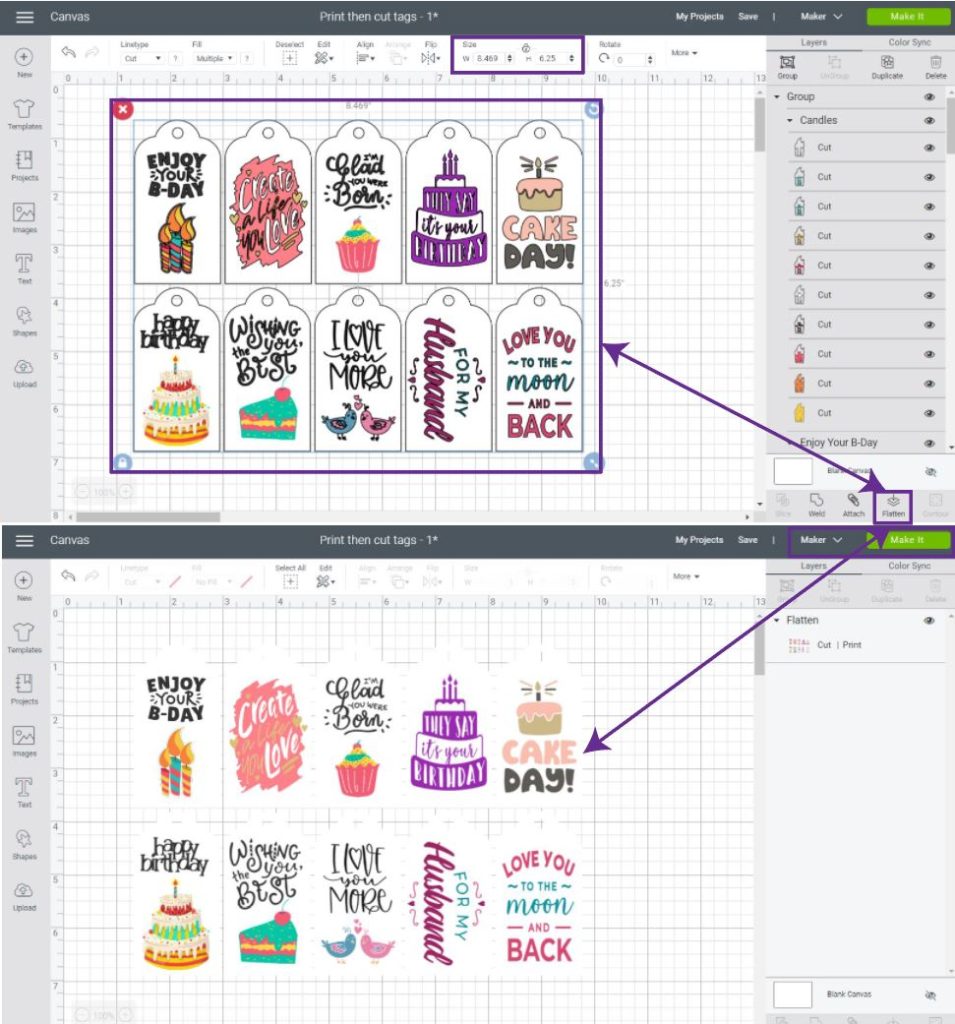
When you are done creating all of your gift tags, and organizing them like the screenshot you see right above, select all of the items you have on the canvas area and click on flatten (located at the bottom of the Layers panel).
After flattening, all of your layers (images, quotes, text, etc.) should be in a single one.
Remember that with Print then Cut your image can’t be larger than 9.25. X 6.75 in. If your final layer is bigger than that resize before you click on “Make it.”
Note: Size is located on the top panel of the canvas.
After resizing click on “Make it.”
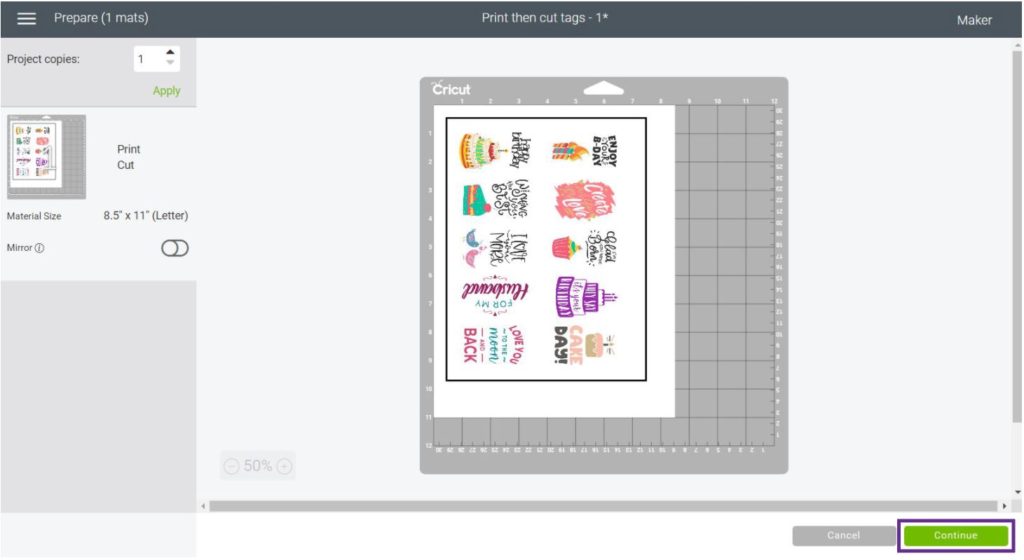
Step 4 – Print then Cut your Gift Tags
When you click on “Make it,” this is the Mat preview you will see; and this is the way you need to place the printed copy on your mat.
Click on continue, and follow the prompts to complete your project. If you still have doubts, don’t forget to check out my Print then Cut tutorial.
I will be covering the cutting process on the next and last technique I will be teaching you.
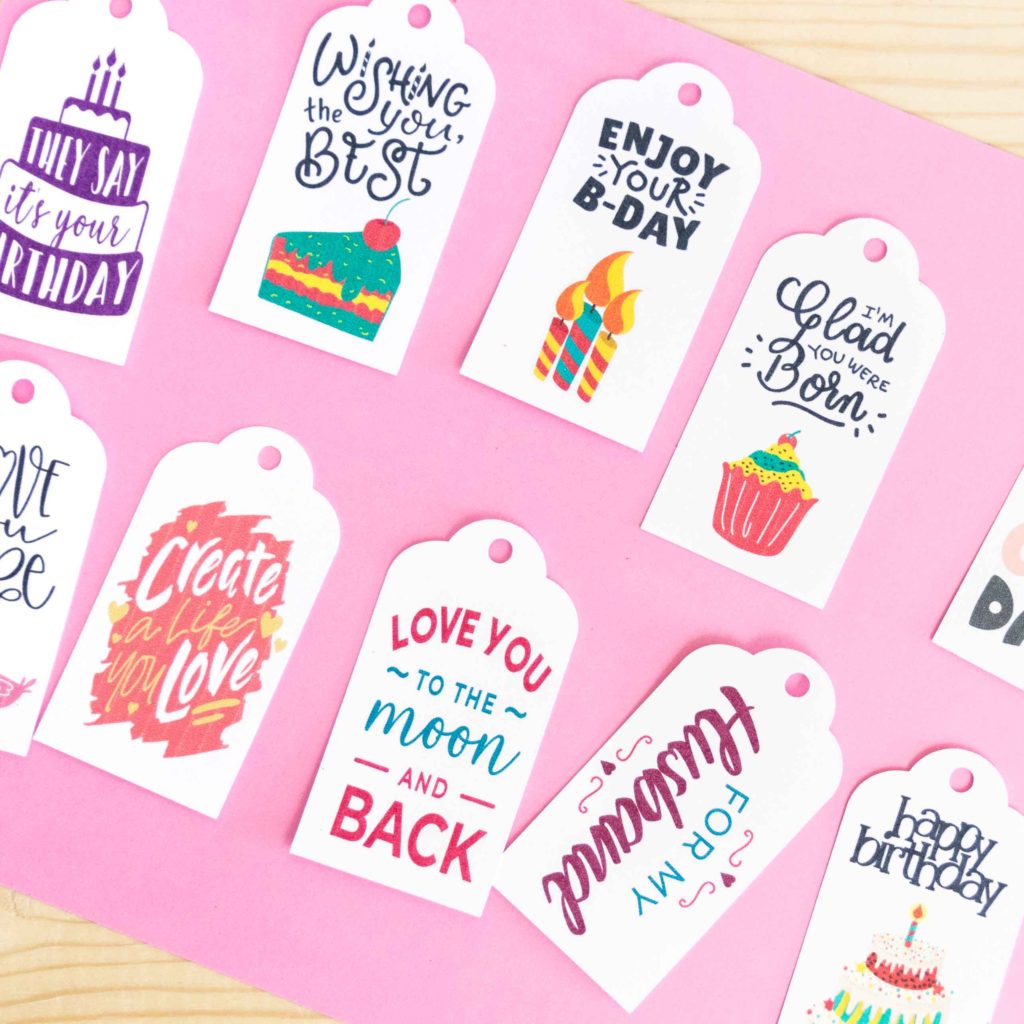
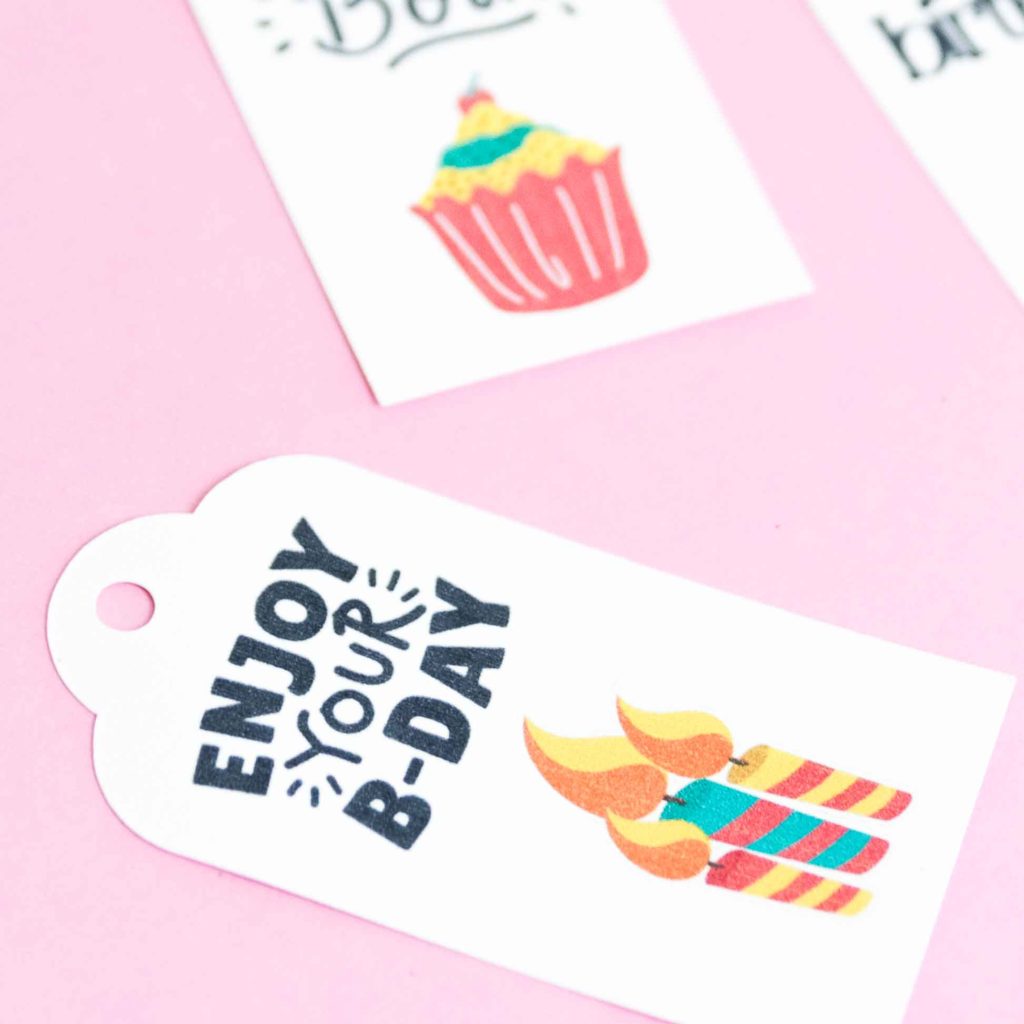
Look at some of the photos of these gift tags!
Gosh…
They are so stinking cute!
I love all of the colors and images. There are so many possibilities you have with Cricut’s Images.

I also “Print then Cut” these Gift Tags in Kraft (brown) cardstock. Although, for dark papers like this, you need a Cricut Maker.
Don’t they look AWESOME?
Free SVG Gift Tags Templates
As I promised at the beginning of this article, here, you have twelve different Gift Tag templates to use for your (personal) projects.
To access them, right-click on each tag you want, and select “Save image as” to save it to your computer. You can also use the download buttons below the thumbnails.
On the following tutorial, we will be using the first (Orange) template and the flowers.


Make Gift Tags with Uploaded Images
With all of the concepts I just showed you in the previews “mini-tutorials” you are ready to take on more complex and fun gift tags.
Although all of the types of gift tags we’ve made so far are gorgeous, there are special occasions where you may want to make something extra fancy and dear I say, breathtaking?
Are you ready?
Warning: This is a more advanced technique. I mentioned all of these concepts at the beginning of this tutorial, so make sure you’ve read it before you get going. Although if already rock Design Space, you’ll be just fine.
Materials
- Cricut Maker or Explore
- Fine Point Blade (a sharp one)
- Weeder
- Strong Grip (Purple Mat)
- Brayer (optional, but highly recommended)
- Cricut Pen
- High-Quality Glue
- Glitter Cardstock (Choose two colors that have a nice contrast)
Step 1 – Upload and Organize Images
The files are at the beginning of this section, and we will be using the orange gift tag and the flower icons.
After you save the files to your computer, log in to Design Space and when you are on the canvas go to the Upload option (located on the left panel), then click on “Upload Images.”
Follow the prompts that Design Space brings up, and once your images are saved, you can see them in Recently uploaded images; select them and click on “Insert Images.
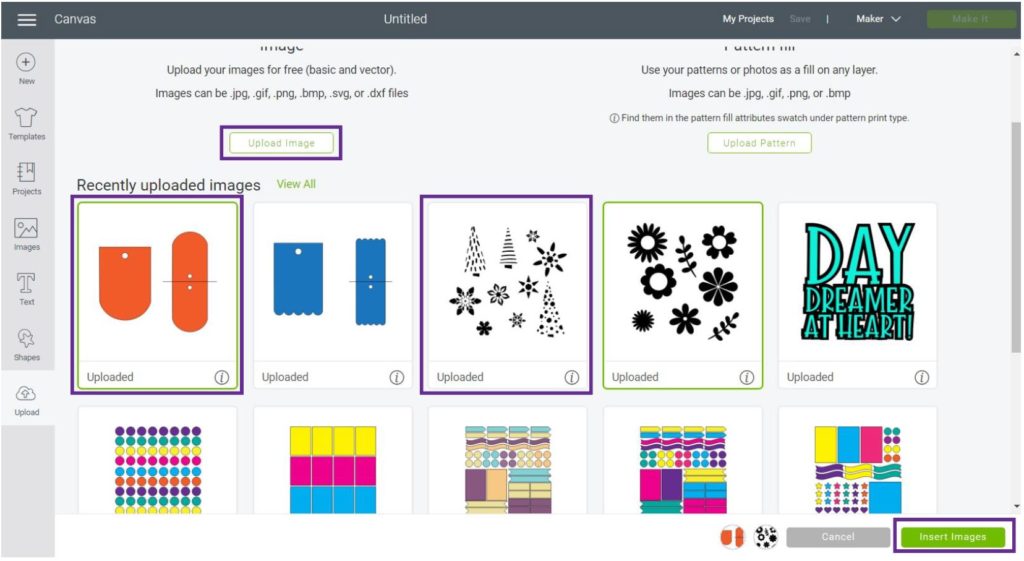
The screenshot down below shows how the images should look like when inserting them in the canvas area.
By default, when you insert an SVG file to the canvas, you will see that when you click on it, all of the layers are grouped; but, since we need to edit them individually go ahead and ungroup the flower and the Orange Tags.
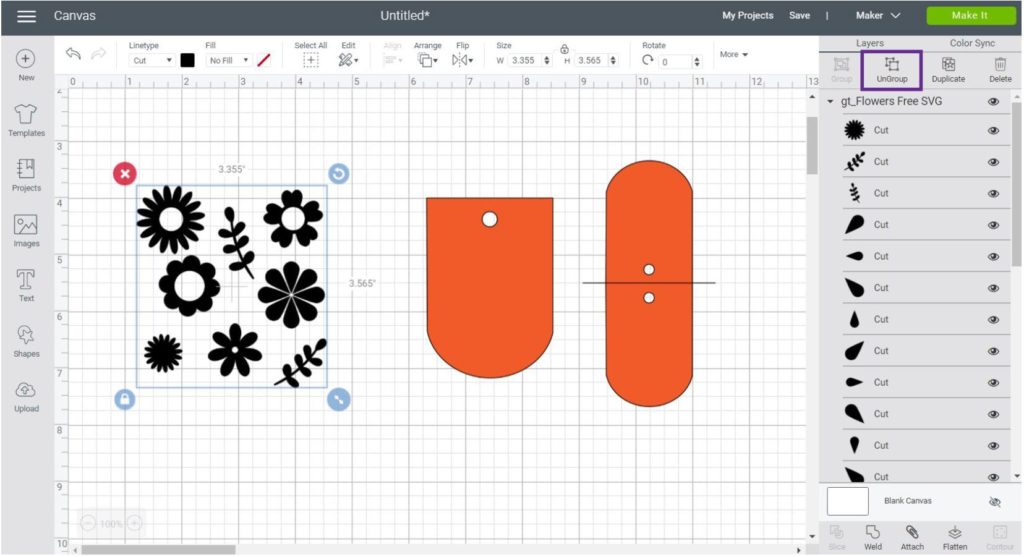
We will be using the double gift tag (it will be foldable) and some of the flowers.
Step 2 – Slice and Weld
For this Gift tag, I wanted to add a beautiful “Cut-Out” effect. There are many ways to do this, but I decided to use the Slice and Weld tool.
Check out the following image, then let’s chat about what I did in more detail.
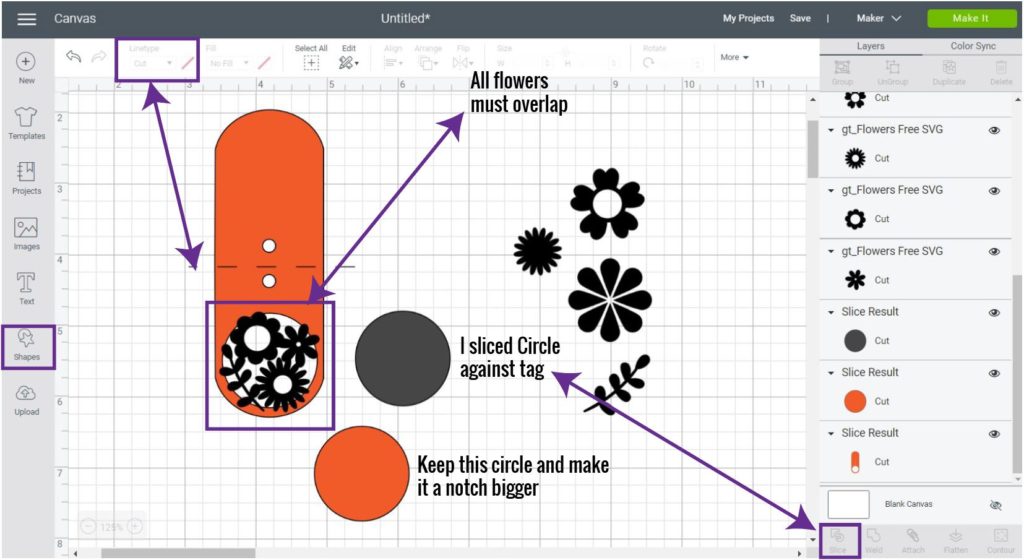
This Gift Tag has a lot of things going on.
First, you need to change the linetype of the line on top of the gift tag. Select it on the canvas and go to the top panel and change the line from Cut to Score.
Second, for the “Cut-Out” effect, we will add a circle and place it on top of the bottom of the tag, then select the tag and circle and click on Slice.
After slicing, you will have three different layers; two circles and the tag with a “cut-out” circle. Delete one circle and make the other one a notch larger.
Third, place flowers on top of the circle. They need to overlap the other flowers, and the tag itself.
Last, select all flowers, and the orange tag and click on “Weld” to create a single layer, then change the colors you want to use for your project. I went with purple and pink.
Tip: If a layer is on top, or back (when it shouldn’t) rick click on it and send it to either to the front or the back.
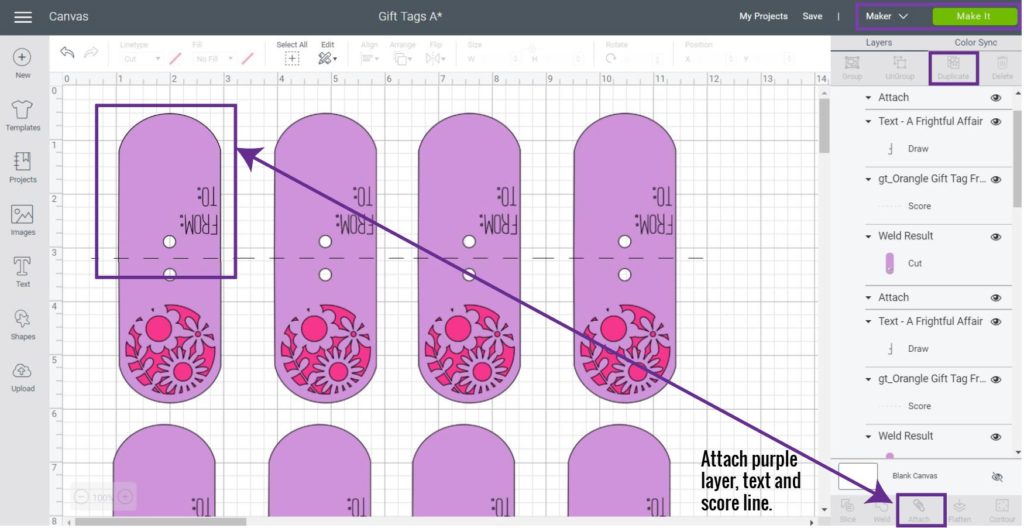
Step 3 – Add Text, Attach and Resize Tag
For this tag, I just added “From: & To:” but, there’s something very IMPORTANT you need to do here.
Sometimes it is difficult to envision a project after completion; on this one, for instance, we will be placing the cardstock “pretty side down,” so we can cut, score and write in a single step.
So your text must look the right way before you send your project to cut. In this case, you need to rotate it 180° and place it where the screenshot down below shows.
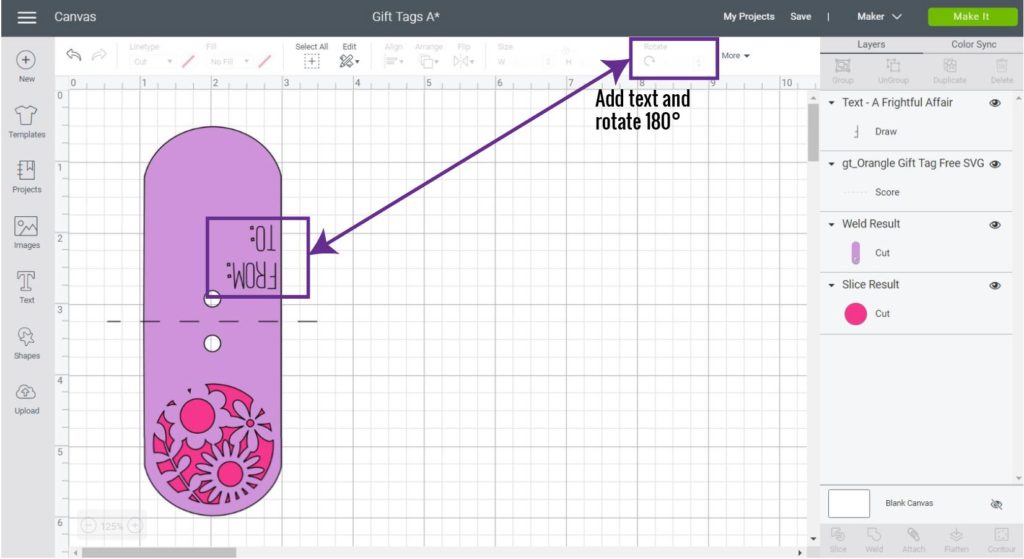
When you place and organize your text, select it along with the purple tag and score-line and click on Attach.
After attaching, select all of the items on the canvas and size the gift tag. For me, each tag (including the score-line in the selection) was 3 x 5.5 in.
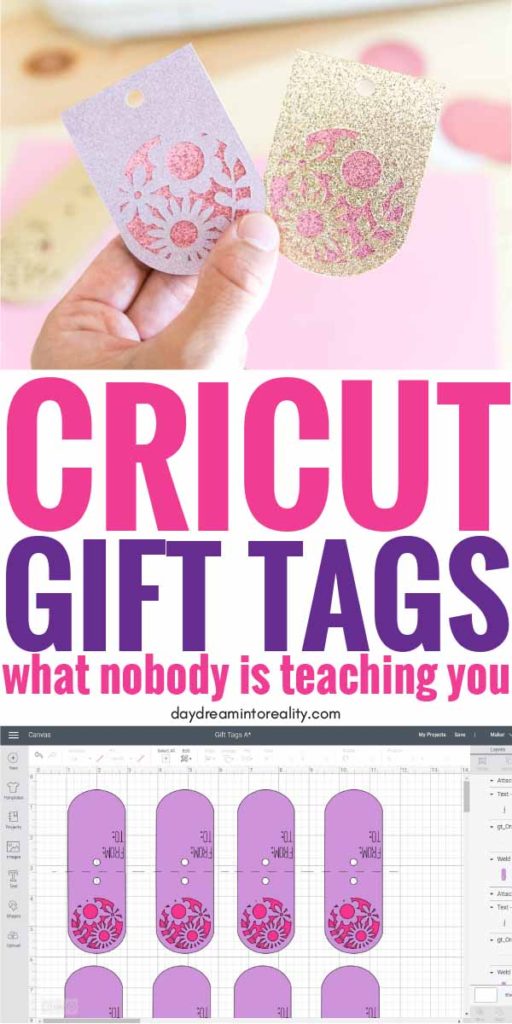
If you want more than one gift tag, select all layers again and duplicate (or copy-paste) them until you complete the desired amount of gift tags you want.
When you are done click on “Make it” on the upper-right hand corner to cut your project. (Make sure you have the right machine selected, Maker or Explore)
Step 4 – Cut your Gift Tags
When you send your project to cut, this is the preview you should have. You may have more “Mats” depending on the number of copies and the final size of your gift tags.
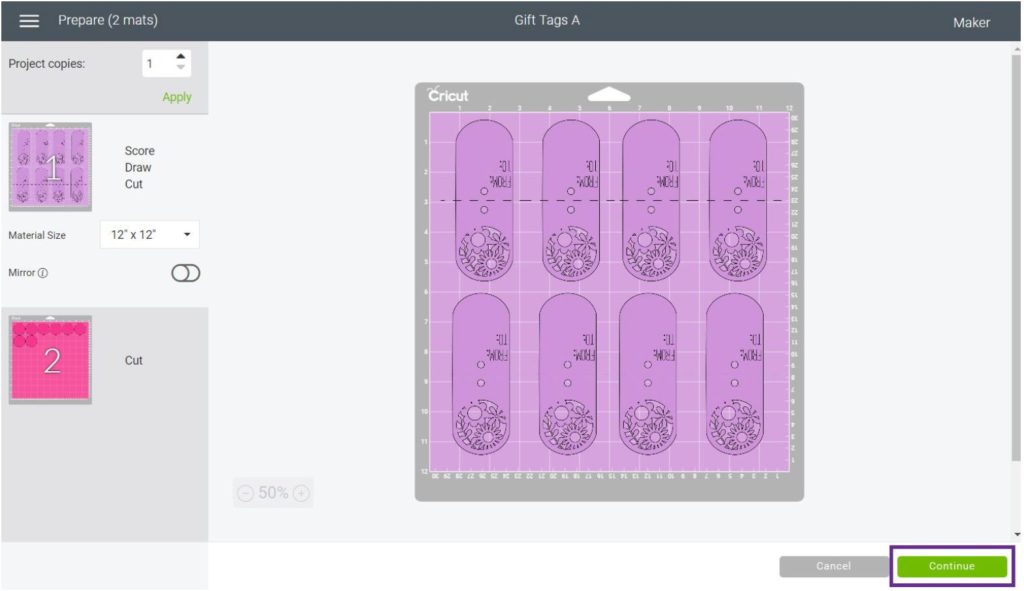
Click on continue to select the materials and install the tools you will be using.
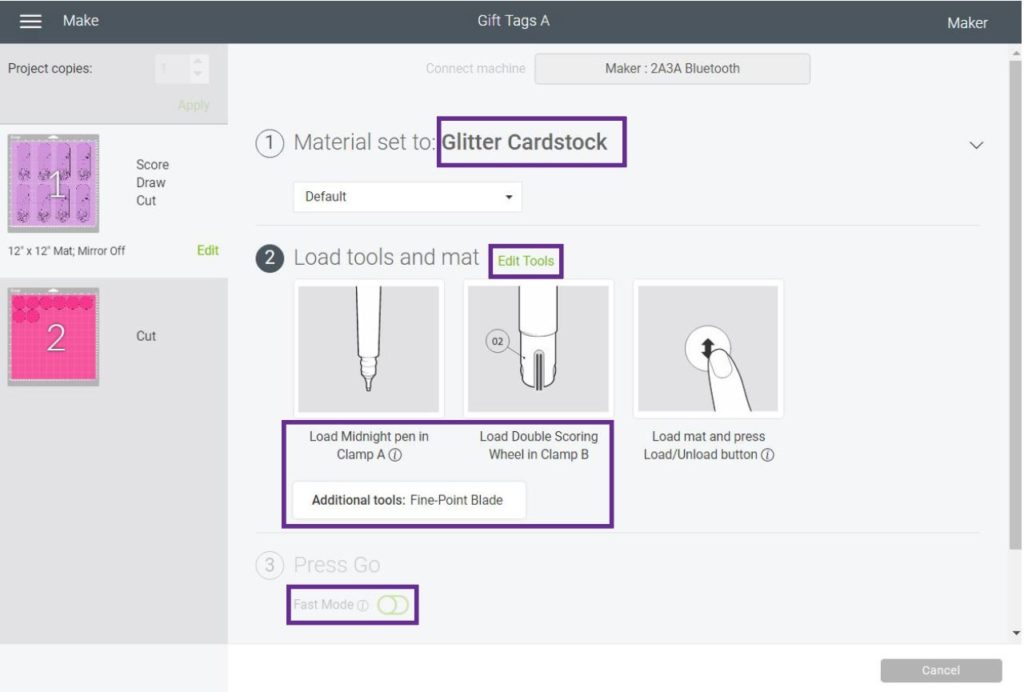
Cricut Maker Instructions: Select Glitter Cardstock from the materials and choose the tools you are going to use.
On the tools section, Design Space will always show the tools you will be needing and the ones you should initially install. If you don’t have the scoring wheel, click on edit tools and select it from there.
Cricut Explore Instructions: Set the Smart Set dial of your Machine to Cardstock Plus, or custom to select Glitter Cardstock from Design Space.
For the tools, install the ones Design Space calls for first. I am quite sure it will be the Scoring Stylus and fine point blade.
Now let’s move to real-life photos!
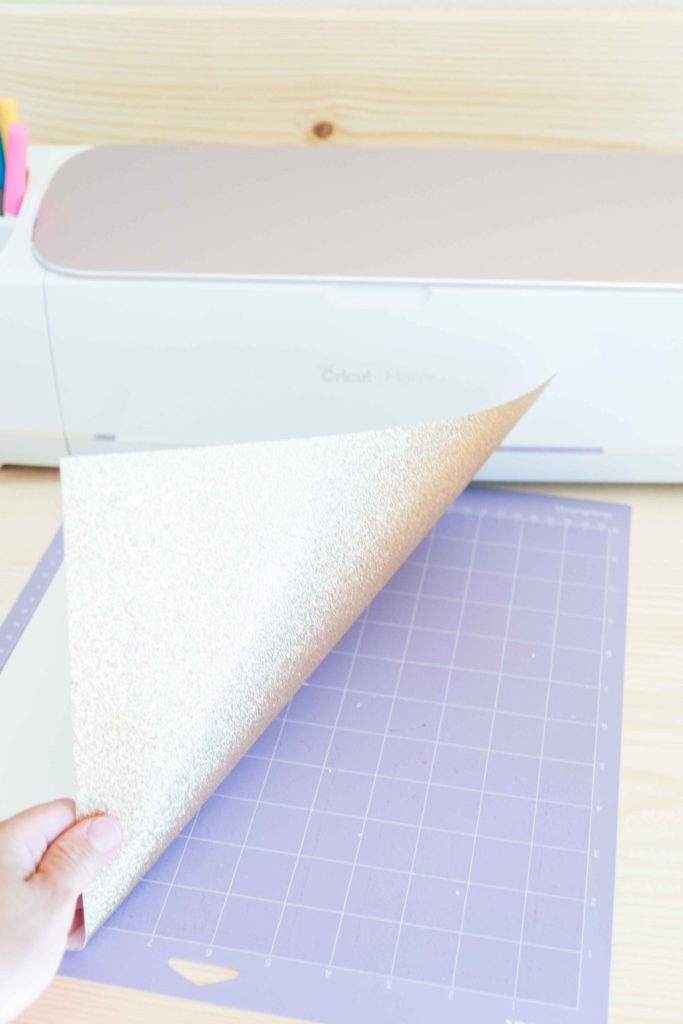
Place Glitter Cardstock pretty side down on a purple mat. You have to because we are writing on the white side, remember?
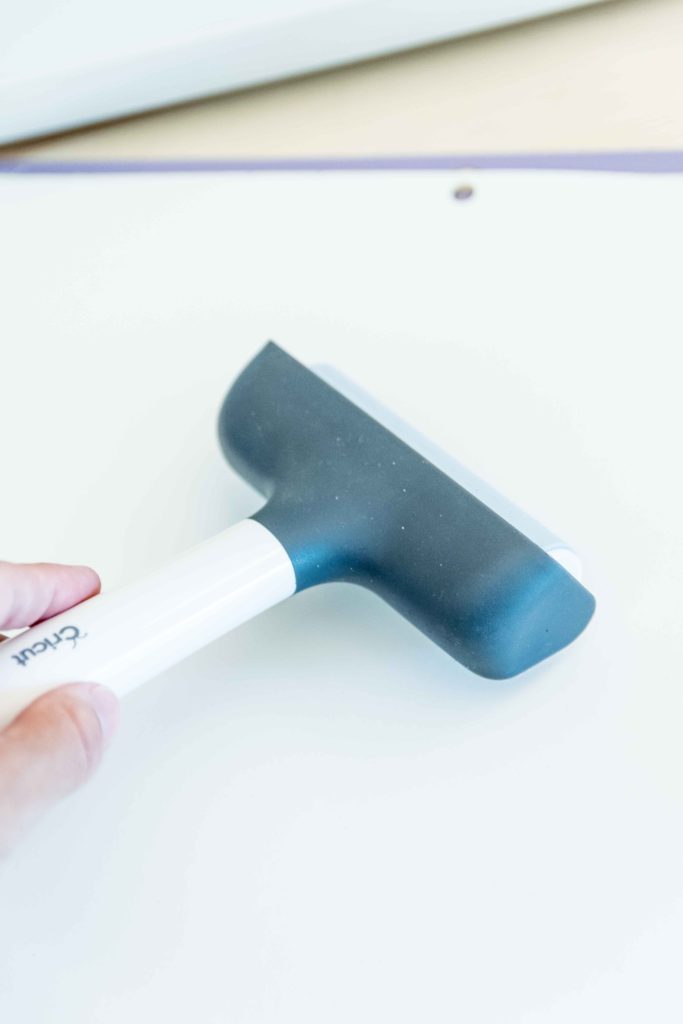
Something I love lately is the brayer. If you have one, use it to extra secure the paper to your mat. If you don’t own one yet, use the scraper, and make a little investment today, and treat yourself with a brayer.
I love mine!
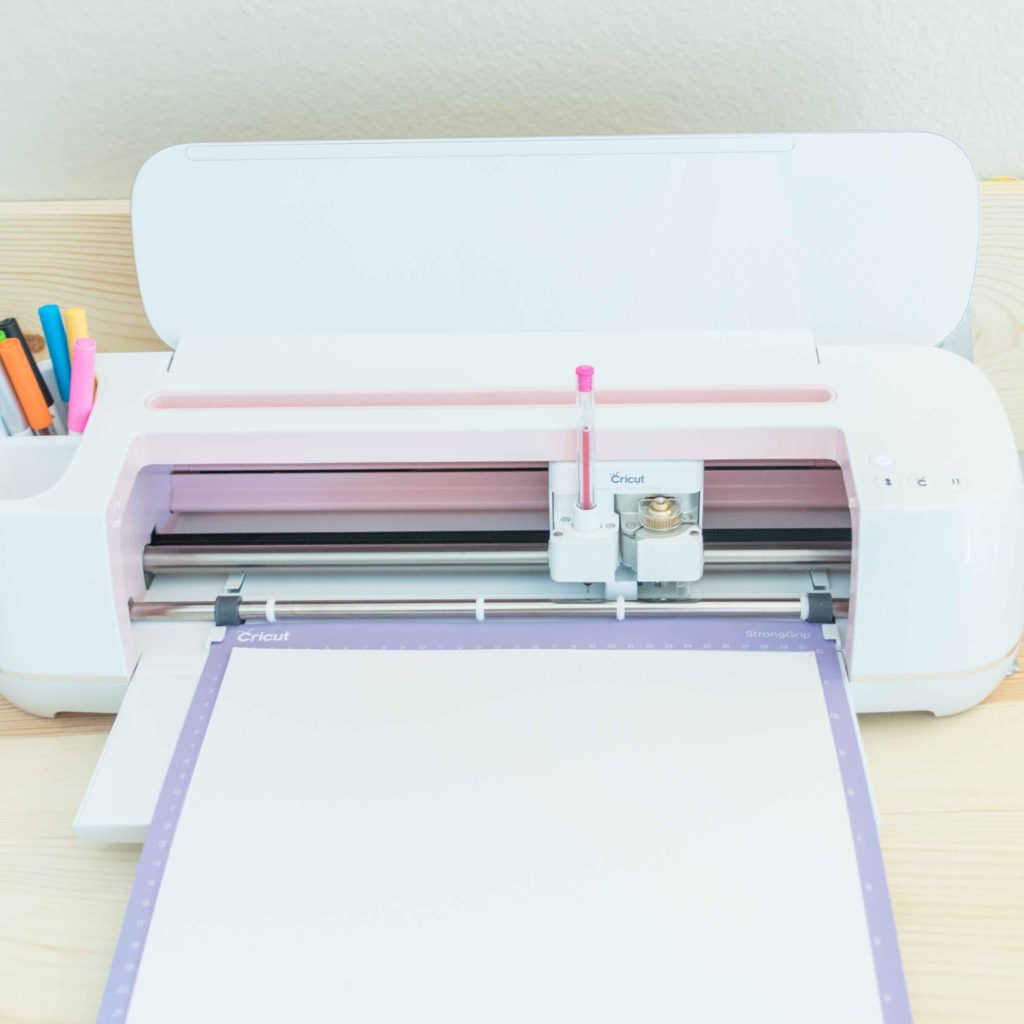
When you are done securing the paper to your mat, load it to your machine and press the flashing go button on your machine.
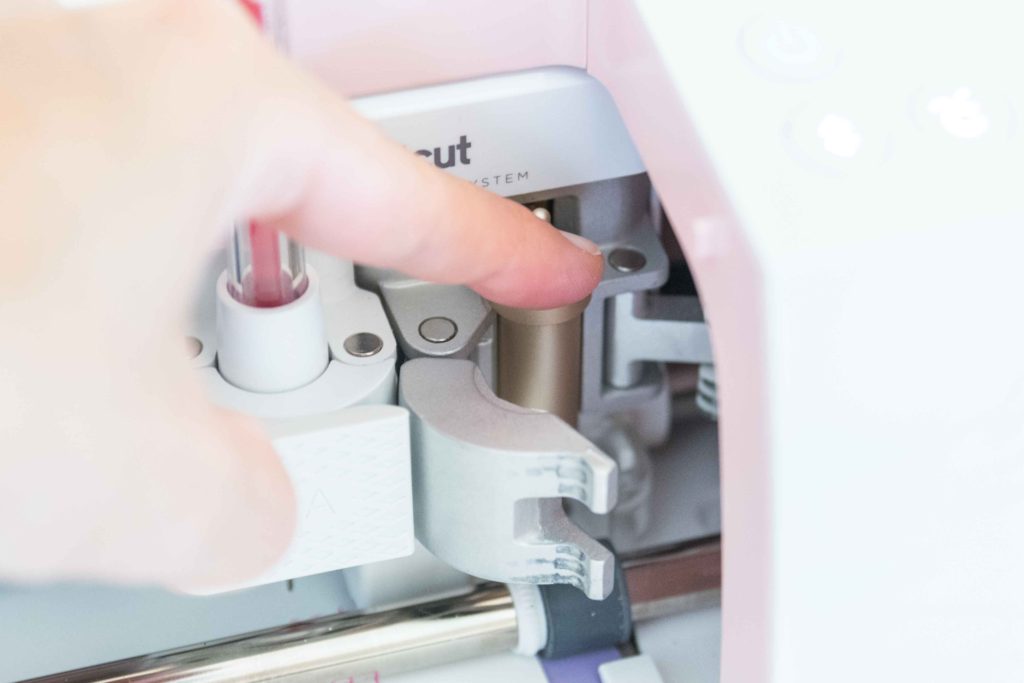
Changing tool message…
At some point, your Cricut will be done with one of the tools and since we are using three, depending on your machine and the tools you chose (score wheel or stylus) Design Space will bring up a notification to install the missing tool.
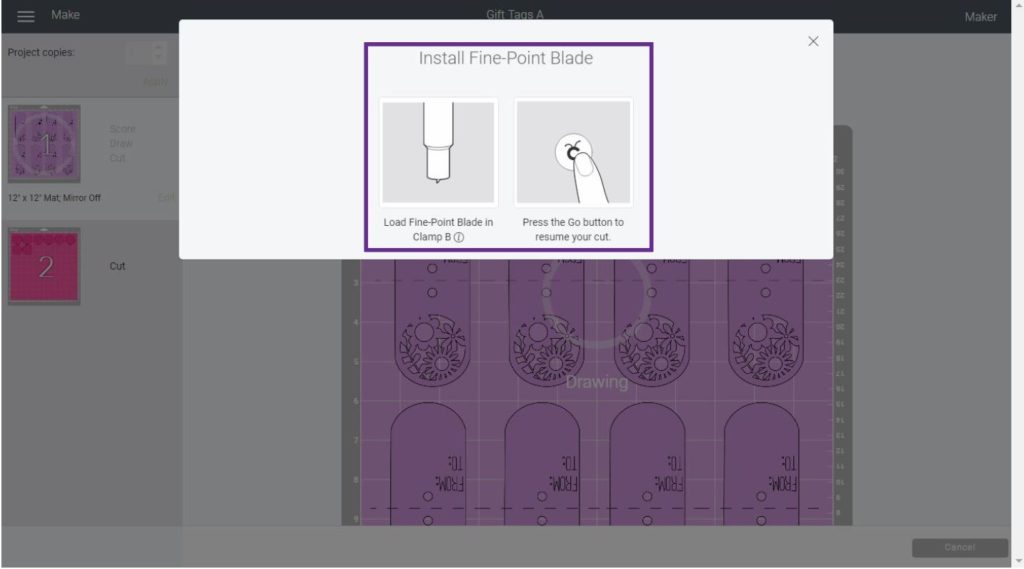
I had to install the Fine Point blade because I used my Maker for this project.
When your mat is cutting the gift tags, and if you are using Glitter Cardstock, you will notice that Cricut will do a second pass.
Since these cuts are so little and intricate, that second pass may damage the gift tags. So, I recommend you only do one pass when your Cricut is about to start the second one, tap the pause button of your machine, and unload it.
Important: Don’t use thick cardstock for this project. Ex: Martha Stweart cardstock is too thick and you’ll need two passes, this will destroy the intricate cuts. When in doubt test first.
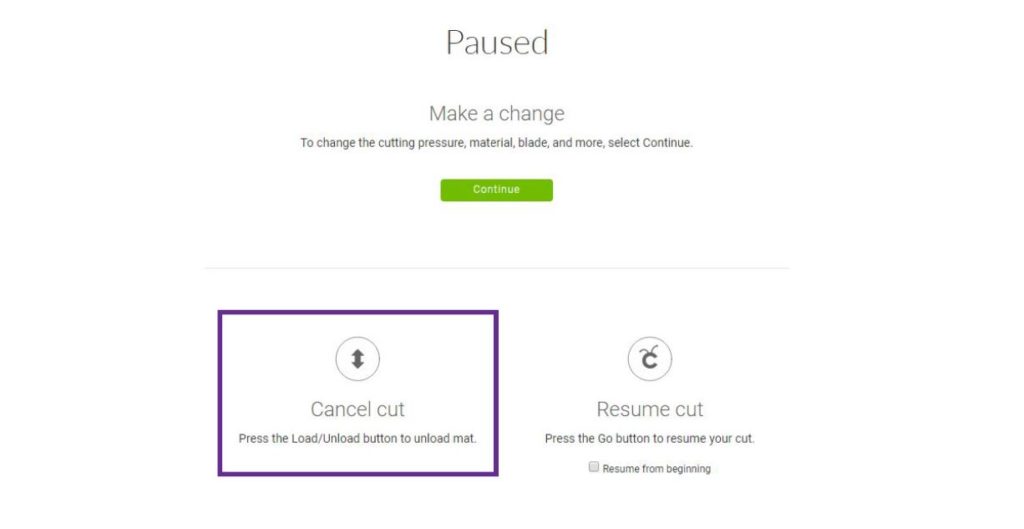
When you press the unload button after pausing your project, you are only “canceling” that mat. Therefore you can load your second mad without having to go back to the canvas area.
Isn’t that cool?
When you are done with the first mat, repeat the same process for the circles.
Step 5 – Remove from Mat and Assemble Gift Tags
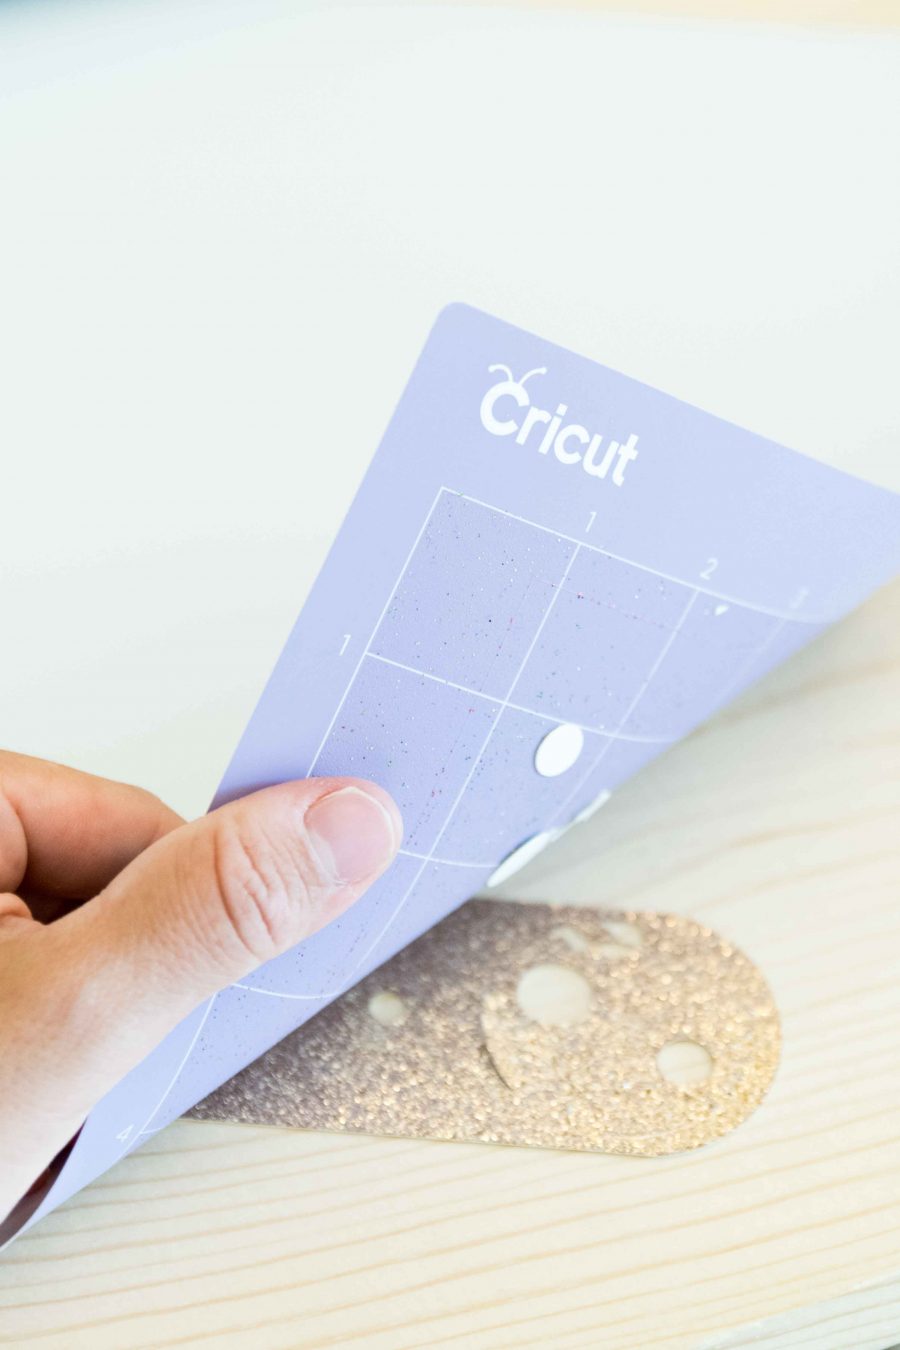
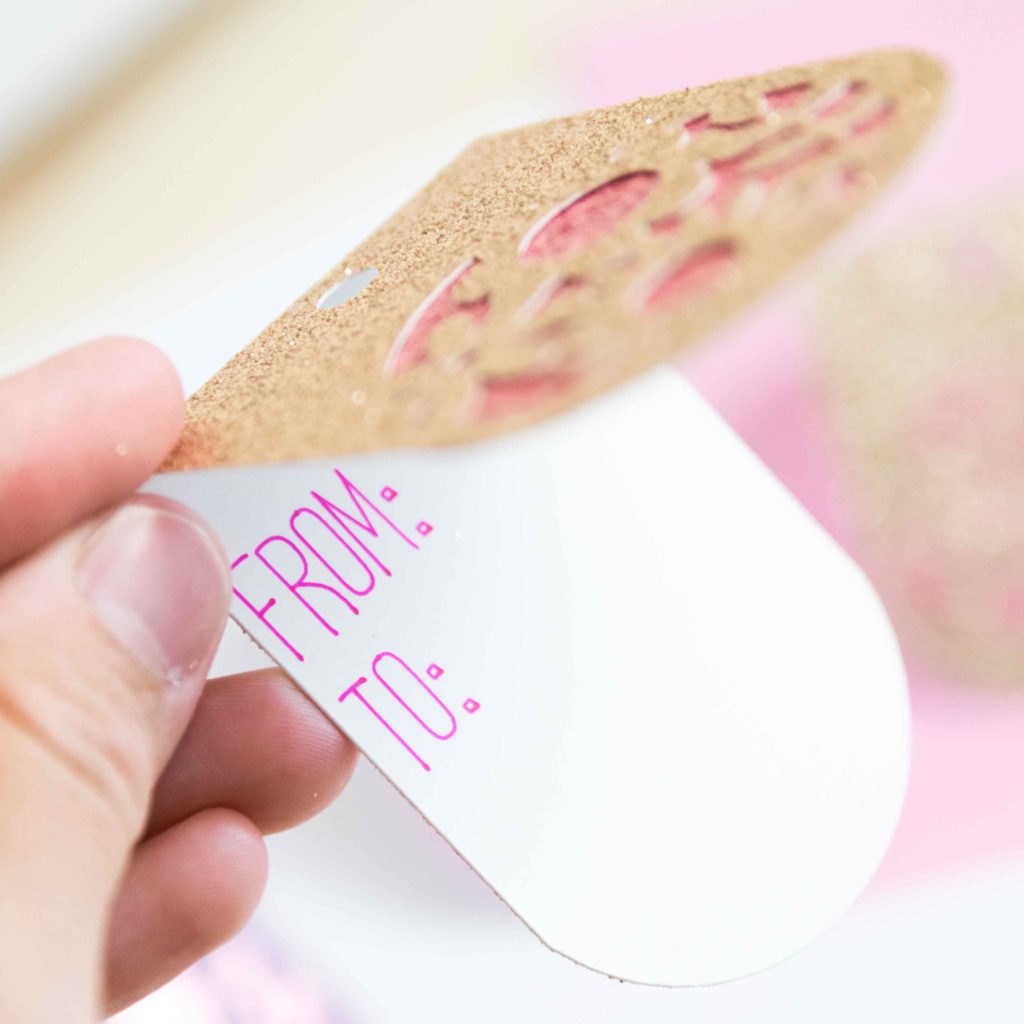
Once you unload your mat, remove the tags, and circles from it. The best way to remove the gift tags is by bending the mat and letting gravity do most of the work. (Check the photo down below)
After removing the paper, clean the mat with the scraper, and repeat this process with the circles.

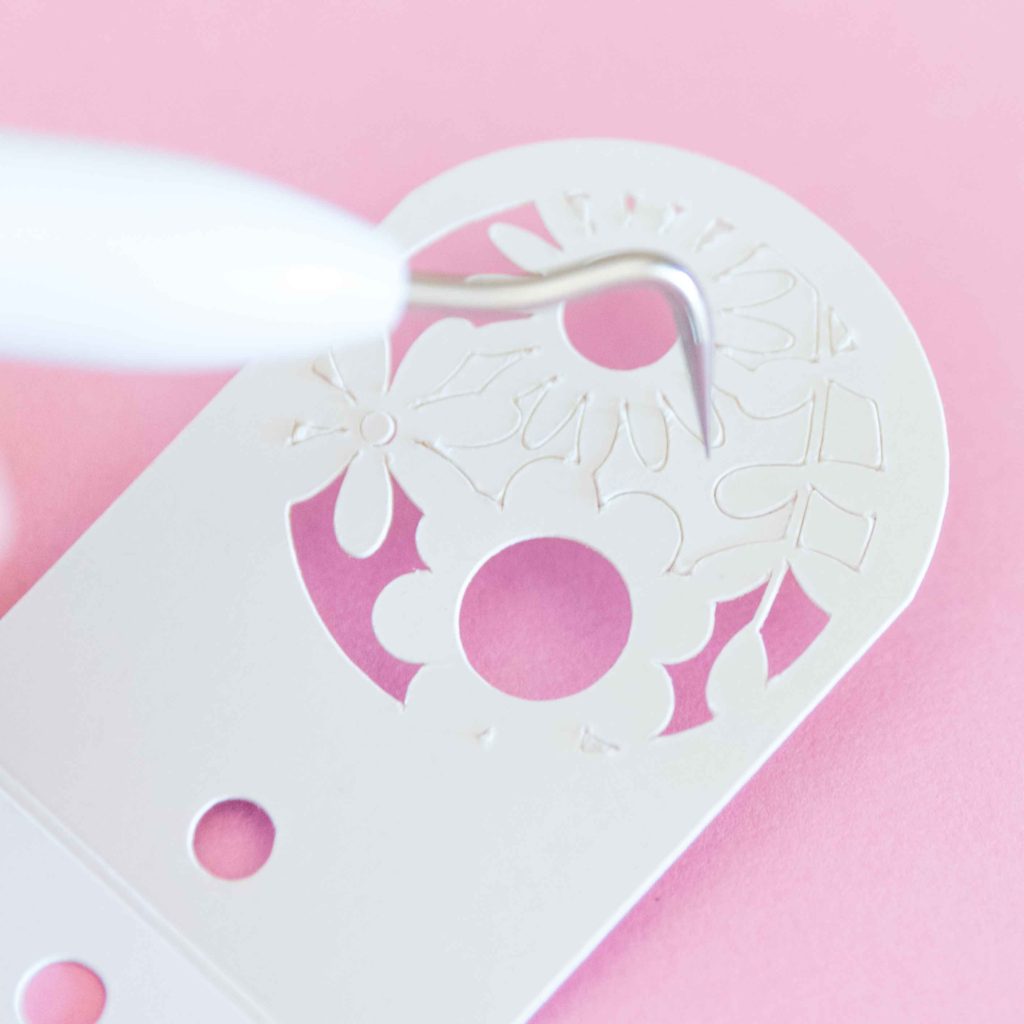
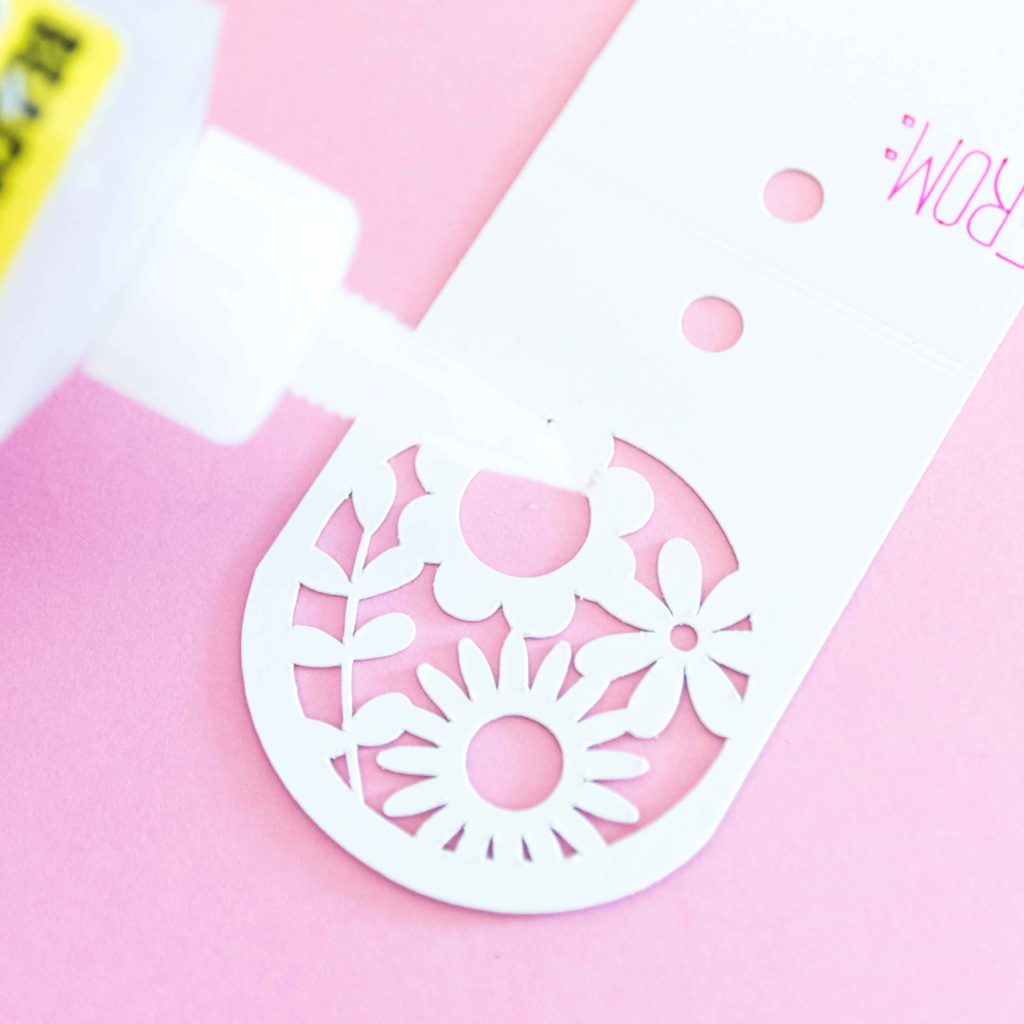
Since we didn’t do a second pass with our Cricut, you may have to use the weeder to push out some of the cuts.
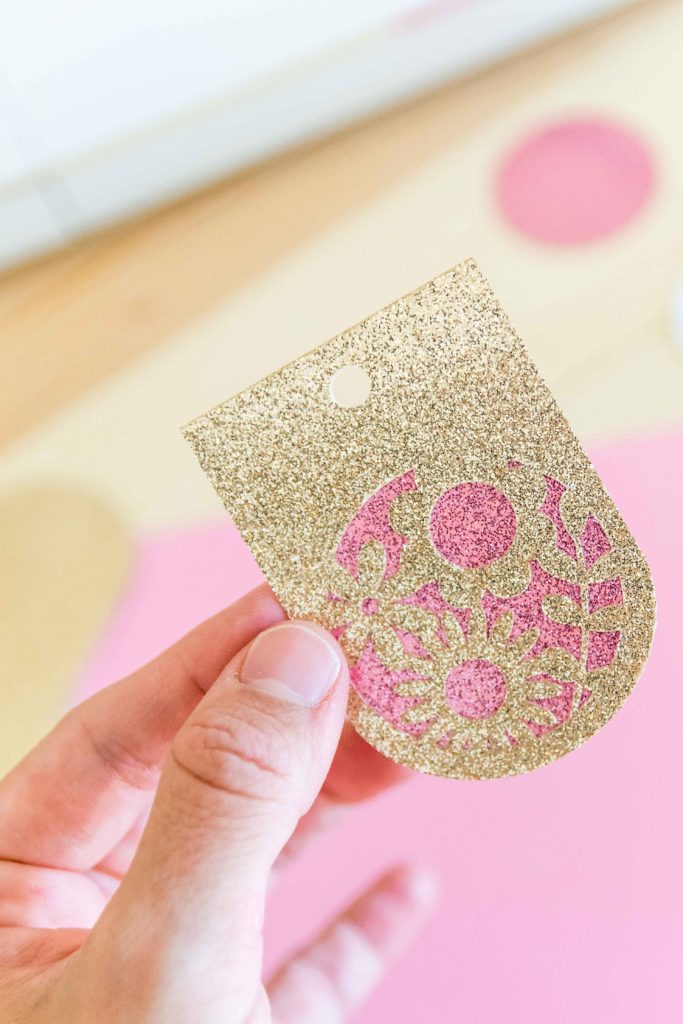
After pushing the negative cuts, glue the circle to the inside of the gift tag. Please, please use a high-quality glue, for your sanity and the final look of your project, don’t use kids glue.
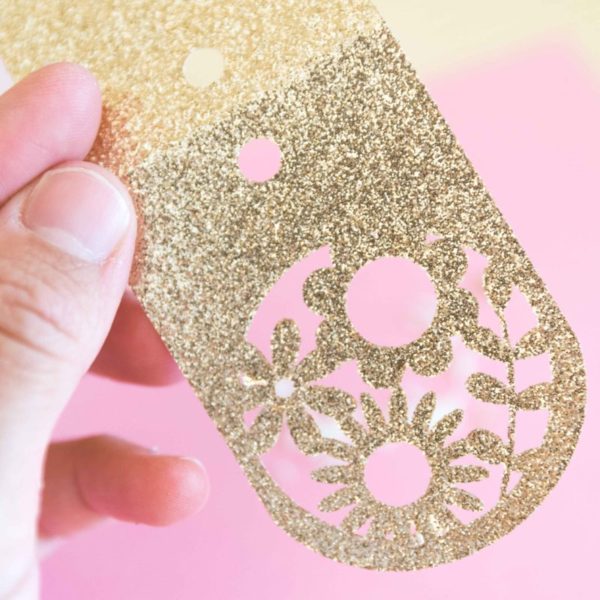
Don’t they look amazing?
The photos don’t do it justice, but in person, these gift tags are the most beautiful I’ve ever seen in my life.
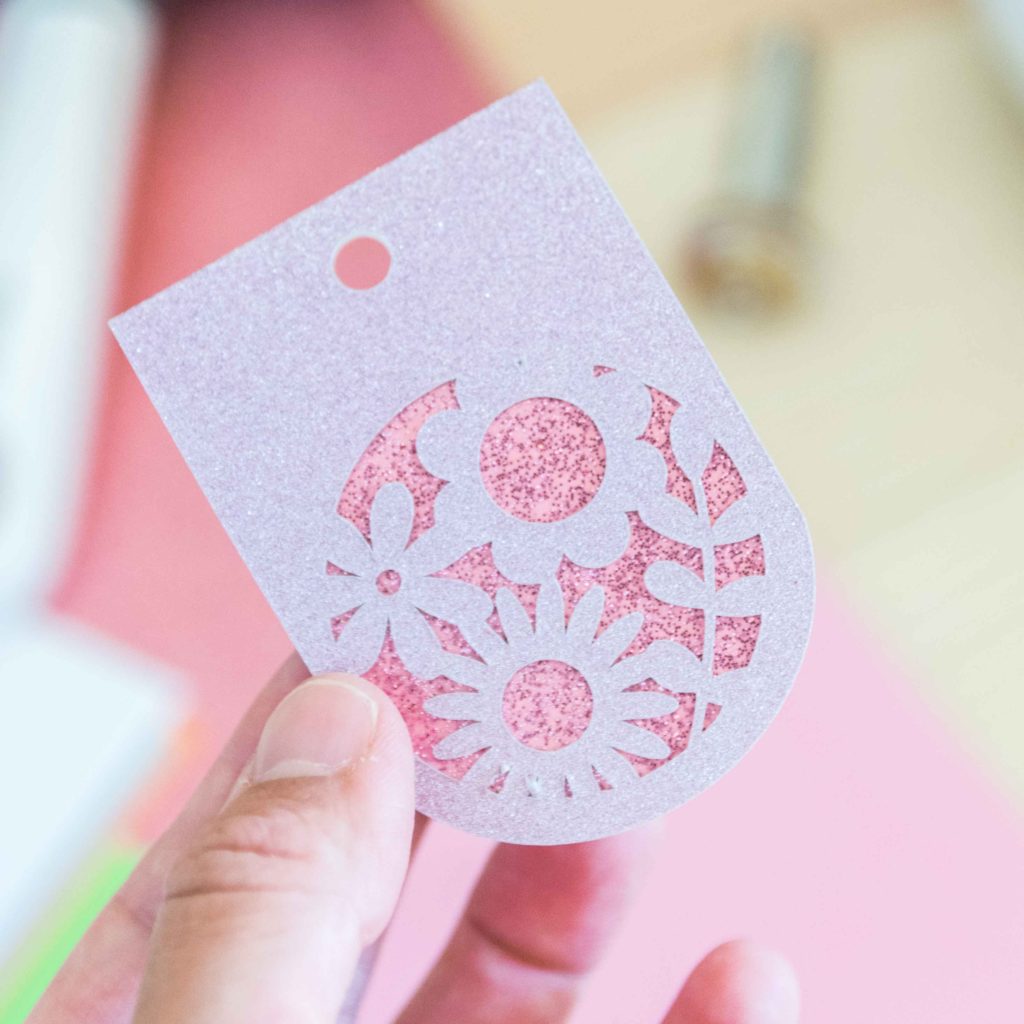
No joke!
The question is, what occasion are you going to use them for?
Sharing is Caring!
I hope this tutorial was useful and easy for you to follow. If you followed along, I have no doubt you are now an expert in making gift tags with your Cricut.
Do you know it takes me over 25 hours to complete a single Cricut article? I know it’s wild, but I want to make sure you understand everything!
I would appreciate your support on Instagram , Pinterest , and YouTube as I try to grow my audience and continue producing great content!
Thank you cute tags
HI, I think I have pinned several of your tutorials for cricut projects. I was wondering if you have all the tutorials in an ebook that’s printable. I’m old school and really need to read over instructions again and again!
I don’t! Cricut updates its software all the time and it’s impossible to catch up with everything!
I was reading your tutorial on gift tags, looking for some cute ideas for Christmas. I’m rather confused about the section on “making tags with fonts” though. In your pictures it looks like a single letter cut-out is added, duplicated, then hidden and just plain writing added. I’m really confused on how this makes a different tag than the basic “add text with writing” in the previous section. Is there something I’m missing about how the final result looks?
Not really, there are just different techniques. The tags made with fonts have letter cutouts that need to be removed.
I tried to download your orange tag and it won’t download and show up in orange with the score line. What am I doing wrong? Also, I could try and make it on my own, but when I flip the image, how do I know where to weld it, so that the holes will match once it is folded?
Thanks for your help. I am enjoying watching your videos. 🙂
Hi Tina, you need to right click the image (from your desktop computer) and select the option save image as.
The holes are synchronized, you don’t need to do anything. Oh and the score line is also in the middle of the tag.
You don’t need to flip the image. It may look flipped because on the video I was holding the tag as a reference so the design was flipped in that moment.
Does that make sense? Let me know! I am happy I can help 🙂