Hello Daydreamers!
Shapes are one of the most significant features in Cricut Design Space, and on this tutorial, you are going to learn how to use them to perfection.
Sometimes, it is tough for us to imagine all the possibilities a software has. This article is based on months of experience using my Cricut and its software, and today I will be sharing with you all my tips and secrets of how to make the best designs with shapes in Cricut Design Space.
Ideally, you will read this tutorial from the beginning, because as we go, we will be implementing the concepts mentioned in the previews steps.
Tip: If you want to learn everything you need to know about iron-on (HTV) and master its use on different surfaces, make sure to check out this amazing tutorial I put together.
In a nutshell, these are the topics we will be covering in this tutorial:
- How to add shapes
- How to change the size, colors and rotate shapes
- How to cut words or text out of shapes
- How to make text into shapes
- How to create new designs from simple shapes
Are you ready?
Let’s Daydream Into Reality!
Related: How to make rounded corners in Cricut Design Space + Free Templates
How to add Shapes to Cricut Design Space?
Let’s start from zero!
To add a shape, log in to your Cricut Design Space canvas area and click on the shapes button located on the left panel of the canvas.
After clicking, a little window will slide out open with all of the shapes that Cricut allows you to create in just a click.
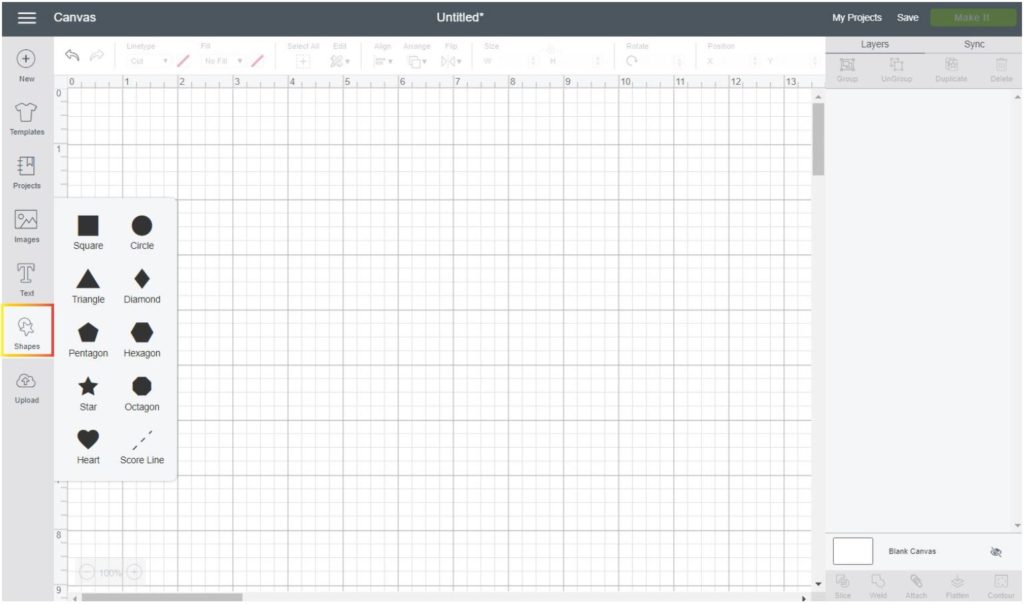
Take a look at all the shapes you can create!
- Circle
- Triangle
- Diamond
- Square
- Pentagon
- Hexagon
- Octagon
- Heart
- Star
Note: the last option is called Score Line; this is not a shape but a tool that allows you to create folds on your materials, trust me this is quite handy when making cards, boxes, etc.
How Resize, Rotate and Change Shape Colors in Cricut Design Space?
Now that you know how to add a shape let’s see how to resize, rotate, and change shape colors. We will be using all of these concepts throughout this tutorial, so please don’t skip this part.
Change Size; Unlock Proportions and Rotate Shapes
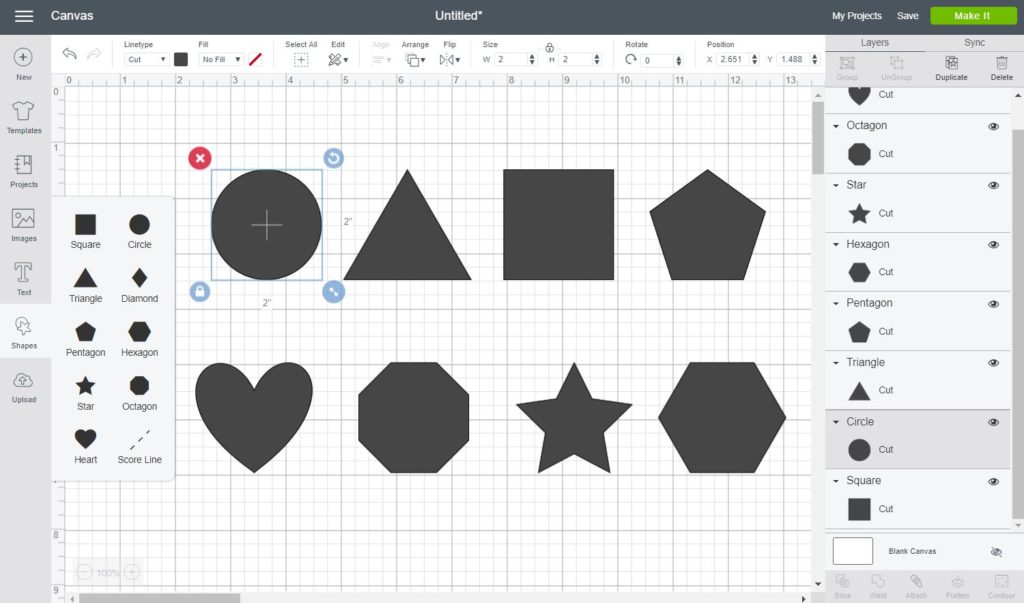
There are two ways you can change the size of a shape or image in Cricut Design Space.
The easiest way to resize a shape is by selecting the shape and dragging the little arrows of the lower right-hand corner of the selection.
The second way of changing the shape size is by selecting it and then typing in the exact measures you want on the Top Menu of the canvas; this is very helpful when you are working on a project that needs very accurate measurements.
Something fundamental to learn with shapes, and any other images or text in Cricut Design Space, is that everything is locked; this means that when you try to increase the size of a shape, the change will be proportional.
To be able to edit your shapes freely on the x and y-axis; you need to unlock the proportions.
To unlock the proportions of a shape, either select it and click on the little lock located on the lower left-hand corner of the selection; or select it and click on the small lock located on the top menu in between the width and height options.
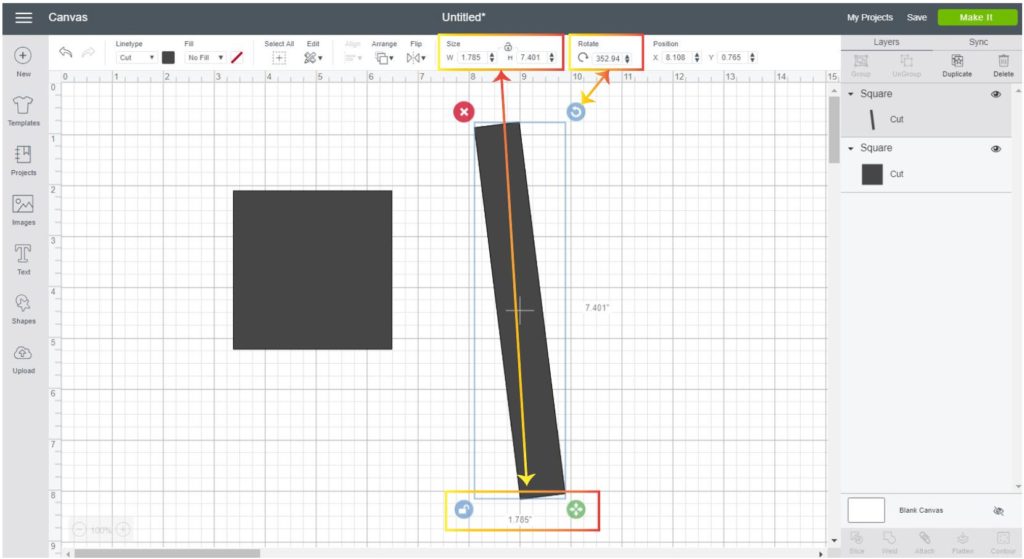
If you need to rotate your shape, you can do it by selecting the shape and clicking on the curved arrow on the upper right-hand corner of the selection; or, if you need to rotate your shape in a precise angle, use the rotate box located on the menu and type in the angle (just numbers) you need.
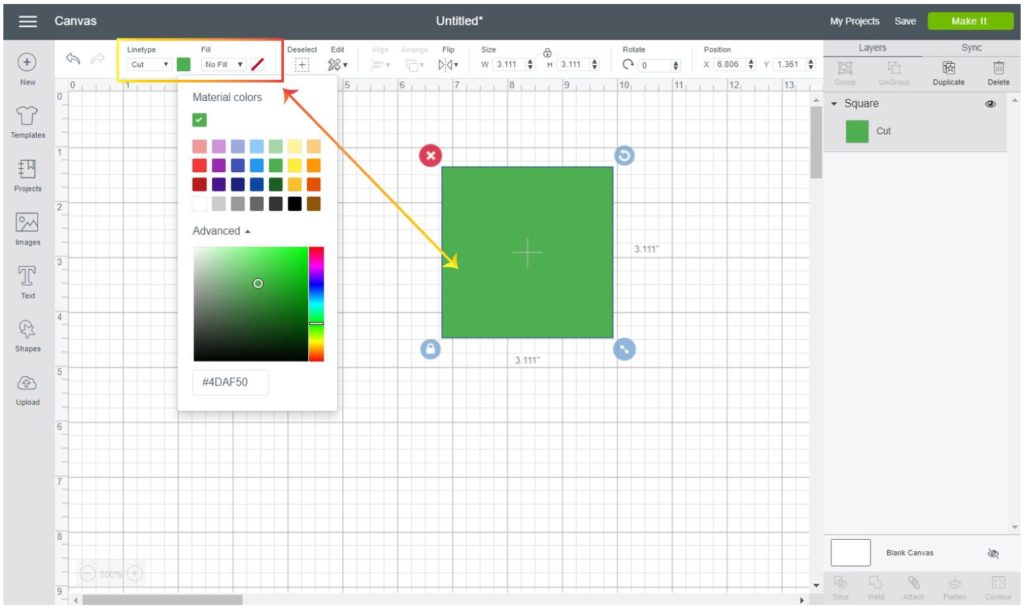
Changing Shape Colors in Cricut Design Space
To change the color of a shape in Cricut Design Space, you need to learn how Linetype and Fill works.
Linetype will tell your machine whether you are going to Cut, Draw, or Score your shape. And Fill will tell your machine whether you are going to print your design or not; so, if you are going to cut a material color, select Cut as linetype and change the little color box that is on the right of Linetype to select the color of your material.
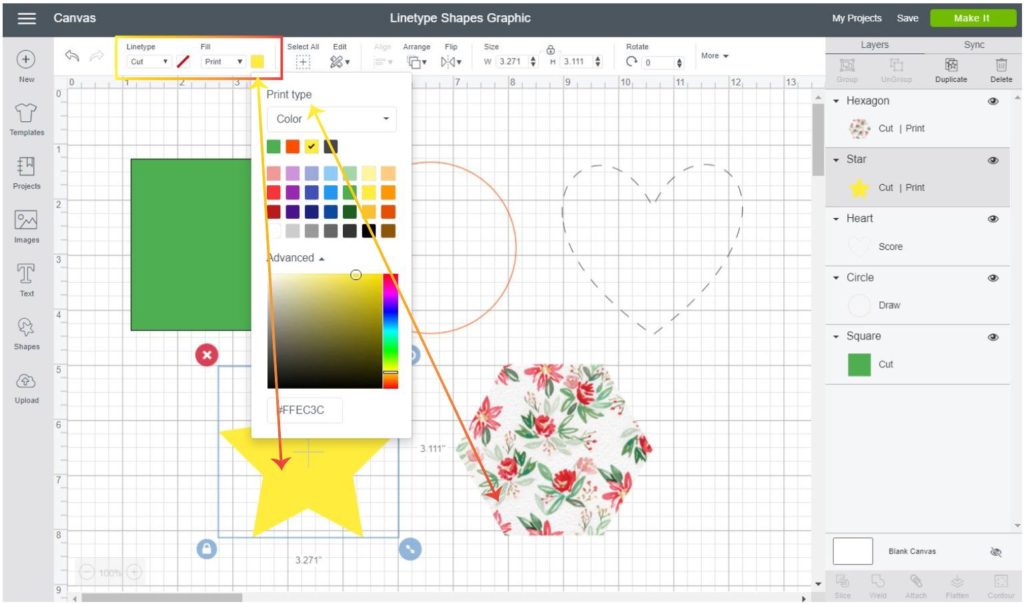
What about Print as fill?
If you are going to Print then Cut (check out my full guide to learn this technique) you must have cut as linetype; and, to change the color of your shape select the color box on the right of the fill option and choose your favorite color.
You can also fill your shapes with beautiful patterns by changing the print type from color to pattern.
Now let’s see all of the possible color combinations you have for shapes in Cricut Design Space.
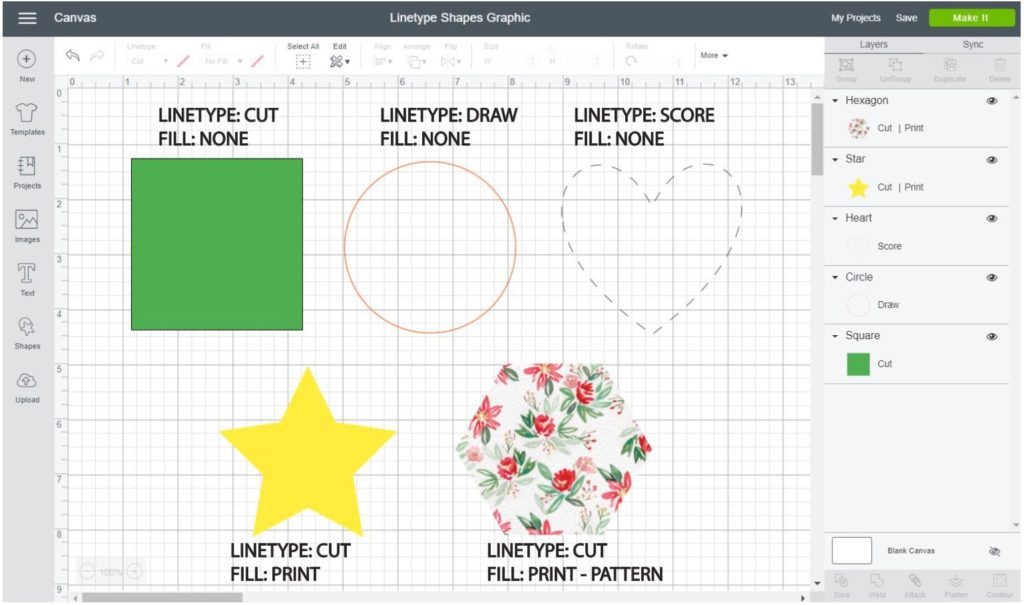
- Linetype: Cut / Fill: None – Choose this option if you want to give color to a shape you want to cut. This color will represent the color of your material.
- Linetype: Draw / Fill: None – Choose this option if you want to draw your shapes with Cricut Pens. When you activate this option the color box, instead of showing you a solid color, will display the different types of pens you can use.
- Linetype: Score / Fill: None – This is just to score a shape. No color will be added.
- Linetype: Cut / Fill: Print – If you want to Print then Cut your shapes, select this option. To select the color of the shape you would need to use the Fill Color Box.
- Linetype: Cut / Fill: Print/Pattern – If you want to print then cut a shape filled with a pattern, this is the option you need to select. To fill your shape with patterns you need to change the Print Type from Color to Pattern.
How to Cut words out of shapes in Cricut Design Space?
Cutting text out of a shape is really easy. These are the steps you need to follow:
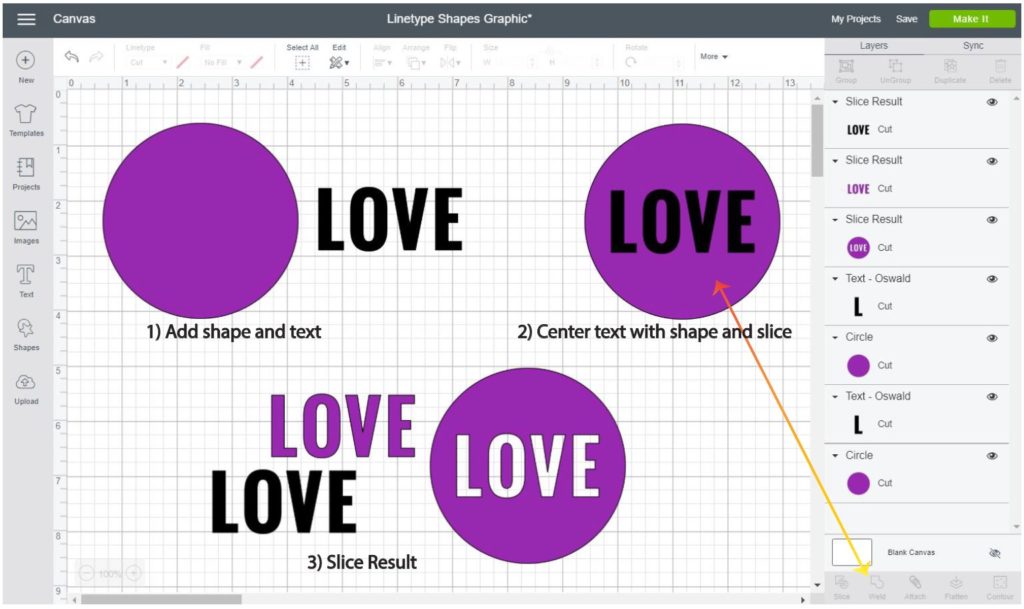
- Step 1: Add the shape and text you want to cut out of it. Note: to add text, click on the text button located on the left panel of the canvas area.
- Step 2: Center or place text where you want to cut it out of; then select both layers (text, and shape) and click on the slice tool located at the end of the layers panel.
- Step 3: After slicing, move the slice result pieces from the circle and delete what you don’t need.
Note: you can only slice two layers at the time; so if you have multiple lines of text, you will need to weld them to create a single layer and then proceed to slice.
How to write on Shapes with your Cricut?
Writing on shapes is something that you will want to do at some point. Especially if you’re going to make cards, thank you notes, etc.
Something that you need to consider with writing is that you have two different options regarding the way the text looks on your shape.
The first option is to use an outline of the text by changing the Linetype to draw. Most FONTS, including the ones you have on your computer, can be outlined with the pens. However, the second option that allows you to write with your pens in a handwritten style is only available on some of the Cricut fonts.
Here are the steps to find writing fonts:
- Add font, select it and click on the font option on top of the canvas area.
- A window with the different types of font you can choose will slide open.
- Click on the filter option and select writing.
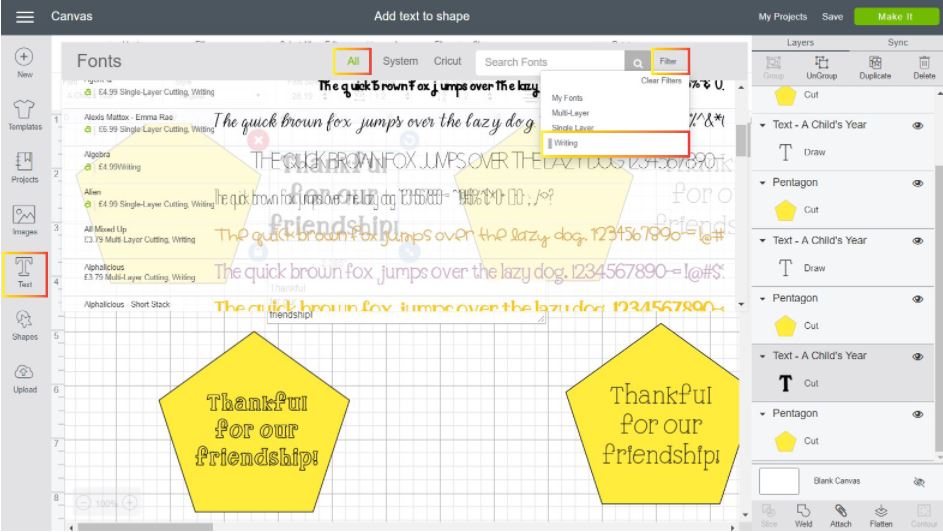
If you still have doubts about these types of fonts, check out my How to edit Text in Cricut Design Space tutorial.
Now that you know how to do either, outlined or handwritten effects, let’s see how to add them to your shapes.
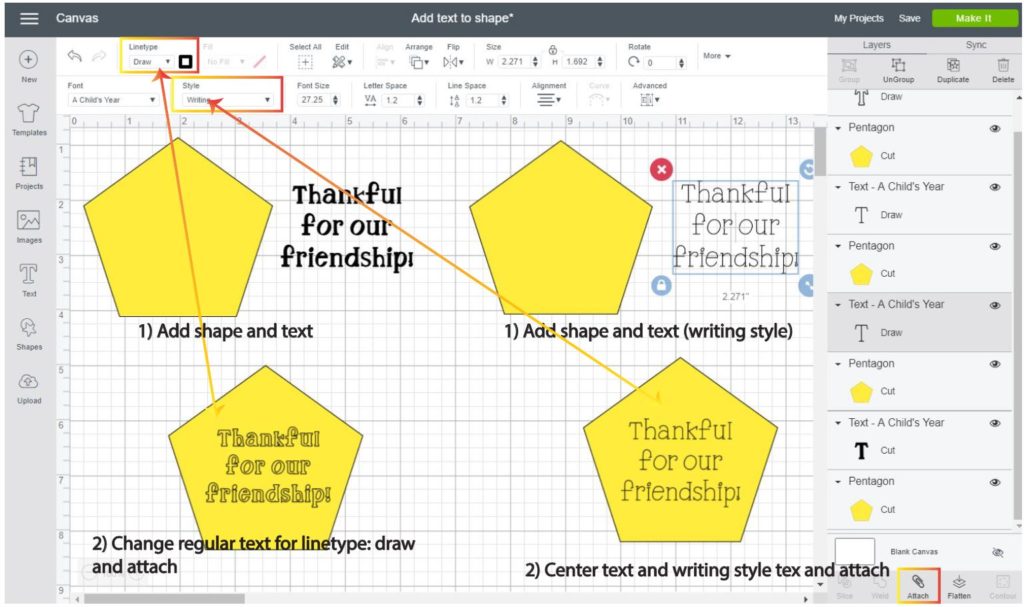
For Outline Text:
- Step 1: Add shape and text, then place text where you want to write.
- Step 2: Select text and change Linetype to Draw. Select text and shape and click on attach located at the end of the layers panel.
For Handwritten Text:
- Step 1: Add shape and text, then place text where you want to write.
- Step 2: Select text and Font style to writing. Select text and shape and click on attach located at the end of the layers panel.
Note: Attaching the shape with your text is EXTREMELY IMPORTANT. If you don’t do this; your text and shape will be on different mats during the cutting process.
Before we continue…
We are about to have so much fun in the next section of this Editing Shapes tutorial. However, this part is more advanced; so please make sure you understand the following concepts:
- Add Shapes: change colors, rotate, change sizes, unlock proportions, and all the concepts I’ve explained so far on this tutorial.
- Add text: rotate it and select different types of fonts, etc
- Ungroup (separate) to Letters: will allow you to separate a word or line of the text you are selecting into single letters so you can edit each letter on its own; this concept is one of the most important ones to understand before you move forward.
- Slice Tool: cut text or images out of shapes.
- Weld Tool: Create a single layer or image from multiple ones.
- Duplicate or Copy Paste: Saves time, instead of creating a new shape every time.
- Flip and Arrange: to organize shapes and text. You can use rotate instead as well.
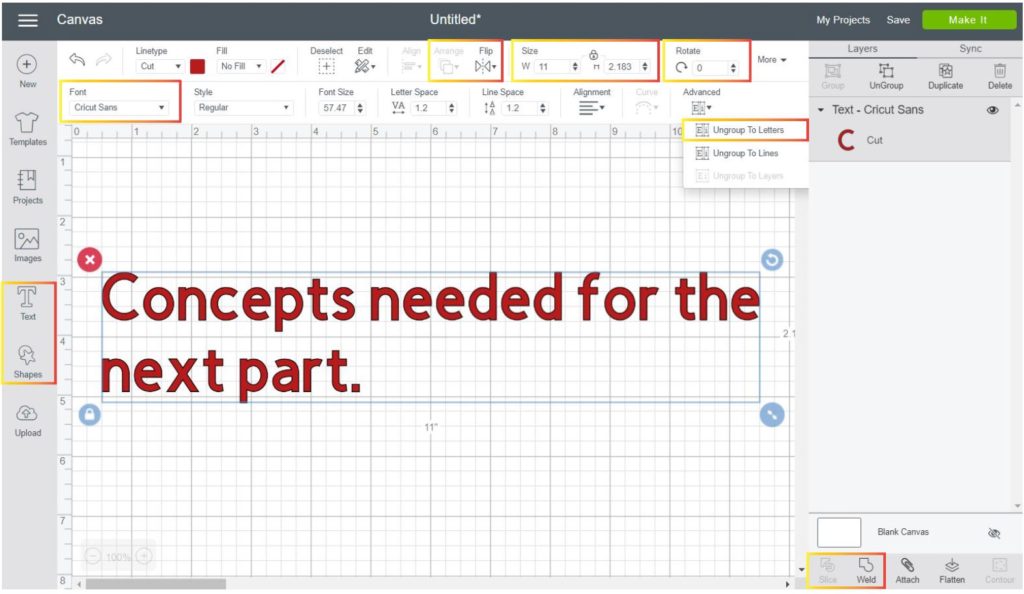
If you feel lost the following articles can also help you to understand the concepts and tools I just mentioned.
- What is every icon for in Cricut Design Space
- How to edit text in Cricut Design Space
- Learn how to slice like a Pro in Design Space
- What do Attach, Weld, and group mean in Cricut Design Space
How to make words into shapes in Cricut Design Space?
Now that you know the basics of shapes; it’s time for you to have fun and create different effects with them!
Something cool you can accomplish with shapes and text is to make words into shapes. I have five different examples for you, so you can see that the sky is the limit!
They all follow the same methodology and steps, but as I move forward, I will add more variables to show you more possibilities.
Let’s start by making a word into an oval
Step 1: Add a circle and the word you want to make into an oval. Make sure to select the font you want on this step as well.
Step 2: Unlock proportions of the circle (form an oval) and text. Try to fit as much as you can of the text inside of the oval. It won’t be completely perfect, but we will fix that on the next step.
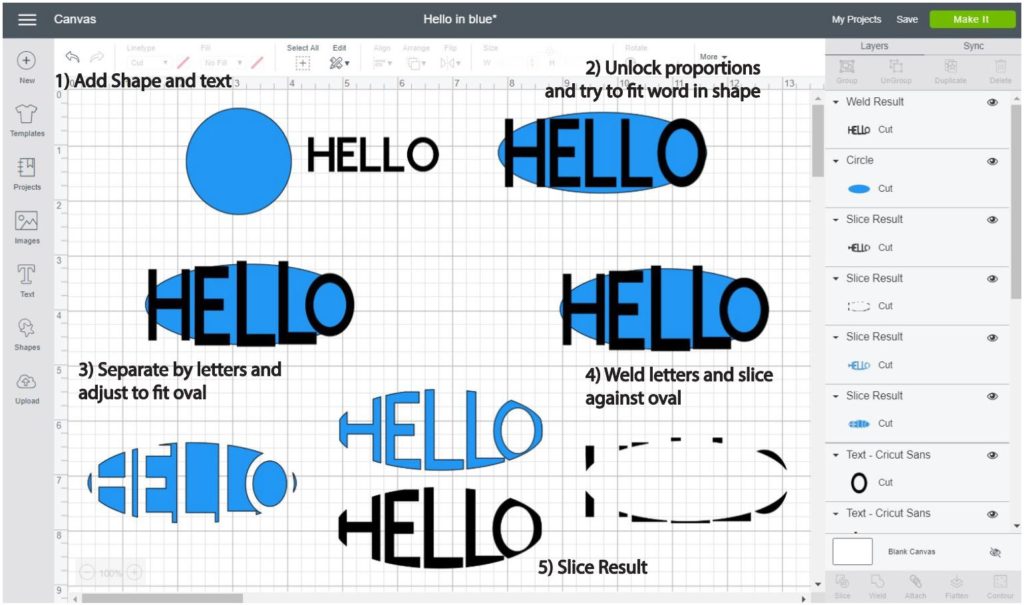
Step 3: To fill the oval with our text, we need to edit each letter on its own. So select the text you have and click the advanced options on the top panel area and choose the option Ungroup to Letters. (All the screenshots say separate by letters – oops!)
Go ahead and edit each letter until the word as whole fits the oval to the best of your abilities. Most of the time, you will need to unlock the proportions of each letter as well.
Now, it’s ok if some letters leave the oval; you are encouraged to do this. Nonetheless, make sure that you don’t overdo it because after you are done with the entire process, you may not understand what the word says.
Step 4: Weld all of the letters and after you are done select the welded word and the oval and click on the slice tool; both, the slice and weld button are located at the bottom of the Layers panel.
Step 5: After slicing you will have 4 slice results.
- Two “hello” words in the form of ovals
- An oval with a (hello) cut out.
- And the edges that we removed from the word “hello” to make it into an oval shape.
Choose the option you want to keep and delete the unwanted pieces.
Check out how to make a word into a heart
As you can see, I followed the same steps that I did with the oval shape, and I had the same results.
Doesn’t it look great?
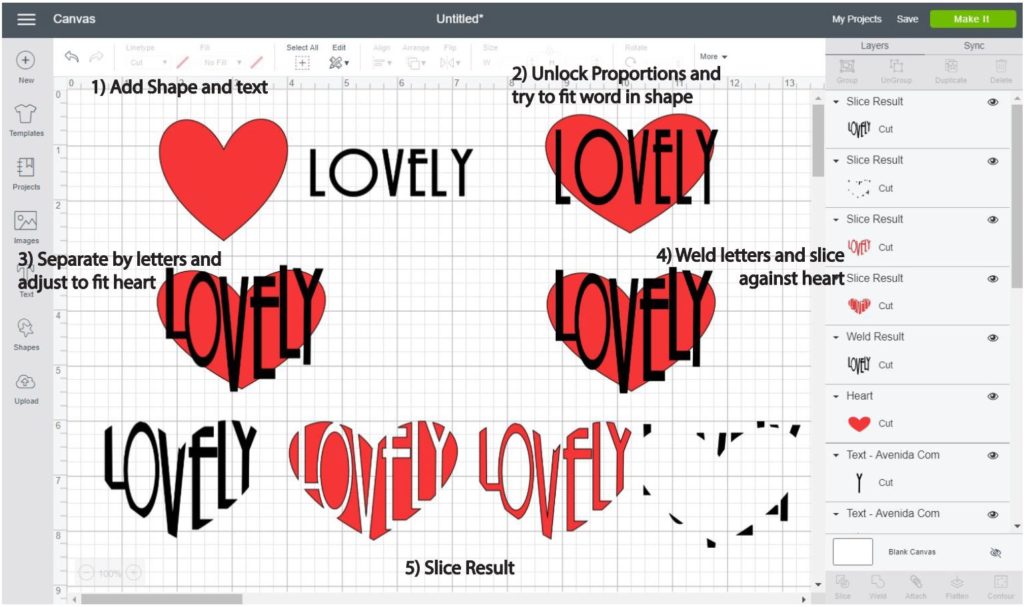
TIP: Use short and small words. Also, try to visualize how that word would fit inside your shape. It takes practice, but the more you do this, you’ll get faster.
Now let’s make a word into a diamond
For this example, I decide to add one heart to the original text to spice things up. And then to fill the diamond shape with text I had to modify each letter a lot, and add extra hearts.
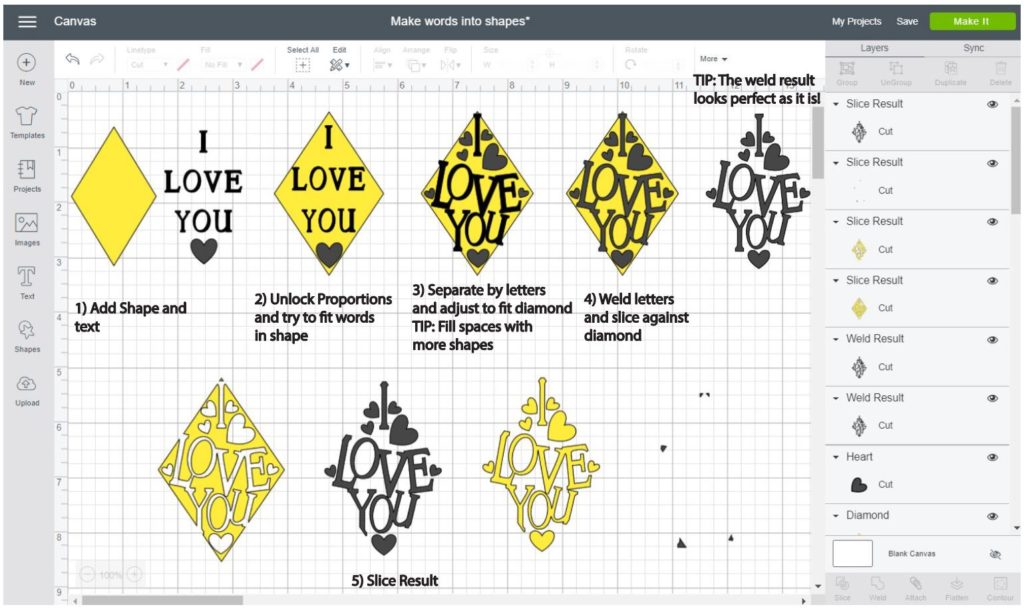
It’s ok to add more shapes, and edit the proportions of your shape and letters as you go! It’s part of the creative process. I really love how whimsical the letters look.
TIP: If you want to make a word into a particular shape, but the word itself is not filling the whole shape and taking the form you want it to take; use other elements, or shapes to fill in the blank spaces.
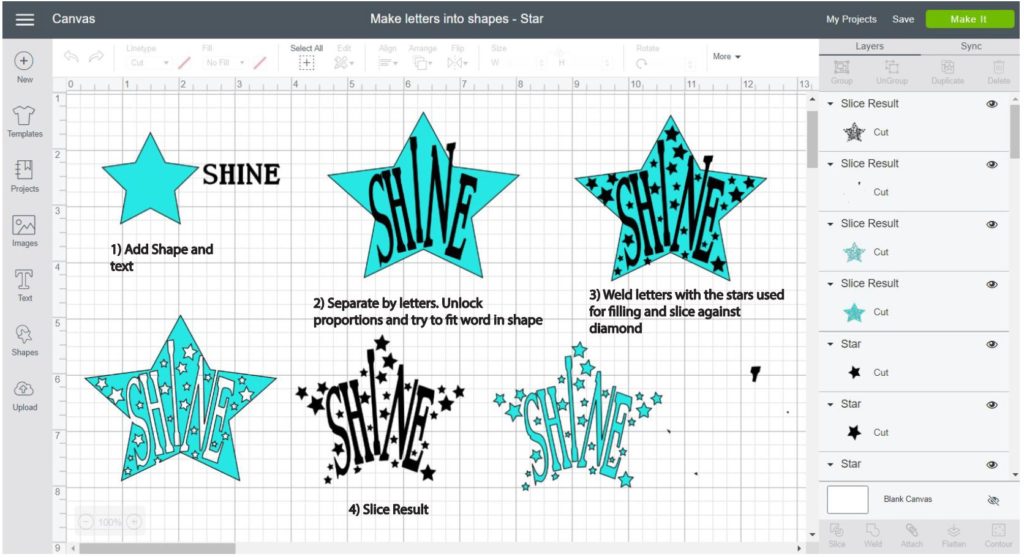
You can also make words into stars
This one took me a while to pull off. However, after trial and error, I was able to make a word into a star.
Again, follow the same steps I showed you (when turning a word into an oval) and add other elements and shapes to fill the rest of the star.
Make a word into a half circle
Check out the following graphic and let’s chat about what I had to do to make a word take the shape of half a circle.
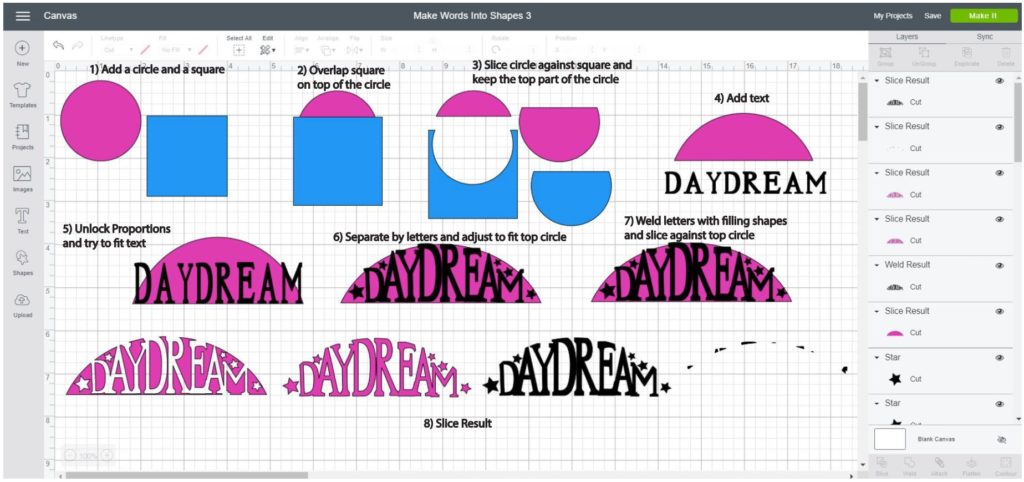
As you can see, I sliced a square against a circle to obtain a different shape. Then I followed the same step I covered at the beginning and throughout this section to make a word into a half-circle.
Edit Shapes in Cricut Design Space to create new images
Something that I don’t like about Cricut Design Space is that you don’t have a Pen tool to draw your designs as you go.
Ahggg…
I hope this changes one day, but in the meantime, you can use shapes to create different images and effects.
Let’s start by making a Cloud
Step 1: Add a circle
Step 2: Duplicate (copy/paste) circle until you have five copies of it and overlap them in a cloud shape.
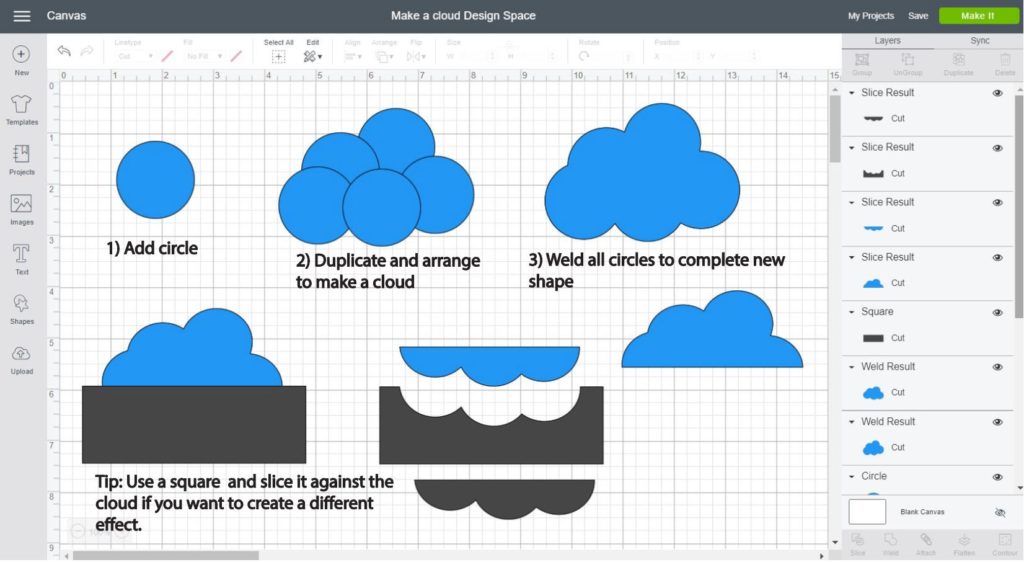
Step 3: When you are happy with the result, select all circles and weld them.
Tip: You can slice the cloud against a square to make a cloud with a straight bottom.
Let’s see how to make a Sun
Step 1: Start by adding a circle and two small squares.
Step 2: Unlock the proportions of the squares and resize them to create the sun’s rays. One should be longer than the other one.
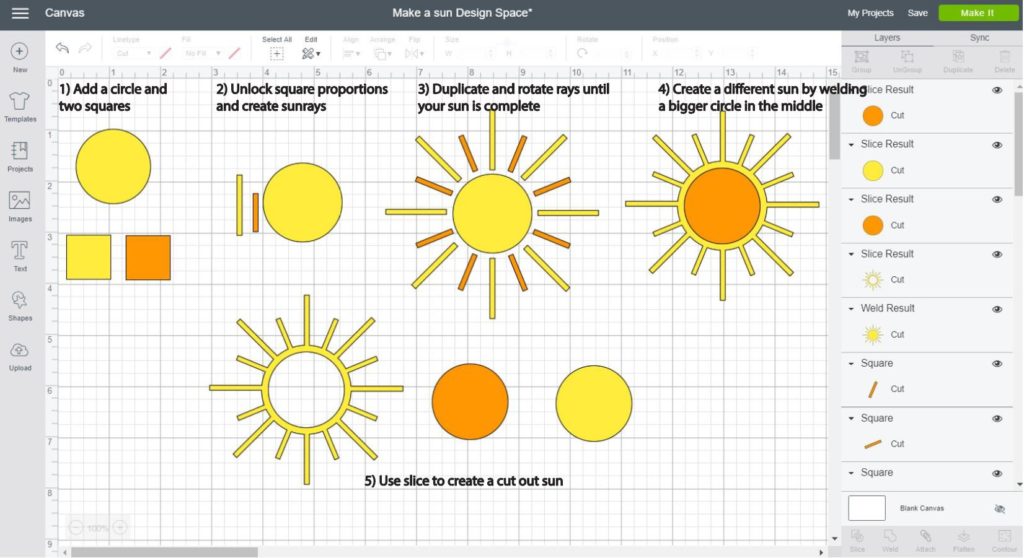
Step 3: Duplicate, rotate and organize all sunrays until your sun is complete. Doesn’t it look beautiful?
Step 4: If you want the rays to be part of the sun, add a bigger circle to the middle of the design (that overlaps the rays) and weld it with the sunrays.
Step 5: Want a sun with a cut-out effect? Add a smaller circle in the middle and slice it against the sun.
What about making a Moon in Design Space?
Step 1: Add two circles to the canvas area.
Step 2: Make one of the circles a bit smaller, then overlap (halfway) it with the other one. When you are happy with the size and thickness of your moon, select both circles and click on Slice.

Step 3: Select the design you want to keep and delete the unwanted pieces.
Edit shapes to Create Flowers
If you want to make flowers in Design Space by using simple shapes, follow the next steps.
Step 1: Add a heart for the petals and a circle for the middle of the flower.
Step 2: Duplicate the heart until you have four copies. Then rotate and organize each copy to form the petals (check graphic down below).
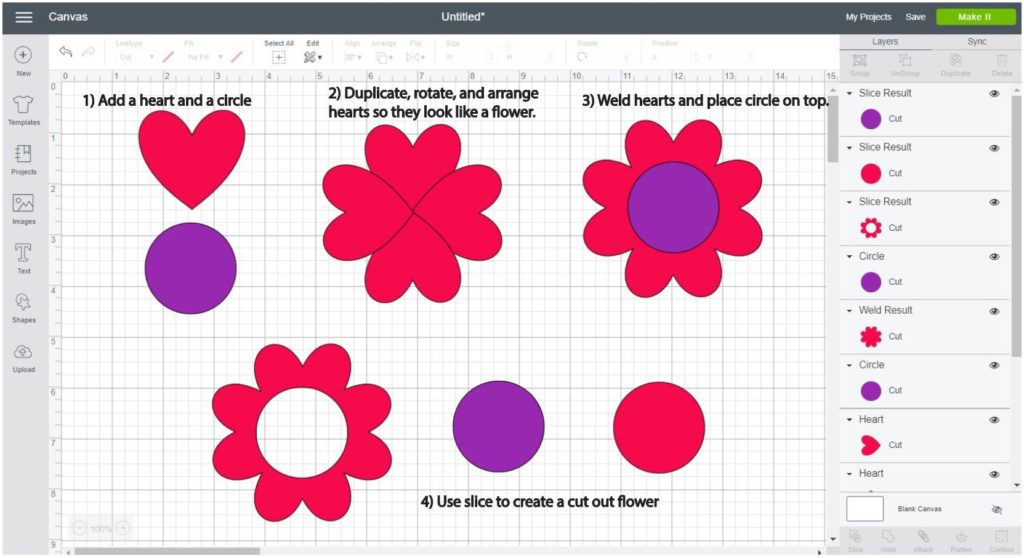
Step 3: Weld all hearts to create a single shape and place the circle in the middle to finish your flower.
Step 4: Want a flower with a cut-out effect? Select the flower and middle circle, click on Slice, and delete unwanted pieces.
Make a stalk or stem
In this last example, I want to show you how far you can get by learning how to edit shapes in Cricut Design Space.
I was able to create a stalk with multiple leaves only using circles. Check out the following graphic and let me teach you how to do it on your own.
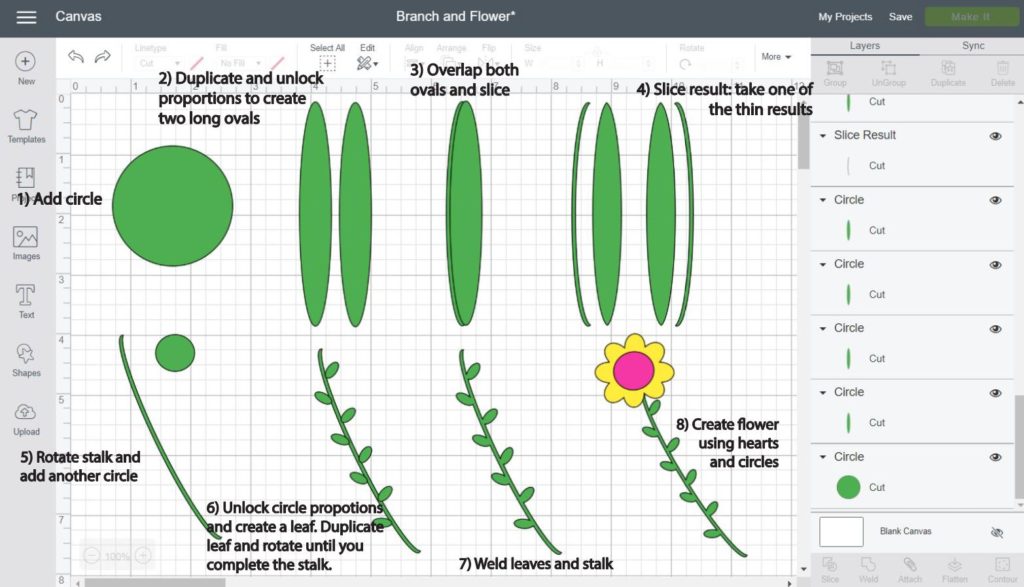
Step 1: Add one circle.
Step 2: Step 2: Duplicate and unlock the proportions of the circles to create two long ovals. Note: they should be identical.
Step 3: Overlap both ovals leaving a small space between them to create the stalk. Then select both ovals and click on Slice.
Step 4: From the Slice result, we are going to pick the left thin result. Delete the other parts.
Step 5: Rotate the stalk and add a small circle.
Step 6: Unlock the circle proportions and make a small oval to create the first leaf. When you are happy the way the leaf looks, duplicate and rotate it until you complete the stalk.
Step 7: Select leaves and stalk and click on Weld.
Step 8: Add a small flower using the method I just showed you right above.
You are a Pro!
If you followed this tutorial from beginning to end, you are a PRO at editing shapes in Cricut Design Space!
Also…
Do you know it takes me over 25 hours to complete a single Cricut article? I know it’s wild, but I want to make sure you understand everything!
I would appreciate your support on Instagram , Pinterest , and YouTube as I try to grow my audience and continue producing great content!

I need to find a handsaw shape. Do you know what shapes I can combine in order to create the handsaw shape?
I think the shape is very intricate, if you google “Handsaw” free SVG I am sure you’ll find plenty of options 🙂
Thank you so much. Pictures and directions made it so much better to understand.
Love your tutorials. I really like that you actually put it down in print makes the following of your instructions so easy. Thankyou.
You’re very welcome!
Thanks so much. Your concise instructions are an inspiration to try way more with Cricut and to just have fun creating!
Thank you for a well presented article. I learned so much. Thanks again.
This was amazing. I always wanted to know how to do this. Awesome tutorial.
What an awesome tutorial. I learned so much from this. Thankyou, and i will be checking out your others..
Thank you so much for your tutorials. You have made the seemingly impossible for me to do into the possible. I love the way you broke down each step with words and illustrations.
I hope you are getting reimbursed for all your time and efforts.
Ellen
I am so happy to hear! Have a wonderful day 🙂
Can you make your tutorials printable? I love having a printed copy, your tutorials are so helpful!
You’re very welcome 🙂
Thank you for your tutorials , so easy to understand and put into practice. I’m really grateful to you.
I am very happy my tutorials are helping you!
Thank Heaven for you! I could not find a tutorial ANYWHERE on how to cut a circle out with name in it to put on a tumbler for a friend! Thanks to you, it is now being cut on my Cricut Maker!
Thank you!
Thanks for a great tutorial. You are amazingly creative with simple everyday shapes.
Best tutorial ever!!!!! Thank you so very much. I have been able to really step up my Cricut game with confidence and enthusiasm. I have this bookmarked and have rarely needed it, do to your easy & clear explanations.
I’m trying to make parallelograms and trapezoids for a quilt, I’m lost
I would look in Cricut images, I am sure they have those shapes maybe for a small price, or if you google free svg parallelograms or trapezoids you’ll find them!
Thank you for a Great Design Space tutorial!
My design space doesn’t have ‘Linetype’ & ‘Fill’ … what am I missing?
I am working on updating my articles. Linetype is Operation.
Tyvm, new to cricut joy. This helps alot
Great info!!
Is it possible to edit a shape (for example a square) so that at the left it is one height (e.g. 1″) and the right side is higher (2″)? I need a banner style that is smaller at one end and larger at the other.
I’ve been trying to figure this out without success 🙁
Not really. But you can do another shape and overlap it to the original and rotate it until you create that effect.
Then select them both and weld them.
Hello
Thanks for this tutorial! Can’t thank you enough…you can’t imagine how much you helped me
Thanks again
This is very informative. Thank you so much for your time in making it. I do have something you could hopefully help with. I want to make a closed arch and put letters inside. I just want the outside around the letters. Is that possible? Is there a way to unfill the shape and just leave an outline? And then place the text inside? I feel like I’ve tried everything. Thanks so much
Check out my how-to slice and contour, it may help you to conceptualize your idea!
Hi, I would like to use the shape of a fish and have the text read “It’s Raw” in the shape of a fish . Could you help me with that ? Thank you .
You can follow the same steps I explained but use a fish image from Cricut’s library or online.
I have watched many tutorials about Cricut Design. Yours is the clearest, easiest to follow. Very detailed and thorough. Thank you!
You’re very welcome 🙂
All these great ideas with the same icons I have been using for a long time. How creative!! I’m glad and thankful you took your time for the rest of us. I can’t wait to start making word shapes.
You’re very welcome! I am happy I was able you help!
Thank you. You are good at what you do.
Wonderful article. Seriously thank you so much for taking the time to detail this out for us. I knew basics of shapes and slice/weld but now I have a much greater understanding of how to effectively use them.
You’re very welcome 🙂
I wish Cricut had a silhouette feature but I was able to use your info using circle shape to make a cloud and then weld them together to get some think close to what I needed.
I know. Cricut’s software needs some love. I am glad I was able to help!
Excellent tutorial Catalina. Even though I know the basics & a little more I still learnt heaps so thanks for taking the time to create such a comprehensive guide 🙂
You’re very welcome. I am happy you’re learning with me!
Great article! Thank you for all the information and you explain/show it perfectly! I do have one question about shapes, is there a way to make them hollow? Like say I wanted to make like a half an inch outline of a triangle instead of a full one?
Not really 🙁 I do have a tutorial on how to make outlines that may help you.
You can choose a shape and duplicate it.. Make one smaller, layer it to you liking and slice it. then you will have 3 pieces.. the top inner piece, then bottom inner piece and the outline 😉 I just tried it. 🙂
Wow ! This tutorial and explanation is wonderful. As a newbie Air 2 owner it was so confusing all those terms until you explained it so well and with your graphics. Thank you again. This is the best! You are the best!
You’re very welcome 🙂 I am glad I can help!
This tutorial is wonderful, thank you so much!
You’re very welcome 🙂
Your tutorials are great! Thank you so much!
I am happy to hear you like them! You’re welcome 🙂
I just got my first Cricut Explore Air 2 and am on cloud 9. I’ve wanted one for years! THANK YOU so much for this very detailed information, I can’t wait to get started playing around (with confidence now)! Am following you on Pinterest! ????
I am very happy to hear you are confident about using your machine. What a joy!
Thank you, thank you, thank you so much, this is super clear and the steps are easy to follow, again thank you for taking the time and care in doing this.
You’re very welcome 🙂
Thank you so much for posting this!!! This helped me more than you will ever know!
It makes me happy to know I was able to help!
Thank you for your tutorials – I love the voice of them – it’s very encouraging.
You’re very welcome! I am glad you feel encouraged.
Awesome tutorial! Again! I have learned so much from your tutorials and I plan to read everyone that I may have missed. Thank you, thank you, thank you! Your tutorials are excellent!
Thank you
You’re very welcome.
Hi there, I am stuck between 3 and 4 in the oval with HELLO. I have the oval the word all set, but I cannot grab just the word hello to group then weld? Or maybe my settings are wrong.. Help..
Thank you
Try selecting them from the layers panel. Press shift at all times so you keep the selection.
I just got my cricut within the last 24 hours so I’m trying to understand Design Space. I’ve never used design space but I have used programs like Adobe Illustrator before. I see it’s not quite the SAME freedoms, but I’ll figure it out.
My question with filling designs with your own pattern is: Why? After you fill it with your own pattern, do you then print it to a regular printer? Does that then, in turn, go on the mat and into the cricut to cut out the pattern?? I keep looking for how to use the Fill option but it just shows me to upload a pattern and then no more. I just don’t understand.
You fill with solid colors or patterns. Fill is only for print then cut.
Whatever shape you fill with a pattern, your Cricut will cut. (Not inside the pattern).
This was best explanation I have seen! I have two books and the design space help and I am so thankful for You!!!!!! The best ever!
Thanks a billion!
Thank you so much! I am happy I was able to help!
This was so Helpful. It is easy to feel lost when you’re new to the Cricut design space. Thank you ssoo much <3
You’re very welcome 🙂
Thx SOOOOOOOOOOOOOOOOOOOOOOOOOOOOOOOOOOOOOOOOOOOOOOOOOOOOOOOOOO
much really helped me.
p.s I should have added more S’s
You’re very welcome 🙂
This is amazing! It’s nasty out today so I know what I’m going to do! I so appreciate this easy to follow tutorial.
Happy I can help!
This is a great tutorial. You made it easy to understand. I learned a lot from this. Thank you
for taking the time to make your tutorials.
You’re very welcome 🙂
Thank god for this tutorial!! So helpful. I was able to complete my baby project with your help. Thank you!!
You’re very welcome! 🙂
im so glad this is the first tutorial I looked at. easy to read and understand. love the pics. I feel like I need to take college classes to use a cricut. just got it for Christmas. this defiantly helps a lot. thank you!
You’re very welcome, Marty!
This is the best tutorial I’ve seen for this. Any idea how to make borders longer without making the design thinner or smaller?
Hi Jenna! Yes, try this article I wrote about making outlines!
fantastic read thank you very easy to follow
you’re welcome!
Please subscribe me. Judi Miller
Because of Spam complaints, I can’t subscribe you 🙁 You can fill out this form if you want to be part of the daydreamer’s family.
I am trying to curve text and make sure it is evenly aligned and spaced around the circle. Is there a way to do that?
Have you tried using the Align tool? Check out my Design Space tutorial to see how to use it.
By far the best tutorial I have read, and it was because of your clear, understandable graphics. Thank you! Subscribing right now.
Welcome to the daydreamer family!
Hi I use a CRICUT EXPLORE AIR 2. I added a shape duplicated that shape. Next I added a long retangle shape so I can weld all 3. Any way I can align all 3 before welding?
Yes you can! Select all 3 shapes and click on the align button on the top panel area.
Love your tutorials!
I don’t understand where the diamond is in your star-shaped example? Top row, 3rd over. Shouldn’t it be ‘star’ instead of ‘diamond’?
Hi Becky! You are right. It should say star. I will try to update this. Thanks for letting me know.
Hi I was wondering if you could help me with something. I am making cards in design space and when I go to print them there is a thick black frame around the card, not attached to or touching it, but it’s still there and it prints along with it. Is there a way to get rid of that to save the space and ink?
Hi Noelle,
The black frame tells Cricut where to cut, so, unfortunately, you can’t get rid of it.
this tutorial was a big help to me. I’m trying to make some greeting cards and I can use this!
Thank you for sharing you knowledge with all of us trying to learn new techniques.
you’re very welcome Sarah!
I love the tutorials. So easy to follow. I am making some cut outs for a friends wedding. This was so helpful. I learned a lot of new ways to do welding and attaching. Thank you.
You are very welcome; I am happy I was able to help!
Tú siempre eres la mejor!!! Dios te bendiga más!!!
Muchas gracias Pao, que tengas un lindo dia!
This was by far the easiest tutorial I’ve ever tried to follow. The pictures really helped too. I’m soooo excited to try out some of the things you showed us how to create!
That’s great Michelle! I am glad I was able to help 🙂
Great tutorial! I’m a somewhat newb to cricut and this honestly was super easy to follow. Thank you for your attention to detail and clear concise pictures and directions. Count me into your subscription! I’m daydreaming of what’s to come already.
Yay!
I am happy I was able to help, welcome to the Daydreamer family!
This is absolutely amazing. The time and effort! WoW. I am a hands on visual learner so this is great!
Thank you so much Melissa, It makes me happy to hear this was useful to you!
This write up is AMAZING! Thank you SO MUCH for sharing your wisdom is how to make all the awesome cutouts! THANK YOU!
You are welcome Ian – I hope you make tons of cool stuff!
HI CATALINA. MY NAME IS ARLENE. THIS WAS ONE OF THE BEST, IF NOT THE BEST TUTORIAL THAT I HAVE SEEN, SO EASY TO FOLLOW. I’M SUBSCRIBED AS OFFICIAL DAYDREAMER.
Yay!
Thank you so much Arlene. I really appreciate your kind comment. It really motivates me to get going 🙂 So happy you are a daydreamer!
I think this the most helpful piece of material, I have seen on cricut, this is what everyone one is missing, you brake it down, I love this should be charged for.
That’s so sweet of you!
Gosh this type of comments infuse me with tons of energy to write awesome content. Thanks for your kind words 🙂
Your tutorial is well written and I really liked your visual samples. Great job!
Thank you so much Marti!
This really motivates me to add more awesome content!
This was the best tutorial on using shapes to make words in a shape. Thank you very much.
Thank you Loretta!
I am really happy I was able to help out.
This was a really well done tutorial!! It was very helpful!!
Hi Maureen I am so glad you like it!
Great tutorials!! Well written and easy to follow. Thank you for sharing!
You’re very welcome Machele