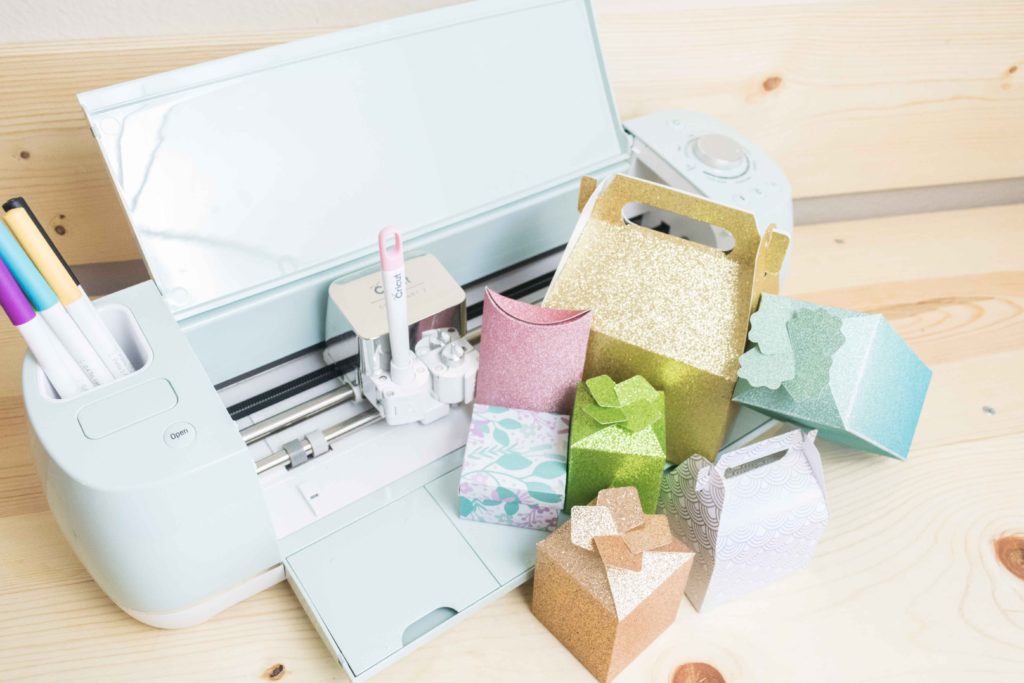
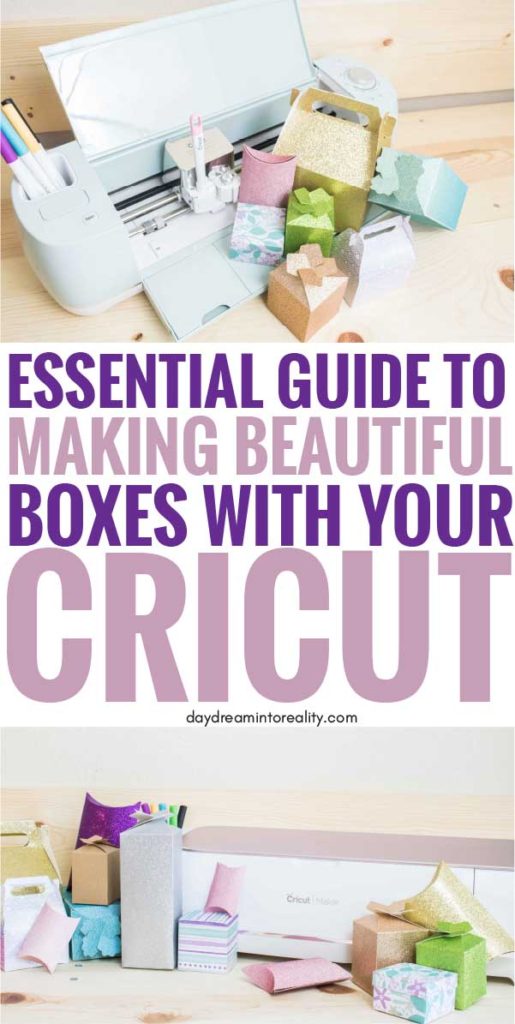
Hello Daydreamers!
Today, you will learn how to make the most beautiful boxes with your Cricut Maker or Explore machine.
I am so excited to bring you this post!
I thought it would take me forever because I wanted to ensure that all boxes were perfect concerning measurements, style, and materials. And to be honest, time is something I don’t have a lot of right now.
But…
Guess what?
My Super Dad, an expert in Math, Geometry, and spoiling his almost 30-year-old baby girl lol, stepped in and said he was going to help me bring you the most astonishing and beautiful designs for boxes.
You WON’T find these templates anywhere, so shout out to my dad, who made this article possible!
If you are a beginner still figuring out Cricut’s software, I recommend this comprehensive and easy Design Space tutorial.
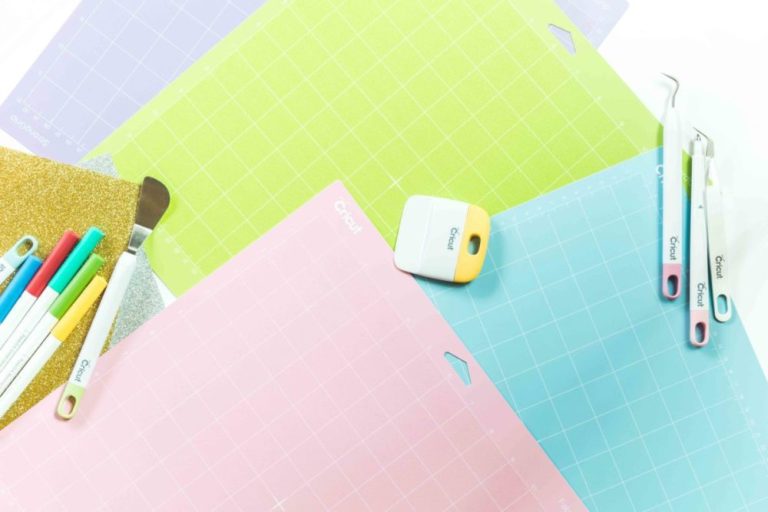
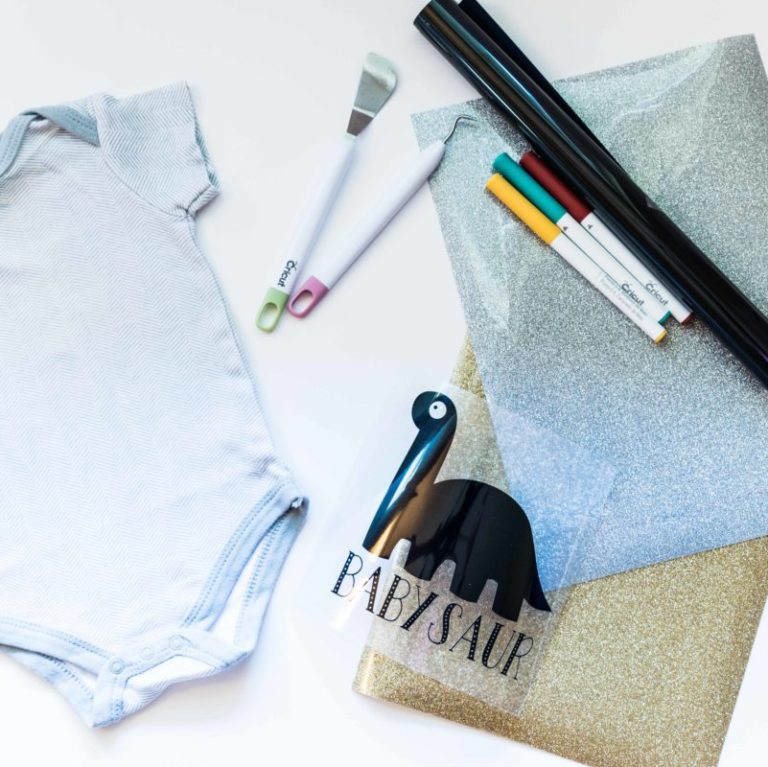
Tools & Materials
- Cricut Machine (Maker, Explore)
- Green Mat
- Fine Point Blade
- Scoring Stylus or Scoring Wheel (Maker only).
- High-quality glue*
- Cardstock**
- Practice File (You can download it, righ down below, at the end of this tutorial, you’ll find the other five templates)
* Always use high-quality glue when making cards or a professional project. Kids’ glue will make your paper wet and bubbly once it dries. I always recommend Beacon 3-in-1, although Crafter’s tape or a glue pen will work as well.
** For boxes, I recommend using cardstock. Regular paper is fragile, and your box won’t be sturdy enough.
Repeat after me. I will only use high-quality paper, and cheap paper will make cheap-looking projects. Michael’s has a great selection of beautiful papers, and they also go on sale, so make sure to keep an eye out for those good deals.
Making Boxes with Cricut – Should you start from Zero?
If you’ve read some of my other articles, I am sure you know that I LOVE teaching you the logic process and how things work in Cricut Design Space.
I am a massive fan of creating things from zero and teaching you how to do them all independently. However, there are moments when we must draw the line to focus on what matters, and that is a beautiful end product.
Cricut Design Space is a great way to come up with custom designs, but I noticed that anytime I needed something exact, it didn’t work that well for me, so that is why I decided to provide you with templates and not a how to do it step by step within the software.
Now that we got that out of the way let’s make some boxes!
Make boxes with your Cricut – Step by Step tutorial
There are six different templates that I have included in this tutorial (find them at the end of this tutorial).
Yay!
For this article, I will only explain the step-by-step inside Cricut Design Space for the most complex one. Therefore, the other templates will be just a walk in the park.
After going through all of the Cricut Design Space steps and cutting process, I will have a step-by-step tutorial on how to assemble each box template.
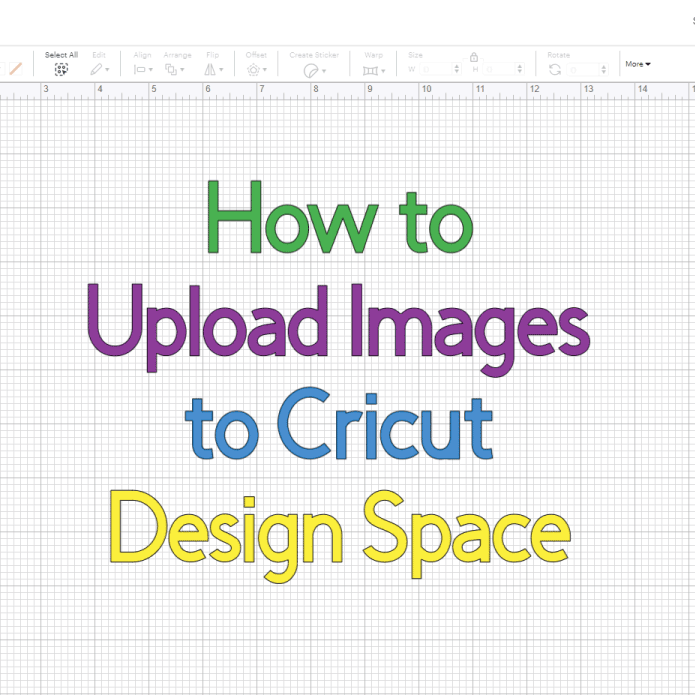
Upload Box Template to Cricut Design Space
Log into your Cricut Design Space account and click on “Upload,” located on the left panel of the canvas area. Once you are there, click on the Upload Image button, choose the template from your computer, and save it to Cricut Design Space.

After you complete those steps, the template will be located under “Recently Uploads.” Select it, and then click on “Add to Canvas.”
Understanding the Template and Getting it Ready for Editing
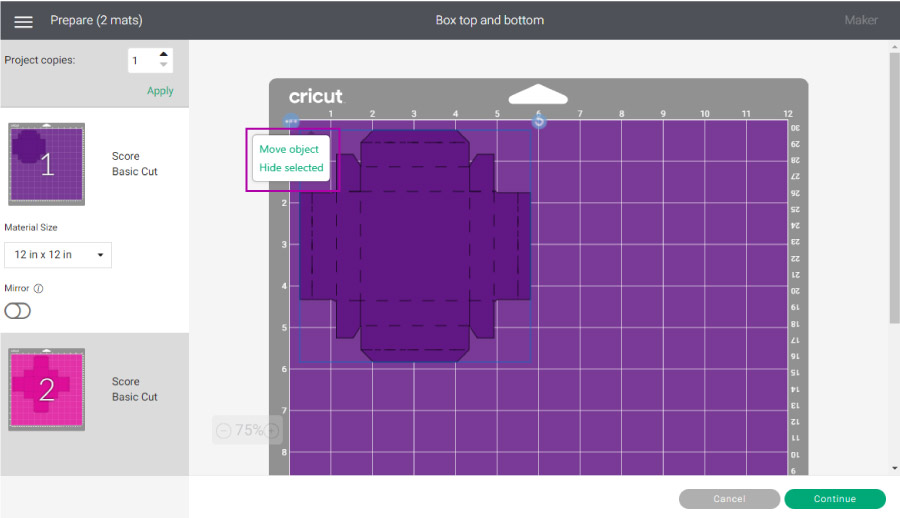
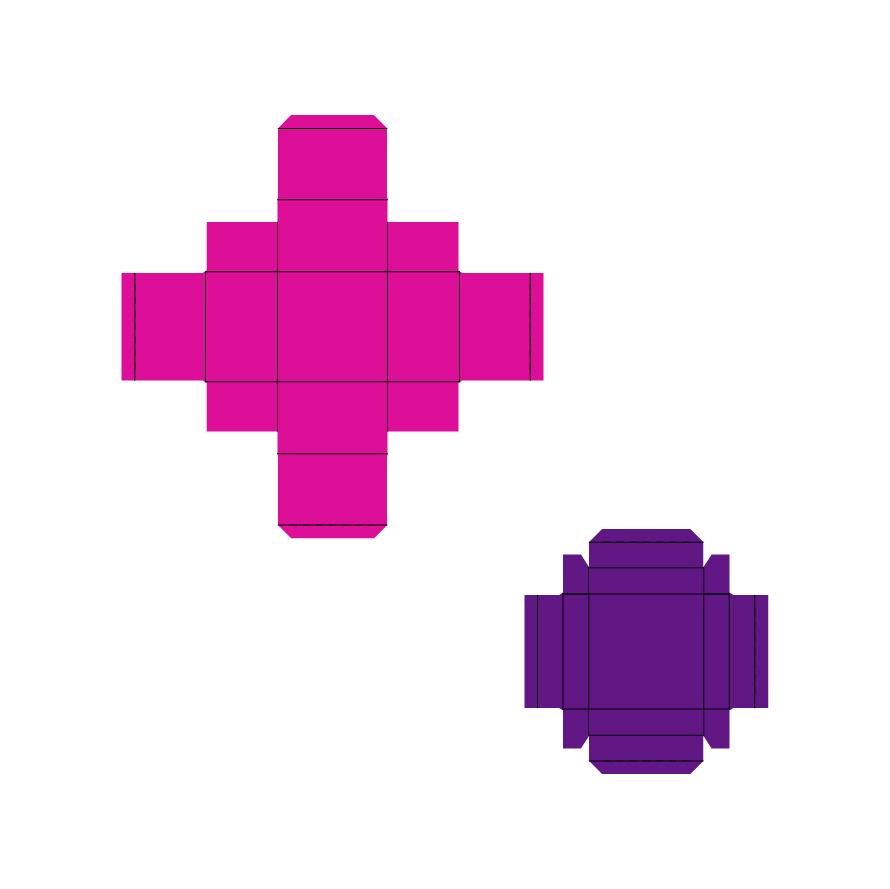
Since this is a “Top” and “Bottom” box, you will have two pieces: the bottom one (the big piece), which is for storage, as well as the top one (the small piece), for the cover.
When you insert the file, both the top and bottom parts are grouped. Since we need to work on them individually, select them and click on “Ungroup,” located at the top of the layers panel.
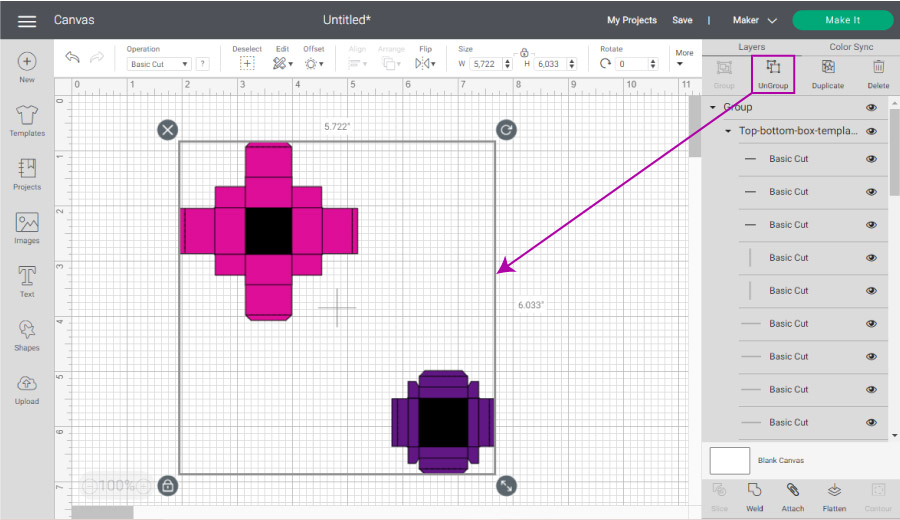
Only ungroup once. The other groups left are there to help you to edit things faster.
Learn more about Group, Attach, and weld on this excellent guide I put together.
Change Operation
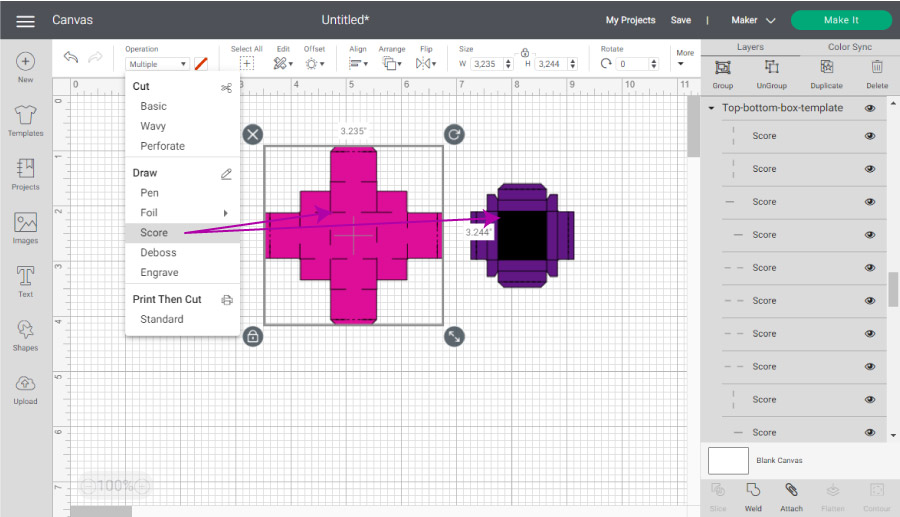
All boxes in the world need to be folded in some way. As you may know, Cricut allows you to create beautiful folds in your materials to make your life and creations much more manageable.
In all of the templates I gave you, I grouped the lines that need to be scored. You will know they need to be scored because they are in black and across the whole design.
However, this box, in particular, is a little tricky because it has some lines that also cut across the design. So, to find the score lines, click on the black square of the middle and then click on “Operation” – located on the top menu – and change it to “Score.”
After changing the “Operation,” you will see that both pieces are now appropriately scored.
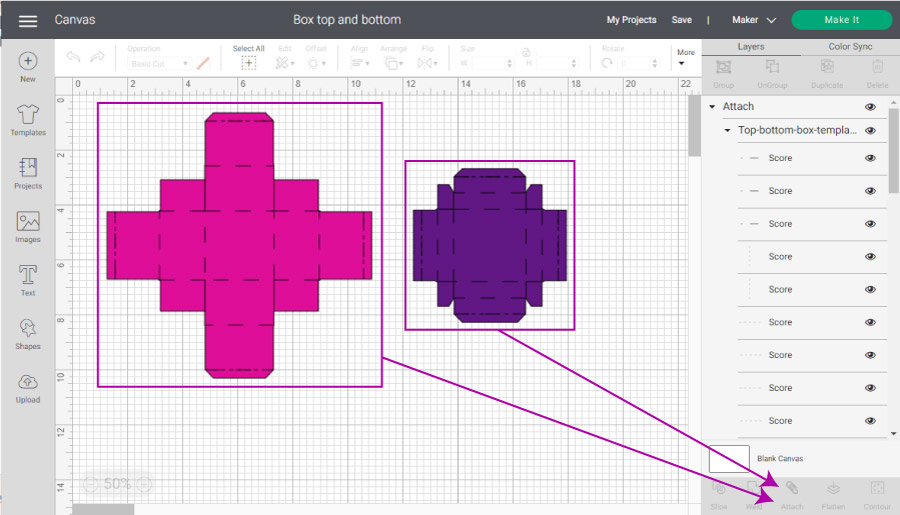
Attach, Resize and Make it
Once you are done scoring the lines, we need to assign them to the box.
You see, even if everything looks in order in the canvas area, the only way for everything to remain in the same spot is by attaching the score lines to the box template.
Select the elements that make the bottom and click on “Attach,” located at the end of the layers panel. Then, repeat the same thing, but this time with all of the elements that make the box’s cover.
At this point, you can resize your box as well. Just make sure to ALWAYS increase both parts at the same time WITH THE SAME PROPORTIONS. Otherwise, the measurements will not match, and your box will be useless. Note: This also applies to all of the other templates.
After you are done attaching and resizing, click on the “Make it” button located in the upper right-hand corner of the canvas area.
Cutting Process
The following screenshot is the window that you will see after sending your box to be cut.
Newer machines will ask how to load your materials. On a mat or without a mat. Select “On Mat” to follow along.
As you can see, there are two different mats; one for each color. Initially, I thought I would use two different colors, but I decided to use the same one. Since both parts fit in the same mat, I moved the top part of the box to the pink mat.
If you are using two different colors, you can just cut your box in two different mats like Cricut instructs – I do have an article on how to cut multiple colors on one mat as well – or if using just one color and the box is small enough, give this technique a try.
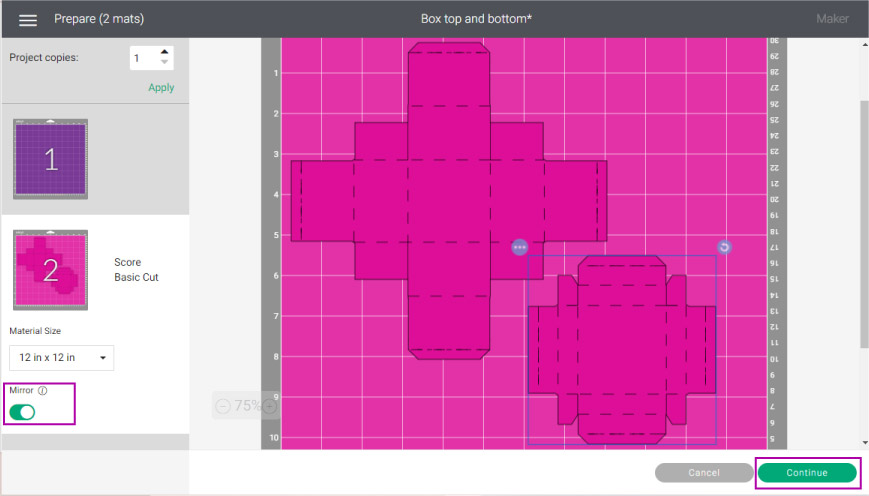
Now let’s talk about the MIRROR and why it is ON.
In my how-to-use the scoring wheel article, I explain that you need to fold your materials towards them whenever you create score lines. So, if you are using one side coated materials like glitter card stock or patterned paper, you need to place your paper pretty side down on your mat.
Every single time you do this, you need to turn your mirror ON. However, since this is a box and boxes are all the same mathematically, you won’t have problems if you leave it on.
I recommend you to turn it ON because of habit. One day you may need to cut something like iron and forget the importance of this concept.
Select Materials, Load Mat, Go
Now it’s time to select your materials.
If you have a machine with a “Smart Set Dial,” move it to “Custom” to select material from Design Space and follow along.
Go ahead and select your material from the options that Cricut has to offer. If your material does not appear on the most popular options, you can browse all materials by keyword or alphabetically.
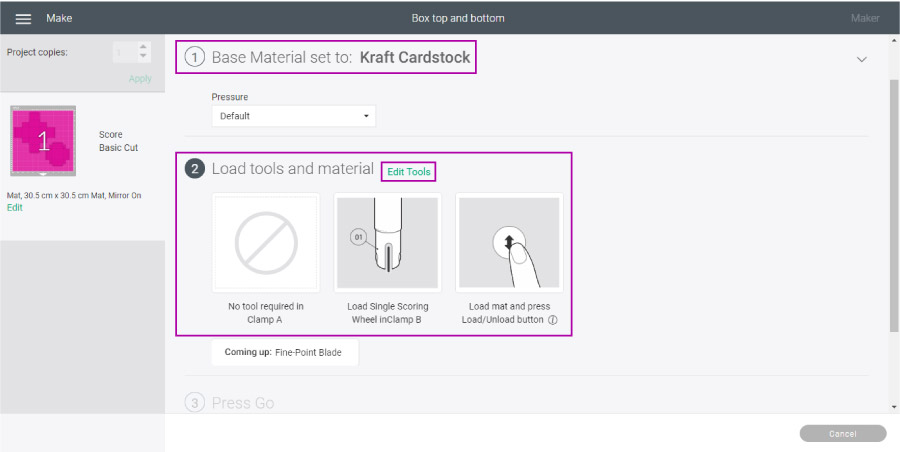
If you are cutting with any of the Explore Machines, the tools section will prompt you to install the “Scoring Stylus” and the “Fine Point Blade.”
If you have any of the Maker Machines, by default, you will have the wheel. But if you want to use the “Stylus,” click on the “Edit Tools” to select the Scoring Stylus. Then, install it along with the “Fine Point Blade.”
Note: Check this article I wrote on the Differences Between the Stylus and the Scoring Wheel.
I decided to use the Scoring Wheel for this project. If you are using the wheel as well, Design Space will prompt you to install the fine point blade when your Cricut is done Scoring.
Finally, after selecting Materials, installing tools in your machine, place material on your mat, load it, and press the flashing GO button on your device.

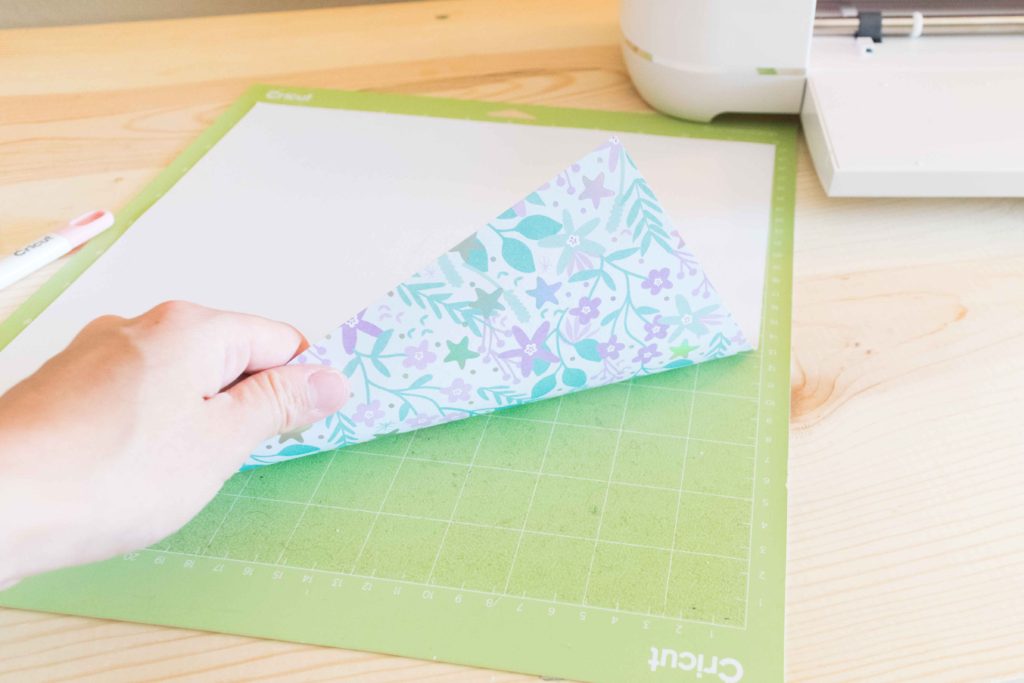
Place Paper Pretty Side Down 
Load to mat for box to be Score and Cut Remove paper by bending Cricut Mat

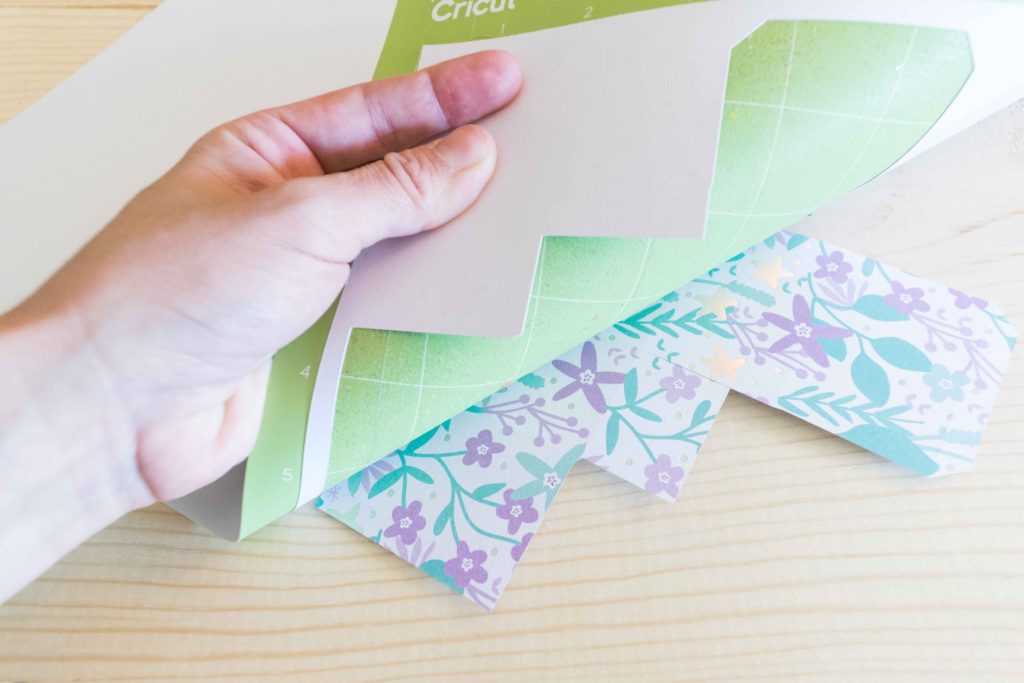
After you are done cutting, you should be left with two different pieces. Remember, the big one is for storage, and the small one is the box’s cover.
Before Assembling After Assembling
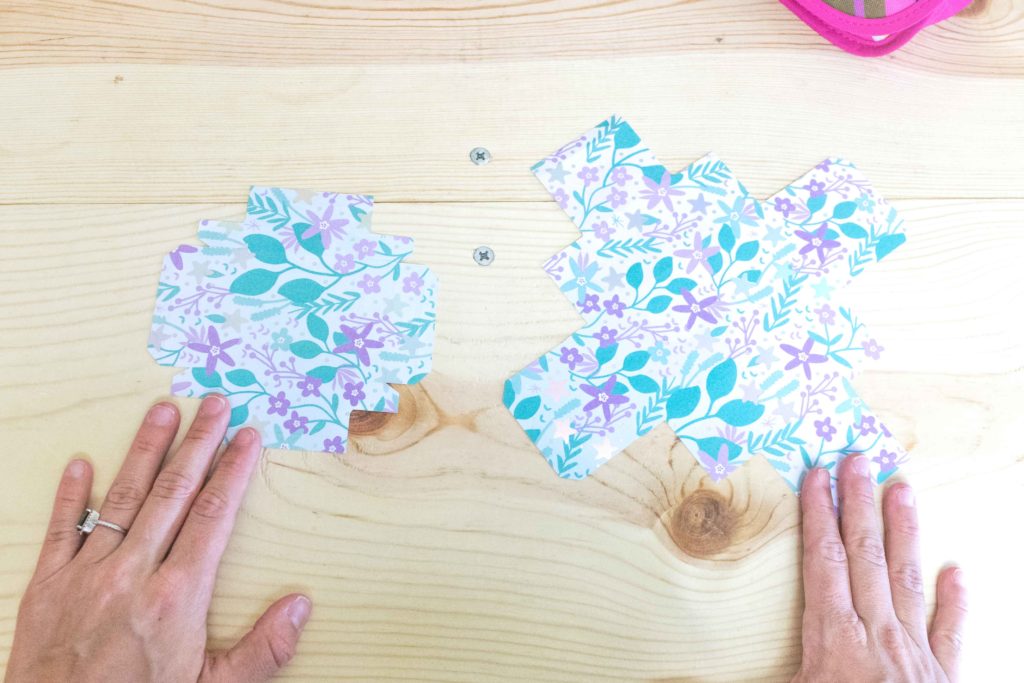
Now, let’s see how to assemble this box!
How to Assemble Boxes after Cutting with your Cricut
At the beginning of this post, I mentioned that I would only do a step-by-step of one of the six templates (the top and bottom box I provided you with). But, I also said I was going to show you how to assemble all of them.
Top & Bottom Box Assemble Process
This box is perfect for small gifts, and it’s just adorable!
I love this design because it doesn’t require glue at all when using thick materials like glitter cardstock or poster board. If you use a thin material, you can use a little glue or tape to secure it.
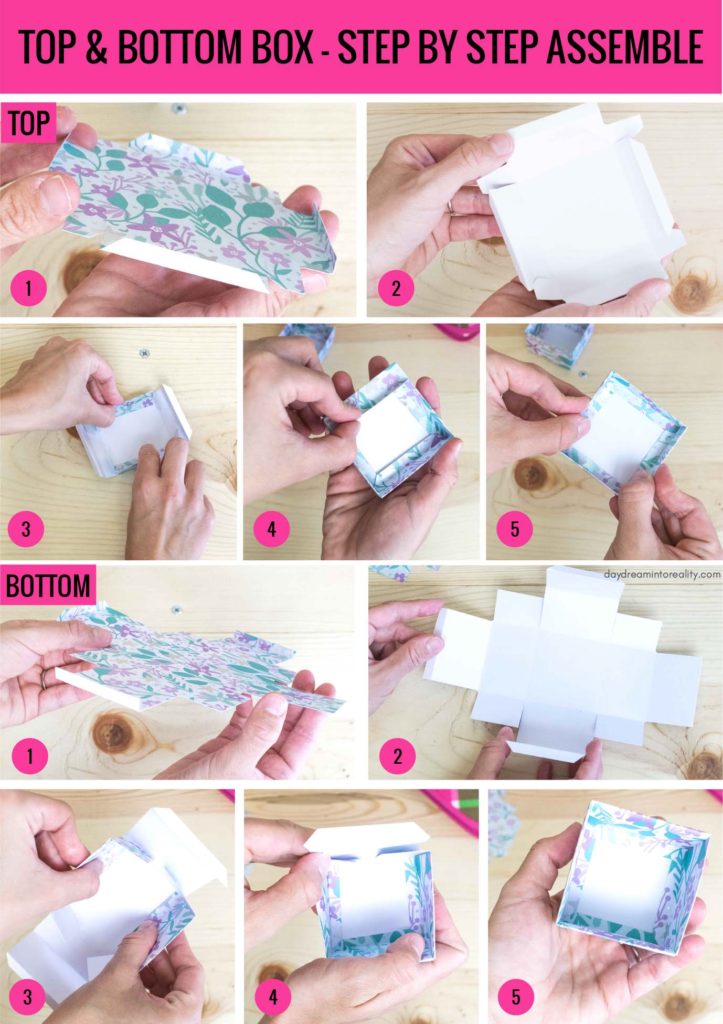
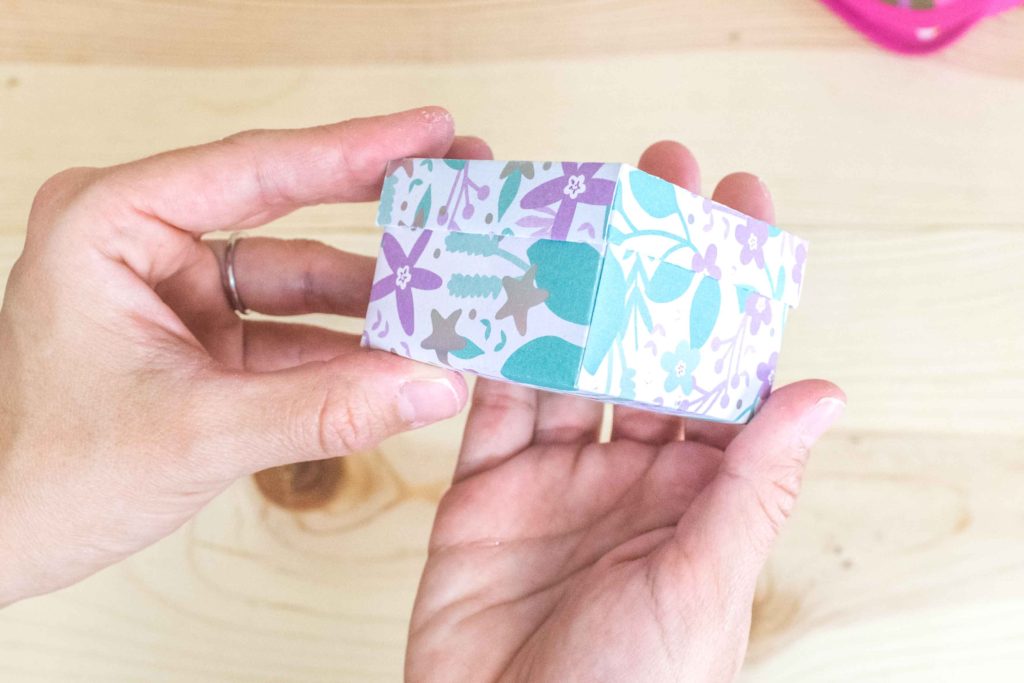
Top – Cover
- Fold all four outermost tabs out.
- Fold the rest of paper towards the score lines.
- Fold the two sides in with square corners first, then fold in the four little taps
- Fold the two angled sides in to complete cover.
- If your are using very thin materials you may want to secure angled taps with glue or tape.
Bottom – Storage
This part is essentially the same process as the top but with a larger surface area.
- Fold all four outermost tabs out.
- Fold the rest of the paper towards the score lines.
- Fold the two sides in with square corners first, then fold in the four little taps.
- Fold the two angled sides into a complete cover.
- If your are using very thin materials you may want to secure angled tabs with glue or tape.
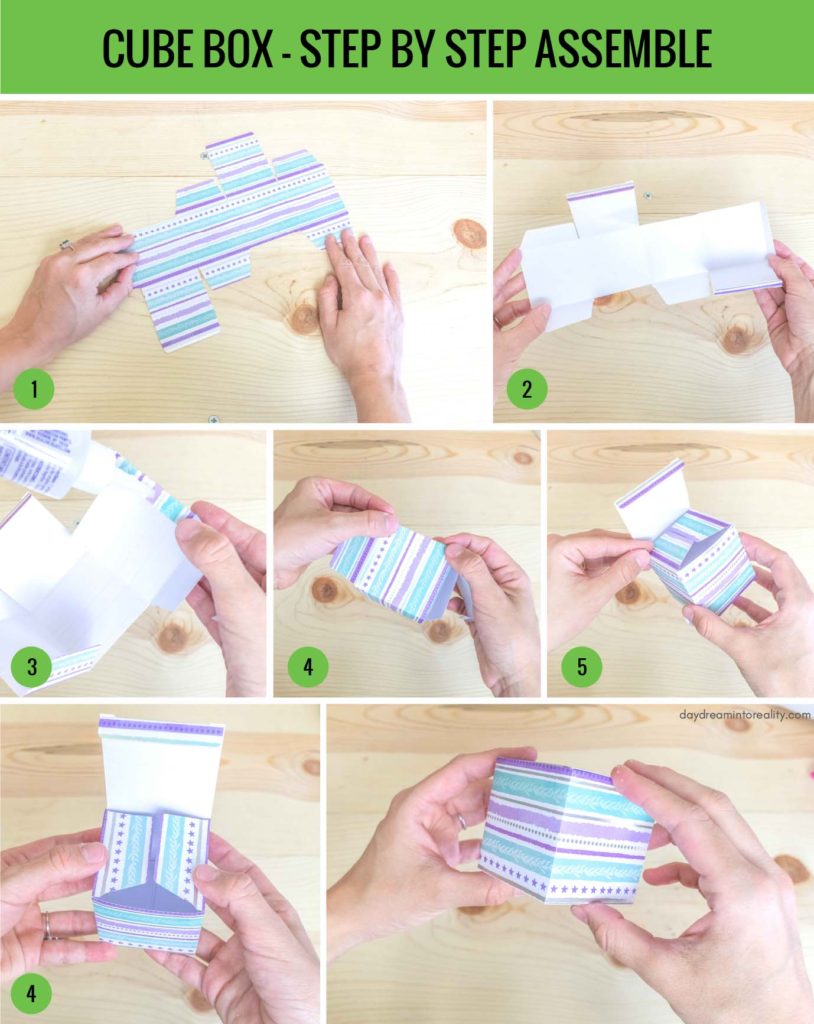
Cube Box Assemble Process
This is the EASIEST box to assemble! You can add extra touches to this type of box to make it extra cute as well. For example, you can use some ribbon to add a bow on top of the box.
- Take a look of the final cut so you can see the logic of the box itself.
- Fold paper towards the score lines. This will also give you a better idea of the final box structure.
- At this point you should have the little outermost tab folded in. Apply glue to the patterned side and attach it to the other side.
- Press tight until glue is dried.
- For the bottom, fold the two small sides in, and then tuck the remaining tab to close the box.
- For the top, repeat what you did on step number 5.
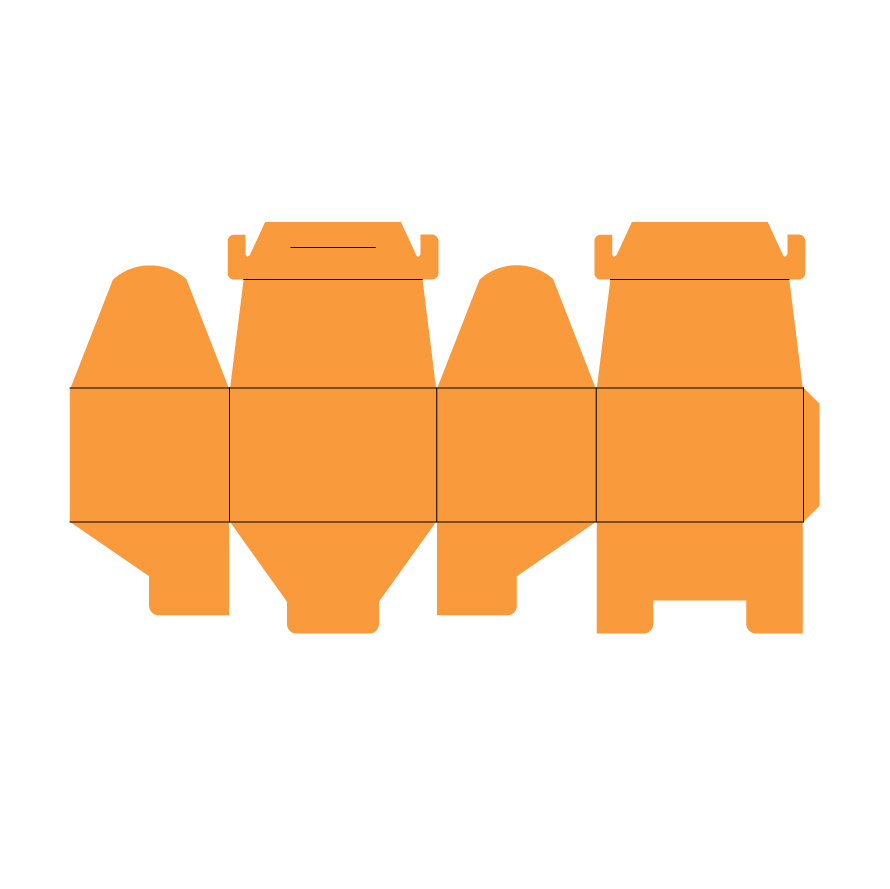
Lunch Box Assemble Process
The Lunch Box is the biggest box of all! If you want to create a fair-sized one, you must use a 12 by 24 inches Mat.
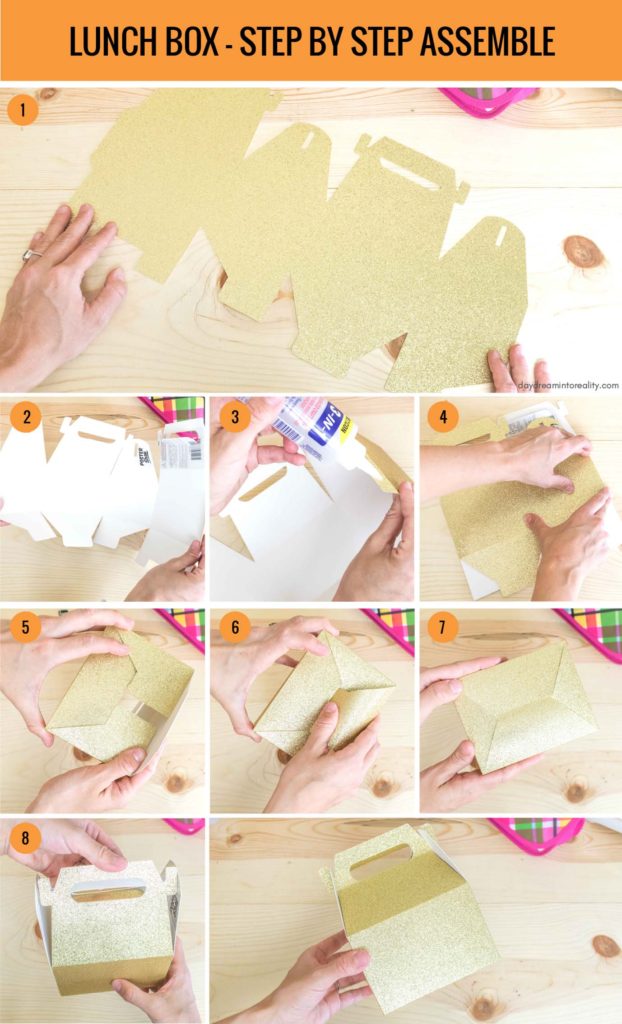
- Take a look of the final cut so you can see the logic of the box itself.
- Fold the paper towards the score lines. This will also give you a better idea of the final box structure.
- You should have the little outermost tab also folded in at this point. Apply glue to the glittered side and attach to it the other side.
- Press tightly until the glue is dried.
- For the bottom, fold the large rectangular tab in first, then the two small side tabs.
- Finally, fold and tuck the large angled tab into the slot found on the large rectangular tab.
- Make sure it looks just like the photo I show you on the step by step.
- For the top, hold the two wider sides together to complete the handle. Then latch the side hooks of the handles with the narrow sides. Note: Use the little flaps in the handle to close the box.
Square Petal Box Assembly Process
This box may seem tricky to assemble. It took some practice for me to get it right, so don’t be frustrated.
Remember, practice makes perfect!
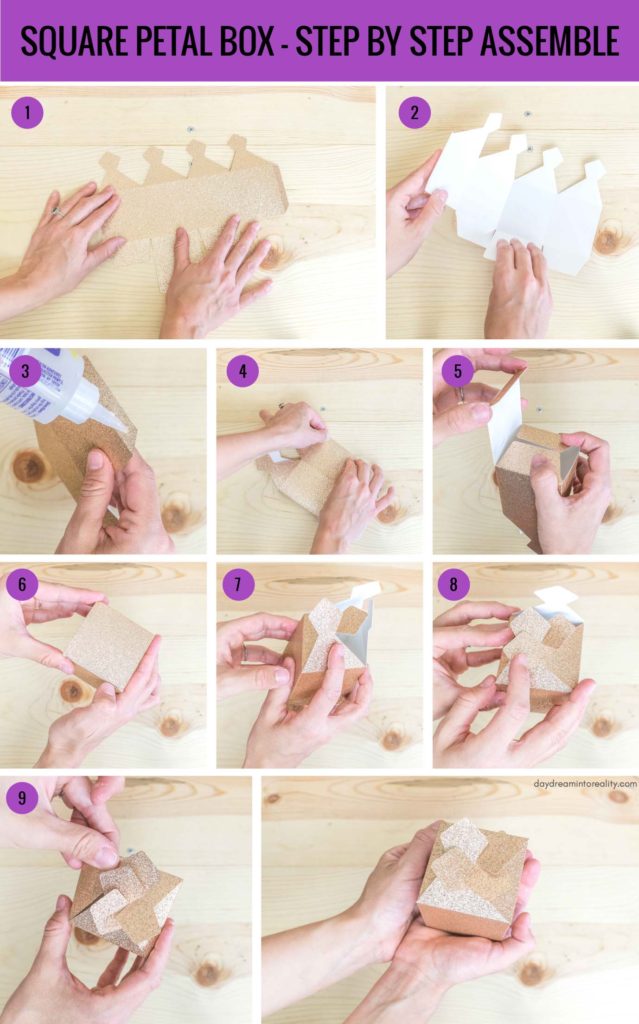
- Take a look of the final cut so you can see the logic of the box itself.
- Fold paper towards the score lines. This will also give you a better idea of the final box structure.
- At this point you should have the little outermost tab folded in . Apply glue to the glittered side and attach it to the other side.
- Press tight until glue is dried.
- For the bottom, fold the two small sides in.
- Now you can close the box by tucking in the remaining tab.
- For the top, grab any of the four remaining tabs and fold in halfway through.
- Then, grab the tab to the right of the folded one and tuck the petal underneath it.
- Continue that process counter clockwise until all tabs are folded in and look like the final photo in the step by step graphic.
Candy Wrap Box Assembly Process
This is one of my favorite boxes. However, something extraordinary happened when using the scoring wheel on this material.
I think honesty is essential. I was about to repeat this box on other material, but I like to be honest with you so you can make an informed choice.
I used a very fine glitter card stock for this particular box, and when I used the scoring wheel tip 02, most of the glitter stayed on my Cricut mat. You can see this on step 1 of the graphic down below.
I tried using the 01 tip for another box and this same material, and it happened as well, but not that noticeable. I honestly don’t mind. I actually like the effect, but if you want fine glitter paper, make sure to test before you create a large project.
Now let’s get to the step by step!
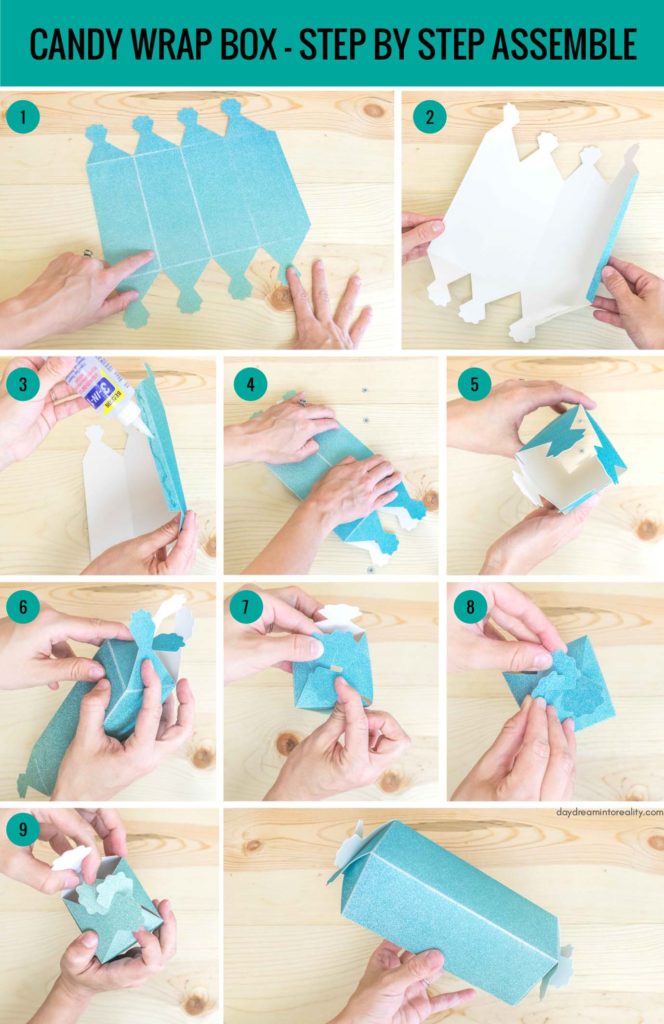
- Take a look of the final cut so you can see the logic of the box itself.
- Fold paper towards the score lines. This will also give you a better idea of the final box structure.
- At this point you should have the little outermost tab folded in. Apply glue to the glittered side and attach it to the other side.
- Press tight until glue is dried.
- Open the box to form top and bottom parts.
- For the top, grab any of the four remaining tabs and fold in halfway through.
- Then, grab the tab to the right of the folded one and tuck the tab underneath it.
- Continue that process counter clockwise until all tabs are folded in and look like the final photo in the step by step graphic.
- For the bottom, repeat the same process, you did for the top, but this time work clockwise.
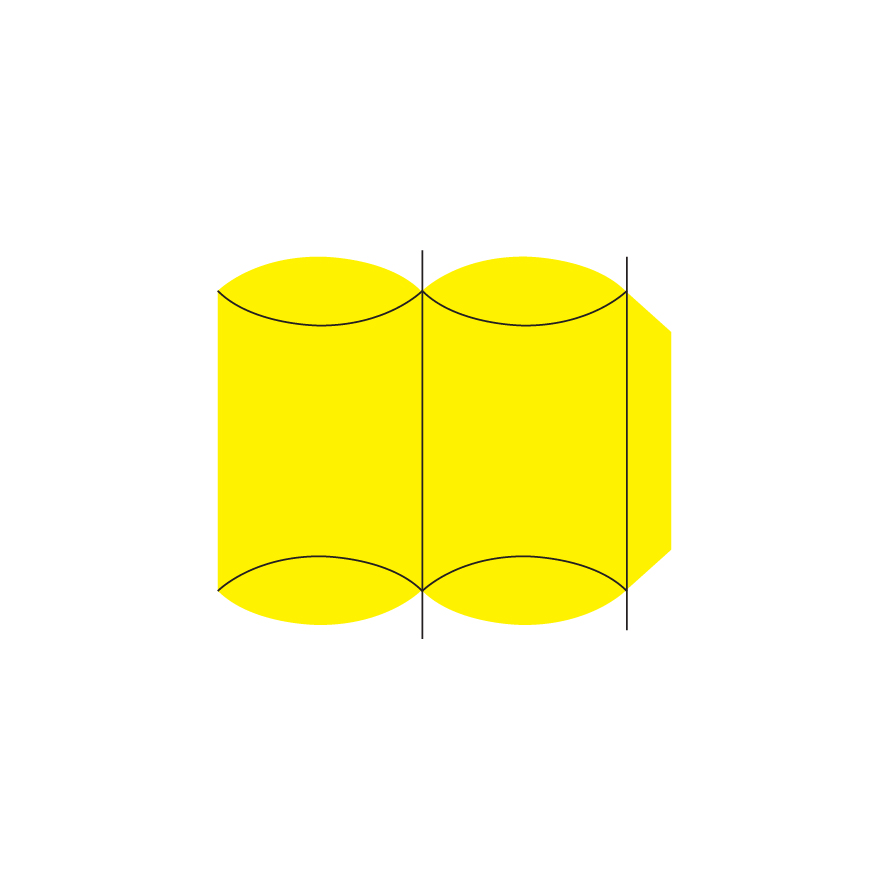
Pillow Box Assemble Process
Pillow boxes are so easy to make, and they are perfect for small presents. In fact, I am planning on making earrings for my friends and family and gifting them in these little boxes.
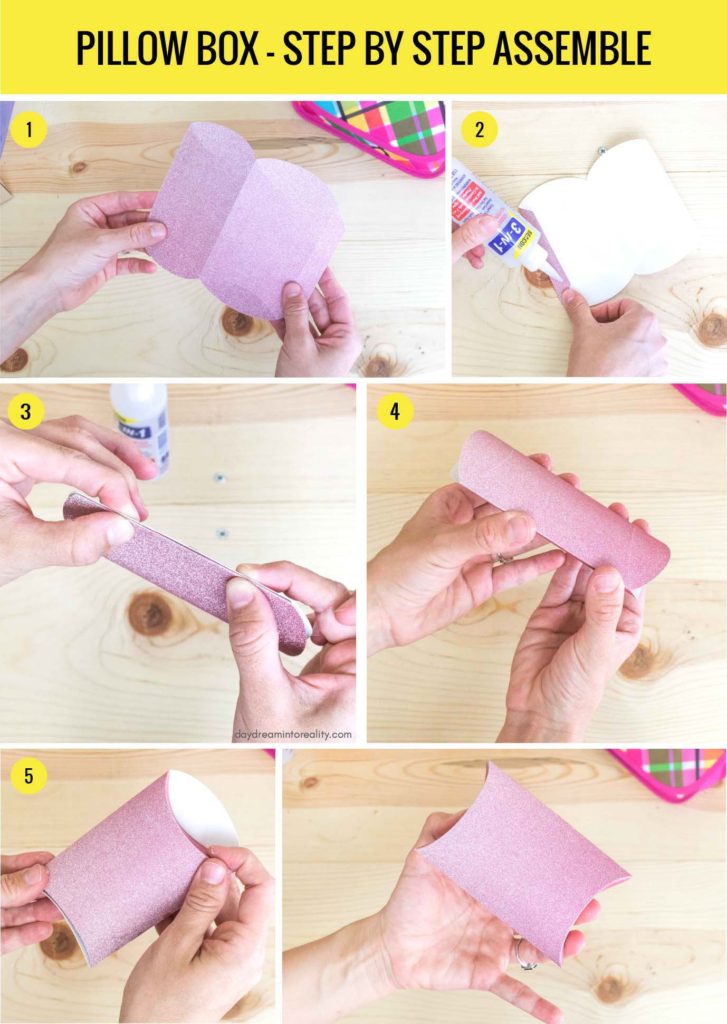
- Take a look of the final cut so you can see the logic of the box itself. Then fold paper towards the score lines.
- At this point you should have the little outermost tab folded in. Apply glue to the glittered side and attach it to the other side.
- Press tight until glue is dried.
- Open the box to give its shape
- For both top and bottom push both curved tabs. One on top of the other one.
Free SVG Boxes Templates
These box templates are organized in a way where score lines and cut lines are grouped so that you can change the “Operation” very quickly.
To download the file(s), you need to be on a desktop or laptop and click on the button to trigger a download file on your PC. However, I’ve noticed that I can also download them from my iPhone.
Depending on your browser settings, your PC sometimes asks where to save the file, although most files will be in your download folder.
If the image opens in a new window (this may happen because of your browser settings), right-click on it, select the option “Save Image As,” and choose where you want to save the file.
SVG files look like web page files when you download them.


NOTE: These files are ONLY FOR PERSONAL use, and please do not upload them to other blogs or any social media platform. It took my dad and me over two weeks of work to bring these resources to you.
Oh!
Just so you know, I also have a library full of free SVG files and Printables for all my subscribers, a.k.a. Daydreamers. You can see a preview right here or get access by filling out this form.
Quick Summary

How to Make Beautiful Boxes with your Cricut
Materials
- Glitter Cardstock (Or any other sturdy material of your preference)
- High Quality Glue
Tools
- Cricut Maker or Explore
- Scoring Wheel / Scoring Stylus
- Fine Point Blade
- Standard/Strong Grip Mat
Instructions
- Upload Template to Cricut Design Space.
- Change Cut lines for Score lines to make folds
- Select all of the elements on the canvas, attach, and click on Make it
- If using one side coated materials like glitter or metallic paper turn the mirror ON. Click Continue
- Select Materials from Design Space if you have. If using a machine with Smart Set Dial move it to "Custom."
- Place Material on Mat* and load it along with Scoring Tool and Fine Point Blade**
- Press the flashing "Go" button and when the cut is ready unload Mat
- Remove cut from the mat and assemble box
Notes
*If using one side coated materials place material pretty side down.
**If you are using Scoring Stylus you can Score and Cut without any intervention. However, if you are using the Scoring Wheel, you will need to install this tool first and wait for Cricut Design Space to tell you when to install Fine Point Blade.

This is AMAZING!! Thank you thank you
I would love to get design tips from your mathy dad. This looks like something I’d like to create from scratch. Thank you for an excellent tutorial.
Thank You!!
love these… any chance you can do a quick video of how to assemble the square pettal box?
I have the step-by-step pics!
Looking forward to trying out your boxes … ps love your detailed info on all things Cricut.
You’re welcome 🙂
Thank you so much. Your explanations were so easy to follow. These are my first boxes, and they turned out perfectly the first time. Thanks to your Dad as well!
You’re very welcome 🙂
Fantastic little box! (Thanks, Dad!)
Now I just need to stop my stylus from ripping some the folds :/
Take your time unload material from the mat. Maybe you’re selecting the wrong material?
Such an awesome resource! I couldn’t find little jewelry gift boxes in the store anywhere and this saved the day. Thanks so much!
Thank you so much for these! I am going to “attempt” to use them for my candy table I will be having at my wedding reception. Crossing my fingers that I can do it! 🙂
Thank you so much for sharing and thanks to your Dad.
I don’t comment on blogs, but feel compelled to comment on this post. The box dimensions were absolutely perfect. I didn’t have to kludge them at all like I usually do. The box I made turned out really pretty and perfectly aligned first time out. Your dad did a wonderful job. I always enjoy your extremely thorough posts. I have learned a lot from you. Thank you.
Thanks. I always need boxes, these will come in handy.
Thank you so much!
Looks great !!! Thanks for sharing 😉
Thank you for your tutorial and sharing I just bought a cricut and was a little bit lost
Exactly what I needed for some little Christmas ornament boxes, and your tutorial is detailed enough for a Cricut newbie like me. Thank you to you and your dad for all your efforts!
WOW these boxes are so perfect!! Thanks so much for making them available!!!!
AWESOME! Thank you so much for sharing your knowledge and expertise. Much appreciated. God bless.
You’re welcome 🙂
Thank you so much and your father for the DVG files and the tutorials,
I have a question regarding the type of glue… you say good quality glue however as a newbie I’ve been experimenting and haven’t found a glue that is strong or tacky enough to quickly hold together.
What type of glue do you use?
Thanks again
Fay
I love beacon glue, you can buy it at any craft store. And I am glad you like the files 🙂
I made the lunch box and love them. My son wants to bring macaroons to school for his bday so i made these and it fits 3 macaroons per box. So cute and perfect thank you.
That sounds lovely, and also yummy!
Hi. This is great, just what I was looking for and thank you for sharing your hard work for free. I am wanting to make boxes that a pint drinking glass (which I draw on and personalise) would fit in and wondered if one of these machines would make boxes, so thank you for confirming this. However, would your template for the box with the lid enlarge enough for me to do this. I would be really grateful if you had the time to reply. Thanks again.
The box with the lid is quite little. Boxes tape a lot of paper. You can try the candy box and using a large mat. I hope this helps 🙂
Thank you for taking the time to create these and offering them free. I will try them soon, they are very cute. I have signed up and tried to get into the library without success. Any help appreciated.
I am glad I was able to help. Please send an email to daydreamintorealityblog@gmail.com
Have a lovely day!
Thank you so much! Was looking for a last minute party favor idea and created the little petal box. Worked perfectly!
That’s awesome 🙂
So, It won’t let me leave my own comment, but I have a question…How can I use these templates where it will put the score lines where they are needed? Also, I need a template (with score lines) for a 2″x2″x4″ box, all one piece. I can’t find one anywhere where it’s not just a picture, I need one with the score lines so my machine will score the fold lines.
The lines should be in place when you download these templates. You just need to change from “Basic Cut” to “Score.”
I need svg box template like cube but with attached top cover on outside frame like the 2 piece – do you have such a template or suggestion? I am so new, I have nooooo idea how to construct. Thanks for insight
I am sure Cricut Access has the type of box you want. On images type in box.
Hi!
I’ve made my own template in Design Space but was wondering if you could share how you were able to save the files as downloadable SVG? I’d really like to save the template I created but am not sure how. Can you help?
You can’t download SVG files from Design Space; I save the files from Adobe Illustrator.
Thank you for all the information posted I purchase a maker with the hope to open a design Tshirt business so I’m in the learning stage . I’m trying to learn how to make soap boxes
Thank you again
You’re very welcome! I am happy I can help.
I am a brand new cricut owner and I am in so much trouble, I am having so much fun! I am constantly learning and made your cute box tonight, I appreciate you sharing your knowledge and the time you and your father spent on creating them. Thank You! You are a good share(er)! I am not sure I would be playing quite so well with others considering the work you put into it. You are are rock star!
You’re very welcome Rene! I am happy to hear you enjoy my tutorials and resources. I enjoy sharing all my tips and files, we all have different passions!
Hello may I ask what was your dimensions for your lunchbox. I can’t figure that part out for the life of me. I like the size of your box in the picture. Please and Thank You
I used the 12×24 mat H: 11.5 W: 20.95! I hope this helps 🙂
I can’t figure out how to resize to make the top fit on the bottom part of the box. I need dimensions.
I cover the sizing in this tutorial. You need to resize both pieces at the same time.
Great instruction
🙂
Does using the scoring wheel, as opposed to the stylus, result in improved quality for cardstock?
What size paper did you use for the large lunch box?
I don’t remember, it was a poster board I bought in Michael’s. It wasn’t on the paper section, though. It was by the wrapping area I believe.
Thank you, thank you for the set of little boxes, I love them !
I am glad you like them! 🙂
I realize I’m late to the party, but these little boxes are so cool! Thanks to you and your dad for the design templates!
You’ew very welcome!
I’m having trouble downloading the svg file for the boxes. What should i do?
Try again, I had a little hiccup.
Thanks so much for the boxes SVG!!!!!!
You’re welcome 🙂
Hi, what do you suggest I do. I try to do the download but it just loads the picture and looks like a pdf. Please help
You can try again. The SVG was opening, you had to right-click on it. But I just found a way to have force download!
Have a good day!
Hi Catalina!
Thank you for sharing this awesome set of boxes! I’ve made all of them and they turned out great!
I am so happy to hear this! I am glad you like them 🙂
I am trying to make my own designs in boxes. Every time I load in a picture it comes in solid black, and I cannot see my score lines. How do I do this
Select all the lines and black spots (except for the colored layer that is the box) then change the Linetype from Cut to Score. Cricut fills with color lines that cross. The step by step tutorial shows an example. I hope this helps 🙂
Thanks for your reply. What file format do you recommend saving in. And do you mind sharing what drawing or art program you use? I am looking at getting a new one.
Thank you so much for sharing!
You’re very welcome!
I adore these boxes! I just keep making them and I don’t even know what to do with them, but they’re so cute I can’t stop 🙂
I am glad you like them! Valentine’s Day is coming, so maybe you can give away some presents!
Thank you for the lovely patterns a tutorial! This was my first time to make boxes and it was really simple! BUT for some reason after I made the first two – with zero issues – it seems my Cricut doesn’t want to score all the lines. Any insight to this issue would be much appreciated!!
Hi Britanny! I am glad you like the boxes. I don’t have any idea why this could be happening to you. Are you installing the stylus or wheel correctly? Also, did you attach the lines?
I uploaded the images to the design space but I can not figure how to score. My cricket just cuts the score lines and I have a bunch of pieces I have to tape together.
thanks
Randi
Hi Randi, you need to change the Linetype of the lines from Cut to Score. I explain how to edit the file with one of the boxes on this tutorial.
Hi there, love these templates, thank you very much for putting them together! I did remix the Lunch Box by adding a tab and slot so it could be assembled without glue. I don’t know how to share the design outside of the Cricut Design Space, so it’s a project called “Glue-Free Lunch Box” with proper attribution to you in the description. Hope that’s ok?
Thanks again!
PJ that’s great, I am glad you are having fun using the boxes. It’s my pleasure to help!
Regarding sharing the design, I prefer you to share the link of where to find the boxes on Pinterest (you can even leave a picture on one of the pins), instead of sharing the file itself on Design Space, because I am able to provide free content when people visit my website.
I have the old cricut explorer and sure cuts a lot program would love to have the boxes. Any suggestions.
Hi Kathy, I have no idea how this program works. Maybe you can see if you can upload the file? I hope you find a way.
My only option is to save as a .png or .bmp… how do I get the .svg?
Hi Danielle, the option should be already in SVG file. Do you have Mac or PC? Just right click and save images as (don’t change anything).
I made the lunch box style to put a onesie in for a gift and it is perfect! Thank you! But, for some reason I cannot get any of the other boxes to download as an svg….I right click, etc. trying different things. Do you have a tip to get them downloaded?
You need to right click on each thumbnail and select the option save to computer. So happy you made the box I wish I could see a photo!!!
I figured it out! I have to right click and open image in new tab, then right click to save as SVG! 🙂 I am excited! Thank you for sharing!
Yayyy!
I have become a member but cannot find where to download the box SVG files. Please help!
Hi Leilani, the boxes are in the post itself; you need to right click on each one of them and save them to your computer.
Amazing tutorial! Thank you for sharing so much!
Are the boxes only available through desktop computer? I’m unable to access them using my cell phone. Thanks
Hi Michele. You are correct, you need to right click on the thumbnails of each image and save it on your computer, and then upload to Design Space.
What an AMAZING post! Glad I found it! Thank you!
You’re very welcome Robin!
To start this is an awesome post and I’m glad I came across it. For some reason I am not able to resize the top and bottom box correctly. I had a nice size bottom and huge top. How can I make it where both are larger?
When resizing you need to select both parts of the box. You can’t do one at the time. They need to increase proportionally. I hope this makes sense!