Hello Daydreamers!
In today’s tutorial, I will teach you how to make beautiful monograms in Cricut Design Space.
A monogram is a design that combines the letters of a name, last name, a brand, company, etc. They are super popular, and the possibilities are endless.
There are multiple techniques to achieve different results, and today you’ll feel empowered to make a monogram for every occasion!
Tip: This tutorial builds upon the skills I teach in every step. If you’re just starting with your machine, I suggest you read and follow each step.
Oh!
Just so you know, I also have a library full of free SVG files and Printables for all my subscribers, a.k.a. Daydreamers. You can see a preview right here or get access by filling out this form.

Before we get started, let’s have an overview of the techniques I’ll cover in this article, so you know what to expect.
- Warning/Precaution
- Make a super simple monogram
- How to make a split monogram
- Using images to create a monogram
- Making monograms using fonts
- Learning how to make circled or multi initial monograms
Are you ready?
Let’s Daydream Into Reality!
Warning!
When making monograms, I advise you to keep your information private, especially if you’re making something for your kids.
For instance, if making a monogram with your child’s name, avoid putting it on a backpack or the front of a t-shirt if you aren’t going to be around. The last thing you want is for a stranger to call your child by name.
Unfortunately, we live in a cruel world, and bad people exist.
Make a Simple Monogram in Design Space
Making a monogram doesn’t have to be complicated at all!
Step 1 – Type letter
To make a super simple and elegant monogram, go to the canvas area in Design Space, then click on “Text” and type in the letter you want for your design.
Choose a font you like. For this monogram, I chose “Dtc Miss Honey,” I know; you gotta laugh a bit with those silly font names.
Right?

Picking a font is an essential part.
Are you making a monogram for a wedding? Then pick a beautiful and elegant script font. Are you trying to make something cute to decorate your kid’s bedroom? Then choose a silly font.
Step 2 – Add Name
Choose another font that will look good with the first one you picked, type a name, brand, or what you want on your monogram, and place it on your letter.
Since my letter was “O,” I had to work with curve lines; I curved the font using the “Curve” tool on the top panel.

I curved positive for the pink “O” and placed the name in the outer left corner. And for the yellow “O,” I curved negative and put the name in the inner right corner.
I added a little heart from the “Shapes” icon to make things extra cute.
Wasn’t that super easy?
Make a Split Monogram in Cricut Design Space
Split monograms are really fun and very popular!
The idea is to pick a letter, split it, add sort of a decorative frame and finally type a name.
Let’s see how to do it!
Step 1 – Add Letter and Rectangle
Type the letter you want for your monogram (I’m sticking to the same “O”).
Click on “Shapes” and drop a square on the canvas area. Select the square to unlock proportions by clicking the little lock in the lower-left corner of the selection.

Resize the square into a rectangle, ensuring its width is larger than the letter’s width.
Step 2 – Align and Slice
After resizing, select the letter and the rectangle, click on “Align,” and select the option “Center.”

Tip: Sometimes, you’ll want to only “Center horizontally” and use the arrows on your keyboard to find the perfect spot for the split. Some letters like A, B, E, R, etc., require a more personal decision of where to divide the letter.
Select both layers once you find the perfect spot and click on “Slice.”

Keep the split letter and delete the other pieces.
Step 3 – Add Split Decoration
Add two other rectangles (using the same technique I explained above), one of them thinner than the other.
Tip: The idea is to make a space for you to type in a name or word, so you need to calculate how thin or thick both rectangles are to fit it.
Now, select both rectangles and “Cente Align,” and finally, click on “Slice.”
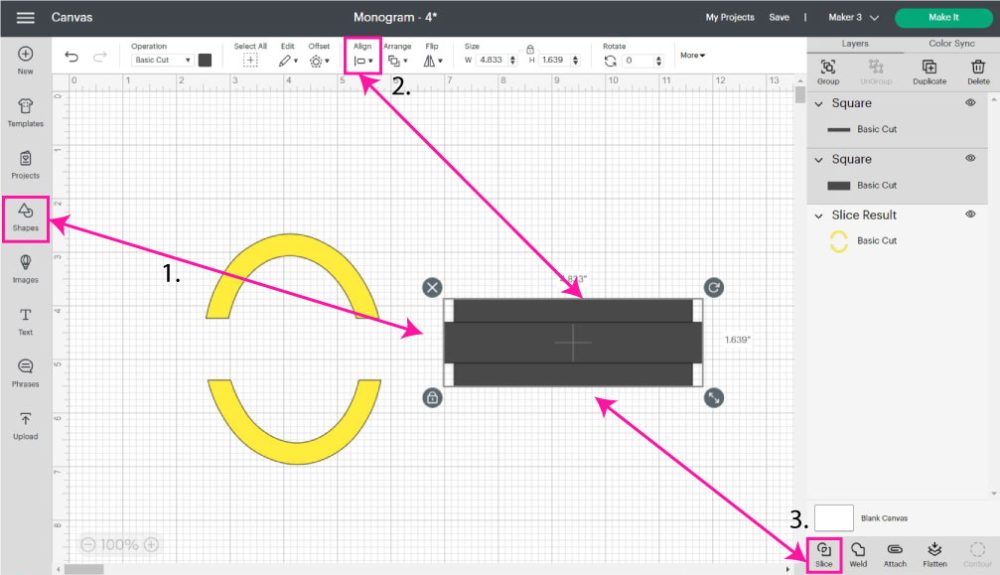
Move all “slice result” pieces, keep the two small rectangles on the same layer, and delete the rest.

Step 4 – Weld
Place rectangles on letters, as shown in the image below. I recommend using the “Align” tool and centering both layers.
Select both layers and click on “Weld.”

There you have it, a split monogram!

Now, it’s time to add your name or word.
Check out these three different fonts I used on the same split monogram.
Which one is your favorite one? I liked the pink one the best.

Check out other ways to add the decorative frame on the split monogram.

Make them using the same technique I showed. You can even do a double frame (reddish color) by slicing and aligning two pairs of rectangles. The key is playing with the thickness of the rectangles.
Using Images to Make a Monogram
You can also use Cricut images to make a unique monogram!
If you don’t have Cricut Access, this may not be the route as you would need to pay for each image. However, you can use this same concept and look on google for free decorative SVG frames.
Step 1 – Add Images
Go to the canvas areas and click on “Images.” On the search box, type in “floral frame.”
Tip: you can also type other keywords to find different types of frames. Try doing winter, fall, heart, etc/ followed by the word “frame.”

Select the frame you like the most and click on “Add to Canvas.”

Step 2 – Type in Initial(s)
Type in your initial and choose a font you like, then place it in the middle of the frame and center it.
Note: Depending on the frame you choose, sometimes it’s better to eye-align rather than to use the “Align tool” because this tool isn’t going to consider the placement of certain decorative elements on the frame.
Select both layers and “Weld” if you want the design to be the same color, select both layers and “Weld.”

How to Use Monogram Fonts & Where to Find them
If you’re into monogram projects, I must tell you that using monogram fonts is my favorite way to make a monogram.
Why?
There are hundreds to choose from, and many of them are free for personal use.
Getting fonts installed in Design Space is straightforward! Download the font you want (free or premium), unzip it if necessary, double click on it, and click “install.”

Now, if Design Space is open, restart it. If not, the font will be available for you to use the next time you open it!
I may write a more in-depth tutorial about this in the future. However, if you want a more step-by-step tutorial, check out this youtube video.
Now, let’s check where to find monogram fonts.
If you like free, check out dafont.com. They have thousands of fonts for you to use in your projects. Keep in mind that some of these fonts require you to pay if you plan on using them for a commercial license, so make sure you read the fine print.
To find monogram fonts in dafont, type in “monogram” on the search box on the right side of the window and click on “Search.”

Note: Some of the links below are affiliate links, meaning I make a little commission when you buy through them at no extra cost.
Scroll down and search what font you like the best!
My favorite place to get fonts is Creative Fabrica.
I do have a subscription there that I pay with my own money, but I have to tell you that they have so many fonts to choose from. They also have very competitive prices, and their commercial license is the best one in the market.
To find monogram fonts at Creative Fabrica, type in “monogram” on the search box at the top and check the “Fonts” on the left panel.

They have many beautiful ones!
The second place I love buying fonts from is fontbundles.net. Their license is suitable but not as impressive as Creative Fabrica’s.
However, there are times when the font I love is there, and I gotta have it!
To find monogram fonts at fontbundles.net, type in “monogram” on the search box at the top and hit enter.

So easy, right?
How about I show you some examples!
Using Monogram Fonts in Cricut Design Space
Here are some examples of monogram fonts and how they look in Design Space.
1. Molidia Monogram
I think this font is so elegant and beautiful. You can use it for a wedding project or maybe by decorating a wall in your house.
It’s a little tricky to place text on these fonts because the decorative frame is curved.
The best way is to do single words and use and play the “Curve” tool to make words fit into the space.

Download Molidia font for personal use.
2. Premium Monogram
Some fonts come with a single and split monogram included!

When you set your keyboard to uppercase, you’ll only have a frame with your desired initial, and when you put the keyboard to lowercase, you’ll get a split monogram where you can add your desired text.
3. Viktorial Monogram
Here’s another beautiful font.
It depends on what you like and what you’re going for on your project.

4. Marliana Monogram
This font is absolutely charming!
If I had a girl, I could see myself decorating her room with this font.

If you plan to use this font for personal projects, you can download it from dafont.
5. Spring In Monogram:
This font caught my attention because it had so many details. If you’re into elegant but lighthearted, I think this monogram font is for you!

If your keyboard is set on uppercase, the monogram will be split, and if the keyboard is on lowercase, you’ll have an initial.
Circle or Multi Initial Monogram in Cricut Design Space
If you want to include more than one initial on your monograms, this is the type of font you need.
Many people like a font called Monogramos (you can download it for free on dafont). It’s beautiful. However, if you plan on using it for commercial purposes (like I do), the license is a little expensive.
In my research to find something more affordable, I found this fantastic monogram font bundle. You get six fonts for the price of one!
Whether you use Monogramos or some of the fonts from this bundle, this is how you would do it.
Step 1 – Install Fonts and Type Initials
First, you need to install three different fonts on your computer; “Left Monogram, Center Monogram, and Right Monogram.” Once the installation is complete, restart Cricut Design Space and type the letters you want on your monogram.
You’ll want to use three initials. Each letter must be in a different layer.

I just used three “C” letters, but you can also combine different letters.
Step 2 – Change Font
Select one letter at a time and change the font considering the initial’s position.
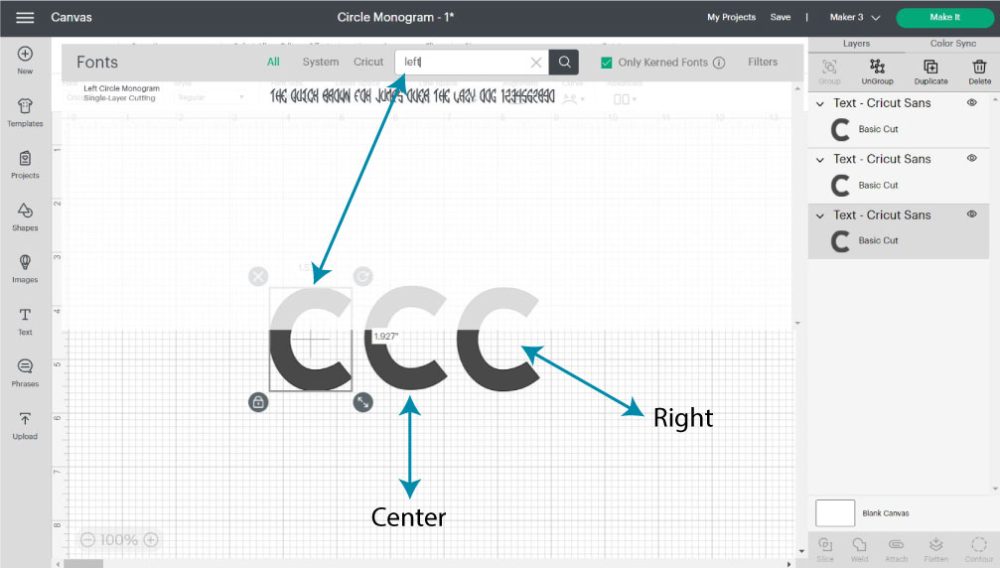
For instance, the first letter would be “Monogram Left,” the second one would be “Monogram Center,” and the last letter would be “Monogram Right.”
Step 3 – Align Initials
It’s time to organize your initials.
Select all three layers, click on “Align,” and pick “Center Vertically.”

With the arrow keys on your keyboard, move the first initial to the right and the last initial to the left, as shown in the graphic below.
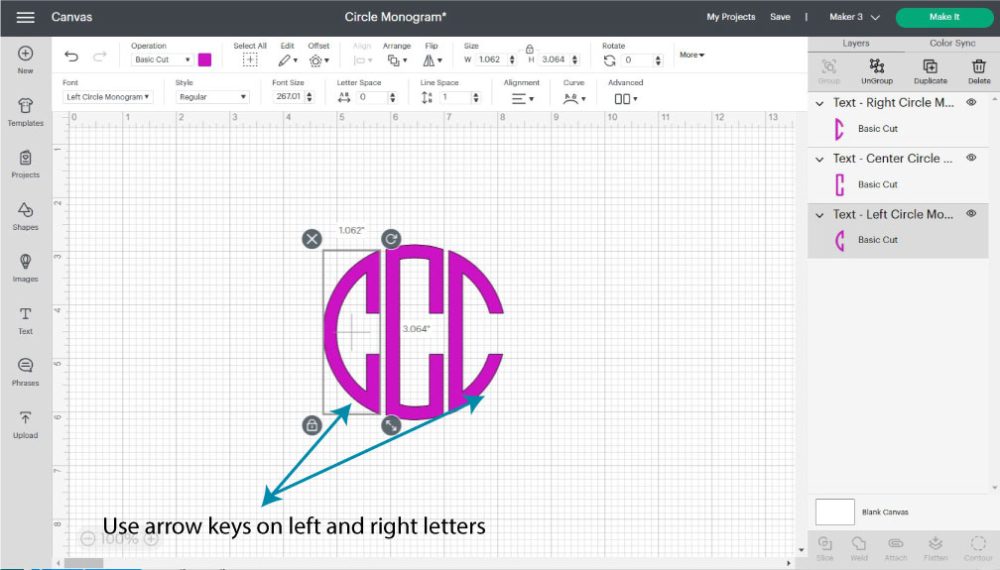
Easy, right?
If you buy that bundle, check out the other fonts. Some of them are a trio like I just showed you, and the others are a single font where you need to change the first and last letter’s size.

For “Fishtail Vintage,” I changed the sizing of the first and last letter; for “Vine Monogram,” I used a combination of upper and lower case letters and sizing manually until I was happy with the look.
Please share it!
Do you know it takes me over 25 hours to complete a single Cricut article? I know it’s wild, but I want to make sure you understand everything!
I would appreciate your support on Instagram , Pinterest , and YouTube as I try to grow my audience and continue producing great content!

Wow, thank you…So easy to follow…Answered so many questions.
You really make using monogram fonts easy and fun. Thank you. I’ll give it a try.