Have you ever tried cutting multiple colors at the same time on one Cricut mat? I have and today I am going to teach you how to do it.
Ok! Let’s dig in a little further…
The KEY to cut multiple colors on a single mat is by attaching all of the different colors in one final piece, and then cut. Depending on the design you want to cut, there will be extra things you need to do; so make sure you read all of this post so you don’t make the same mistakes I did!
When I was first getting started with my Cricut, I couldn’t really understand why did Cricut Design Space wasn’t able to just put all of my colors on the same mat, I seriously clicked on every single button but there’s not real option for it.
Quite frankly I was a little annoyed, because for every color you need to load a single mat, and I don’t know about you, but I am all about saving precious time! – I have a year old that wants to play all the time!
Are you ready?
How to Cut Multiple Colors on One Cricut Mat
After using my Cricut for a while, I now understand why this option isn’t really available.
When I first tried to do this I totally cut into the other colors – I wasn’t organized – and ruined a couple of materials. Plus you also need to consider that you might want to use different materials in a single project as well; even different blades.
Heads UP! DO NOT use this method I am about to teach you if you need to cut different types of materials, you can ruin them, or not cut them at all!
I always recommend you to practice on paper first until you get the hang of it. You don’t want to ruin precious materials. Right?
Now that I got that out of the way, let’s have some fun!
I think the BEST WAY For you to learn is by following along. So, for this tutorial I am using this Hello I’m Awesome FREE SVG, so make sure to download it and practice as you read.
Oh!
Just so you know, I also have a library full of free SVG files and Printables for all my subscribers, a.k.a. Daydreamers. You can see a preview right here or get access by filling out this form.
Step 1 – Upload Your Design
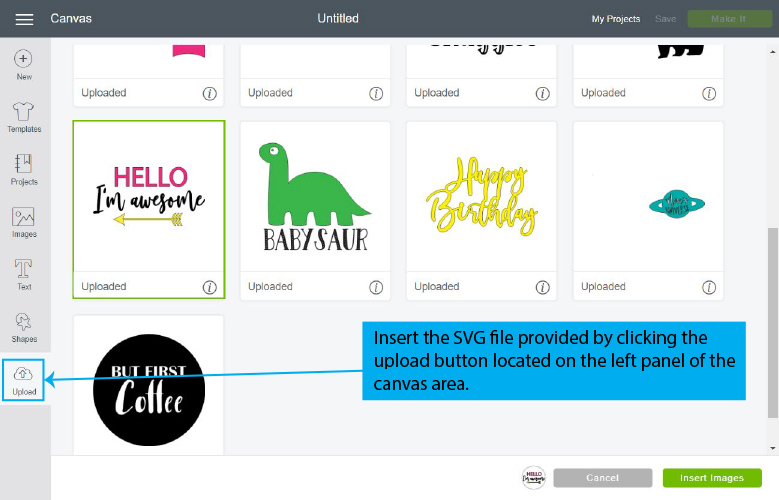
As I just mentioned, the best way for you to learn is by following along. So go ahead, save and upload the”Hello I’m Awesome” SVG file to Design Space.
You can do this by clicking on the upload button located on the left panel of the canvas area.
Once you upload it, select it and then click on Insert Images.
Step 2 – Tidy up your design
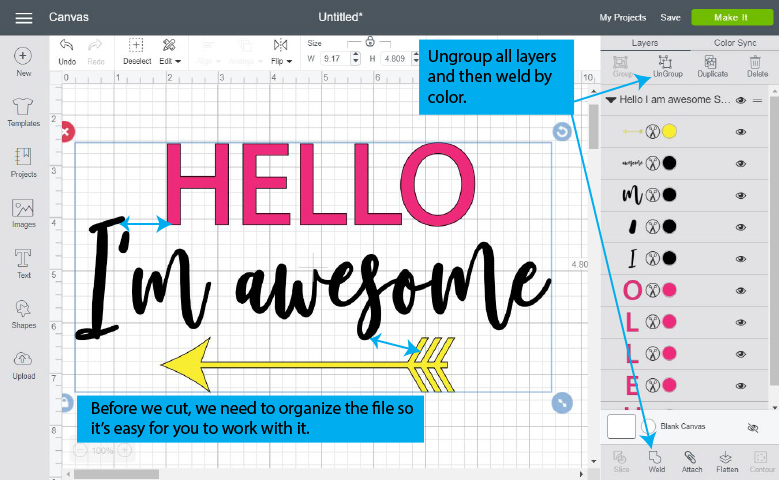
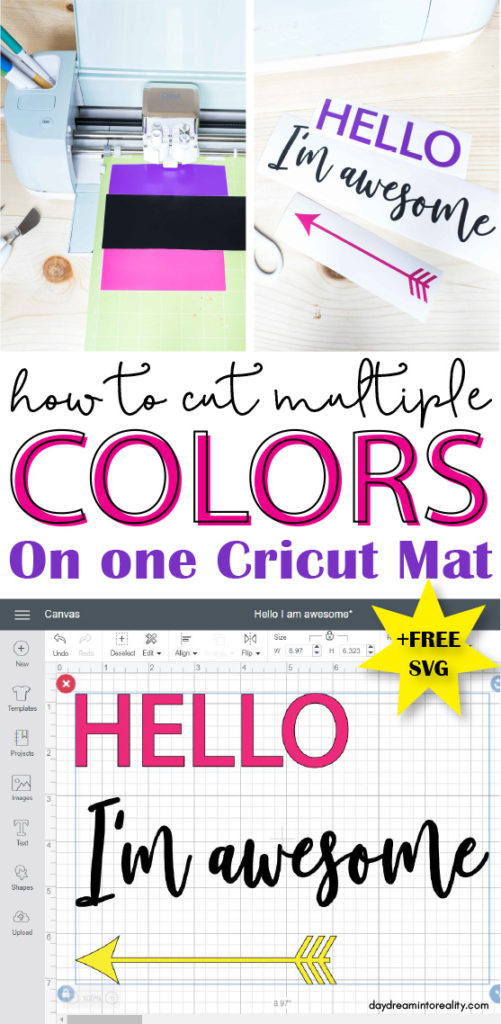
As you can see – in the image right down below – the file needs some work before you are able to cut it all on the same mat.
First select it all and click on ungroup. Then select all of the letters that make up the word “Hello” and click on weld; do the same thing with “I’m awesome”.
Before we proceed there’s something very important you need to consider. This design is set and organized the way we want it to look in real life. However, for us to be able to cut it in different colors we need to move the elements around so there are away from each other.
For instance, look at the little blue arrows inside the design in the graphic down bellow. Although you could cut each material to fit on this example; sometimes you will have more complex projects and that’s a room for disaster.
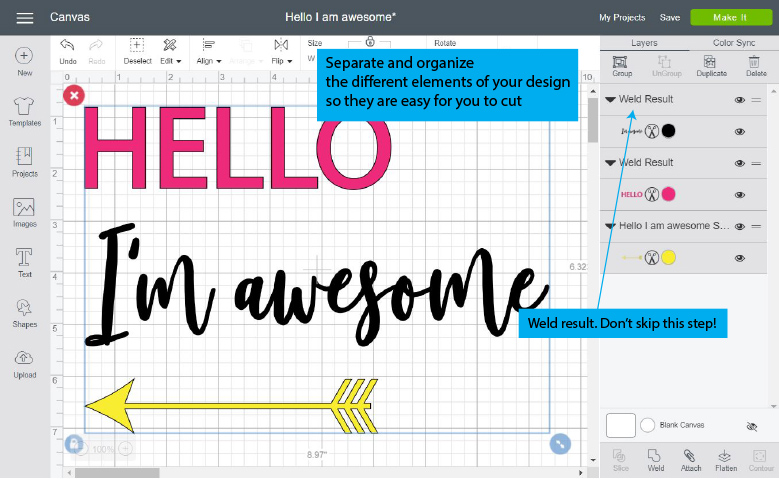
So, what we are going to move all of the 3 elements of this design – Hello, I’m awesome, and the arrow – away from each other. Making sure every element has its own space.
Tip: Before you move the next steps of this project – and as a good practice – copy and paste the original design, group it, and then hide the visibility of it by clicking the little eye on the layers panel. You always want to have a copy of the original!
Note: I wanted to show you a screen shot of how this project would look like if you were going to click on make it at this point.
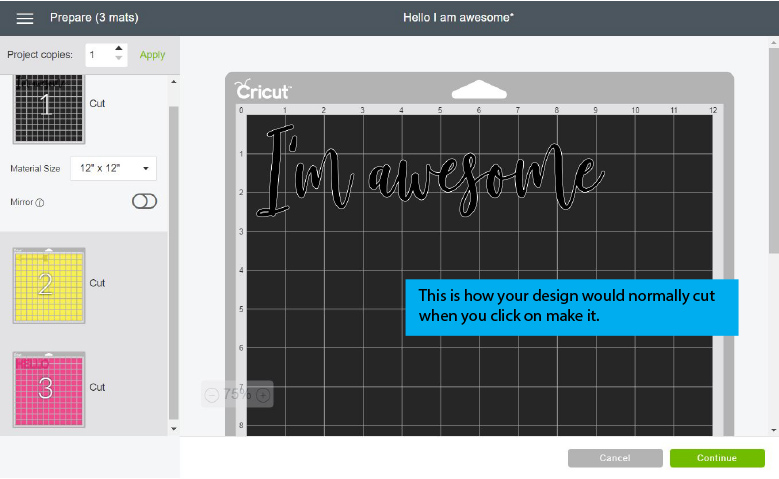
Every mat represents each color, and this is SO USEFUL because from that moment you would just follow the cutting instructions. And you are good to go.
Step 3 – Attach Design and Click on Make it
Once you are done organizing every element and giving it its own space, select all of the elements and click on Attach, and then press Make it.
After attaching, you will see that all of the designs take one color. This is always going to happen, because the number of colors dictate the number of mats you are going to use. And in this case we just want a single mat.
When you attach something you are telling the software that all of the elements will remain together when you send your project to be cut.
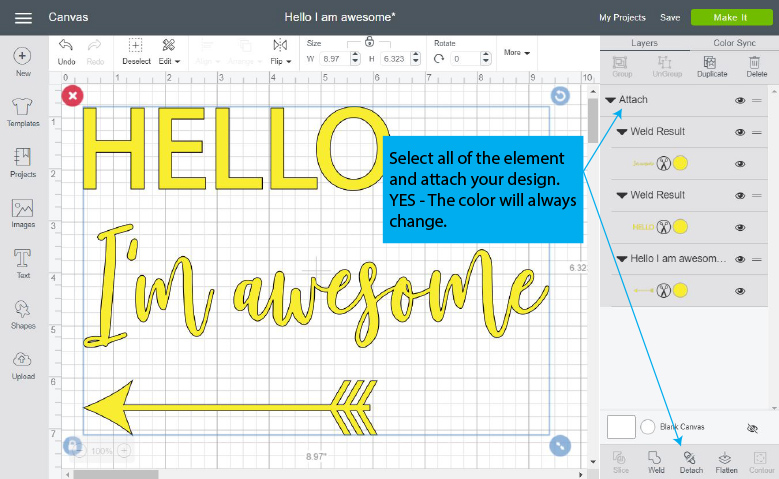
When you press make it, you will see that all the elements are now in one mat! Yay 🙂
However, the work isn’t over yet!
Listen to me, if you don’t take your time doing this part, you WILL waste time and materials.
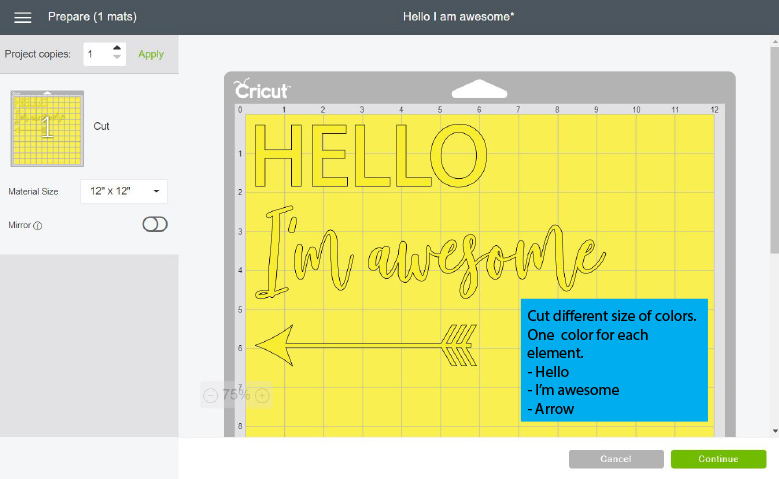
For this project every element represents a different color.
Right?
Now, we need to cut 3 strips. One for each color. The good think is that by looking at the mat we can see what size they are approximately. When in doubt, use more material but be careful to not overlap them.
For this project I used vinyl and I also changed some of the final color to what I had on hand:
- Hello: Originally pink (I used purple). Size: Width 6.5 in – Length 2 in
- I’m awesome: black. Size: Width 9.5 in – Length 3 in
- Arrow: Originally yellow (I used pink). Size: Width 6 in – Length 2 in
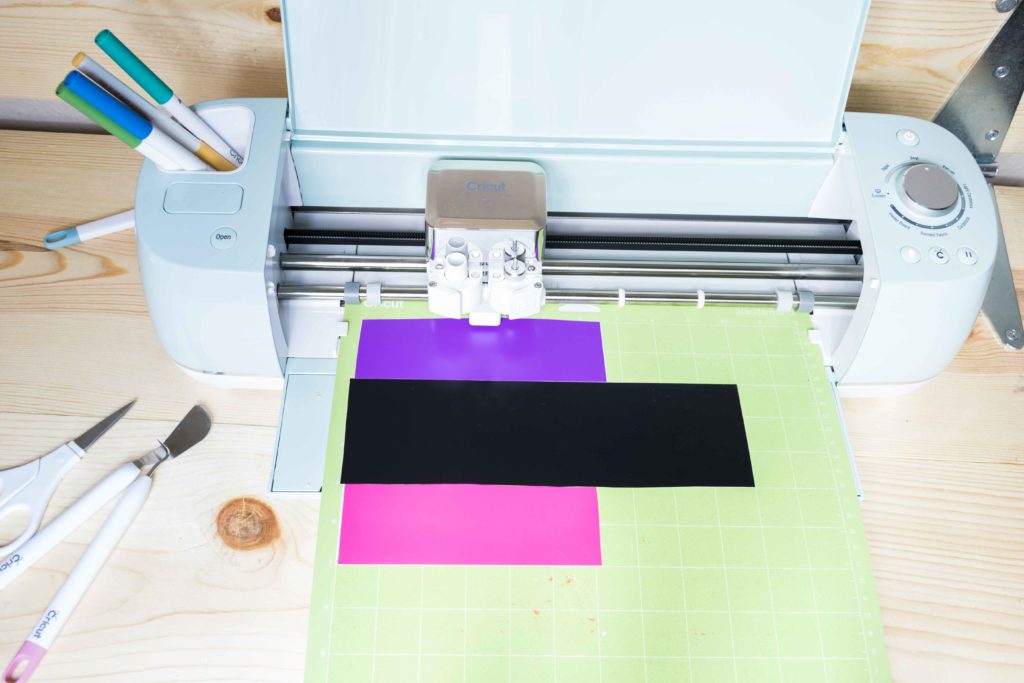
If it’s your first time, I totally recommend you using paper. However, if you measured well you can also use vinyl or any other material you would like.
Once you cut all the different stripes of color; stick them to the mat, then, load it to the Cricut, choose your materials on Cricut Design Space or Smart Set Dial (Explore Family Machine) and press the make it button!
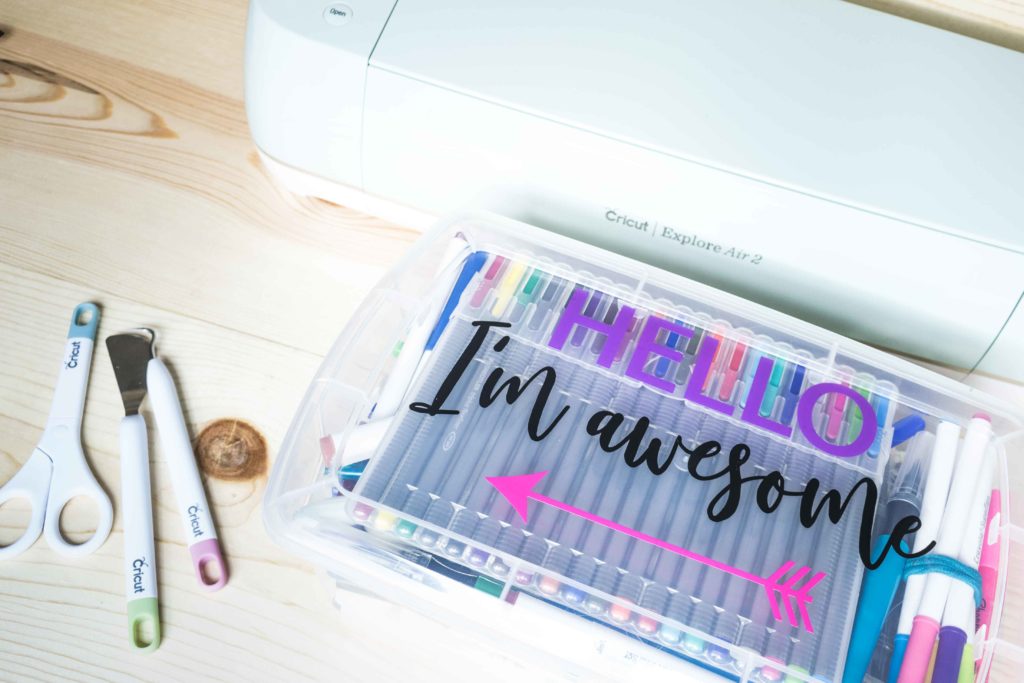
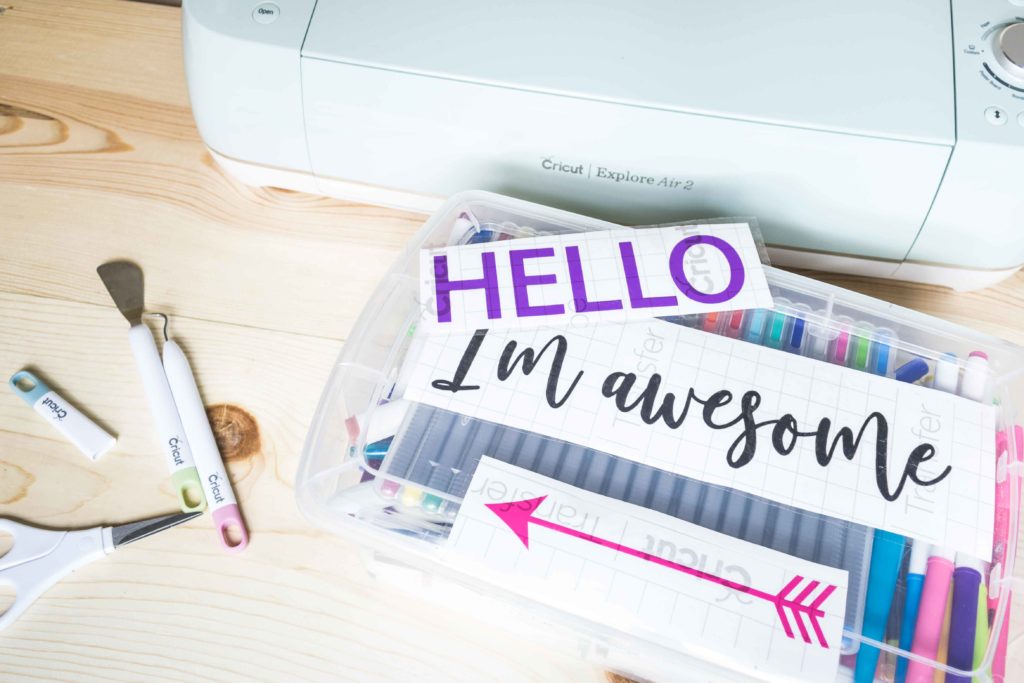
After the Cricut is done cutting. Weed and remove materials from the mat, then proceed to transfer your design! I transferred my design to my giant box of colors and markers.
There you have it!
You just cut all of your project on one single mat!
Pros & Cons of Using this Method
The main reason I use this method is because I don’t like removing and weeding multiple times. I like being done cutting in one step and then have fun weeding and transferring my project.
With that said there are some cons to using this kind of method:
- You need to change the layout of your design 100% (Always save a copy) and measure your materials accurately. This takes time, and the more colors and elements you have, that time will increase.
- You need to do extra steps – cutting strips of color, organizing on Design Space – that you wouldn’t have to do on the normal process.
At the end of the day, there will always be trade off time. You either load and unload the mat multiple times, or plan and organize your project accordingly.
The question is; What do you prefer?
So…
What did you think of this tutorial? Did you like it, are you going to use it?
Crafting with the Cricut is so much fun, and I have tons of tutorials and guides that will make your life so much easier.
If you liked this tutorial, and think someone else would benefit from it, make sure to share it on your favorite social media. By doing so, you are not only helping other people to learn how to master their Cricut, but you are also supporting my work!


Awesome!! I love this!!!!
You’ve cracked the Case Way to go.
Thank you so much for sharing this, I did a project yesterday which required 16 mats of different colors and shapes! I thought there has to be an easier way, and I am really just a newbie to this!
You’re very welcome 🙂
I am new at this, and I wanted to say thank you for shared.
Hey. My name is Teresa and I’ve done several of your projects with you. I love the way you explain things so simply so I’m not confused. I also did your boxes that your Dad helped you design and it took you guys 2 weeks to do. I just wanted to tell you how lucky you are to have your Dad still in your life. So hug him often, tell him you love him and appreciate him because not all of us are as lucky as you to have your Dad still here on earth to spend time with. I cried reading that box tutorial. You are a very lucky young lady and talented too. I lost my Dad when I was 12 and still cry from the pain of losing him. I’m A lot older than you but still need my Dad. God bless you and your father.
Sincerely,
Teresa
Thank you so much for your kind words! I am so blessed to have my dad still!
I didn’t understand when u said u needed to cut 3 strips of each color? Don’t you just need 1 of each color?
You’re correct. Sorry!
I followed along just like you said. Worked perfectly. At the end I said out loud to myself, “well that made sense!” LOL. Nicely explained. Appreciate all the help I can get as a new, rookie Cricut EA2 owner. Looking forward to using this method. Thanks!
That sounds wonderful!
Thanks! I can’t wait to try this! I just got a cricut a few weeks ago & printed multiple colors for the first time yesterday-whew!-I thought there has to be a better way! So glad your site popped up when I googled this.
I am glad I was able to help!
Wow that makes so much sense! I’ve often wondered the same thing, and thought it was so much trouble handling all the different mats. Thank you for providing all the details.
You’re very welcome 🙂
Thank you! for sharing your technique. So plainly taught too.
You’re very welcome 🙂
Would it be easier to just take a pic of the mat and than rearrange everything?
There are many ways you can get to one place! I teach some of the ways, but if you find something that works better you should go for it!
Hi I just got cricut Joy for mother’s Day from my daughter. Will that work for my machine or do I have to have the bigger machine
It will work for the Cricut Joy, but with the size limitations.
Hi Catalina,
I’m new to using a Cricut. I have the Lilac Cricut Maker and I use an iPad Air 3…I don’t have a mouse, so I am trying to figure out how to download your file above. This is not an easy task. I’m still trying to figure this out. I did sign up as a daydreamer though, so maybe I will be able to access it better that way.
Also, when you use the phrase “tide up your design”, I think you mean “tidy” up your design. That makes more sense. Tidy means, to fix up/arrange/sort out. Tide means, waves coming in.
I’ll comment again, if/when I figure out how to download your SVG file onto my iPad. If you have any advice for saving this SVG to my iPad, let me know. Thanks.
Take care and have a great day.
Jenifer
Hi Jenifer! Thank you so much for the spelling heads up! I just corrected it! As far as the SVG goes it’s mainly for Desktop users. I will be making a video soon to show you how to do it from your phone/iPad.
I’m getting ready to start making shirts for Disney in the winter. I have an act that is a black Minnie nose with white snowflakes inset and a buffalo plaid Minnie bow. How would I do all three? If I use a black vinyl for the Minnie, will the snow flakes automatically get cut out, then they would show up on the white shirt? Then cut out the bow separately on the buffalo plaid vinyl and fit where the Minnie ears would go?? Help me!!!
Hi Sarah, I recently wrote an article on how to work with Iron-On. Maybe it can help? There are also tons of tutorials on Youtube for these types of tutorials.
Thank you so much, this was really helpful!! I think it’s so much easier to layer when I can take the transfer tape down the mat instead of keeping everything free of pet hair while I change mats. lol
I am happy this tutorial helped! 🙂
Directions were very clear and straight forward. Thank you.
You’re welcome 🙂
This is wonderful , I just got my cricut for Christmas haven’t done no project yet but looking forward to following you.. thank you so much you make it look so easy..
You’re very welcome!
Thanks I also didn’t know this awesome
Another great tutorial!!
Thank you!
This was great…However I put them all on the same mat when I’m at the cutting page. After all the colored mats show up I click on the object on one color. When the object it highlighted there is a box on the left corner that I click on. It gives you the option of “Hide” or “Move to another mat.” I choose to move it to the main mat. At this point it will show up on the mat I chose and then I move it to a spot where I can put another piece of vinyl. It’s basically what you have done before sending it to cut.
I’m going to try your way next time to see which way actually saves time ?.
Thanks for your ideas!
Hi Ruth!!!
I had no idea about your method! I need to try it ASAP! That’s amazing.
Thank you so much!
I’ve gotta try this I hate changing mats! Thank for sharing!
You are more than welcome! Let me know how it goes.
Hi Catalina! I found you on Pinterest yesterday and have been avidly reading your posts. I am new to all this, bought my Maker in November but only unboxed it last month. The only project I have done is the sample one they included material for.
I love your idea to put everything on one mat if possible!
I followed along and understood everything except the copy and paste part. I copied and pasted the group to a spot lower on the canvas, then clicked the eye on each part, it disappeared off the canvas but still shows on the right section. I didn’t notice that on your example. I guess I don’t understand what you mean by copy and paste.
Anyways, I just wanted to let you know how much I appreciate your sharing and God Bless!
Corinna
PS I stay on Catalina Island for a few days back in the 80’s, I loved it so much!
Hi Corinna! I didn’t do that part because I thought of it later – after screenshots – It’s basically a way for you to have an extra copy of the original design in case you want to go back to it. It’s always goo to have a back up. When you cut the design it won’t appear because you hid it! I hope that helps 🙂
There’s a duplicate button next to the “eye” button Catalina mentioned. Use that to make a copy of your design. Just make sure you click and drag a box around your design so you select it entirely. (Much like you’d do to attach it all on your modified design.). Then, press the eye button to hide it after you have moved your original copy to a place out of the way on the design grid.
Thanks for all of your tips. I really liked the information on cutting multiple colors on one mat. I really want to know how to create a T-shirt design that has letters of different colors on the same line or in the same word. Can you help me?
Hi Parisa. I’m glad you like these tips!
For a word. You would basically do the same on this post but type a letter at the time.
You will have to have the squares of letters well defined.
Or, You can use letter spacing to make the letters more spaced out. Then when you click on make it; Make sure your different pieces of vinyl match their position with a letter on the mat! (Check our my article https://www.daydreamintoreality.com/edit-text-cricut-design-space/ if you don’t know how to do letter spacing)
Vinyl is expensive. If you have doubts try it with paper first:)
I hope that helped! Have a great night!