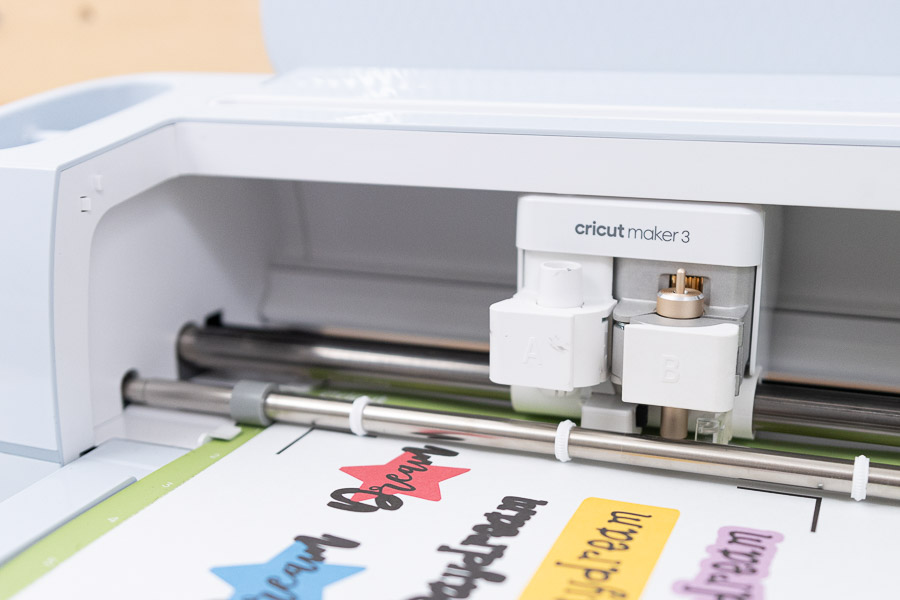
Hello Daydreamers!
Today, you’ll learn everything you need to know about “Print then Cut” with your Cricut machine.
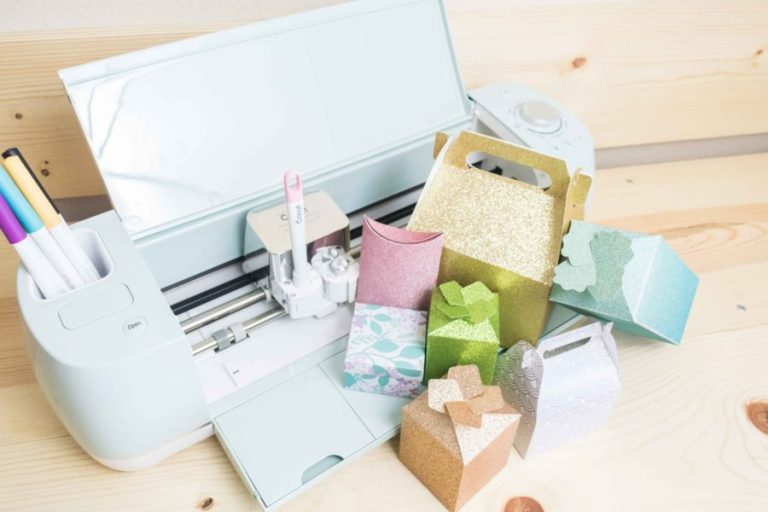
The “Print Then Cut” operation lets you print your designs and cut around them. When you select an element or design to be printed and cut, Design Space sends it to your printer, and subsequently, it is cut.
This feature is one of my favorites because I can make stickers, do homeschooling activities for my kids, create printables, etc.
Since I don’t want you to get lost, these are the topics I’ll cover in today’s tutorial:
- Machine Specifications
- Types of images you can use for “Print Then Cut”
- Design Space tutorial with all sorts of examples
- Printing and cutting process
- Troubleshooting if you’re having issues with your project
Tip: This tutorial builds upon the skills I teach in every step. If you’re just starting with your machine, I suggest you read and follow each step.
If you are a beginner still figuring out Cricut’s software, I recommend this comprehensive and easy Design Space tutorial.
Print Then Cut Sizes per Machine
Cricut Joy Xtra: This machine supports “Print Then Cut” on standard 8.5 x 11-inch (Letter) and 8.3 x 11.7-inch (A4) papers, with maximum project sizes of 6.75 x 9.25 inches and 6.51 x 9.93 inches, respectively. It is compatible with both matte and glossy materials. However, it does not support larger paper sizes like Legal, Tabloid, or 12 x 12 inches.
Cricut Explore Series (Explore 3 and newer): These machines can perform “Print Then Cut” on various paper sizes, including Letter (8.5 x 11 inches), A4 (8.3 x 11.7 inches), Legal (8.5 x 14 inches), Tabloid (11 x 17 inches), and A3 (11.7 x 16.5 inches). The maximum project sizes range from 6.75 x 9.25 inches on Letter paper to 9.95 x 14.75 inches on A3 paper. They are compatible with both matte and glossy materials.
Cricut Maker Series (Maker and Maker 3): These machines offer “Print Then Cut” functionality on the same paper sizes as the Explore series, including Letter, A4, Legal, Tabloid, and A3. The maximum project sizes are similar, ranging from 6.75 x 9.25 inches on Letter paper to 9.95 x 14.75 inches on A3 paper. They also support both matte and glossy materials.
Cricut Venture: The Venture model provides the most extensive “Print Then Cut” capabilities, supporting larger paper sizes such as 12 x 12 inches, 12 x 18 inches, 13 x 19 inches, 16.5 x 23.4 inches (ISO A2), 24 x 12 inches, and 24 x 28 inches. The maximum project sizes vary accordingly, with the largest being 22.25 x 26.25 inches on 24 x 28-inch paper. This machine is ideal for larger projects and is compatible with both matte and glossy materials.
It’s important to note that while the Cricut Explore 2 and older machines can only cut on white and matte-finished paper, the newer models, including the Joy Xtra, Explore 3, Maker 3, and Venture, have enhanced sensors that allow cutting on both matte and glossy materials.
Here’s the Information in a handy table as well:
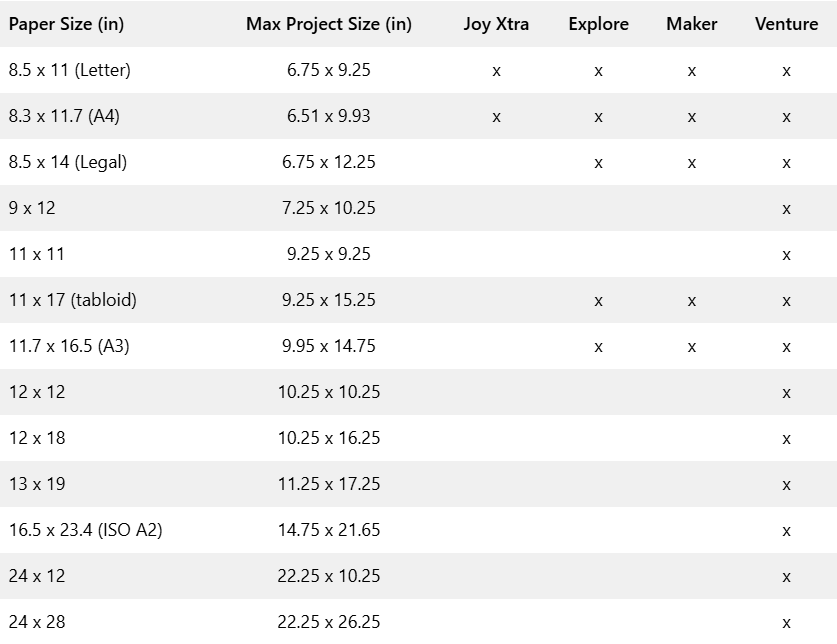
This “Max Project Size” is a little tricky because while I moved between machines, I could sometimes increase it just a tad more.
For instance, I noticed I could do a 7.5 x 7.4 in project for letter-sized paper but not a 7.5 x 9.25 in. This means that your project size can increase in width or length depending on the type of shape (rectangular, circular) you want to print.
I want to give you accurate information, but you are welcome to increase your project size by 0.01 inches to see how big you can make it.
I am quite disappointed that Cricut didn’t allow “Print then Cut” on 12 x 12 paper for the Maker and Explore Machines. Hopefully, they do at some point.
Change the Size of Paper
You can change the type of paper size you want to print for your project in two ways.
The first way is to click on the top drop-down menu and go to settings. A small window will open. Click on “Load Type” and choose the “Print Then Cut Page Size” you want to work with.
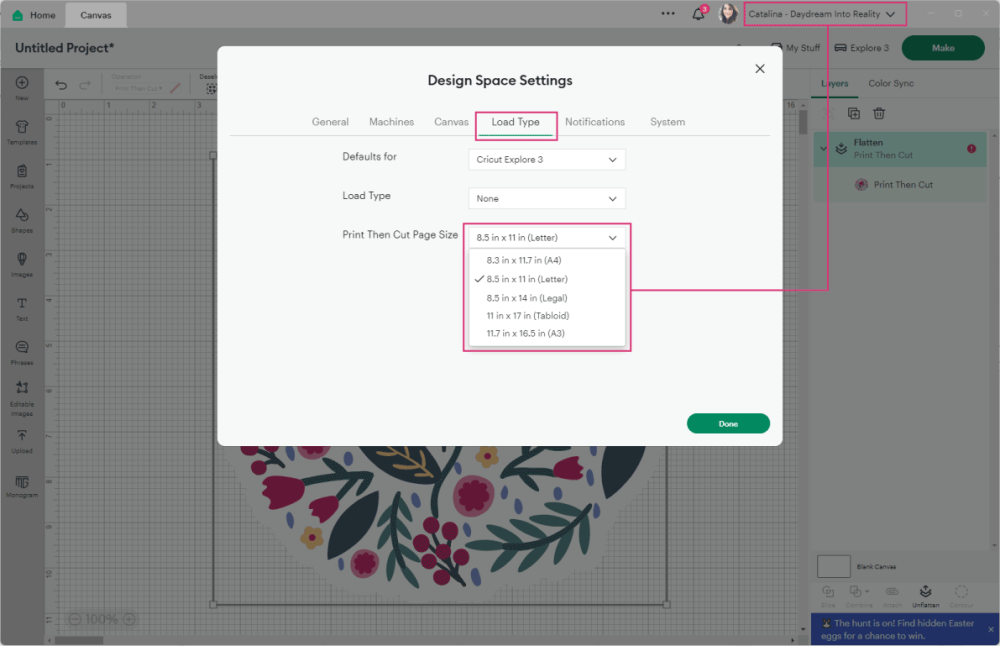
All my paper is 8.5 x 11 in, so I will stick with letter paper.
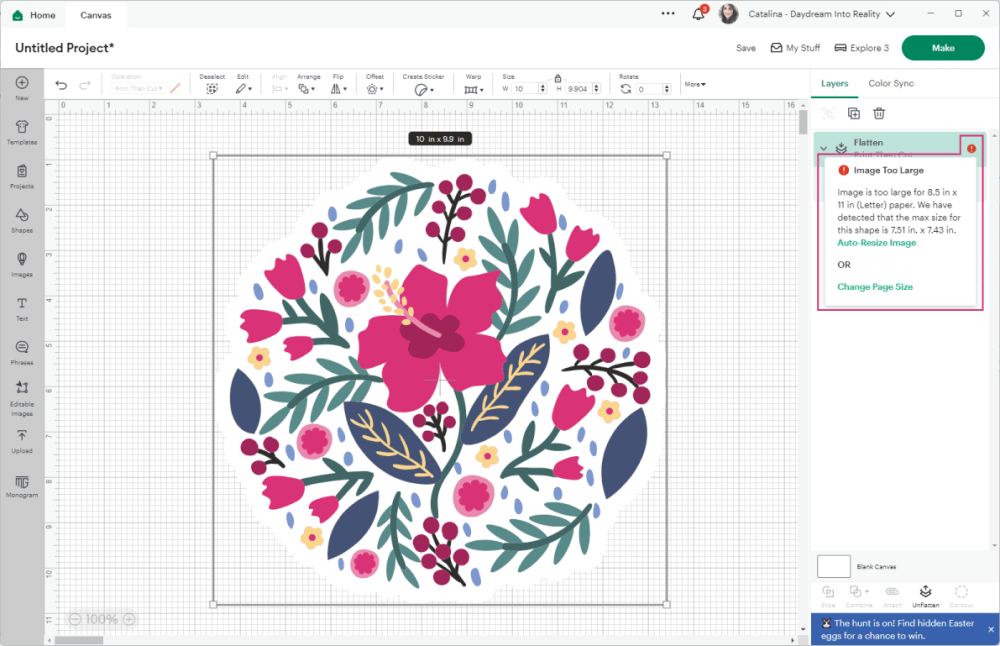
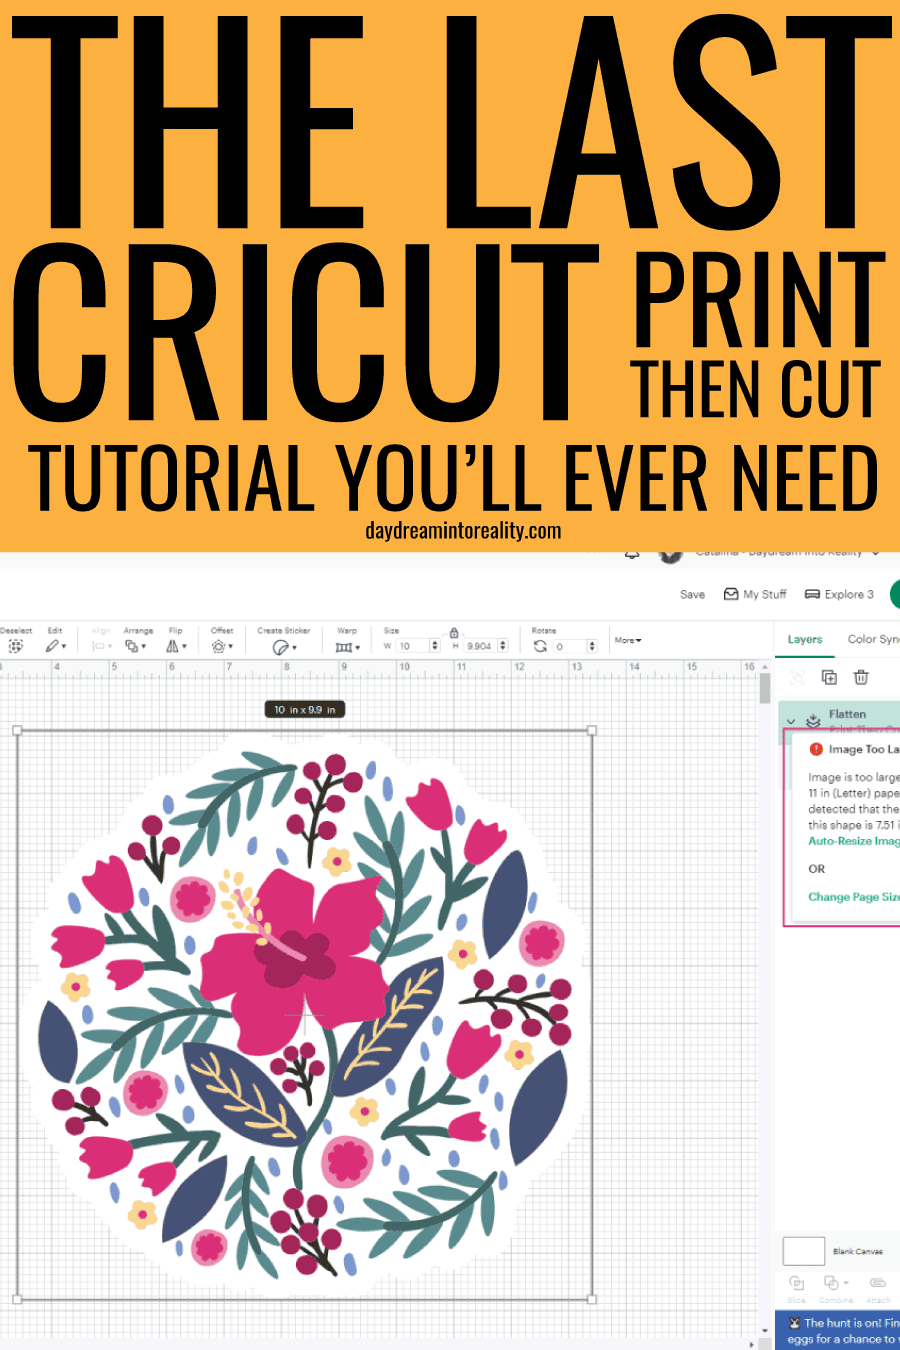
The second way is through the layers panel. If your image is bigger than what your machine can support, you’ll have an error notice, and Cricut will prompt you with a message to resize your project and open the “Load Type” settings window.
What types of images can I use?
You can “Print Then Cut” any image you upload to Design Space or from Cricut Access.
I won’t go into detail on how to upload each type of image to Design Space because I have a great tutorial on how do it. However, I want to mention three types of images and the differences you need to know to have a good experience with “Print Then Cut.”
- Images With a Solid Background – JPG: These types of images are often very busy and usually have a solid background. They require extra work because you must isolate the image you want to cut.
These images have specific extensions; you can recognize them when they end in .jpg, .gif, or .bmp. - Images with a Transparent Background: These images are a great fit because the main image, text, or element you want to cut is isolated and placed on a transparent background. However, if you try to make them bigger, they can lose some of their quality and look pixelated.
You can recognize them when they end in .png. - Vector Images: These are the best images you can use across Cricut Design Space. They are also called SVG or Cut files. The good thing about SVG files is that you can resize them without losing quality.
You can recognize these images when they end in .svg or .dxf
Step-by-step Tutorial
This is a functional tutorial, and It’s not meant to look super pretty or anything like that. It’s intended to teach you all your possibilities with “Print Then Cut.”
These are the following things we are going to use:
- Uploading Images
- JPG Image
- PNG Image
- SVG File
- Shapes
- Patterns
- Images
- Text
- Offset
Upload Images to Cricut Design Space
Use the following images to follow along.
To download the file(s), you need to be on a desktop or laptop and click on the button to trigger a download file on your PC. However, I’ve noticed that I can also download them from my iPhone.
Depending on your browser settings, your PC sometimes asks where to save the file, although most files will be in your download folder.
If the image opens in a new window (this may happen because of your browser settings), right-click on it, select the option “Save Image As,” and choose where you want to save the file.
SVG files look like web page files when you download them.


Oh!
Just so you know, I also have a library full of free SVG files and Printables for all my subscribers, a.k.a. Daydreamers. You can see a preview right here or get access by filling out this form.
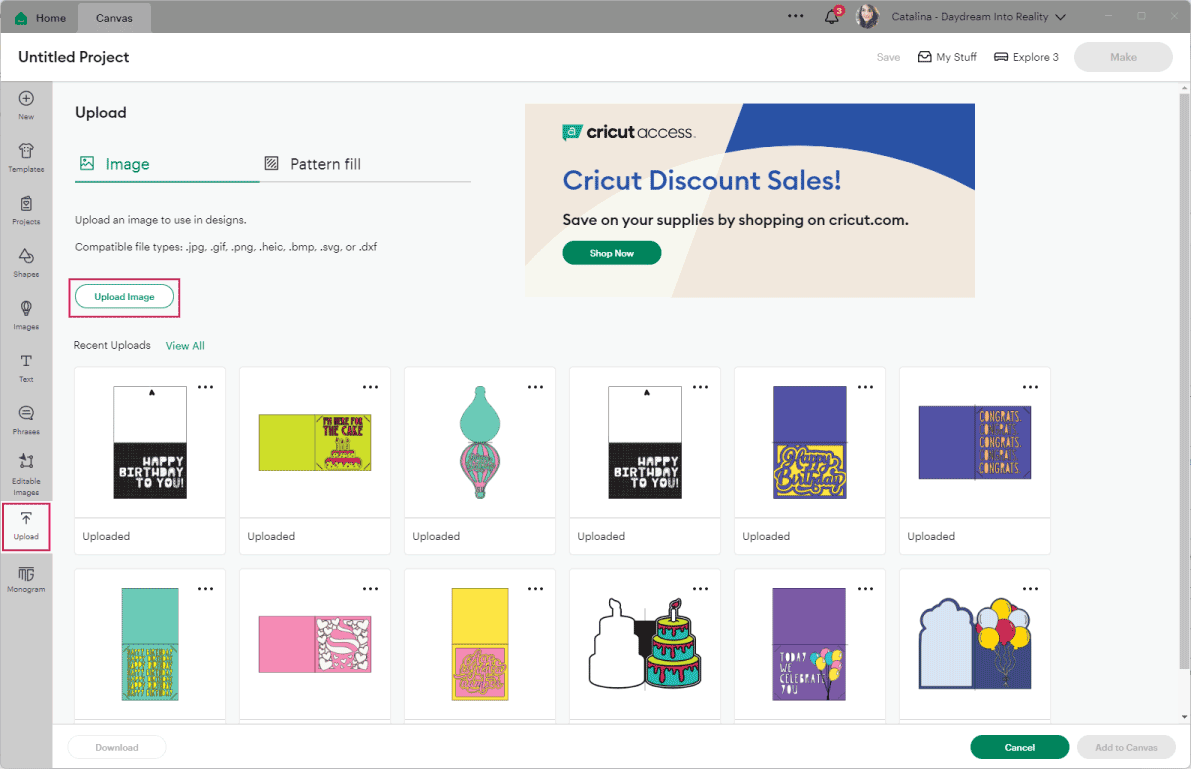
After saving the images on your computer, log in to Design Space and click “Upload” on the left panel; then click on the “Upload Image.”
A new window will pop up, asking you to locate the file on your computer. Search for the image and double-click on it to upload it.
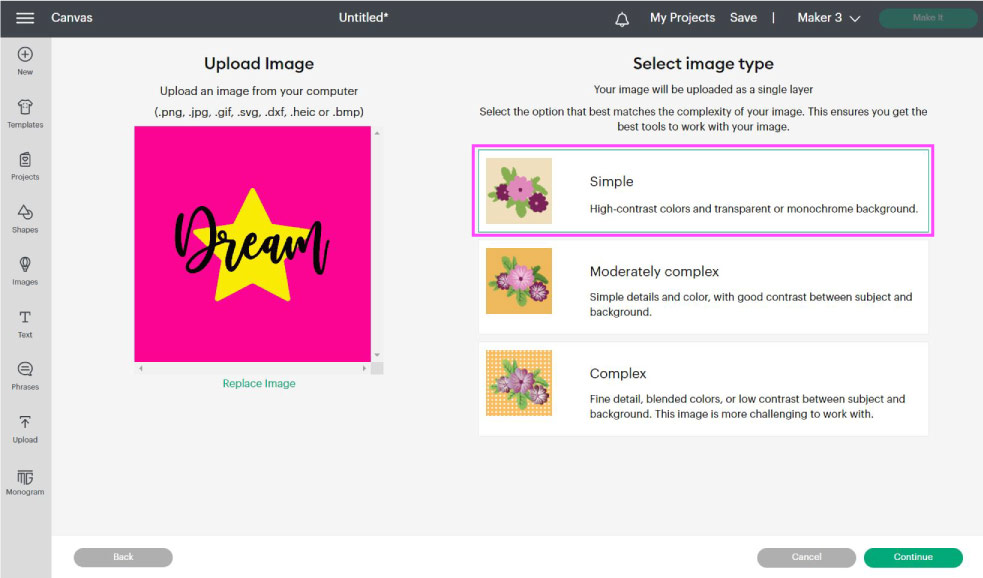
We are working with a JPG file; therefore, Cricut doesn’t recognize all of the elements that make the image. The only thing Cricut can detect is a big square.
Since this design has only three high-contrast colors, select “Simple” and click on “Continue.”
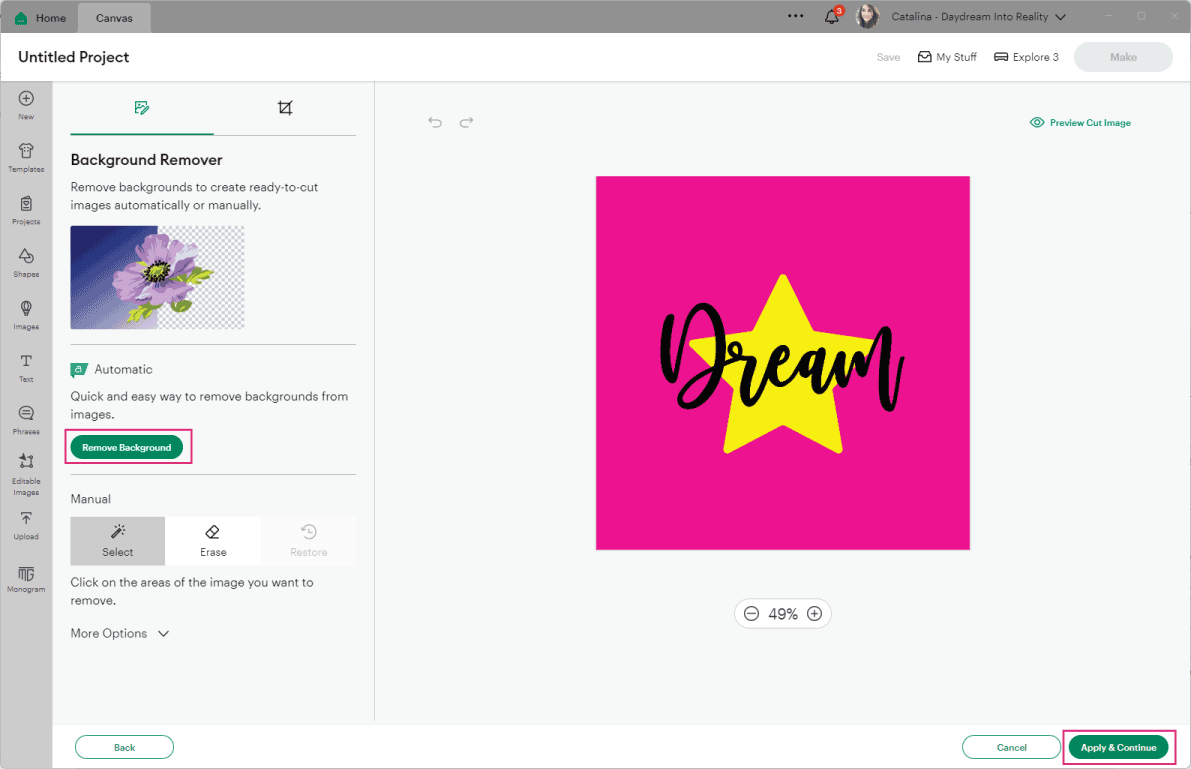
In this section, you have different options for cleaning up the file. I suggest you play with them to see which is better for your image.
My favorite way to clean up JPG images is by using the “Remove Background” button. However, depending on the type of image you have, you can also use the wand and eraser. For this tutorial, I am choosing to keep the image as is.
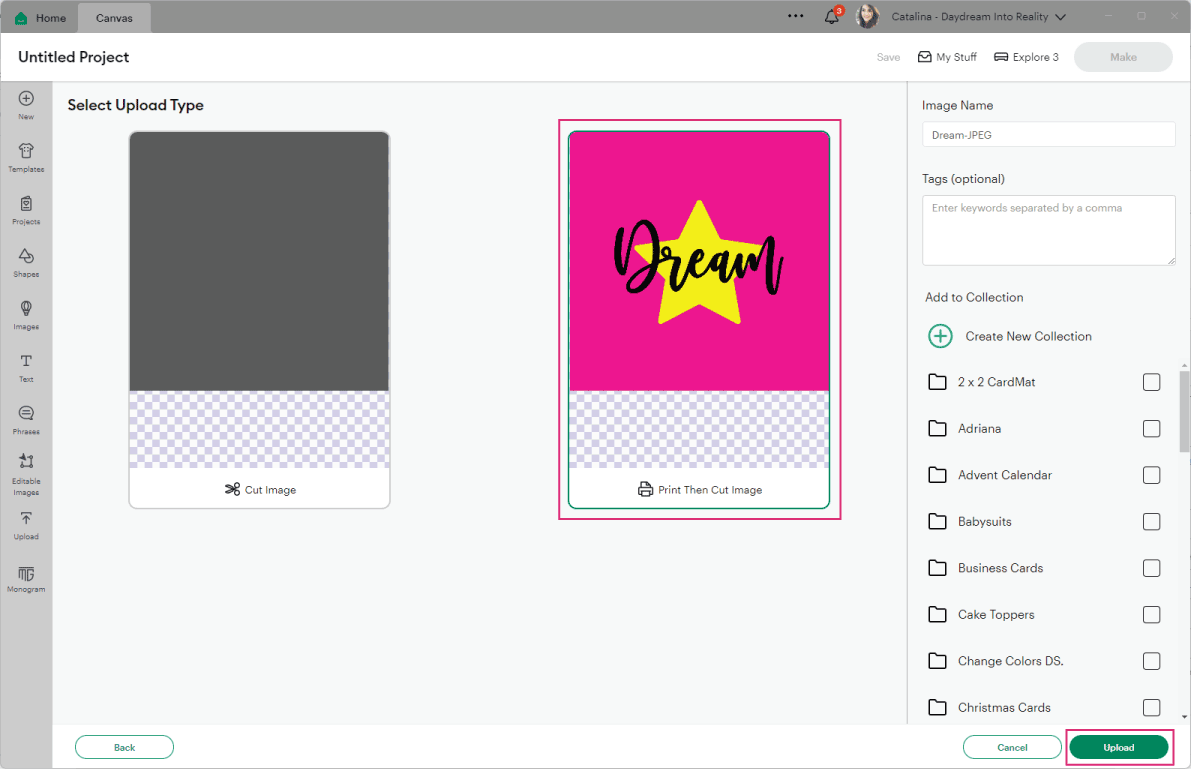
In the next step, you will see that you have two options. The first is to save the file as a “Cut Image,” and the second is to save the file as a “Print Then Cut Image.”
Select “Print Then Cut.”
The PNG image – dream and pink star – already has a transparent background, so there’s no need to delete anything:
- Upload image
- Select “Simple”
- Click on continue.
- Save as a “Print Then Cut.”
The SVG file is the easiest to upload. You only need to upload it, name it (optional), and finally save it.
After uploading the third file, select all three images and click “Add to Canvas.”
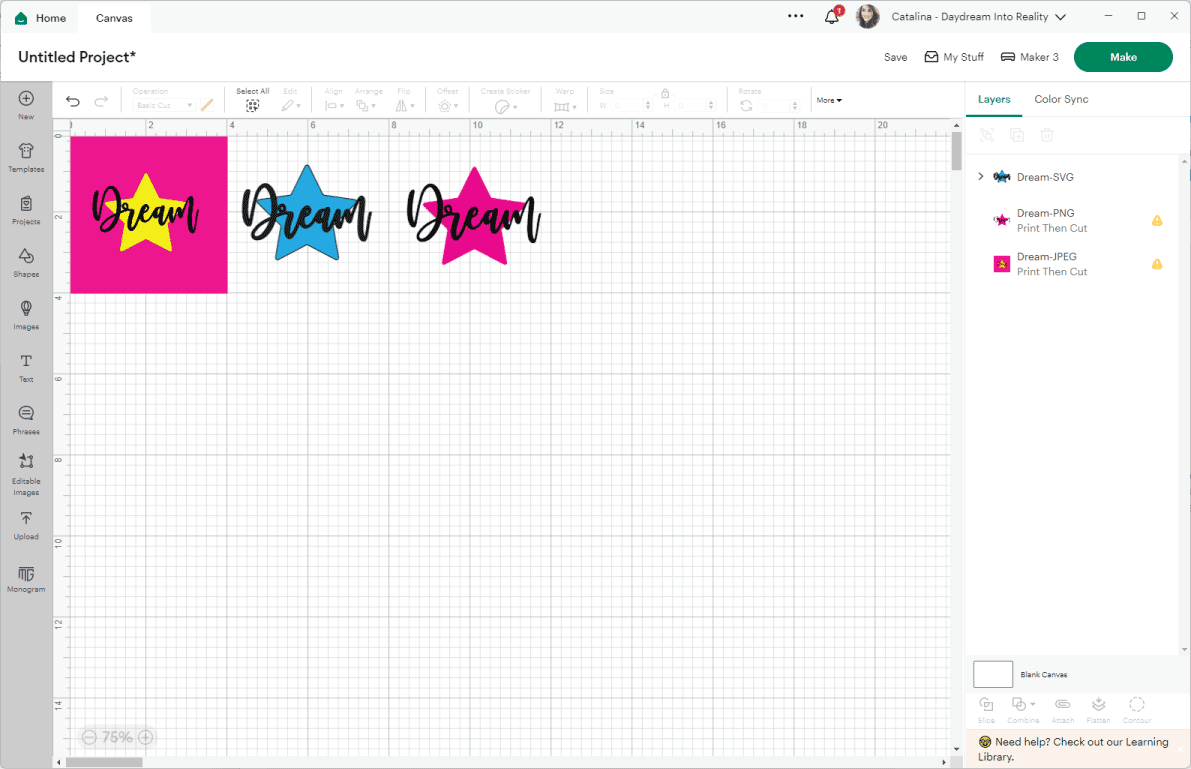
All files should now be on the canvas; they are most likely scattered around, overlapping each other, and in different sizes.
Go ahead and tidy up the canvas area so it looks like the screenshot is down below.
Watch out! You are about to read the most IMPORTANT part of this tutorial.
If you were going to do this project right now, your machine would only “Print Then Cut” the designs with the yellow and pink stars. (Remember, we saved them with this option in mind)
Why wouldn’t Cricut print and cut the design with the blue star?
The ANSWER is quite simple. This file is a CUT or SVG file. Whenever you upload these files, your Cricut will assume you want to cut and nothing else.
How do you tell your machine to “Print Then Cut?“
There are two ways to tell your machine that something needs to be printed and then cut. The first is through “Operation,” and the second is “Flatten.”

Most beginners will change the “Operation” to “Print The Cut,” but this is not how you usually “Print then Cut” an entire project.
The problem with “Print Then Cut” as an “Operation” is that if you have cut files (blue star and word dream) that overlap each other or have different colors, instead of cutting around the edges as a whole, your Cricut will cut each design on a different mat; and, even if you try attaching them, one of the elements will cut through the other one.
When using “Print Then Cut,” add all of your elements (text, patterns, shapes, offsets, etc.). At the end, select them all and click on the “Flatten” tool at the bottom of the Layers panel.
I want to explain the logic behind how things work, even though it may not seem easy.
Attaching and “Print Then Cut” as an operation can be used together to accomplish other projects like printing and not cutting a part of your project or adding a background to a sticker sheet.
Add extra touches – Cricut Images, Text, Shapes, Patterns, and Offsets
It’s been a lot, right?
Take a moment to stretch out, maybe grab some tea or a snack, and let’s explore more things you can “Print Then Cut.” As I just mentioned, don’t worry about “Operation.” yet.
Cricut Images
All Cricut Images can be used with the “Print Then Cut” operation. Cricut has really cute stuff in its library. If you have Cricut Access, your possibilities are almost endless—there are over 250,000 images for you to pick from!
To access them, click on the “Images” icon on the canvas’s left panel. Cricut has multiple filters, which I often use to narrow my search on some of my projects.
If you want to use something free, click “Ownership” and check the option “Free.”
To find the exact image I used, type in “Dream Believe” in the search box.
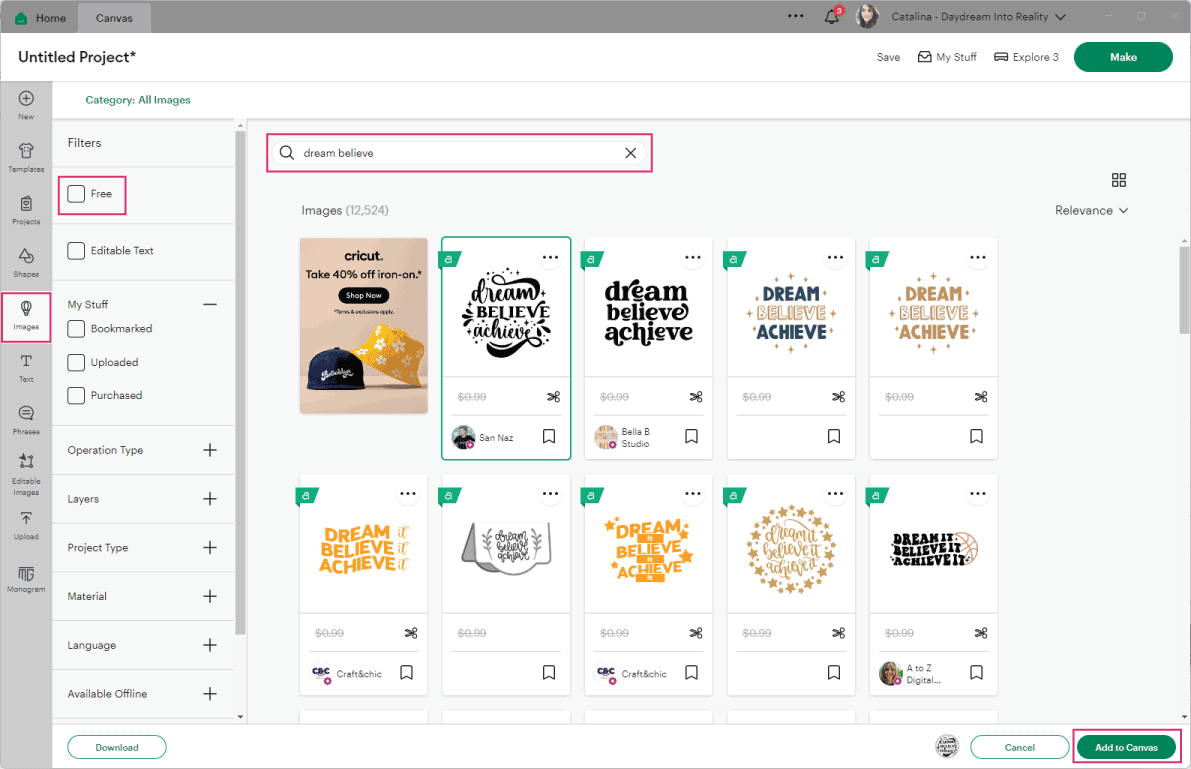
Once you find your favorite image, select it and click “Add to Canvas.”
Add Shapes and Patterns
I want my image to be on top of a beautiful patterned circle.
To add a circle to the canvas area, click on the “Shapes” icon on the left panel. Then select the circle and change the “Operation” from “Basic” to “Print Then Cut.” Then click on the color box to change the “Print type” to “Pattern.”
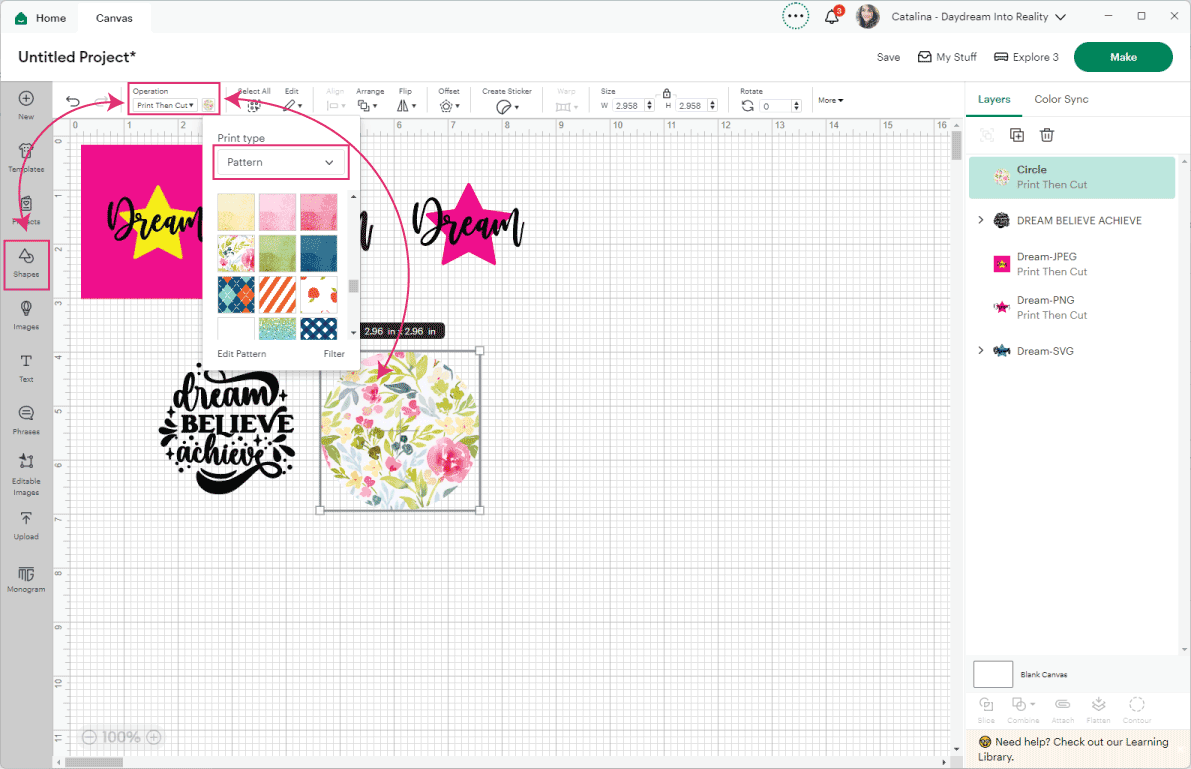
Now, you get to pick your favorite pattern. Cricut has hundreds of them, and they seem to be free for now, so take advantage of this!
After picking your pattern, center the image (Dream, Believe, Achieve) on top of the circle.
Tip: The circle will most likely be on top. Right-click on the image and select “Move Forward” to bring it forward.
Add text
Text adds so much value to any design! To add it, click on the text icon on the canvas’s left panel.
I added the same word twice to share a point with you.
If you are using paper, you most likely want the text to be together. If you leave the word on its own, Cricut will cut each letter, and If this is what you want, great. However, if you want the entire word to remain together, you need to place it on top of a shape.
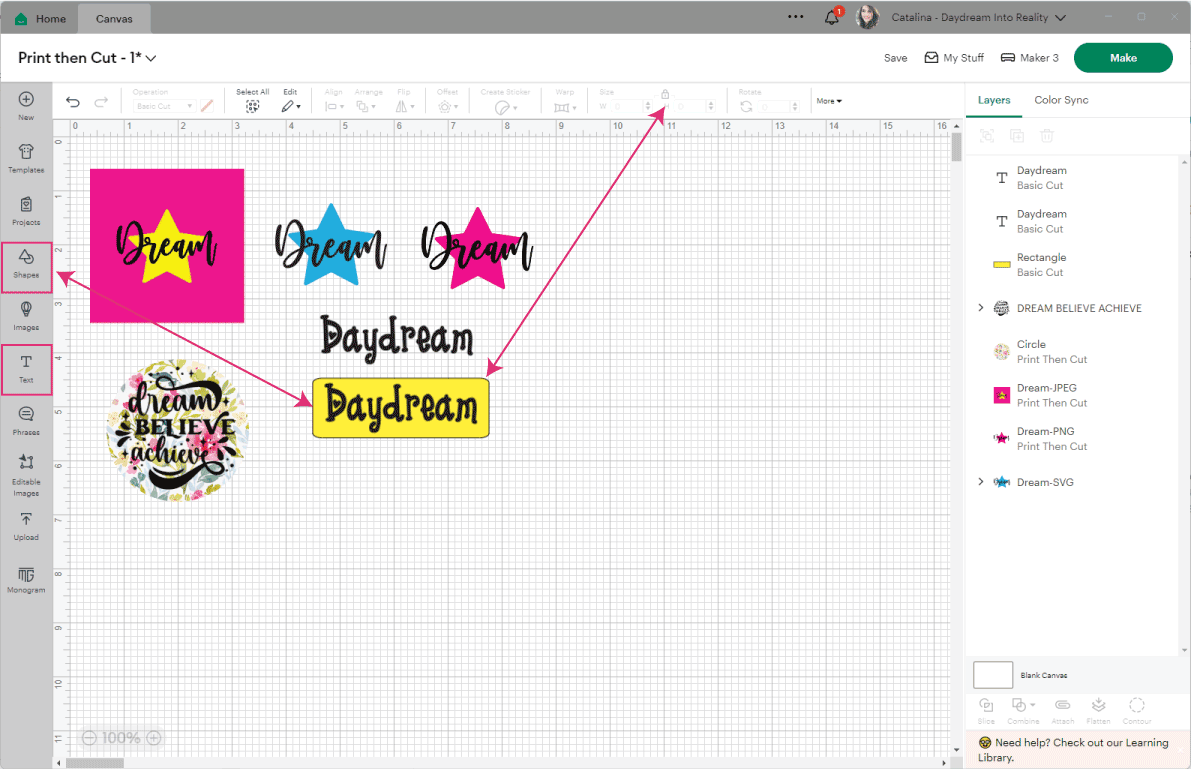
In this case, I added a square and unlocked its proportions to make a rectangle; then, I changed the color to yellow and typed daydream on it.
Add Offset
One of the coolest tools for “Print Then Cut” is the “Offset” tool.
The “Offset” tool allows you to create a proportional outline inside and outside of text, images, and shapes, and it’s perfect for making all sorts of stickers and other “Print Then Cut” projects.
Take a look at the following screenshot.
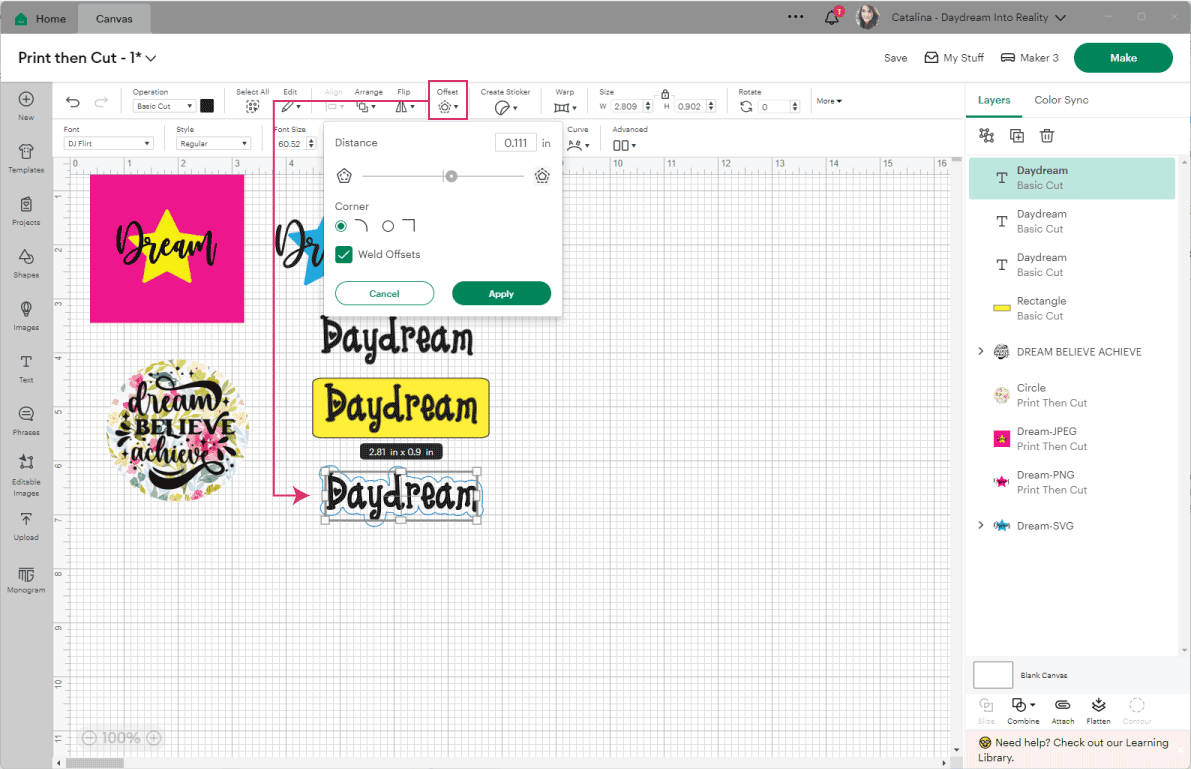
Make a copy or “Duplicate” the text we just used in the previous step.
Select the copy and click on “Offset.” Adjust the slider and click “Apply” to create a proportional outline of the text.
When you first create the offset, it will be grey or black. As you can see, I added the same pattern that I used on the circle.
I invite you to play with the “Offset” tool and see what looks good together.
Check out my offset tutorial for more ideas.
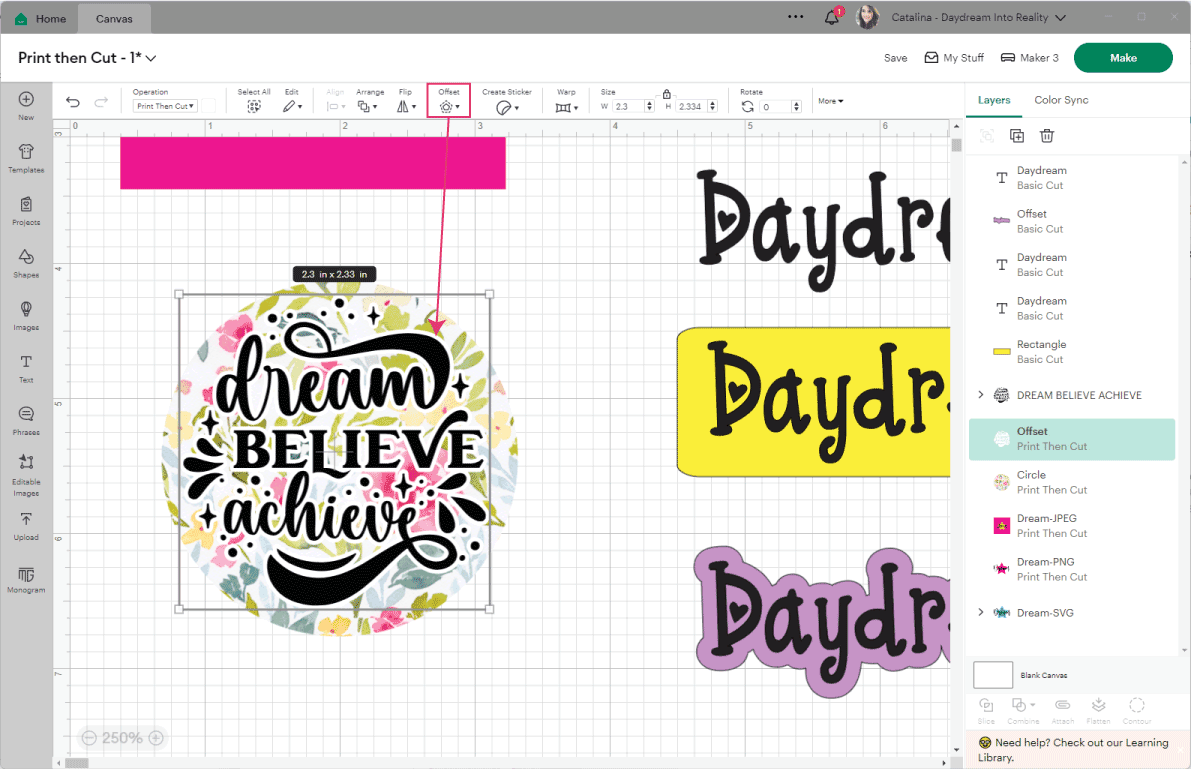
I also added an offset to the “Dream Believe Achieve” image to increase the pattern’s contrast with the image.
Flatten and Resize your Design
Do you remember the talk we had about “Operation” and “Flatten”? Since we are done with all the designing, we need to tell Cricut that all images, text, and shapes need to be “Print Then Cut.”
If you look at the layers panel (on the right), you will see that not all the elements have the “Print Then Cut” attribute; some are set to “Basic Cut.”
However, as I explained before, you can’t just change the operation from “Cut” to “Print Then Cut.” You need to compress all elements that make this project into ONE SINGLE LAYER.
To do this, click on “Select All” and then on the “Flatten” icon at the bottom of the layer’s panel.
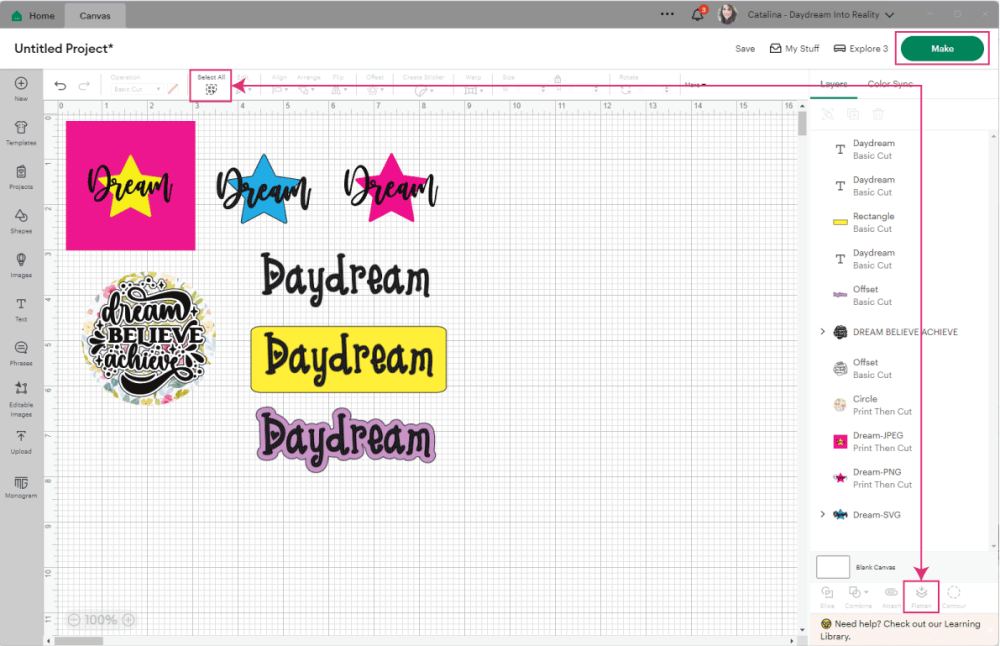
Notice that after flattening, you only have ONE layer!
Now that we finished with the designing process, click “Make.”
Note: When using letter-sized paper, the final size can’t be larger than 9.25 x 6.75 in. If your design is bigger, select the already flattened layer so you can continue.
Print and Cutting Instructions
Finally.
It’s cutting time!
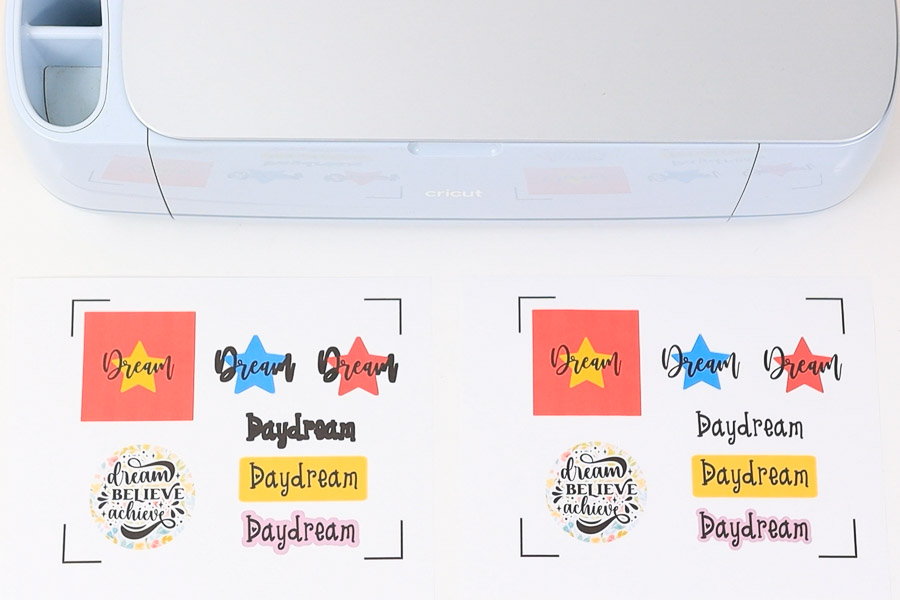
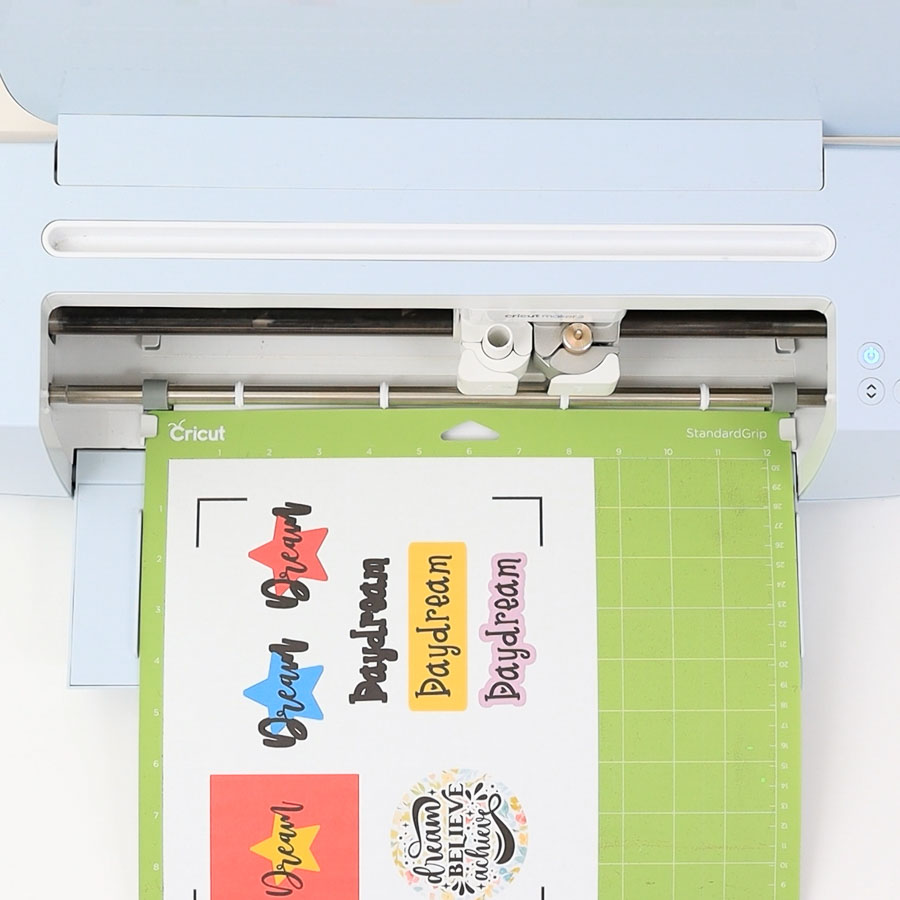
The following screenshot shows you what your print should look like.
After you are done printing, you need to make sure that you place the paper on your Cricut Mat exactly as you see it here.
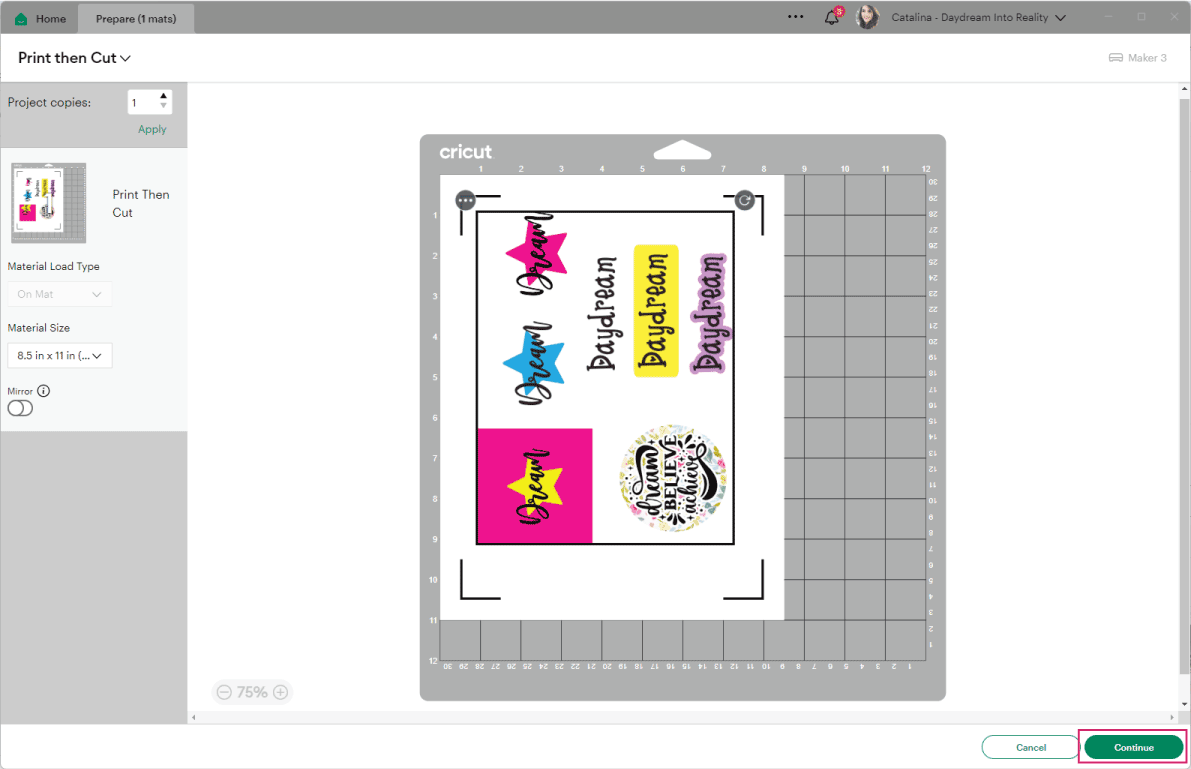
Tip: on “Material Size,” if your design is small enough to be printed in either A4 or letter paper, you can change the paper size you’re going to use.
One of the questions I get asked the most is how to get rid of the black lines when I “Print Then Cut.”
Unfortunately, you can’t get rid of it!
The black corners serve as a reference for your Cricut to know where to cut.
Printer Set-Up and Printing Process
After leaving the mat preview, you will be given the step by step to cut your project.
The first option is “Print,” and it has a button that says “Send to Printer.” Go ahead and click there.
A small window named “Print Setup” will open. From this window, you can choose your printer, add extra copies to your project, turn on bleed, and/or use your system dialog box.
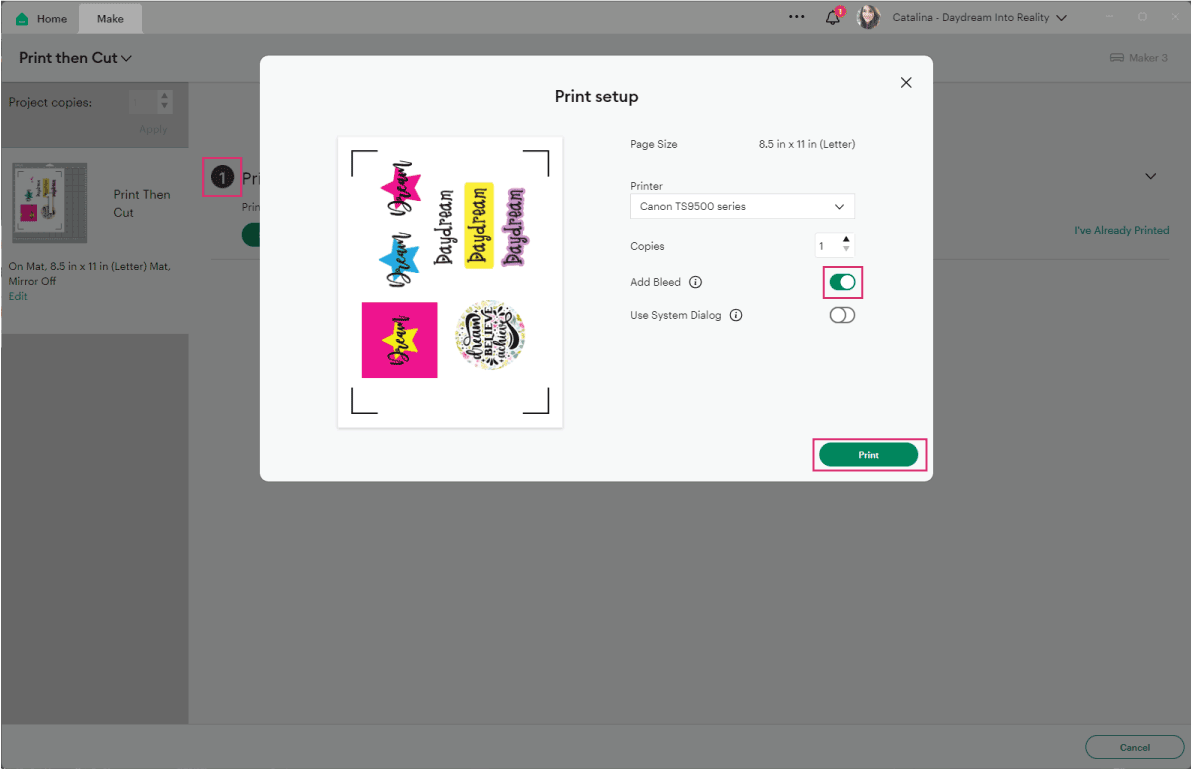
The “System Dialog” is useful if you need to find your printer, change the type of paper you are using, or want to save your project as a PDF and print it in a different location.
If your printer is already connected to your computer, you can leave this option off.
I usually have “Bleed” on and “System Dialog” off.
Now…
Can we just talk about “bleed” for a little bit?
Understand Bleeding
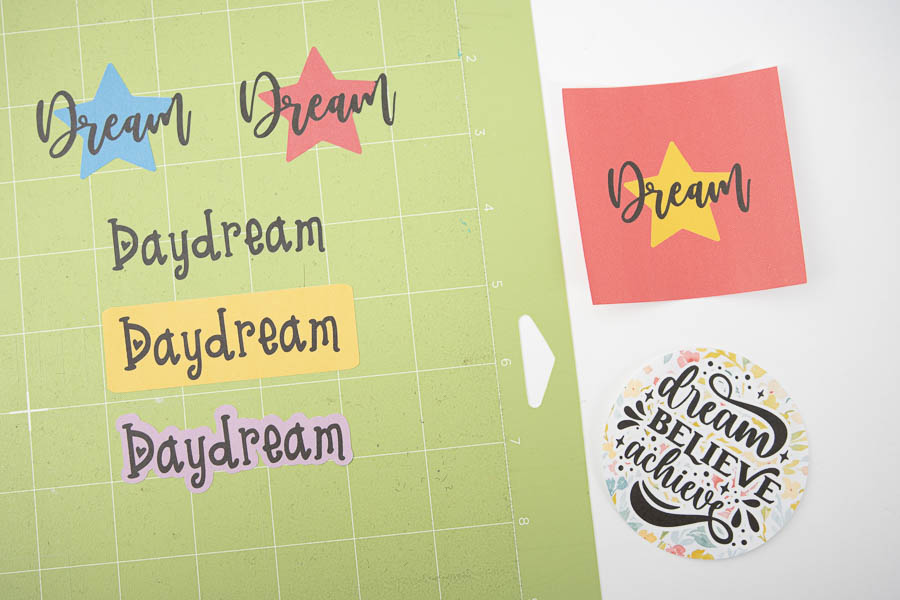
I printed this project with “bleed on” and “Bleed off.” So, let’s take a break to see the results and resume with our step-by-step tutorial.
“Bleed extends ink slightly beyond the border of the image to eliminate a white margin once the image is cut.”
Check out the following photos, and let’s chat about the results.
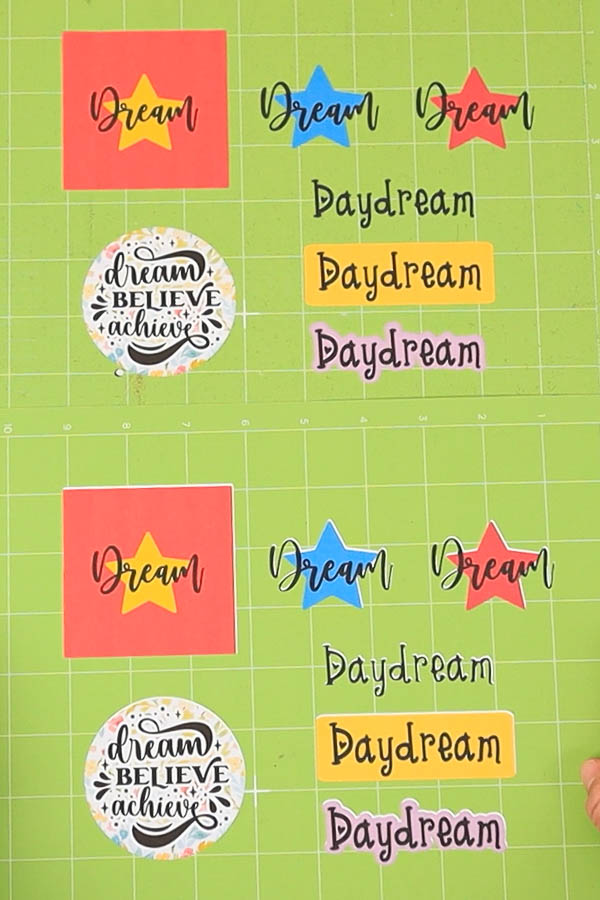
The following picture with “bleed on” may shock you or may not because I am warning you. But the first time I saw this, I thought my “Print Then Cut” wasn’t working at all.
Don’t you think it looks extremely weird?
Thankfully, I was wrong. As you can see, Design Space extended the ink in every place the blade was supposed to go. Notice that the fonts look just fine inside the designs.
Although Cricut’s sensor is pretty good, there’s little room for error. The bleed prevents your machine from cutting inside and outside of the place where it is supposed to.
When I turned Bleed-off, all of the designs had a white border on some parts of the cut.
So which one should you choose? That’s up to you to decide. I like the bleed-on for all of my projects.
Now, let’s get back into our step-by-step tutorial.
Select Materials, Arrange Mat & Cut
After you print, it’s time for you to choose the material you printed on.
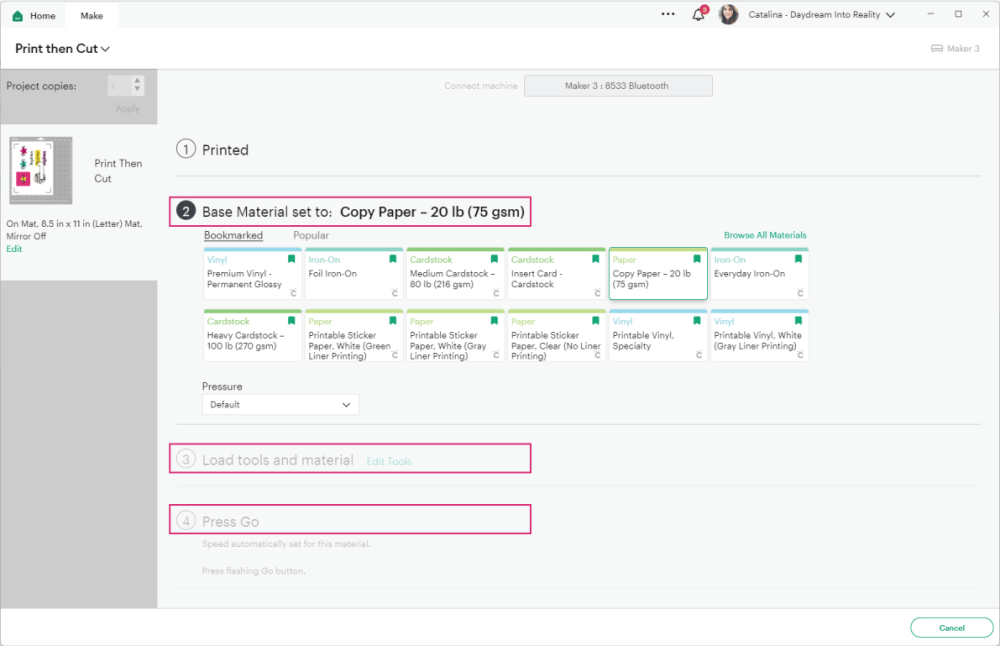
Choose the material from Cricut Design Space. For machines with a smart set dial, move to “Custom” to follow along. For this project, I used copy paper.
Install the fine point blade, place the printed project on the mat, and load it into the Cricut machine. Remember that it has to look like in the preview.
After loading your mat, go ahead and press the flashing go button to start the cut.
At this very moment, you will see the beauty happen!
The “Print Then Cut” sensor will turn on and start reading the black corners surrounding the project. Once it’s done reading, Cricut will proceed to cut.
When Design Space tells you the cut is done, unload your mat and remove the project from it.
Having trouble?
We are on our final stretch!
I hope your machine is running smoothly, but I wanted to point you to good resources if it isn’t.
If you are having any of these problems, check out Cricut’s following steps.
Thanks for the tutorial. Congratulations. Very nice the explanations. May I know how Cindy Duke is cutting images from a single images to use them to pop up. maybe you can check on cricut official. She said is with the new Print then Cut settings but I cant find how to work it. Thanks is Advance.
You’re welcome. I don’t know who Cindy is. I will be updating this tutorial next year or so!
This tutorial was amazing , thank you
What type of printer do you recommend for the print and cut? I really would like to start printing stickers for my grandkids. I need to buy a new printer.
I’m new to all this was wanting to know what the Cricut model for Birthday toppers is? Saved By God’s Grace.
Any of the big machines will do. If you want to make wooden toppers, you would need the Maker.
I downloaded your christmas tags that are png files and I keep getting a warning sign in design space when I want to print and cut the file. What can I do?
You need to resize them so they are the size Cricut allows
Hola Catalina. You are the best. Your tutorials are very explicit. Thank you very much for your time and effort. I still have a few questions but I want to practice before.
This tutorial was the absolute best! I’ve been working at making my own business card for weeks and this tutorial finally helped me get me designs, texts and images flattened, printed and cut out! You’re the best! Thank you
You’re welcome 🙂
How do I put print on a design which is made from a SVG FILE which just cuts the outer frame ie. scrunchies paper holder. It is just print and cut but I need to put details on the design.
You can use plain text as well. But check out my how-to Print and NOT cut, so you have an idea!
Thank you! I would love tutorials on using print then cut with the mug press!
I don’t have sublimation printer :/
Thanks for useful explanation
but what kind of paper need for print and cut specially if I’ll use the design to iron it on clothes or bags
HTV Printable Vinyl!
Thanks for such an excellent tutorial. I really appreciate the effort you put in and admire the thought processes behind your work.
Thank you so much 🙂
Thanks for this article!
Is it possible to cut (professionally) pre-printed items? Ie not using the print and cut? Or do I need to use print and cut and save to PDF if that’s an option?
For printed documents, Cricut needs to know where to cut. So yes, you need to PTC, unless it is a patterned paper and you don’t mind where the cut is.
Thank you for your explanation. I will read this again, just to let it sink in.
Kind regards.
Thank you your explanation makes it easy to follow.
I’ve had to read a few times as it’s a lot to take in and at 71 I’m a little bit slow.
I am wanting to press this on a T-shirt so how will it work with just cardstock and not on vinyl? Confused about this! Thanks!
Yes, I am covering only on paper for now, but will work on printable iron-on vinyl soon enough.
Do you print on colored vinyl (blue/yellow/pink star color)? or do you print on white and have the printer color that all in?
You print in white. But you could use colored paper as well. It depends on what you want for your project.
@Catalina, I’ve been trying to print on parchment colored paper and it keeps saying it cannot read the cut sensor marks. Then says to make sure I’m printing on white???? Is there a way around that?
What machines do you have? If you have an explore (except for explore 3) you can only use white paper.
Is there a setting so that I can cut stickers and not have it go all the way through so they can be pealed off later rather than cutting each individual sticker?
Yes, it depends on the paper you have on hand, check out my how-to-cut a custom material with Cricut.
Have you discovered a hack for getting a Cricut to print-and-cut on black cardstock? I have seem hacks for Silhouette, but nothing for Cricut. I tried applying them to the Cricut and while I did get it to cut, nothing lined up at all, so I’m back to square one. Am wondering if I need to invest in a Silhouette. 🙁
I’ve cut black cardstock with my Cricut (using Print then Cut) on the Maker. Do you have an Explore?
@Catalina, I have both. What is your secret? The only way I was able to get it to cut was to cut out a white rectangle with the black cut line around it and then place the print-and-cut on black inside of it. My problem was getting them to line up properly – I wasted so much material.
Hi thank you for this.
I have been trying to print 24 circle stickers with a white border. But the alignment is off on the last couple of lines. I have calibrated my machine and also restored it. Nothing seems to work any ideas? Thank you in advance.
I recommend you call customer service!
Love your detailed instructions. I’m completely new to this Cricut’ing stuff & I end up wasting A LOT of materials, which aren’t cheap! Thanks!
Thanks for the very detailed post. I’m having problems getting circles cut precisely. Some will come out ok but most get cut just slightly off. It’s frustrating to say the least. Would you have any suggestions? TIA.
Yes! You can calibrate your machine. Check out my tutorial.
What kind of paper do i use for the print then cut?
Any paper you can put on your printer. Remember your machine specifications though. Some people use sticker paper, cardstock, printable vinyl, etc.
My question still is gone without answering after every how to cut then print video LOL…. My cricut acts like it is going to start cutting and then half way it stops and a pop up screen comes on… Ive tried it on my cricut explore air 2 and cricut maker.. does the vinyl that you are putting with the picture to cut have to be white as well? Because I have tried different lighting like one post said, I have dusted the bottom area off as well and still nothing.
You may be having sensor problems. Have you contacted them?
I am not meaning to step on toes.
@Ashley, try it with lower room lighting if you are in bright light, or if in lower lighted room, add a lamp. Sometimes, depending on light, I close the top Cricut lid and put my tape dispenser on it to hold it down.
I’m having a issue with print to cut my Cricut will cut my image out just in a square how to I get it to cut the image out so it looks like vinyl so there’s no white around my image in other words it cuts the image itself out not just a square and it’s done hope this makes sense
Are you using a JPG image? If that’s the case you need to delete the background when you try to upload it.
Hi Catalina,
This is an incredibly helpful post!! Everything was so detailed and easy to follow! I followed right along with you and learned so much! Thank you so, so much for your clarity and patience and for not assuming that we know certain things. Your explanations and screenshots were awesome! Excellent tutorial!…and btw, I too, am a follower of Jesus 🙂
I am happy I was able to help! Have a lovely day 🙂
I have been trying to do print and cut and I keep running into an issue where only 3 of the 4 black lines get printed on the paper. I do not know what I am doing wrong and nowhere on the internet does anyone else mention having this problem. If you have ran into this please let me know what I am doing wrong
I’ve never run into this problem before. Have you tried to contact customer service?
I had this issue yesterday. To make it work, I had to size down my picture. I hope that helps.
Hi! Thank you SOOOO much for this tutorial. I am having some issues though & am hoping you can help me. I am trying to make some monogram stickers. I used a yellow monogram frame from cricut access & added a text box with my monogram text in side the frame, ive welded & flattened it all, then selected the print then cut. It prints it perfectly but when I go to cut it, it cuts each individual letter, or the entire monogram and the frame separately. Im printing it on white label sticky paper and only want the yellow frame of the monogram frame cut around so I can put them on notecards. (IDK if this makes sense b/c i’m terrible trying to explain it)
Are you cutting a single layer only? The yellow frame and the monogram need to be combined in a single layer when you click on “Flatten.”
I bought the Paper studio printable vinyl, I was able to print and cut my images, but I can not use the transfer tape…it rips/or doesn’t come the tape. The package instructions does say how to apply to object. Is there a trick that you can share?
Dolores
If you are using Printable Heat Transfer Vinyl, you need to buy transfer tape.. I haven’t use Printable HTV, but once I do, I’ll make sure to document everything.
Have a lovely day.
This is a great walk through! What printer and ink do you use, or what do you think works best? I have a Canon Pixma MG3620 I bought years ago, would this work for creating stickers?
I have a HP4520 (very cheap printer). I am sure your printer will be just fine!
I cannot get the hp 4520 to print in colour!? Pulling my hair out. Is there a setting I’ve missed?
This happened to me recently!!! Uninstall your printer, then install it again. This fixed the glitch for me. I hope it helps. 🙂
Can I print to PDF instead of my printer? I want to print to PDF so I can have my print job done at a copy center, then bring the printed pages home and cut with my maker. I’m doing this because I want laser printing and my home computer is inkjet.
Yes, you can! Turn on the Use System Dialog option, and click on print, a new window will open, on “Select Printer” choose Adobe PDF and click on Print.
Hi. I was wondering how to get the words to stay together to put on the shirt. I used printable dark iron on transfer paper. Would you get transfer tape? Is there a specific type of transfer tape needed?
You can buy heat transfer tape on Amazon for printable vinyl (affiliate link).
Thank you so much for the great and easy to follow directions! I do have a question that I can’t figure out. I am wanting to print and cut text only (to be specific “Baby Boy”) using a script font. How do I do this without cutting out each individual letter? I am trying to just have a a script font with text only (I noticed in the example you had that when there was a yellow background it cut the entire rectangle out instead of just the text). Thanks so very much!!!
You need to fix and weld the text first. Check out my How to edit text tutorial.
I want to add a logo to my sticker sheets but I don’t want it to cut. How can I make my logo no cut and only print? I have tried everything but I just can’t figure it out. Please help!
Unfortunately, you can’t do this at the moment. 🙁
@Mari, You can either send it through your printer (with the logo only) after you cut or you can have the cricut draw your logo, though with the drawing you’ll likely have to color it in afterwards. I’d do a secondary print, myself.
I printed all my images one day, and went to cut the next, and cricut rearranged my designs on the mats so it doesnt match what ive printed! can i move them from page to page to get them how they are actually printed?
Maybe your project didn’t save the flattening changes? They should be identical.
I’ve looked everywhere for the answer to for the print and cut, what type of material do you use? Is there a special vinyl or paper or what am I looking for. Thank you
There are many types of materials you can use with Print then Cut. Regular copy paper, sticker paper, printable vinyl, etc.
Hi,
My printers are only printing the guide box and not the image, do you have any pointers on this issue?
Not really, it’s never happened to me, try restarting the app, and if the problem persists call customer service.
Hi Kelly, I’m having the same problem…did you work out what was happening? Thanks x
Hi I am trying to use my cricut to just print with and not cut. however when I print my design using the cricut design software it always prints with a box around it. is there a way to remove the box at all?
The box is a guide for your Cricut to know where to cut so you can’t get rid of it.
I just bought a printer and I am not sure how to pair it with my cricut. When I go to print and cut it says no airprinter found. I have an HP Envy 6055
You need to pair your printer to your PC, once you do that, Cricut will detect it. Check out HP instructions to pair printer to PC
Hi Catalina, I was wondering if you could help me with a problem I am having with the Print then Cut feature. I have just bought a Maker and I have been able to upload a pre made sticker sheet. My problem is, when it goes to print, it is printing landscape and not portrait. I don’t even know where to begin to find out how to fix it. Any help you may be able to give would be greatly appreciated. Thanks so much in advance. ????
It really depends on how your design was saved. You can also try rotating the image in design space.
Hi Catalina! I love your tutorials! Thank you so much for the time you put into them and into your replies! I’m fairly comfortable with print then cut but I’m trying to perfect my cut settings depending on how I’ll use my stickers. When I select the materials installed in design space, the cut doesn’t go all the way through the carrier sheet and that’s great for my full pages I make for my planner and such. Do you have an easy trick for getting it to cut all the way through the carrier so I can give individual stickers away? Is it as simple as just choosing more pressure once you select your material? I haven’t tried yet and I have so many different printable vinyl and sticker paper varieties, I don’t want to waste any! Thank you again!
I don’t think selecting more pressure will do the trick. Try selecting a thicker material, my sticker sheets are very thin. If I wanted to cut through the carrier sheet I would select a thin or medium cardstock.
So I made stickers for the first time today and was able to figure it out but I had some refinement to do so I turned to researching and came across this article. So my question is how/can I just cut around an image? For example, I got a panda image through access and wanted it cut out around the edges of the panda. The first time I did it it cut out the ears and eyes and paw pads, which didn’t make the image a solid sticker but an outline sticker. So I went back and placed it on a white rectangle and just cut the rectangle with the panda image printed on it, which worked but I really just want the panda without a white background.
Have a copy of the panda then for one of the copies click on contour and hide all of the so you have just the outline; then change that outline for white. Not place the other copy on top of the outline and flatten both layers. I hope it makes sense!
I’m trying to use Print then Cut and it works on some images while other times it just hangs at the “Scanning” screen. It will cut out one box but it will not cut out two on the same sheet. It’s driving me insane. I have no idea why it works on some and others it doesn’t. I don’t even get an error message! Any help?
I would contact customer support. This hasn’t happened to me.
I have tried 2 different printers and neither will print the correct color of the words I made. I need them to be link but they are turning out more purple. Any tips to help with that be appreciated.
Thank yoj
You need to choose a CMYK color and know the code, there are some bright colors that are only visible on your screen, meaning they will change when you attempt to print them.
I actually managed to cut then print successfully! Now my big question: Does it matter what direction the mat loads into the maker? Your example showed the cut out triangle at the top of the mat going in first. My mat layout is upside down so the triangle was at the bottom. I did set it up just how it looked but I’m curious why my entire design was upside down.
It doesn’t matter if you rotate the mat (it has the same measurements), in fact I encourage it so your mat gets used on every angle. However, always place the design as you see it on the mat preview.
Question – if I only want to print and cut a small 4×4 American flag on a piece of printable vinyl. Do I loose the whole sheet of vinyl. Or can I use the leftover vinyl for another project.
I don’t think you do. However, you need to make sure your printer will print on a smaller cut of paper.
I downloaded a shape that I want to add text to. I want it to print then cut. Is this possible with Cricut Air 2?
Yes, you can do this with an Explore Air 2
My paper keeps tearing in some of the more intricate corners on my stickers. Any suggestions?
When was the last time you changed your blade? They get dull at some point.
Also how intricate are your cuts? Is your mat sticky enough, if not that may be causing the issue!
I hope this helps 🙂
Hi! The SVGs I’m uploading are still being cut out not as a whole image, but cutting each individual letter or shape. I have flattened the image but it keeps happening! Please help- I’m going crazy!
if you don’t want individual letters or pieces you need to flatten them with a shape behind them. Check out the letters with a yellow background in this tutorial and that will give you an idea.
If you want them printed as one word you would need to “Weld” them together or place on a shape and flatten the image as Catalina said. It will print the shape, with word printed on it but won’t cut the word.
Wow! How helpful!!!
Makes everything very understandable. Thank you.
What I was looking for was if you could print at a copy shop and then cut. This does not seem possile. I find it so expensive to use my own ink. Anyone have any ideas?
Thank you very much.
You’re very welcome. I tried to check this and my system doesn’t let me save the copy to bring it to a store. However, maybe you can print from your phone at the store I think that can work!
@Chris, Print to PDF and take that to the copy shop. Mine has mobile ordering, so that really simplified things.
Please help!!!! I tried to reach Cricut to no avail. My print then cut doesn’t want to print at all, the circle just goes around and around when I hit print. I’ve tried uninstalling cricut, modifying the size of the image, different images and nothing. I have so many orders backed up and I really feel like quitting!!!!
I don’t know why this could be happening. Have you tried using the app at least for the printing option.
If you chose the “System Dialog Box” (you clicked it and it turned green) then you need to go to the dialog box and choose Print. The dialog box is your printer and it shows up behind the Design Space screen. This happened to me many times before I finally figured it out. Just put your DS screen down so you can get to the Printer Screen. Choose print. It will send to the printer. You can bring your DS Screen back up. Hope this helps!
If you were using a Windows 10 computer, a July 2020 Windows update did mess up some folks using the print then cut feature. The best solution, is to locate the Drivers for your particular model of printer from the manufacturers website. And download the drivers to your computer. Then uninstall your printer from your system via the Control panel (uninstall devices) and then install the Printer driver(s) you downloaded to re-install your printer to your system/network. Then just restart your computer. Microsoft was supposed to release an automatic new update to Windows 10 computers that was designed to fix the Printer glitch. I personally have always installed my printers using the drivers from the Manufacturer website vs using any installation CDs that might be included with a new Printer. So I didn’t experience any issues when my Windows 10 computer updated with the Print then Cut feature in Design Space. I use PtC more than any other feature with my Explore and / or Maker machine.
I’m having trouble being able to Pin any images from this post on my Android phone using Chrome….
Liberty
Thank you so much for this. I was able to do it and im super excited!!
I am happy I can help 🙂
Can you do a mirror image on printable vinyl? I have someone that wants to bumper sticker to go inside windshield?
I haven’t tried this yet. If the image has different colors (I am guessing that’s why you are using printable vinyl) I don’t it would work.
This was GREAT! I have to say that I love following your learning plus tutorial rather than watching a video…and I am learning SO MUCH! Thank you!!
You’re very welcome!
Thank you so much for this step by step tutorial. It was very helpful. I learned a lot. I am a beginner to the cricut explore. I will be looking for more step by step tutorial. Thanks again.
You’re very welcome! 🙂
I have read your tutorial and it is so simple and easy, BUT, no matter what I do, I cannot get the “flatten” button to work. It is always grayed out.
Are you selecting all of the layers? It should work. If it doesn’t I recommend you call costumer service.
Thank you so much for explaining in detail how to use a scan and cut files, I’m new to this and had purchased a few but had know idea how to cut them out using my Cricut. Now I’m able to cut them out with no problems. Thanks again great job!
Happy I was able to help!
for some reason my printer is not printing the top and left side of the box. I have tired all the different printer settings and it still only wants to print part of the box for the cricut to read. I am getting so frustrated im ready to quit all together. It worked before and now it does not..
Do you have enough ink? Printers can be a pain sometimes, I’ve never had this problem, so I don’t know how to help here. 🙁
i was having the same problem top of box was not printing, I moved the image down on the cut screen and it’s been working fine by doing that hopefully this helps.
Loved all of the helpful information, thank you for this. I am having trouble getting my image to print with color, it just prints gray. I’ve done a print and cut before and the picture came out perfect, but the image I’m using now is an inserted shape from design space that I filled to be red. Hopefully you can tell me what I’m doing wrong.
I don’t know why this is happening. Maybe your printer settings change and it’s only printing on greyscale? Do you have enough ink, too? Have a great day 🙂
This is awesome. Thank you for sharing your wisdom 🙂
My question is in regards to printing. Is there a way for me to save what it would look like on the make it screen to a flash drive so that I can take and have it printed on any printer and then come back to cut it with my maker?
You sure can! When printing, choose the option “system dialogue” and find the option to save as PDF. Then go prin it, come back and select the option “already printed.” Make sure your paper measures 8.5 by 11 inches.
Is this option available on the iPad app? I’m having trouble with my printer printing the black registration box.
Yes, Print then Cut is available on Ipad.
Love your tutorials! I’m wondering if the print then cut option would work with lamination? Specifically, could I print the images, laminate the paper, then have my Maker cut them out? As a teacher, I spend a fair amount of time hand cutting, then laminating, then cutting a second time. What a time saver it would be if the Maker could do that for me! Thanks for your help.
I’ve cut laminated paper before. You need to pick the right option in Design Space which “it doesn’t exist.” But I remember trying “stencil vinyl.” Basically, if you are cutting through the paper and the “laminate sheet” select a material you know could be the same thickness. Does that make sense?
If I take a screen shot of something I want to cut out multiple times and use the upload feature to get it onto the canvas of the design studio and hit duplicate until the item fills the page, why won’t it just cut the shape out? Print and cut still confuses me. I build dollhouses and I want to add embellishments. I took a screen shot of a carriage house door hinge. I want to duplicate it till it fills the page and then cut them out. It’s a black hinge with a white background. When I upload the picture to design space I get a giant black box or nothing at all. If I print this on my home computer, I don’t understand how that will get the image correctly into design space to the duplicate and cut out of thick chip board.
You’re using PNG and JPG images. The answer needs to be explained with pics, which I can’t add on comments. Please read the section on this tutorial that explains of Print then cut works with different images.
I am about to toss my new explorer 2. This print and cut is making me crazy. What do you put in the printer, the vinyl?? Which side goes in printer??
Will it cut just a shape without a printer?
Thank you.
If you don’t need to print your design you don’t need to print. For the printer, you put your paper and you should print on the side you want to cut. Each printer varies so use a regular piece of paper to see what side your printer prints.
Regarding tossing your machine, I can tell you that I’ve felt the same way as well!
I have read a lot on making knockouts.Every time I get to the place that says to save as my computer won’t let me do it. What am I doing wrong? If you could help me I would appreciate it.
Hi Joy. Unfortunately, Cricut disabled the “Save as” option. I have a tutorial on how to make outlines in Design Space.
What can I print and cut on to use on a cup
There are many things you can do, quotes, images, etc!
Detailed explanation thank you. I do have one question, can I print and cut on vinyl?
Thank you,
Sheryl
You’re welcome 🙂
Hi Catalina – Thank you for the great tutorial! I think you already answered my question. But, just to be clear; If I want to print on vinyl to put on a tee shirt or a glass bottle, using Print and Cut, I can print directly onto the vinyl material with my printer?
You’re correct. Make sure you’re using InkJet printers for Iron-On Printable Vinyl!
Hi Catalina, so after I get my design ready in cricut design, I then insert the Vinyl/Cardstock/etc into my printer (Epson WF-2630) and I make the design that way? Not printing onto my regular printing paper, but on the Vinyl (or other material) that I will be using to create?
Exactly! You just use the paper you want to print on.
Thank you for all your great tutorials. I am new to cricut and have not even taken out of box yet. I need to recreate a label for a beer stein but unsure what material to use. I can see Print and Cut as great possibility to make it but on what? Multiple colors & I can take picture of the label that is on the box it came in. The one on the glass is flaking off.
Hi Shirley. I would use adhesive printable vinyl if you want to have multiple colors and print then cut. However, if the colors are simple, I would use permanent adhesive vinyl and layer up.
I have glossy permanent vinyl (Oracal 651) and an inkjet printer. The print smudges all the time. I almost want to quit. I even tried printing hello in black ink and it still smudges. Should I just buy a different paper? Thank you.
Oracal 651 is not meant to be printed on. If you want to print on vinyl you need to get Printable Vinyl! I hope this helps 🙂
I have a question? I have a picture I’m printing on a t-shirt, I want to add some text to the picture.
How do I do it or are they a way to do it with out having to do it separately?
Add all the elements you want to use for your design, then select everything and click on flatten. Then follow the instructions for cutting your HTV and weed it.
I get so confused over the layers panel. I created my own image for a sticker (multi-colored) but when I click on attach or weld then make it the entire image turns into one color and some of the components disappear. For instance I have a circle with a sheep head over it. The sheep head disappears when I click make it. Also, i want the Cricut to cut around the perimeter of the sticker, but it wants to cut each individual letter of a word out instead. I know I am doing something wrong, just not sure what lol.
Hi Trish! With stickers you want to use flatten! I do have an awesome sticker tutorial, that will walk you through everything!
Hi, I got a lot out of this tutorial and want to print then cut on printable vinyl. If I am using this material do I need to mirror it for shirts? I have never used this material before . I am a cricut newbie.
Thanks.
If its for white t-shirts yes, if not, then no. Read the instructions the vinyl came with! I know it’s expensive!
My husband bought me the Cricut air for Christmas and I am enjoying learning all the things it can do. You tutorials are excellent. I am learning so much from you. Thx
This makes me very happy, Donna!
Just to be clear, whatever material I’m going to cut, has to go thru the printer first, correct?
You’re correct!
Hi Catalina, your tutorials are fabulous! Having never used any type of cutting machine before, I was almost afraid to take my new cricut maker out of the box after Xmas, but your tutorials make everything very clear and I’m easily able to follow along. I was having difficulty grasping the print and cut concept, as one of the first things the salesperson told me was the cricut maker is “not a printer”. Then I read your tutorial and … eureka! I have a large stash of suitable images from years of digital scrap booking and can’t wait to give this a try. Huge hugs to you for providing these tutorials!!!
Thank you Linda for your comment! You have no idea how much it fuels me to keep putting out good tutorials. I am glad I can help!
If printing onto iron on vinyl should it be white. Also how do I turn a photo into an svg to print onto a shirt for print and cut.
Thanks
Hi Lorraine, I don’t have that tutorial. However, you can use the image and then crop it in the form of a heart, shape, star, etc and use that as a Print then Cut reference. Check out my slice tutorial for more info on how to crop images.
This was very helpful but I’m wondering what setting should i put my printer on if I’m printing on a shirt?
I don’t have experience with printing on fabric so I don’t know what it’s the best setting.
Hi Catalina,
What I’m wondering is what you use these cut images FOR. I assume you need a color printer to make this work (obviously), but once you have a piece of cardstock with your design on it, what do you DO with it? What else can you print it out on? These are the things I’m wondering.
Also, how do I become a subscriber?
Thanks so much!
Hi Sessa, there are multiple projects you can make stickers, cards, gift tags, bookmarks, etc.
To subscribe you can fill out this form.
Have a good day!
Hello,
I want to try the print and cut option with my cricut maker but I’m having a hard time finding for a reasonably priced inkjet printer that will cut on upto 110 lb cardstock. Would you please recommend one for me?
Thank you!!
Hi Amina. Printers for thick materials are quite expensive. 🙁 I really can’t recommend you one because I haven’t test any, and I would never point you to something I haven’t tried myself. Search on Amazon for Cardstock Printers.
Is there a way to preserve the printed image after it is printed and cut out? I notice that the ink scratches off easily. I’m using an inkjet printer if that makes a difference.
Hi Roseann, my images are vibrant as the initial time. What paper are you using?
I have the same problem, I’m using dark shirt iron on. My second problem is I can’t get the backing off to iron it on. Ended up scraping everything. Color faded out from black to gray ????
I am sorry Debby! I haven’t been able to work with this type of material. What I know is that for dark shirts you need Printable Iron On for dark fabric.
Have a great day!
Good Morning Catalina,
Is there anyway to print & cut iron on material?
Hi Genevieve, there’s a material called Heat Transfer Printable Vinyl. There you can Print then cut your image. It doesn’t work with the rest of the Iron-On materials.
Somehow I increased my image by 100% when I went to cut it. I decided I liked it like that but now it won’t cut. How do I make other images increase by 100% I would use this if I knew how to find it again. I purchased an Explore Air 2 a few months ago so I am pretty new to this. I just found your site and I can’t wait to try out some of the instructions you printed. Thank you so much for taking the time to help us newbies .
Hi Shirley, I don’t know a way where you can increase an image in percentage. From the size tool (top panel) you can add the values you want in inches, but not a percentage. I hope it makes sense.
I am glad you like my tutorials!
when you say reflective or dull paper, it is included glasse paper type? .. I have many problems with my cricut to print and cut and if not for the type of paper
TKS
Hi Carola,
If you have an explore you can’t use glossy papers because the sensor is not as powerful as the Maker.
I learned so much just that fast from you…thank you thank you a Million times!!!
You’re very welcome! 🙂
I may have missed this, can you only print on paper? How would I do a personalized design on iron-on vinyl or permanent vinyl? Is it possible?
Thank you!
You can also do it with Printable Vinyl. There’s also a material called Printable HTV (Heat Transfer Vinyl).
Absolutely Awesome Tutorial. Thank you so much.
You’re welcome 🙂
Thank you. Your tutorial is very easy to follow, as I am new to cricut and not conversant with the horrors of jpeg, svg and png it has been fabulous to have instructions that are so detailed and explained in easy to understand language. I am now following you so that I can learn more.
You are very welcome Dianne!
Thanks for such a detailed tutorial. Total newbie here…got my explore machine yesterday and going to attempt this next week so I can proper resources for my classroom.
Can I print then return to cut later? Will it save the project in the place I got to or does it have to be cut immediately after printing?
Thanks
Kate
Hi Kate! Yes you can, instead of selecting print, select the option already printed.
Have a great day!
Please publish a Cricut help guide. I have had my Air 2 almost a month and am so lost on using it. What is the meaning of several mats?
Hi Jean!
I am sorry you are feeling frustrated with your machine (I saw the comment on my Print then Cut tutorial).
I have multiple articles that can help out.
Check out my blog section
I will recommend you reading my Cricut Design Space tutorial.
Have a great day, you got this!
What type of printer do you use? Do you recommend it?
Hi Nicole, I have HP Envy 4520 but I have I want to change it because it’s not the best quality. I can’t recommend you one because I would need to test it first. I would go to amazon and look for reviews on a printer that’s more than your average 45 dollars.
I loved this article. I do have a question though. You mentioned to insert cutting blade …do you not leave your blade in all the time?
I do, but sometimes you may have another blade installed. I just like giving all the instructions.
Have a lovely day!
I would love to have access and learn more about my cricut
Hi Sharla, What would you like to have access to?