Hello Daydreamers!
In today’s tutorial, you’ll learn everything there’s to know about the “Slice” tool in Cricut Design Space. You’ll know what this tool is for and all the possibilities you have with it when making a project.
What is “Slice” in Cricut Design Space?
“Slice” is a Cricut Design Space tool that allows you to split or crop out two overlapping images or layers to create a new design.
Mastering “Slice” is one of the main things you should learn on your Cricut journey because you can take a design from boring to extraordinary in just one click.
Seriously…
If you conquer the “Slice” tool, you’ll be closer to mastering your Cricut machine.
If you are a beginner still figuring out Cricut’s software, I recommend this comprehensive and easy Design Space tutorial.
In a nutshell, these are the topics I will be covering in this tutorial:
- Where to find the slice tool.
- Slice overview
- How to slice multiple images
- How to crop images using the Slice tool
- Using Slice with text
- Slice and the offset tool
- Slice to make new shapes
- How to slice with grouped images or multilayer fonts
- Slice vector lines
- Slice vs. other Cricut Design Space tools
- Weld
- Attach
- Flatten
- Contour
- What is the “Slice & Set Method”
- Examples of when to use Slice.
Tip: This tutorial builds upon the skills I teach in every step. If you’re just starting with your machine, I suggest you read and follow each step.
Ready to become a pro at slicing?
Where to find the Slice tool in Cricut Design Space
The “Slice” tool is available on desktop computers and the Cricut app.
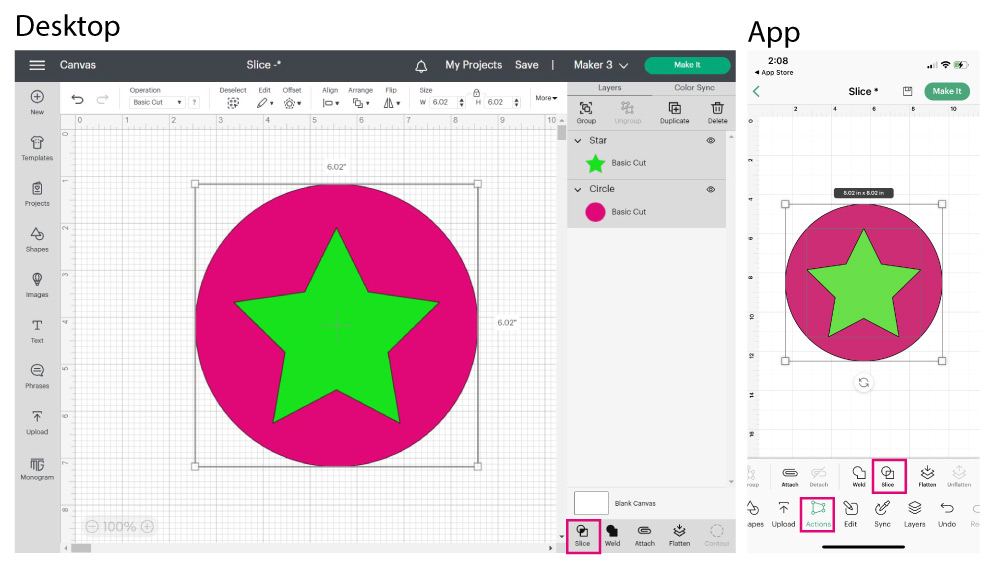
On desktop computers, “Slice” is at the bottom of the layers panel. And on the app, Slice is inside the “Actions” menu at the bottom of the screen.
If you aren’t familiar with Cricut’s app, I have a handy tutorial that will teach you how to navigate the app and what every icon is for.
Unless I mention, you can use Cricut’s app for everything I am about to teach you. However, all screenshots will be from a desktop computer.
How to Use Slice – Overview and things to keep in mind
You know what Slice is and where to locate it; now let’s see how to activate and use it.
- Rule #1: Slice will only be activated if two layers are selected on the canvas.
- Rule #2: The images must be overlapping. If you slice two images that aren’t overlapping, nothing will happen.
- Rule #3: Slice will be greyed out if you select only one or more than three layers at the same time.
- Rule #4: You can’t Slice flattened layers.
Ready to see Slice in action?
Check out the following graphic, and if possible, follow along, so you internalize the concepts.
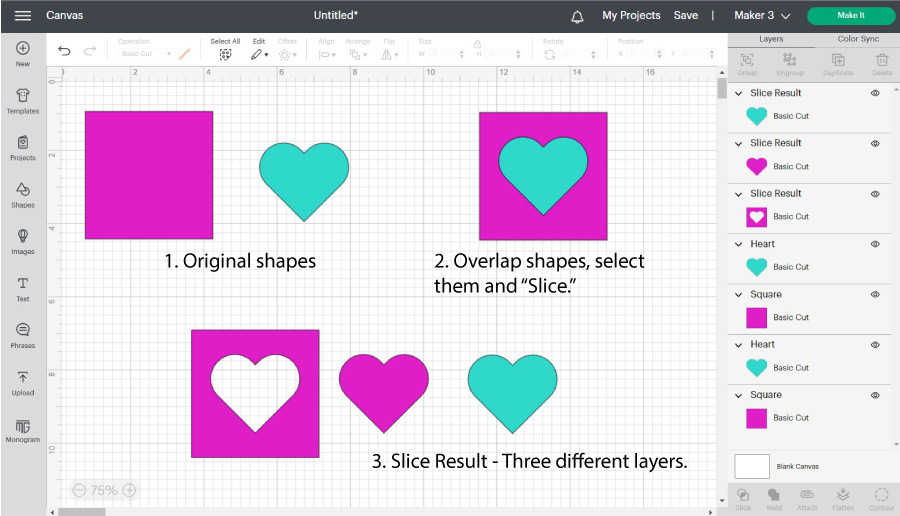
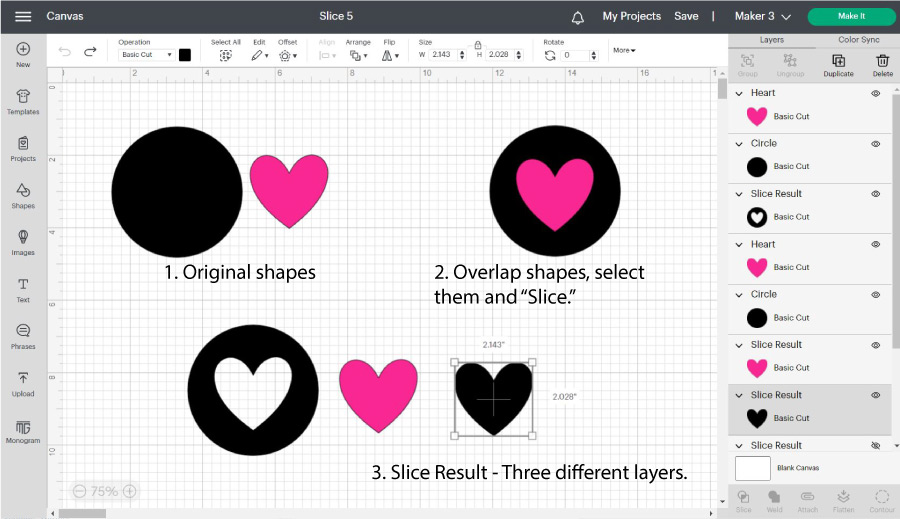
- Drop a square and a heart on the canvas area by clicking on the “Shapes” icon on the left panel
- Overlap shapes, select them, and click “Slice” at the bottom of the layers panel.
- Move the resulting pieces.
After slicing, you will always have three or more layers called “Slice Results.“
- The one you wanted to cut out of the more oversized shape – In this case, the blue heart.
- A copy of the shape you wanted to “slice” out – In this case, the pink heart.
- And last but not least, and the reason you sliced in the first place, a new design with a cut out of the image you used to Slice against – In this case, the pink square.
Easy, right?
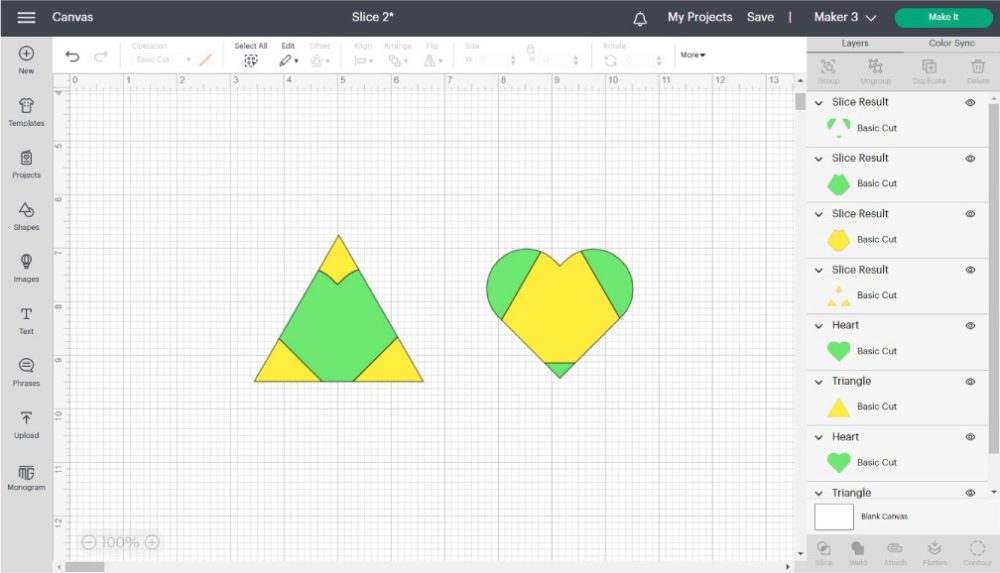
Most of the time, you’ll have three “Slice Result” layers. But here’s a case where you have four different “Slice Results.”
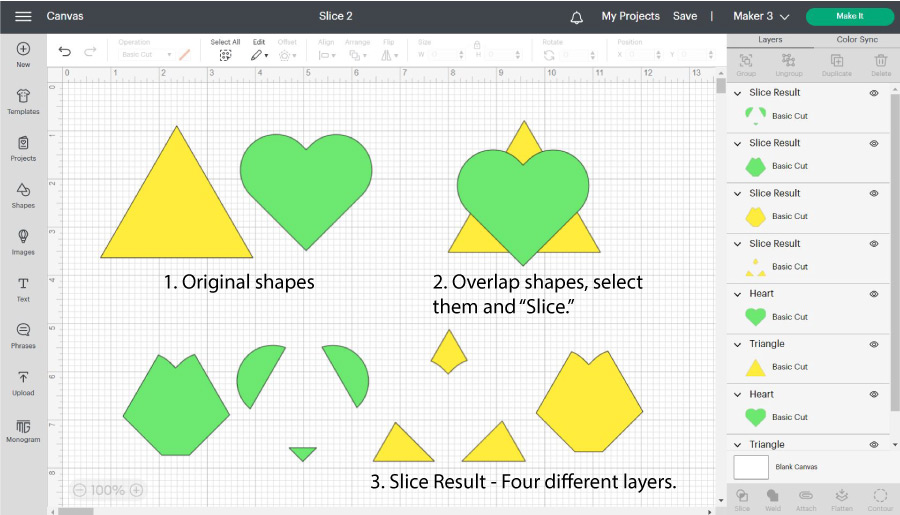
The number of results doesn’t really matter. Simply delete the pieces you don’t need.
Sometimes, even without a clear vision of my project, I slice things that don’t make sense just to see how a shape will change into another one.
For instance, from the “Slice Results” above, I could form an abstract heart and triangle.
When you keep trying new things, new ideas will come to your mind. I am amazed at how different were my first projects vs. my new ones.
How to Slice Multiple images on Cricut Design Space?
What’s rule #3 of the Slice tool?
You can’t Slice more than two layers at the same time.
There will be a moment when you’ll need to Slice multiple images simultaneously.
Let’s take a look at the following screenshot.
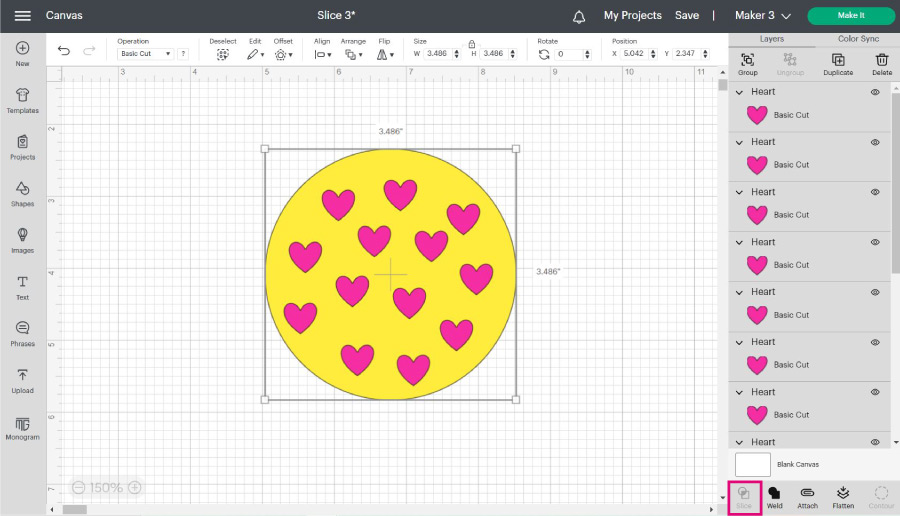
We have a yellow circle with multiple hearts on top. My goal with this design is to cut out all hearts from the circle.
Do I slice every single heart out?
No, thank you!
That would take forever.
The answer to this riddle is the “Weld” tool.
“Weld” will take all those scattered heart layers into a single one.
You need to do this to slice out multiple images and shapes from another layer.
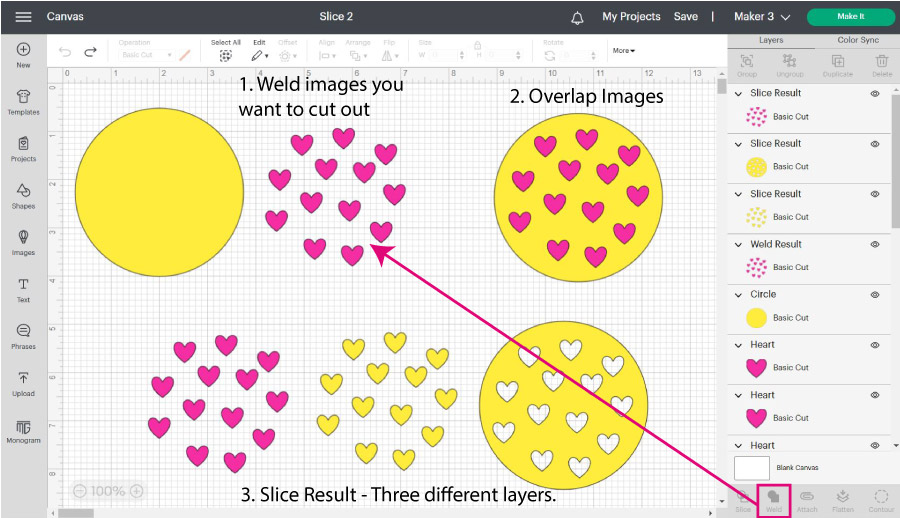
- Select the layers you want to cut out and Weld them. The “Weld” tool is located at the bottom of the layers panel just to the right of the Slice tool.
- After welding, you will see that all hearts are in one layer. Now, overlap them on top of the star, and click on the Slice tool.
- After slicing, you will have three different results.
- Pink hearts
- Yellow heats
- A circle with multiple heart cut-outs.
IMPORTANT: After welding, you won’t be able to separate the hearts, so if you think you will need them later on, you should make a copy, then group them all, and hide their visibility.
I explain this better in my “Weld, Attach and Group” article. All these options are intertwined, so I encourage you to check them out.
Using the Slice tool to Crop Images in Cricut Design Space
I have seen multiple tutorials on Cricut Design Space, but I have yet to see one where you can learn how to crop Images and photos.
Complex images or photos like .jpg or .png files are not meant to be cut piece by piece like an SVG or cut file. These types of images are for you to “Print Then Cut. “
When you upload the photo, you DO have the option to crop it, but that is a square crop and nothing like what I am about to show you. If you want to learn the Print then Cut process for photos or .jpg images, I encourage you to read my fantastic tutorial.
Ready for cropping?
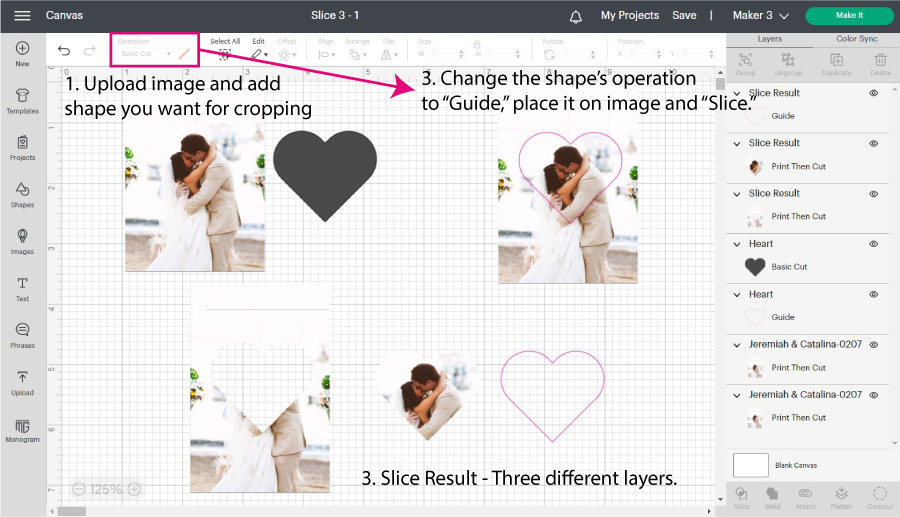
- Click on the “Upload” icon on the left panel of the canvas and select the photos you want to work with. Then add the shape you want to use for cropping.
- Change the shape’s operation to “Guide” so you see the best placement for the crop. Select both layers and click “Slice.”
- Delete unwanted pieces. For this case, we will keep the heart-shaped picture.
Let’s see more examples.
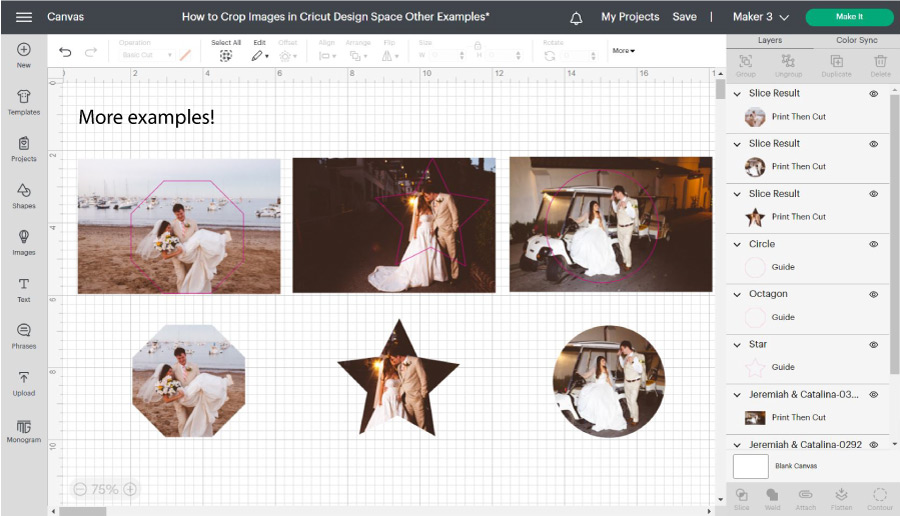
I used an octagon, a star, and a circle to create different crops and effects for my images. If you want more of a standard crop, you can also use a square and unlock its proportions to create a rectangle.
Note: the proportions can be changed by selecting the shape/layer and clicking on the little lock on the top menu.
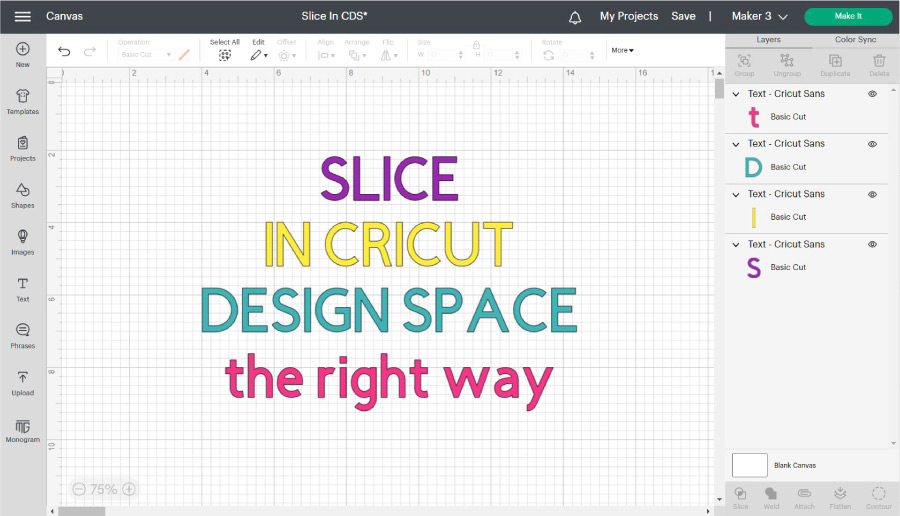
Using Slice with Text
Whenever you slice text against another shape or element, you won’t be able to edit that text again. Other than that, the process is identical.
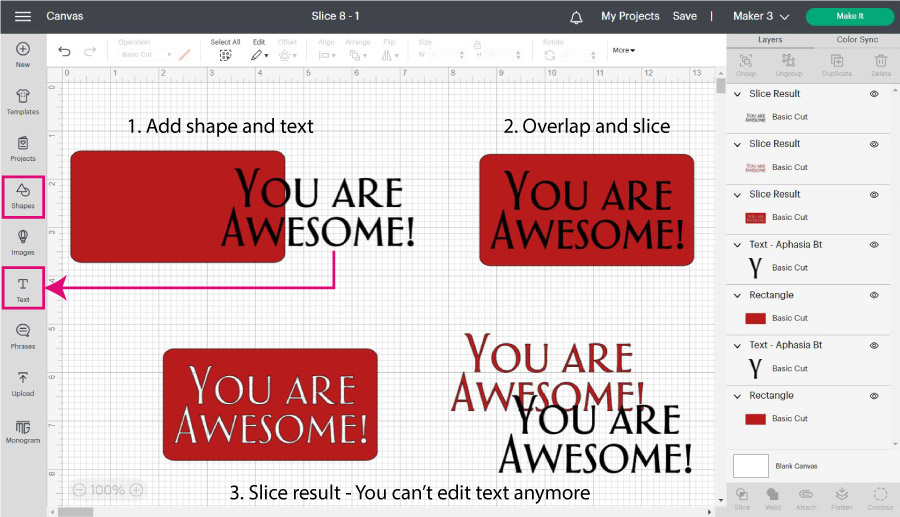
- Add the shape and text you want
- Overlap text over the shape, and while selecting both layers, click “Slice.”
- This particular design has three “Slice Results” the shape with the cut-out text, the original text, and a copy of it. If you look over the layers panel, you’ll see that the text layers are now a “Slice Result”; therefore, you can’t edit it anymore.
If you think you’ll need to edit your text, I encourage you to make a copy and hide it so you can use it later.
Use Slice to Change Colors and Shorten Images
Sometimes, images come in a single color, or the placement doesn’t look as good as you would like.
The following image, “YOU ARE MY HAPPY PLACE,” is on a single line. Nonetheless, I don’t want my image to be that long; plus, I also want a little color!
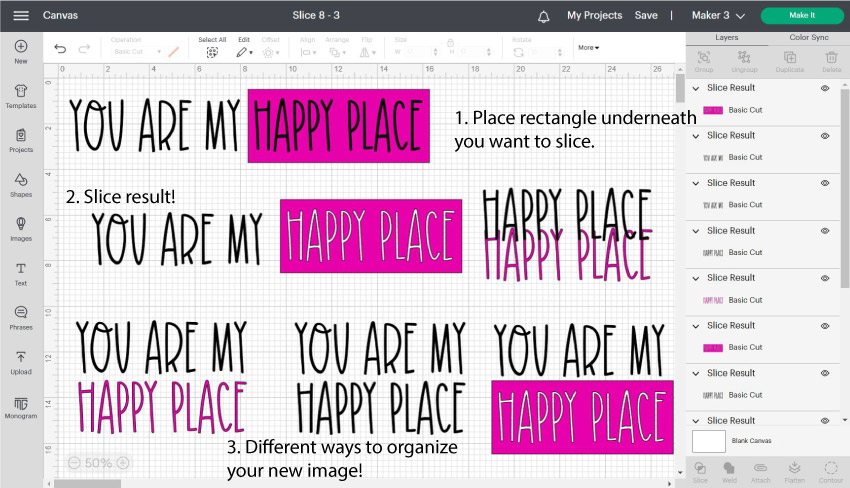
- Go ahead and add a rectangle to the canvas and change its color for the want you want to use; right-click on it and send it all the way to the back.
You want to size and center the rectangle on the area you want to slice as much as possible because you can use it later to see if it fits your project. - Slice the rectangle with the image (remember to select both layers).
- Now check all the possibilities you have.
“YOU ARE MY” remains the same, but you can use “HAPPY PLACE” with a different color, the same color, or with the sliced rectangle.
I loved the rectangle result, but I want to add an extra touch!
After slicing, select one of the “HAPPY PLACE” slice results and add a small outline using the “Offset” tool on the top menu. Select the offset with the rectangle and Slice.
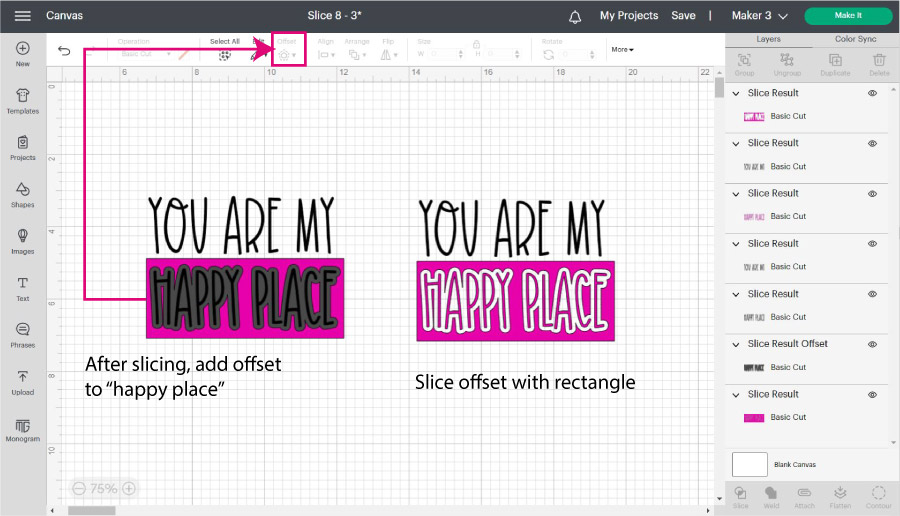
Delete all the unwanted pieces, leaving behind the pink rectangle and the pink “HAPPY PLACE.”
Don’t you think this new design looks better than the original?
If there are elements of a particular design you love, but there’s something off, you can always use the Slice tool to mix things up.
Using Slice with the Offset Tool
On the mini tutorial, we just saw we used the Offset tool after we sliced.
I love making outlines on my designs because they add a lot of balance and beauty. Be prepared to make a project ten times better when you combine the Slice and the Offset tools.
Take a look at the following screenshot, and let’s have a little chat.
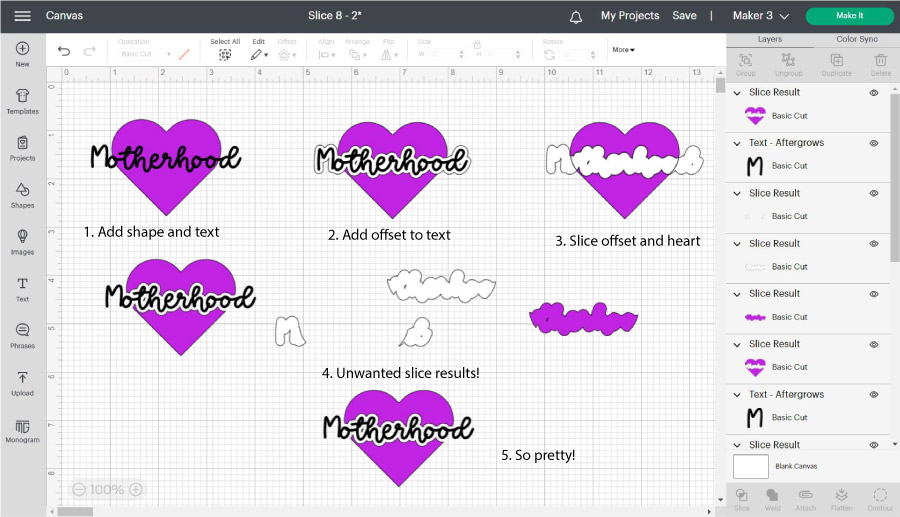
Imagine you’re making a t-shirt with a heart and something meaningful on top. In this case, I used the word “Motherhood.” As you can see in step one, something is missing; the text doesn’t seem to flow with the heart.
Wouldn’t you agree?
To make the design flow better, let’s do the following:
- Add shape and text
- Center text with shape and add a slight offset for the text.
- Select offset of text with shape and click on Slice.
- Delete unwanted pieces.
- So pretty!
Note: The offset tool doesn’t work on android.
Learn more about using Offset in this tutorial.
Using Slice to Make New Shapes and Designs
Cricut Design Space is a little elementary; there’s no pen tool for freestyle drawing, and if you want a quick image, be prepared to pay if you don’t have Cricut Access.
Related: Is Cricut Access worth it?
If your image is simple enough, you may be able to make it with shapes and the Slice tool.
Let’s see how to make a moon using the Slice tool.
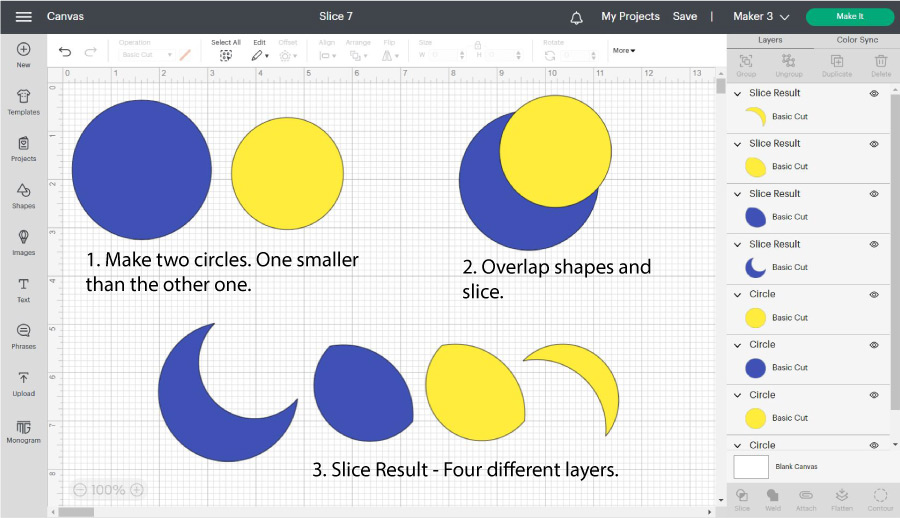
- Add two circles to the canvas area, making one of the circles a bit smaller.
- Overlap one of the circles with the other one and Slice them.
- Do you see that lovely moon you just made?
You can also make unique cut-outs using shapes and text.
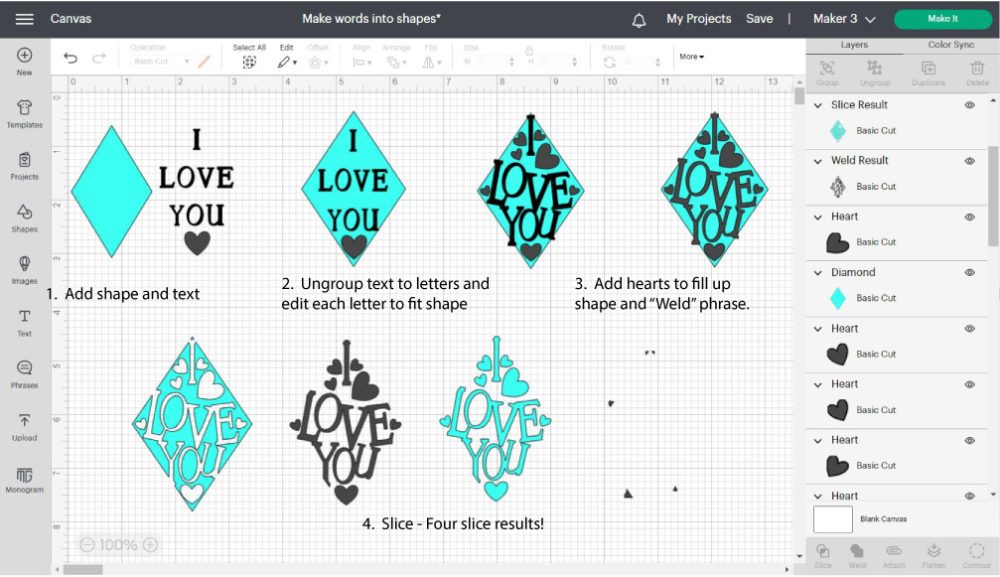
- Add shape and text
- Ungroup text to letters (no lines) and move each letter to fill the shape.
- Add other shapes like hearts to fill empty spaces and Weld them with the text.
- Slice the phrase with the diamond shape.
Doesn’t that diamond cut-out shape look beautiful?
I cover more examples and tips to make these sorts of projects in my how-to work with shapes in Design Space tutorial.
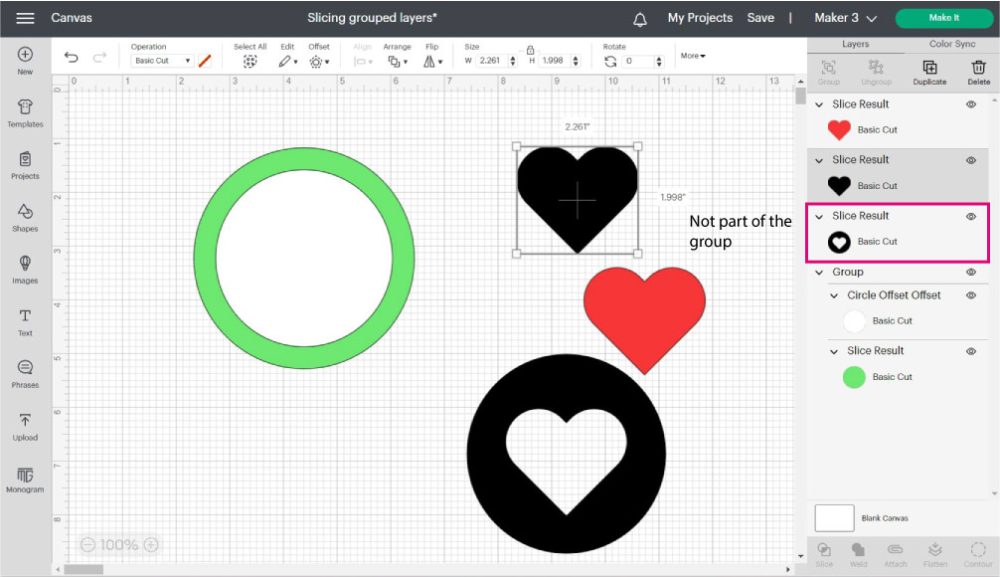
Slice Tool and Grouped Images
Let’s talk about slicing elements that belong to a group.
If you have a group (not a multilayer font), you can ungroup before slicing or select the layer you want to cut against from the layers panel.
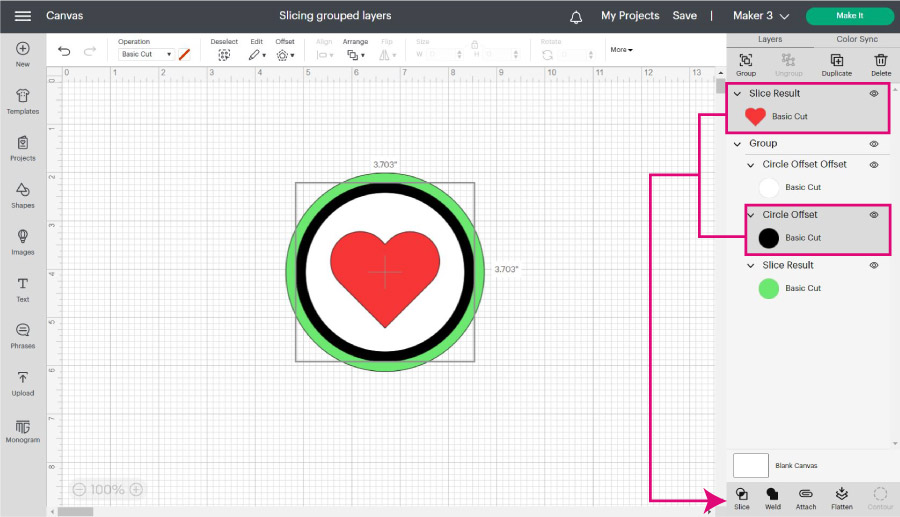
After slicing, the element will no longer be part of the group.
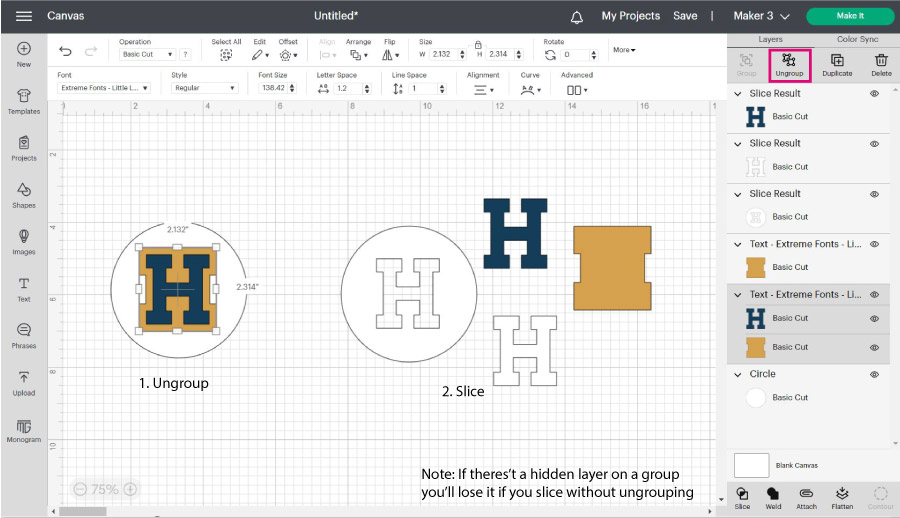
Slice Tool and Multilayer Fonts
Cricut has these cool fonts called “Multilayer.” These fonts have different grouped layers; however, most of the time, one or more layers are hidden.
You have a couple of options whenever you want to slice a multilayer font.
- If you don’t need the other layer, you can hide (or keep it hidden) it from the layers panel and proceed to Slice. (The hidden layer will disappear).
- To keep the text layer, you must ungroup and then slice.
Slice VS. Other Cricut Design Space Tools

At this point, you should know how to use the Slice tool in your projects.
While learning to navigate Design Space, I often got confused with the tools next to Slice.
Since I want you to have the best experience, here’s a comparison of Slice vs. Weld, Attach, Flatten, and Contour.
Slice VS. Weld
The Slice tool allows you to cut out elements using two different layers. However, the Weld tool will enable you to combine them into a single layer.
When slicing, you can only select two layers; but there’s no limit of layers when welding.
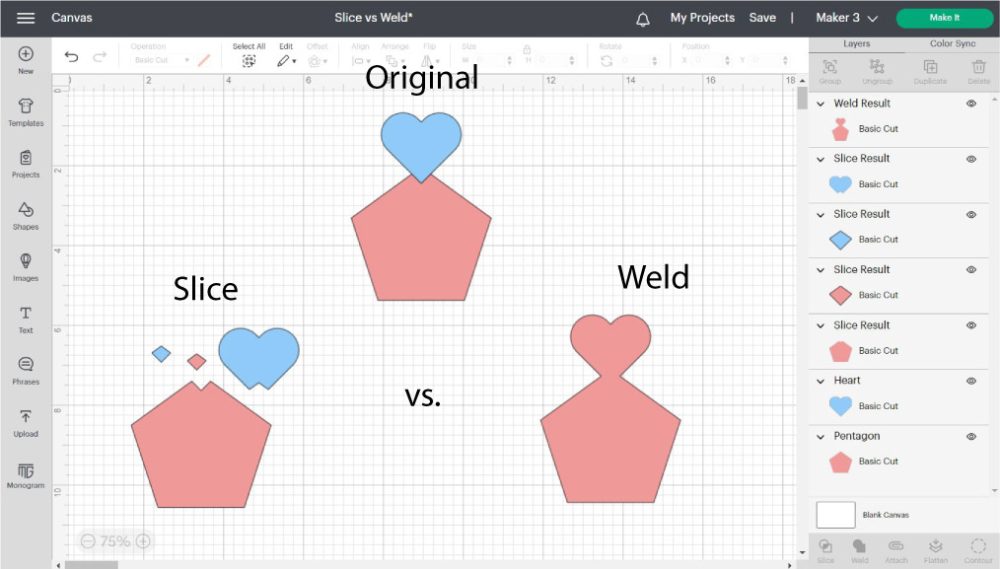
As you can see from the screenshot above when I sliced the original design, I had multiple layers (Slice Results); however, when I welded the original design, I created an entire shape.
Both tools are equally important and can be used together on a particular design.
Remember when we sliced multiple hearts out of the circle?
Slice VS. Attach
Attach, in my opinion, is one of the most essential tools in Cricut Design Space.
Attaching allows you to keep all the – linked – layers together on the mat when you send your project to your machine.
Although a particular design may look different in Design Space when slicing and attaching, sometimes these tools can have the same effect on your project.
For instance, in the screenshot below, if you wanted only to cut a pentagon with a heart, you could either slice a heart from it or attach it.

However, if you wanted to write a heart on a pentagon, you would need to use Attach and change the operation of the heart to “Pen.”
Related: learn how to use Cricut pens.
Sometimes, you may want to use Slice to cut a shape in half using a solid line (vector line).
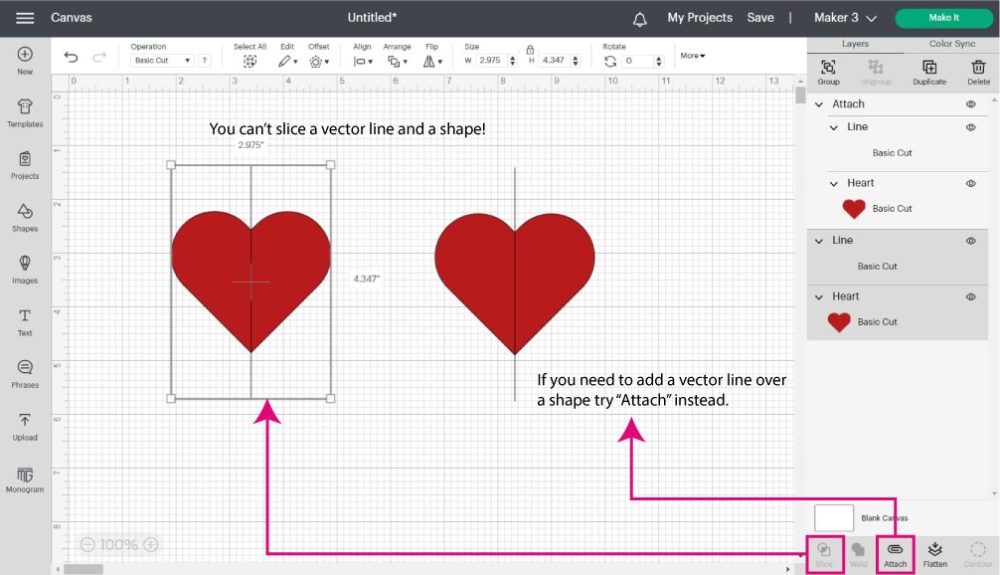
Unfortunately, you can’t slice or weld vector lines with other shapes. In these rare cases, you must use Attach.
Which tool should you use?
I use the one that makes sense for the final vision of my project. If I am thinking of a cut-out, I use Slice, but if I am thinking about keeping something together when I send my project to cut, I use Attach.
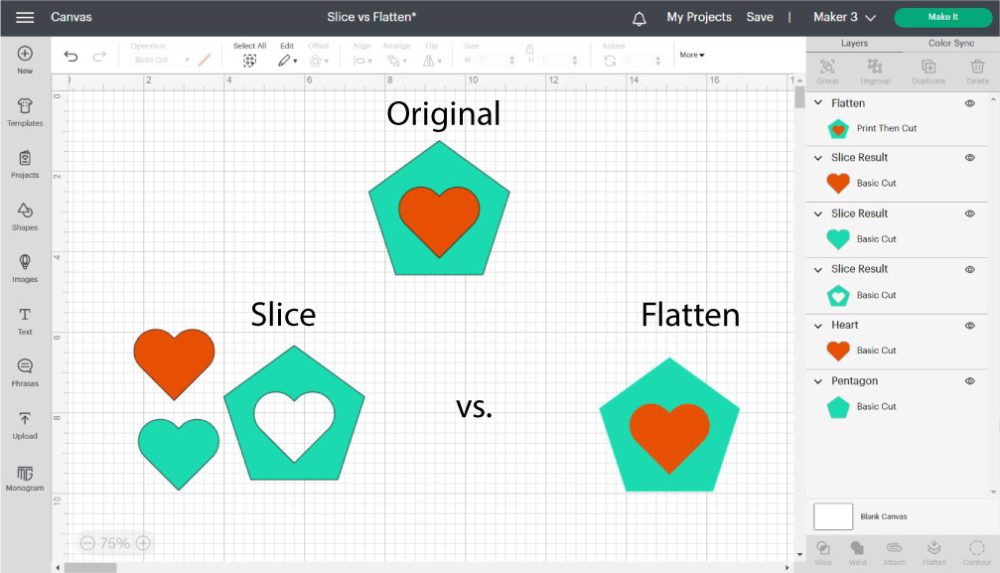
Slice VS. Flatten
Slice and flatten don’t really mix.
Both tools have very different purposes. Slice will help you make nifty cut-outs, and Flatten tells your machine to print and cut your project.
You can use Flatten on a project you used the Slice tool to make a new design; however, you can’t use Slice on flattened layers.
Learn all about the Flatten tool and Print then Cut on this step-by-step tutorial.
Slice VS. Contour
The primary purpose of Contour is to hide an element from a design.
Have you ever heard of “All roads lead to Rome?” Sometimes you can accomplish the same effect in Design Space with different tools.
However, one path can be more time-consuming. I’ve had comments on my blog where people tell me how they did something different on a particular project.
I love those comments because it shows me that no matter how good you think you are, there’s always a better way.
For instance, in the following screenshot, I wanted to modify the original image so the bottom part was yellow.
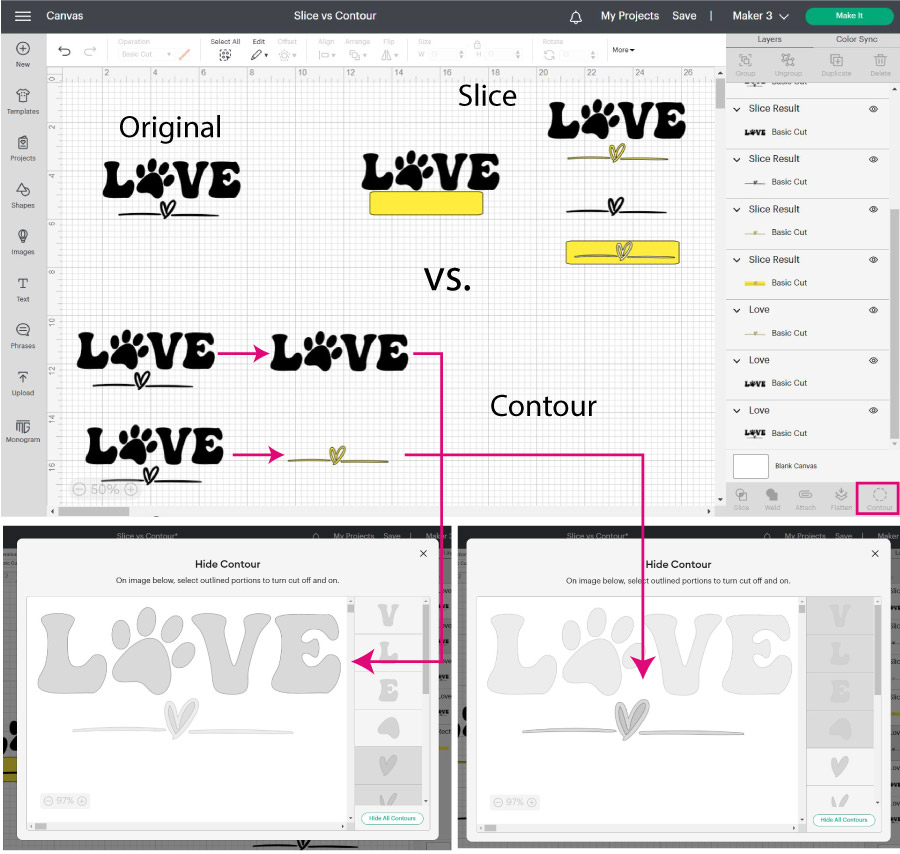
With the Slice tool, I only have to add a yellow rectangle and delete the unwanted pieces. However, I have to make a copy of the original design with Contour. I need to hide the bottom elements for one of the copies, and for the one on top, I need to Contour the word love.
For this case, I prefer using Slice.
But sometimes, you may want to cut out a very irregular element, and you can’t isolate it with a shape. In that case, Contour is the best alternative.
Take a look at the following example.
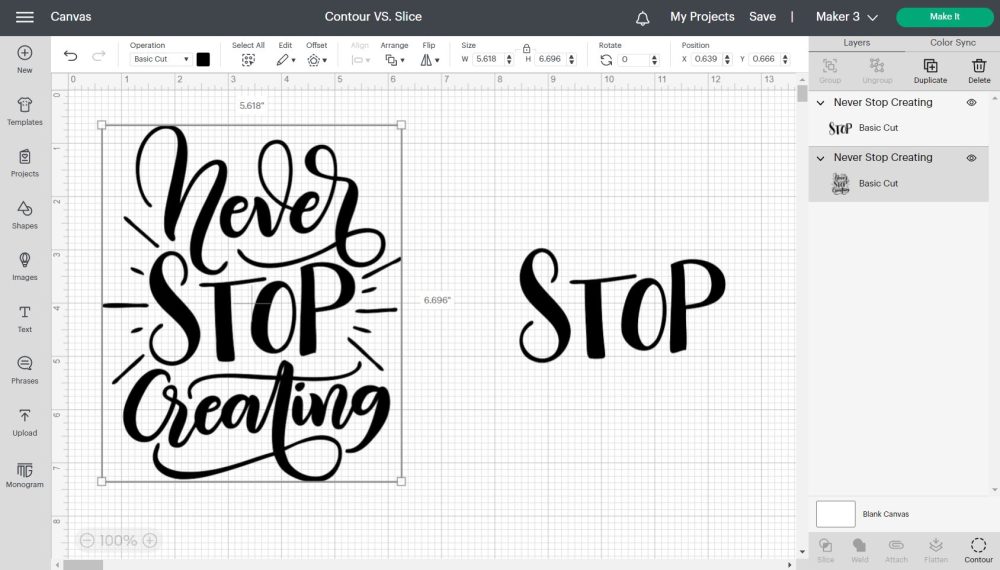
If you try to cut out the word “Stop” from the original design, prepare to take some time and fail while trying.
For an image like this, use the Contour to hide the elements around.
Read my Contour tutorial to learn all the cool things you can do with it!
What is the Slice and Set Method?
Most examples you saw throughout this tutorial aided you in making your project look awesome and unique.
However, there are times when you must use Slice, or your project may fail.
This is extremely important when using materials like Cricut infusible ink, where your project will be ruined in you don’t apply this method. Or when you’re layering iron-on and don’t want your project to be super bulky.
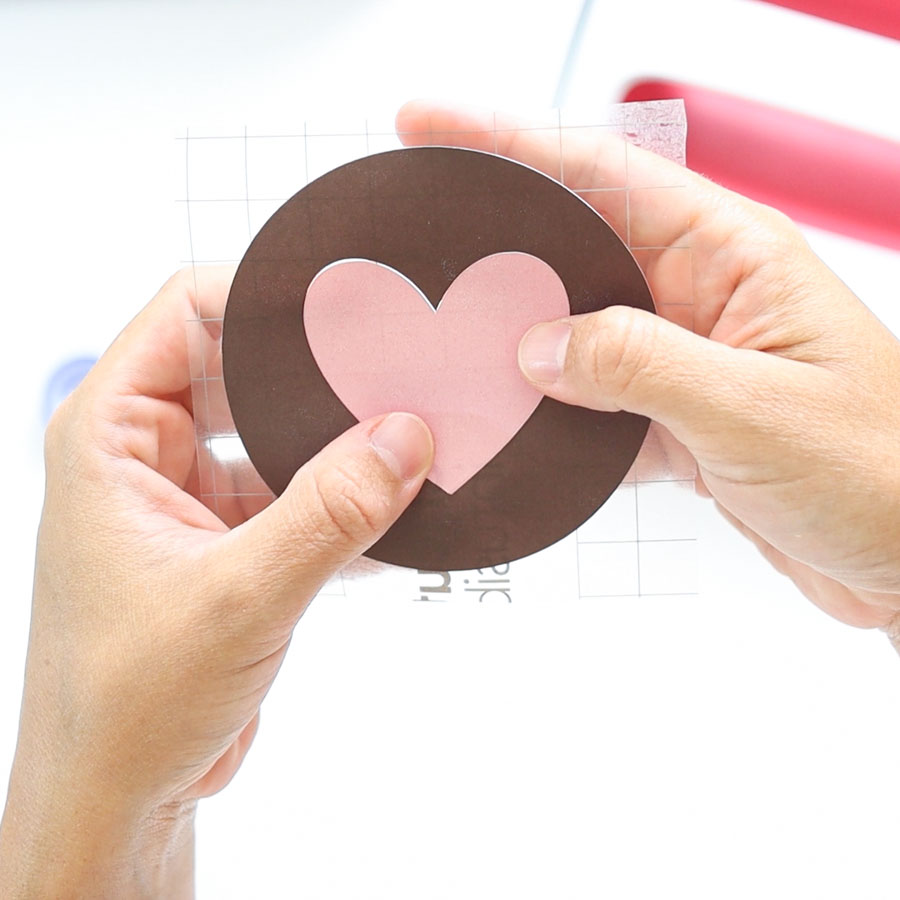
Look at the following example (with real-life pics).
I wanted a black coaster with a heart, and I wanted to use infusible ink products. If I didn’t slice the heart out of the circle, the outcome would’ve been different.
You can read more about it on my coaster tutorial.
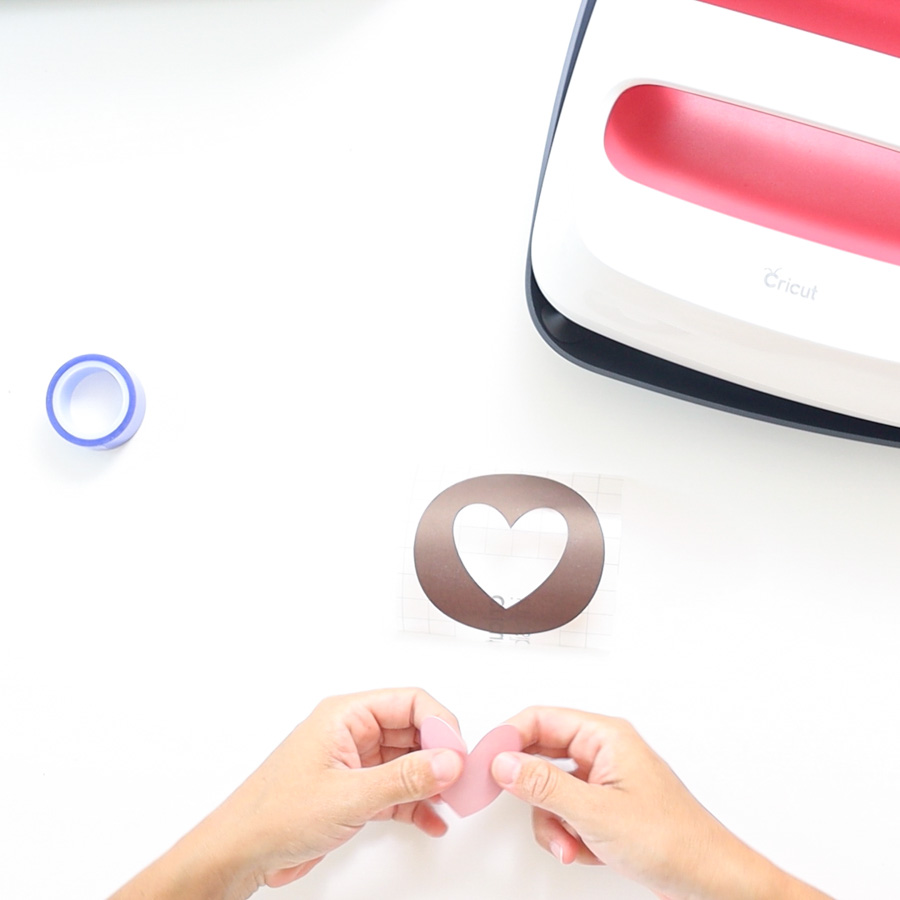
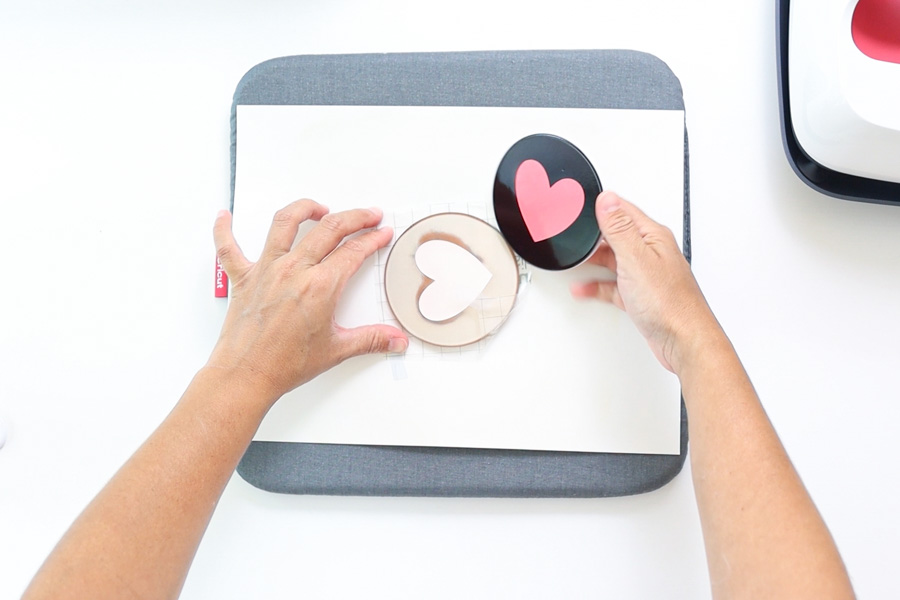

“Slice” is for what you do in Design Space, and “Set” is for what you do when making your project.
As you can see below, the slicing process is the same as I performed in other examples, but it was pretty necessary for the type of project I was working on.
Hopefully, you enjoyed learning all about this little but powerful tool!
Oh!
Just so you know, I also have a library full of free SVG files and Printables for all my subscribers, a.k.a. Daydreamers. You can see a preview right here or get access by filling out this form.
More Examples Of Using the Slice Tool.
Here are a few real-life applications of the Slice tool.
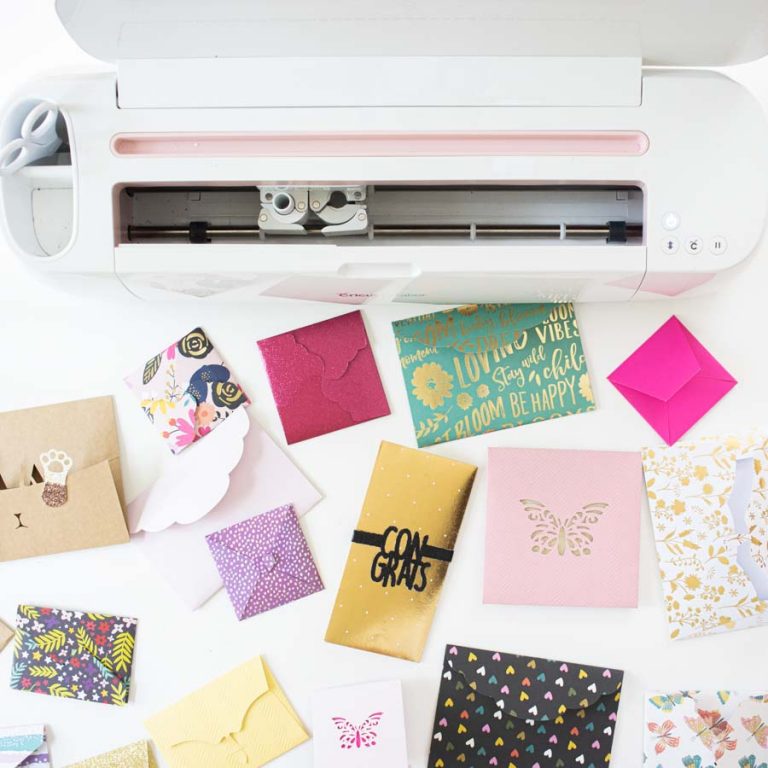
- Gift Tags: Use Slice to make punch holes.
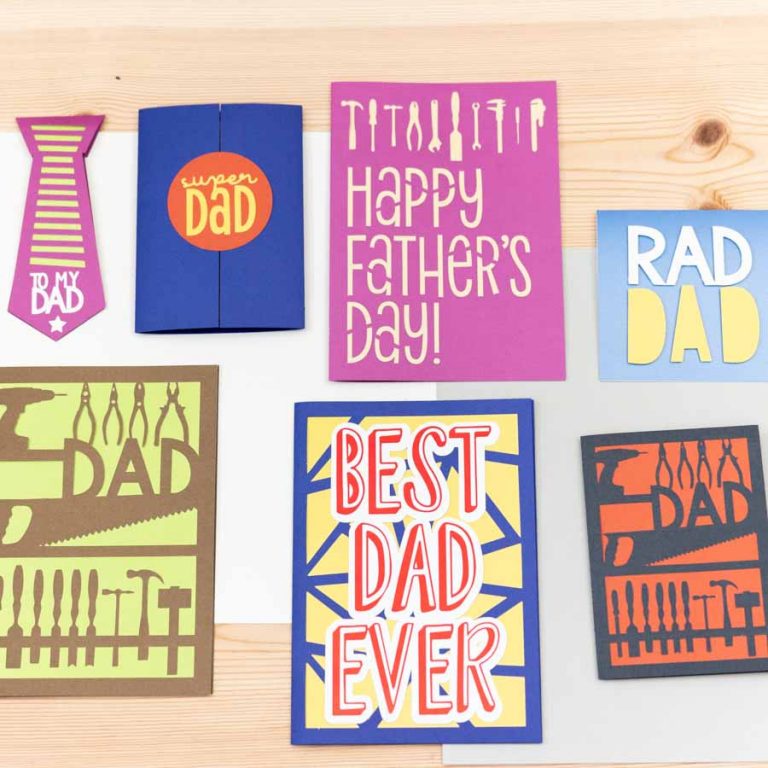
- Making Cards with beautiful cut-outs
- Make monograms in Cricut Design Space
- Make words into shapes.
Make sure you visit each link to learn the Slice technique I used in the projects I just mentioned.

How to Slice in Cricut Design Space
The "Slice" tool is a very powerful setting in Cricut Design Space that allows you to cut out a shape, text, or image from other ones.
Materials
- It depends on the project you want to make.
Tools
- Cricut Machine
- Cricut Design Space (App or Phone)
Instructions
Before you attempt to use the Slice tool, remember the rules.
1. Add the shapes or images you want to slice.
2. Arrange images the way you want to slice them. In this case, I place the heart on top of the square. Click on the "Slice" buttons located at the bottom of the Layers panel and delete unwanted results.

Notes
- If you slice text against an image, you can't edit the text. Therefore, before "Slicing," make sure your text looks the way you want it.
You Did it!
If you followed along with this tutorial and want to put into practice everything you’ve just learned, CONGRATULATIONS, you are a Slice Master!
Do you know it takes me over 25 hours to complete a single Cricut article? I know it’s wild, but I want to make sure you understand everything!
I would appreciate your support on Instagram , Pinterest , and YouTube as I try to grow my audience and continue producing great content!

With the slice and set method what is the set part? I understand the slice part. I have an idea I can use it on so I’m really excited.
the set part is on the transferring process when you put both pieces together.
I’m trying to slice a SVG file that is print then cut with multiple images. However, I only want to use 3 of the images. It doesn’t show up on the layer as a choice for me to ungroup. How do I get the other images out that I don’t want printed?
You can use the contour tool to hide details from an image.
Thank you Thank you! Finally someone showed me easily how to do what I wanted. I love crafting but was so confused being a new bee. I’m now your biggest fan.
What about when we add text or an item thats going to be drawn. So i have a rectangle and added a draw element to it, but i made that element larger and now half of it goes outside the rectangle. I dont want to waste paper and have the cricut draw the park of the image i dont need. I just want whats inside the rectangle drawn.
Use the slice tool to crop the rectangle against the new design.
I am a frustrated beginner. I purchased SVG files to make vertical porch signs for Christmas presents. The wood is 48″ long so I know I need to cut the design into 2-3 sections to cut the vinyl. I want to keep the design in each section intact. I am unable to find the answer on how to do this. I have picked up things here and there from watching it seems every video on YouTube or post on Pinterest or even Cricut web page and many times even tried unsuccessfully to slice this design. I have tried doing monogram separation example and although it slices a double bar between where I want to slice it does not divide into 2 separate sections. I would appreciate if you could give me suggestions, ideas or additional videos that could help me. This is a desperate crafter! ????
I need to work on a tutorial for this. In the meantime, I think this video can help!
I tried this. Looks easy but no way will the slice light up.
I am the same as the gal above . I bought a SVG from Etsy for a vertical porch sign. I have spent hours trying & retrying.
You need to select two elements in Design Space to activate the slice tool.
I want to thank you for the great tutorials! I too am an old lady who just got a Joy and am trying to learn everything I can about how to use it. My focus is mostly cards but I do enjoy some cute tee shirts, etc! Your tutorials are very easy to follow and informative. Thank you!
I am really happy I am able to help. You know what they say, age is just a number!
Hi, thanks for this tutorial! I’m new to Cricut and am trying to slice a draw image and a shape. Is that possible? The slice is greyed out.
If your image is SVG you should be able to slice it. Are you selecting both layers?
Phenomenal!!!! I’ve been using my cricut maker for two years and I didn’t know about slice!!! You’ve made my day and improved my life!!! Thank you x1,000,000!!!!
That’s awesome! Slice rocks!
Thank you so much, this was supper easy to find my issue out
You’re very welcome!
This tutorial was such a blessing to me because I am legally blind, so trying to watch a video is not a whole lot of help, but it is what it is. Lol.
I am really having trouble getting the hang of this Cricut, but I am getting there more and more every day.
Quitting was something that I never learned to do very well, and when you mix in being just a tiny bit stubborn, I usually figured out away to “Git ‘er done!”
I know how to upload personal photos, change them into a circle for plates and other projects, I have designed and printed a beautiful vinyl transfer for mugs for my church, then add photo and name on the other side.
I used curved lettering on the mug and can add the logo wherever I desire.
I am still working on doing t-shirts, but have a good design I laid out already completed on my computer.
You may think I am bragging but so help me I am not, I am only honoring God for giving me the strength and ability to do this.
Being 79 years old, legally blind, and having been diagnosed with stage 4 prostate cancer and hearing the news that I had less than a year to live, on top of severe diabetes, and I am still kicking, you better believe I am honoring the Lord, because 8 months after being diagnosed, now they tell me I am beating this cancer and will live to a ripe old age if I continue with treatments.
Let me see here, I am already 79 years old, I wonder what they consider a “ripe old age,” maybe they figure 80 would be that ripe old age, lol, but I am very appreciative for everyone that worked to save me, and most of all, I thank the Lord for his healing power and touch.
Folks, prayer really works!
By the way, I am starting up a t-shirt business and having the time of my life, I have learned to just put the horrible pain and agony into the back of my mind, and let the mop flop. Lol.
Sometimes, it is very hard to keep a happy attitude but so far, it has worked wonders for me.
I’m not worried about dying, I have too much living to do in the short time I have left upon this earth, my chief desire is to be a blessing in some way to others, I want my life to stand as a beacon to others, so they will know, “Hey, if old Bud can make it, I know I can make it, too.
If I can get this t-shirt business up and running, I will have something to leave behind for my family that Pop built with his own two hands, with the help of the lord.
By the way, my wife and family are my biggest supporters, but I love to prove to everyone that being handicapped doesn’t mean you have to just sit down, stick your head in the sand and give up.
When the lord impresses me to do something, I will bust a gut trying together the job done
I already have bought a heat press with all attachments, a Cricut, and quite a selection of vinyl, and have made a few sales already, with other items I bought to sell in my business, at a super good profit.
One other thing, I don’t owe anybody one red cent on anything, the Lord blessed me to be able to pay for everything as I went, thank you, Lord, I know you didn’t do it by yourself, but without you, it never would have been possible.
Sorry for the long post, forgive an old man’s rambling, but it is 3:25 in the morning, I am hurting so bad that I decided to study a little more, trying to learn more about my Cricut, which I have just been learning to “slice,” an amazing feature, to say the least.
May God richly bless you wonderful people,
Please pray for me,
“UncleBuddy” Simmons
Thank you for taking the time to write this wonderful comment! I am so happy you’re pushing through the pain to work for what you want! Age is just a number and only God knows our days. You’re bringing glory to His name!
God Bless you!
Buddy, I am so inspired by you and your perseverance! Thanks for sharing! Thanks to Catalina for great tutorials! So glad I found you!!!
Thank you for your tutorials – I’m finding them much easier to understand than some of the others I’ve used. I’ve looked between the print and cut and this slice tutorial and I’m still struggling with my project.
Essentially I’m looking to make an insert for an invitation by printing onto sticker paper. I’ve used the text function to create my wording and found a nice border within images. A couple of problems I am facing, as I’ve tried a couple of ways to try to make it work:
1. I can’t get the machine to cut just around the outside of the frame; it cuts the outside and the inner lines.
2. When I have the line type to cut and make the fill print and put my text in the inside, the machine then tries to cut each of my words too (I’ve made sure to pick a printable font).
3. I tried to use the slice function to give the border a ‘fill’ in the middle so that I can overlay my text and then flatten but none of this is working either.
I’m sure it’s a really simple solution and I’m overthinking it! Pleas help!!
Hi Claire! If you check my how to make stickers tutorial you’ll see what’s happening! The answer is simple, but the logic is what you need to understand. Let me know if that helps! 🙂
Very easy to understand. Looking forward to reading more. Good job!
Thank you!
This was SO helpful! Thank you for putting all of the efforts into getting it posted. I’m excited to begin using the slice tool!
You’re very welcome 🙂
this was fantastic!, I had purchased an .svg from Etsy, of 6 trees, and could not figure out how to use it, as I did not want 6 trees together, the ungroup button was just what I needed.
The weld button has become my best friend since I started purchasing files, thanks for the tutorial, I will be back for more!!
I am glad you are learning so much! There are more tutorials coming soon!
How did you upload the picture into design space
Hi Susan, click on the upload button on the left panel of the canvas and follow the prompts Cricut gives you. A regular photo needs to be saved as a Print then Cut. You can read more about it in this article.
This is great! This post is exactly what I needed. I was trying to do this and didn’t know how to do it but now I do! I am going to slice multiple stars out of a rectangle to use as a stencil. My husband and I are using A pallet to make an American flag and I wanted a star stencil. Thanks for your excellent and clear explanations on how to use Cricut design space.
That’s awesome Renee! I am very happy i was able to help!
I have learned a lot with your teaching.Looklng forward to trying this I’m beginner in the cricut have cricut explorer for a year and just in the last few months learned to use I’m addicted. Once again Thank you.
So gabby to hear Brenda! This motivates me to keep going!
Can I use this post to use like a reusable stencil
Hi Natalia! That’s a little hard to answer. Which one of the mini tutorials?
If it’s the overall tutorial. Yes you can use Slice for creating your own stencils.
Can you slice text from an image?
Hi Baily!
Yes you can slice text from an image. Just remember that it can only be two layers at the time.
This tutorial is amazing! I have had different cricuts for many years. I finally got a cricut explore and am learning about cricut design space. Thank you for sharing such a fun tutorial! It is a method I will definitely be using.
You are welcome Karen. Make sure to check out my other tutorials, they are just as fun!