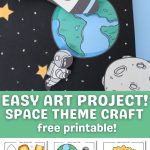
If your kids love rockets, astronauts, and all things outer space, then this Space Scene Art Project is just what you need.
This fun project includes a free, ready-to-use template featuring the sun, moon, Earth, stars, astronauts, and a rocket. It is perfect for a space unit study or an enjoyable, quiet afternoon activity.

Tip: Make this activity interactive by adding magnets so kids can slide the rocket and astronaut across their scene, bringing their space adventure to life.

Related: Paper Plate Rocket Craft for Kids!
Tools & Materials
- Printer
- Template (download at the end of the article; you don’t need to subscribe!)
- Glue
- Scissors
- White paint
- Fine tip brush or Q-tips®
- White cardstock
- Black cardstock (12×12″ or two letter-sized pages).
- Magnets (optional)
- Tape (optional)
- Colors (optional)

Step 1 – Print & Cut Template
Like all my crafts, you can choose to make them simple or complex. Print the colored template to save time, or print the coloring page for a longer activity.
I printed the colored version!

Tip: For very small children, you may need to help cut some parts of the rocket and some of the stars.
Step 2 – Assemble Rocket Rocket
The rocket has a little picture at the end to show how it should be glued.
Some things should be glued first than others so everything comes together the right way.


- Start with the nose cone and the motor mount (engine.)
- Glue the side fins behind the rocket.
- Flip the rocket and glue the exhaust flame.
- Finally, glue the windows.
- You can choose to glue the windows with the little astronaut. I glued the regular windows, but your child may prefer the other option!
And just like that, the rocket is completed!
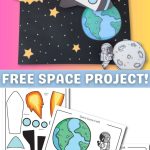
Step 3 – Assemble Space Scene
Grab your black cardstock.
* I used a 12×12″ black cardstock sheet, but you can also use two letter-sized sheets of black cardstock and tape them together on the longer edge.
- Glue the sun on the top-left corner. You’ll want to glue just a fourth or so. This will give the project more character.
- Proceed to glue the earth and the moon on the opposite corner while leaving some of the moon out of the paper.
- Glue the big stars in random spaces on the paper so they are scattered throughout.


- With a fine-tip brush or a Q-tip®, paint white dots to make a starry space. Set aside until it is thoroughly dried.
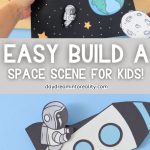
- You can let your child play with the project using the rocket and astronaut as the characters.
- However, if you have magnets, tape them to the back of the astronaut and the rocket and show your child how to slide them across the space scene by using another magnet on the back of the project.


Just like that, you have an interactive space scene art project your kids can play with for hours!
Do you want different rockets? Like the ones in the picture below?

Grab the template and instructions in this “Build a Paper Rocket Craft for Kids!”
Download Template!
As I mentioned, here’s the free build-a-rocket template for your craft! Click the image to open the PDF in a new window or the yellow button to trigger a download on your phone or computer.


Oh!
Just so you know, I also have a library full of free SVG files and Printables for all my subscribers, a.k.a. Daydreamers. You can see a preview right here or get access by filling out this form.

Space Art Project For Kids! | Free PDF Template
Create an interactive space art project with moving rockets and astronauts! Print the free template, grab your supplies, and let your little ones explore the universe with creativity.
Materials
- Template (download at the end of the article; you don't need to subscribe!)
- White cardstock
- Black cardstock
- White paint
- Fine tip brush
- Q-tips® (optional)
- Magnets (optional)
- Tape (optional)
- Colors (optional)
Tools
- Printer
- Scissors
- Glue
Instructions
- Download the template in color or for coloring.
- Print and cut the template.
- Start assembling the rocket according to the small image in the lower left corner.
- Grab your black cardstock.*
- Glue the sun on the top-left corner. You'll want to glue just a fourth or so. This will give the project more character.
- Proceed to glue the earth and the moon to the opposite corner, leaving some of the moon off the paper.
- Glue the big stars in random spaces on the paper so they are scattered throughout.
- With a fine-tip brush or a Q-tip®, paint white dots to make a starry space. Set aside until thoroughly dried.
- You can let your child play with the project using the rocket and astronaut as the characters.
- If you have magnets, tape them to the back of the astronaut and the rocket and show your child how to slide them across the space scene using another magnet on the back of the project.
Notes
* I used a 12x12" black cardstock sheet, but you can also use two letter-sized sheets of black cardstock and tape them together on the longer edge.
You May Like These…
I hope you enjoyed crafting these fun rockets with your little people. Here are more activities I am sure you will also like!
- Paper Plate Rainbow Craft for Kids
- Paper Plate Rocket Craft
- Paper Plate Baby Chick Craft | Free PDF Template!
- Build a Salad Craft Free PDF Template
Happy Crafting!


Thank you so much for not making us subscribe to get the printable. This looks like such a fun project!
Of course, I dread having to subscribe, unless if for something extra! Enjoy